Page is loading ...

Use & Care Guide
Manual de Uso y Cuidado
English/Espa_ol
I<enmore
lite®
Microwove/Convection Oven
1o5 Cuo Fto, 1000 Watts
Homo de MicroondosiConveccidn
: _c " Io c
B Pl_c:,Cubnco, 000 Vatios
Models / _@edelos:
405J4'_ 593I @...IIBl_¢k/ Heg_o
405o74I 5331 e ...S'll_inless S'lleel/A_<_o _Hexidabl_/_eg_e
Customer Assistance/ Asistencia al Cliente
1-800-842-1289
Sears Brands Management Corporation
Hoffman Estates, IL 60179 U.S.A.
www.kenmore.com
www.sears.com
www.kmart.com
®

PRECAUTIONS TO AVOID POSSIBLE
EXPOSURE TO EXCESSIVE MICROWAVE
ENERGY
(a) Do not attempt to operate this oven with the door open since this can result in
harmful exposure to microwave energy. It is important not to defeat or tamper
with the safety interlocks.
(b) Do not place any object between the oven front face and the door or allow soil or
cleaner residue to accumulate on sealing surfaces.
(c) Do not operate the oven if it is damaged. Jt is particularly important that
the oven door closes properly and that there is no damage to the:
(1)DOOR (bent)
(2)HINGES AND LATCHES (broken or loosened)
(3)DOOR SEALS AND SEALING SURFACE
(d) The oven should not be adjusted or repaired by anyone except properly
qualified service personnel.
Specifications
Model: 405.7415931 0/405.74153310
Rated Voltage: 120V_ 60Hz
Rated Input Power(Microwave): 1500W
Rated Output Power(Microwave): I O00W
Rated Input Power(Grill): 1300W
Rated Input Power(Convection): 1400W
Oven Capacity: 1.5 cu.ft./42 L
Turntable Diameter: ._ 13.6 inch/345 mm
External Dimensions: 21.73X20.O8X1 2.83 inch (552X51 0X326 mm)
Net Weight: Approx. 43.65 Lbs (1 9.8 kg)
EN-1

IMPORTANT SAFETY iNSTRUCTiONS
WA RN iN G reducether,skofburns,e, tr,csho k, re,,njurytopersonsorexposure
to excessive microwave oven energy when using your appliance, follow basic
safety precautions, including the following:
1. Read all instructions before using the
appliance.
2. Read and follow the specific: "PRECAU-
TIONS TO AVOID POSSIBLE EXPOSURE
TO EXCESSIVE MICROWAVE ENERGY"
found on page 1.
3. As with most cooking appliances, close
supervision is necessary to reduce the risk
of a fire in the oven cavity.
4. To reduce the risk of fire in the oven
cavity:
i) Do not overcook food. Carefully attend
the appliance when paper, plastic, or
other combustible materials are placed
inside the oven to facilitate cooking.
ii) Remove wire twist-ties and metal
handles from paper or plastic containers/
bags before placing them in the oven.
iii) If materials inside the oven ignite,
keep the oven door closed. Turn the
oven off, and unplug the appliance.
Disconnect the power cord, shut off
power at the fuse or circuit breaker panel.
iv) Do not use the oven cavity for storage
purposes. Do not leave paper products,
cooking utensils, or food in the cavity
when not in use.
5. This oven must be grounded. Connect
onty to properly grounded outlet. See
"GROUNDING INSTRUCTIONS" found
on page 3.
6. Install or locate this oven only in
accordance with the installation
instructions provided.
7. Some products such as whole eggs
and sealed containers-for example,
closed glass jars- are abte to explode
and should not be heated in the oven.
8. Use this appliance onlyfor its intended
uses as described in this manual. Do
not use corrosive chemicals or vapors
in this appliance. This oven is
specifically designed to heat or cook
or dry food. It is not designed for
industrial or laboratory use.
9. As with any appliance, close
supervision is necessary when used
by children.
10. Do not operate this oven if it has a
damaged cord or plug, if it is not
working properly or if it has been
damaged or dropped.
11. This microwave should be serviced
only by qualified service personnel.
12. Do not cover or block any openings on
the oven.
13. Do not store or use this appliance
outdoors.
14. Do not use this oven near water, for
example, near a kitchen sink, in a wet
basement, near a swimming pool, or
similar locations.
15. Do not immerse cord or plug in water.
16. Keep cord away from heated surfaces.
17. Do not let cord hang over edge of
table or counter.
18. When cleaning surfaces of door and
oven that comes together on closing
the door, use only mild, nonabrasive
soaps or detergents applied with a
sponge or soft cloth.
19. This appiiance is for private household
use oniy.
EN-2

20. Liquids, such as water, coffee, or tea are able to be overheated beyond the boiling point
without appearing to be boiling. Visible bubbling or boiling when the container is
removed from the microwave oven is not always present. THIS COULD RESULTIN
VERY HOT LIQUIDS SUDDENLY BOILING OVER WHEN THE CONTAINER IS
DISTURBED OR A SPQON OR OTHER UTENSIL IS INSERTEDINTO THE LIQUID.
i) Do not overheat the liquid.
ii) Stir the liquid both before and halfway through heating it.
iii) Do not use straight-sided containers with narrow necks.
iv) After heating, allow the container to stand in the microwave oven for a short time
before removing the container.
v) Use extreme care when inserting a spoon or other utensil into the container.
SAVE THESE INSTRUCTIONS
GROUNDING INSTRUCTIONS
DANGER
ElectricShock Hazard
Touchingsomeof the internal
componentscan causeserious
personal injury or death. Do not
disassemblethis appliance.
WARNING
ElectricShock Hazard
An improperly grounded appliance
can result in electricshock. Do
not plug into an outlet until
appliance isproperly installed
and grounded.
Three-pronged
(grounding) plug
This appliance must be grounded. In the event of
an electrical short circuit, grounding reduces the risk
of electric shock by providing an escape wire for the
electric current. To protect against electrical shock,
this appliance is equipped with a cord having a 3-
prong grounding-type plug for insertion into a proper
grounding-type receptacle. DO NOT alter the plug
for use in a 2-prong receptacle. If the plug will not fit
into a receptacle, have the proper receptacle installed
by a qualified electrician.
Consult a qualified electrician or serviceman if the
grounding instructions are not completely understood
or if doubt exists as to whether the appliance is
properly grounded. If it is necessary to use an
extension cord, use only a 3-wire extension cord that
has a 3-pronged grounding plug, and a 3-slot
receptacle that will accept the plug on the appliance.
The marked rating of the extension cord shall be
equal to or greater than the electrical rating of the
appliance.
EN-3

1.Ashortpower-supplycordisprovidedtoreducetherisksresultingfrombecomingentangledin
ortrippingoveralongercord.
2.Longercordsetsorextensioncordsareavailableandmaybeusedifcareisexercisedin
theiruse.
3.Ifalongcordsetsorextensioncordisused:
i) Themarkedelectricalratingofthecordsetorextensionmarkedelectricalratingofthecord
setorextensioncordshouldbeatleastasgreatastheelectricalratingoftheappliance.
ii)Theextensioncordmustbeagrounding-type3-wirecord.
iii)Thelongercordshouldbearrangedsothatitwillnotdrapeoverthecountertoportabletop
whereitcanbepulledonbychildrenortrippedoverunintentionally.
Radio interference
1. Operation of the microwave oven may cause interference to your radio, TV or similar
equipment.
2. When there is interference, it may be reduced or eliminated by taking the following
measures:
i) Clean door and sealing surface of the oven.
ii) Reorient the receiving antenna of radio or television.
JJJ) Relocate the microwave oven with respect to the receiver.
iv) Move the microwave oven away from the receiver.
v) Plug the microwave oven into a different outlet so that microwave oven and
receiver are on different branch circuits.
CAUTION
Personal injury Hazard
Tightly-closed utensils
could explode. Closed
containers should be opened
and plastic pouches should be
pierced before cooking.
UTENSILS
See the instructions on "A,_teriats you can use in
microwave oven or to be avoided in microwave oven."
There may be certain non- metallic utensils that are not
safe to use for microwaving. If in doubt, you can test the
utensil in question following the procedure below.
Utensil Test:
1. Fill a microwave-safe container with I cup of cold
water (250mt) along with the utensil in question.
2. Cook on maximum power for I minute.
3. Carefully feet the utensil. If the empty utensil is
warm, do not use itfor microwave cooking.
4. Do not exceed 1 minute cooking time.
EN-4

Materials you
Utensils
can use in microwave oven
Remarks
Aluminum foil Shielding only. Small smooth pieces can be used to cover thin parts of
meat or poultry to prevent overcooking. Arcing can occur if foil is too
close to oven walls. The foil should be at least 1 inch (2.5cm) away from
oven walls.
Browning dish Follow manufacturer's instructions. The bottom of browning dish must be
at least 3/16 inch (5 mm) above the turntable. Incorrect usage may cause
the turntable to break.
Dinnerware Microwave-safe only. Follow manufacturer's instructions. Do not use
cracked or chipped dishes.
Glass jars Always remove lid. Use only to heat food until just warm. Most glass jars
are not heat resistant and may break.
Glassware Heat-resistant oven glassware only. Make sure there is no metallic trim.
Do not use cracked or chipped dishes.
Oven cooking Follow manufacturer's instructions. Do not close with metal tie. Make
bags slits to allow steam to escape.
Paper plates Use for short-term cooking/warming only. Do not leave oven unattended
and cups while cooking.
Paper towels Use to cover food for reheating and absorbing fat. Use with supervision
for a short-term cooking only.
Parchment Use as a cover to prevent splattering or a wrap for steaming.
paper
Plastic Microwave-safe only. Follow the manufacturer's instructions. Should be
labeled "Microwave Safe". Some plastic containers soften, as the food
inside gets hot. "Boiling bags" and tightly closed plastic bags should be
stib pierced or vented as directed by package.
Plastic wrap Microwave-safe only. Use to cover food during cooking to retain
moisture. Do not allow plastic wrap to touch food.
Thermometers Microwave-safe only ( meat and candy thermometers).
Wax paper Use as a cover to prevent splattering and retain moisture.
Materialslo be avoided in microwave oven
Utensils Rema rks
Aluminum tray May cause arcing. Transfer food into microwave-safe dish.
Food carton with May cause arcing. Transfer food into microwave-safe dish.
metal handle
Metal or metal- Metal shields the food from microwave energy. Metal trim may
trimmed utensils cause arcing.
Metal twist ties May cause arcing and could cause a fire in the oven.
Paper bags May cause a fire in the oven.
Plastic foam Plastic foam may melt or contaminate the liquid inside when exposed
to high temperature.
Wood Wood will dry out when used in the microwave oven and may split
or crack.
EN-5

SETTINGUP YOUROVEN
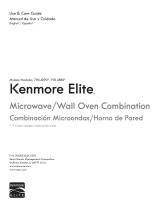
Names of Oven Parts and Accessories
Remove the oven and all materials from the carton and oven cavity.
Your oven comes with the following accessories:
Glass tray 1
Turntable ring 1
Instruction Manual 1
F
A
E D C B
G
Grill Rock (Only be used in Convection
function and be placed on the gloss troy)
A) Control panel
B) Turntable shaft
C) Turntable ring
D) Glass tray
E) Observation window
F) Oven Door
G) Safety interlock system
Turntable installation
Hub (underside) a.
........... c.
d.
Turntable shaft ..... ....
Never place the glass tray upside down. The glass
tray should never be restricted.
Both glass tray and turntable ring must always be
used during cooking.
All food and cont ainers of food are always placed
on the glass tray for cooking.
If glass tray or turntable ring cracks or breaks, contact
the following customer assistance number:
1-800-842-1289.
Turntable ring
EN-6

Countertop installation
Remove all packing material and accessories.
Examine the oven for any damage such as
dents or broken door. Do not install if oven is
damaged.
Cabinet: Remove any protective film found
on the microwave oven cabinet surface.
Do not remove the light brown Mica cover
that is attached to the oven cavity to
protect the magnetron.
installation
1. Select a level surface that provide
enough open space for the intake
and/or outlet vents.
I _2 inches(30cnl ) I tl Ill[ _;;:_tll[
3o _h_ _,:
A minimum dearance of 3.0 inches
(7.5cm) is required between the oven and
any adjacent walls. One side must be open.
(1) Leave a minimum clearance of ] 2
inches (30cm) above the oven.
(2) Do not remove the legs from the
bottom of the oven.
(3) Blocking the intake and/or outlet openings
can damage the oven.
(4) Place the oven as far away from
radios and TV as possible.
Operation of microwave oven may
cause interference to your radio or TV
reception.
2. Plug your oven into a standard household
outlet. Be sure the voltage and the
frequency is the same as the voltage
and the frequency on the rating label.
WARNING: Do not install oven over a
range cooktop or other heat-producing
appliance. If installed near or over a heat
source, the oven could be damaged and
the warranty would be avoid.
The accessible surface
may be hot during
operation.
EN-7

OPERATION
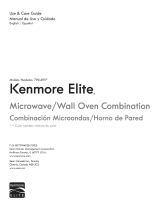
Control Panel and Features
(3)
(6)
(11)
(12)
(13)
(14)
(15)
(16)
(1) Microwave
(2) Auto Menu (Auto Bake, Auto Roast, Popcorn)
(3) Sensor Menu (Sensor Cook, Sensor Reheat)
(4) Auto Defrost
(5) More
(6) Number Pads
(7) Timer/Clock
(8) START ADD 30 SFC
(9) Convection
(1 0) Combination
(1 1) Favorite
(1 2) Warm Hold
(1 3) Time Defrost
(14) Less
(1 5) Power Level
(1 6) STOP Cancel Hold 3 sec: Before cooking starts, press to clear all previous settings.
During cooking, press once to stop oven; press twice to stop oven and clear all settings.
(17) Display
EN-8

OPERATION
1. Power Level
Ten power levels are available.
Prior to or during cooking, press Power Level and "PL10" will display. Press Power Level pad, a
number pad, More or Less pad to select a different power level.
Level 10 9 8 7 6 5 4 3 2 1
Power 100% 90% 80% 70% 60% 50% 40% 30% 20% 10%
Display PL10 PL 9 PL 8 PL 7 PL 6 PL 5 PL 4 PL 3 PL 2 PL 1
2. Clock Setting
When the microwave oven is plugged into an outlet, "0:00" will display.
(1) Press Timer/Clock twice, "00:00" will appear in the display. The first set of zeros will flash;
"-" and the other zero set will be lighted.
(2) Press the number pads to enter the current clock time. For example, if the time is now
10:12, press "1,0, 1,2" in order.
(3) Press Timer/Clock to finish clock setting, ":" will flash and the numbers will appear as a clock
time in the display.
Note: 1) If the numbers entered are not within the range between 1:00 to 12:59, the setting
wilt not be accepted until valid numbers are entered.
2) In the process of setting clock, if the pad is pressed or if there is no operation
within ] minute, the display will automatically return to the previous clock setting.
3. Kitchen Timer
(1) Press Tirner/Ciock once, "00:00" and "Timer" will appear in the display.
(2) Press the number pads to enter the time amount. The maximum amount of time that can be
entered is 99 minutes, 99 seconds.
(3) Press I to confirm setting, the timer indicator will flash, and the timer will start to count
down.
(4) When the time amount elapses, timer indicator will disappear. The oven will beep 5 times.
"End" will display. The time of day will display by opening the door or pressing
Note: 1) The Kitchen Timer setting is different from the Clock setting; it is simply a timer.
2) During the Kitchen Timer function, no cooking function can be set into operation.
3) Kitchen Timer amount cannot be increased by pressing _.
4) Pressing will cancel the Timer countdown.
EN-9

4.Microwavecook
(1) Press Micro, "00:00" and "Cook" will appear in the display.
(2) Press number pads to enter the cooking time. The maximum cooking time is 99 minutes,
99 seconds.
(3) Press Power [.evel; PL10 will flash. Press Power Level several times or pads 0 through
9 to select a different power level if desired. See the POWER LEVEL table above.
(4) Press to start cooking. The remaining cooking time will display. "Cook" will flash.
Example: To cook the food with 50% microwave power for 15 minutes.
a. Press Micro, "00:00" and "Cook"will display.
b. Press "1,5, O, O" in order for 15:00 to appear in the display.
c. Press Power [.evel, then press "5" to select 50% microwave power.
d. Press to start cooking. Buzzer sounds once. The remaining cooking time will display.
"Cook" wilt flash.
Note: In the process of setting, if the pad is pressed or if there is no operation within
I minute, the oven will automatically return to display the clock.
5. Convection Cook
(1) Press Cony. once, "350" will flash. "Conv.", "F" and corresponding temperature icons will
display.
(2) Press Cony. more times or press More or Less to choose the desired cooking temperature.
Temperature selections (°F): 100, 170, 250, 275, 300, 325, 350, 375, 400, 425.
Press to confirm.
(3) Press i to start preheating. When the oven preheats to the selected cooking temperature,
it will beep twice; open the door and place food in oven.
(4) Press number pads to enter the cooking time. The maximum cooking time is 99 minutes, 99
seconds. "F" will disappear.
(5) Press to start cooking. The remaining cook time will display. "Conv." and corresponding
temperature icons will flash.
Note: 1) If no preheat needed, skip step 3 above.
2) If preheating, do not place food into oven until cooking temperature is reached.
3) If Convection Cooking without preheating, place food into oven at the start of
cooking.
4) Once the oven preheats to the selected cooking temperature, the oven will beep
twice to remind you to enter the cook time, and the temperature will flash. If no operation
in 5 minutes, the oven will beep 5 times and return to display the clock.
5) The oven must preheat to the selected cooking temperature, and the oven door must
be opened before convection cooking time can be entered.
EN-IO

6. Combination Function (Convection + Microwave)
(1) Press Combi, "350" will flash. "Cook", "Conv.", "F" and corresponding temperature icons
will display.
(2) Press gombi more times or press More or Less to choose the cooking temperature.
Temperature selections (°F): 170, 250, 275, 300, 325, 350, 375. Press to confirm.
(3) Press number pads to enter the cooking time. The maximum cooking time is 99 minutes, 99
seconds. "F" will disappear.
(4) Press to start cooking. The remaining cook time will display. "Cook", "Conv."
and corresponding temperature icons will flash.
7. Warm Hold Function
(1) Press Warm Hold, "HoLd" will display.
(2) Press to start cooking. The remaining defrost time will count down from 99 minutes.
Note: 1) Warm Hold function can be entered during cooking. The oven will beep twice to
denote entering Warm Hold function.
2) Warm Hold function can be used after Microwave cook, Convection cook,
Combination cook, Defrost cook and Multi-stage cooking.
3) The maximum cook time of Warm Hold function is 99 minutes.
4) Cooking will be canceled if you open the door or press during Warm Hold
function.
8. One Touch Start
(1) Instant cooking at 100% power level and 1 to 6 minutes cooking time can be started by
pressing number pads 1 to 6. Press to increase the cooking time by 30 seconds
with each press. The maximum cooking time is 99 minutes, 99 seconds.
(2) instant cooking at 100% power level and 30 seconds cooking time can be started by
pressing _. Each repeated press will increase cooking time by 30 seconds.
The maximum cooking time is 99 minutes, 99 seconds.
(3) During cooking, press More or Less pad to increase or decrease cooking time by 10
seconds.
Note: 1 ) Time can also be added in 30 second increments by pressing during
Microwave Cooking, Time Defrost and Multi-stage Cooking.
2) Time cannot be added by pressing i during Weight Defrost and Kitchen Timer
functions.
9. Time Defrost
(1) Press Time Defrost, "00:00", "Cook" and "DEF." will appear in the display.
(2) Press the number pads to input the defrost time.
13) Press to start defrosting. "Cook" and "DEF." will flash, and the remaining defrost time wiJl
displayT
EN-11

10. Auto DefrostFunction
(1) Press Auto Defrost, "dEF1 ", "Cook" and "DEF." will appear in the display.
(2) Press Auto Defrost more times or press More or Less pad to choose the defrost food type,
"dEF1" through "dEF4". See table below.
LED display dEF1 dEF2 dEF3 dEF4
Food Meat Poultry Fish Bread
Weight 0.1-6.0 Lbs 0.1-6.0 Lbs 0.1-6.0 Lbs 0.1-1.0 Lbs
(3) Press number pads to enter the weight to be defrosted. See table above.
If the weight input is not between the weight range listed on the table above, the input will
be invalid. The unit will not work until valid numbers are entered.
(4) Press to start defrosting and the remaining cooking time will be displayed.
"Cook" and "DEF." indicator will flash.
Note: During cooking of meat, poultry and Fish, the oven will beep twice to remind you
to turn over the food.
Open the door to pause operation. Turn over food, close the door and press
to resume defrost cycle. If you do not open door to pause operation, the oven will
continue the defrost cycle without interruption.
11. Auto BakeFunction
(1) Press Auto Bake, "Ab-1 ", "Cook", "Conv." and "Auto" will display.
(2) Press Auto Bake more times to choose the menu, "Ab-1 " though "Ab-4". See Auto Bake Chart
below.
(3) Ab-1, Ab-2 and Ab-3, press number pad I to choose the default weight or portion. Press
to start cooking.
For Ab-4, press number pads to adjust the portion or weight. Press to start cooking.
The remaining cooking time and corresponding temperature icons will display. "Conv." and
"Auto" will flash.
Auto Bake Chart:
Food Display Weight/Portion
Frozen Pizza Ab-1 10 oz
Muffins Ab-2 6 each
Biscuit/DinnerRoll/Bread Stick Ab-3 7 oz
Frozen French Fries Ab-4 4-1 6 oz
EN-12

12. Auto Roast Function
(1) Press Auto Roast, "Ar-1 ", "Cook", "Conv." and "Auto" will display.
(2) Press Auto Roast more times to choose the menu, "Ar-1" through "Ar-4". See Auto Roast Chart
below.
(3) Press number pads to adjust the weight or portion.
(4) Press to start cooking. The remaining cooking time and corresponding temperature icons
wilt display. "Cook", "Conv." and "Auto" will flash.
Auto Roast Chart:
Food Display Weight/Portion
Beef Ar-1 2.0-4.0 Lbs
Whole Chicken Ar-2 2.5-6.0 Lbs
Turkey Breasts Ar-3 3.0-6.0 Lbs
Pork Ar-4 2.0-4.0 Lbs
13. SensorCook
(1) Press Sensor Cook, "SC-1 ", "SEN." and "Auto" will display.
(2) Press Sensor Cook more times or press number pads to choose the type of food.
(3) Press to start cooking. "SC-", "SEN." and "Auto" will flash. Once the item has been
sensed, the remaining cooking time wilt display. "SEN.", "Cook" and "Auto" will flash.
Sensor Cook Chart:
Food Display Pad Weight/Portion
Potato
Fresh Vegetable
Frozen Vegetable
Frozen Entree
Rice
Casserole
Ground Meat
Fish/Seafood
Scrambled Eggs
Frozen Pizza
SC-1
SC-2
SC-3
SC-4
SC-5
SC-6
SC-7
SC-8
SC-9
SC-0
1
2
3
4
5
6
7
8
9
0
1-4 PCS
(8-] 0 oz/pcs)
1-4 CUP
(250 mt/cup)
1-4 CUP
(250 mt/cup)
10-20 oz
1-2 CUP
(220 g/cup)
1-4 CUP
(250 mt/cup)
4-32 oz
4-32 oz
2-5 each
6-1 2 oz
EN-13

14. Sensor Reheat
(]) Press Sensor Reheat, "St-] ", "SEN." and "Auto" will display.
(2) Press Sensor Reheat more times or press number pads I through 3 to choose the type of food.
(3) Press to start cooking. "Sr-", "SEN." and "Auto" will flash. Once the item has been
sensed, the remaining cooking time will flash. "SEN.", "Cook" and "Auto" will flash.
Sensor Reheat Chart:
Food
Dinner Plate
Display Weight/Portion
Sr-1 8-24 oz
Soup/Sauce Sr-2 1-4 CUP
(250 mt/cup)
Casserole Sr-3 1-4 CUP
(250 mt/cup)
15. Popcorn
(1) Press Popcorn, "1.75", "Auto", "Cook" and "Oz" will appear in the display.
(2) Press Popcorn two more times or press More or Less to choose the weight, "3.0" and "3.5"
will display in order.
(3) Press to cook. "Oz" disappears. "Auto" and "Cook" will flash.
The remaining time will display.
16. FavoriteFunction
(1) Press Favorite to program and choose up to three cooking procedures.
Each procedure will be indicated by 1, 2 or 3 in the display.
(2) Press Favorite until your desired procedure number appears in the display.
Press to begin it. A maximum of two cooking stages can be set for each procedure.
(3) To program a procedure, follow the steps listed below. Example: Cook food at 80%
Power Level for 3 minutes and 20 seconds; save as memory 2.
a. Press Favorite twice; screen displays 2.
b. Press Micro, then press "3", "2" and "0" in order.
c. Press Power Level once, then press "8" for "PL 8" to display.
d. Press Favorite to save the procedure. Oven beeps once.
Or press directly to save and start cooking.
e. To choose the procedure from the memory list, press Favorite twice. Screen will display "2".
Press to run procedure.
Note: Auto Menu cannot be set in Favorite function.
EN-14

17. Muti-Stage Cooking
At most 2 stages can be set for cooking. If one stage is Defrost, it will automatically set to
be the first stage.
Note: Auto Menu and Preheat cannot be set in Multi-stage Cooking.
Example: 80% Power Level for 5 minutes followed by 60% Power Level for 10 minutes;
saved as memory 3.
a. Press Favorite 3 times; screen displays 3.
b. Press Micro, then press "5", "0" and "0" to set first stage cook time.
c. Press Power Level once, then press "8" to choose 80% first stage cooking power.
d. Press Micro again, then press "1 ", "0", "0" and "0" to set second stage cook time.
e. Press Power Level again, then press "6" to choose 60% second stage cooking power.
f. Press _ to immediately start multi-stage cooking.
g. To choose the proce e from the memory list, press Favorite three times. Screen will
display "3"; press to run procedure.
Note: If you do not want to save a particular multi-stage program as a procedure, do not
press Favorite as the first step. Press after programming both stages.
18. inquiring Function
(1) When oven is cooking, press Timer/Clock for the time of day to appear for three seconds
in the display.
(2) When oven is cooking, press Conv., Power Level or Combi pads for cooking power to
appear for three seconds in the display.
lg. LockFunction
To lock the microwave so that it cannot be operated by children or other unintended users, press
pad for 3 seconds. You will hear a long beep. "LOC" will display.
To unlock, press for 3 seconds, you will hear a long beep and "LOC" will disappear.
If the clock has been set, the oven will return to display the clock. Otherwise, "0:00" will display.
20. Cooking End Reminder Function
The oven will beep five times to alert the user that cooking time has ended. "End" will display.
The time of day will display by opening the door or pressing pad.
21. Other Specifications
(1) must be pressed to continue cooking if the door is opened during cooking.
(2) A single beep sounds to indicate that a pad is correctly pressed; if pad is not correctly
pressed, no beep sounds.
EN-15

Maintenance
Troubleshooting
Check your problem by using the chart below and try the solutions for each problem. If the
microwave oven still does not work properly, contact the following number for customer
assistance: 1-800-842-1289.
TROUBLE POSSIBLECAUSE POSSIBLEREMEDY
a. Plug into the outlet.
Oven will not start b. Close the door and try
again.
c. Check instructions.
Arcing or sparking
Unevenly cooked
foods
a. Use microwave-safe
cookwa re only.
b. Do not operate with oven
empty.
c. Clean cavity with wet towel.
a. Use microwave-safe
cookwa re only.
b. Completely defrost food.
c. Use correct cooking time,
power level.
d. Turn or stir food.
Overcooked foods Use correct cooking time,
power level.
Undercooked foods
a. Electrical cord for oven is
not plugged in.
b. Door is open.
c. Wrong operation is set.
a. Materials to be avoided in
microwave oven were used.
b. The oven is operated when
empty.
c. Spilled food remains in the
cavity.
a. Materials to be avoided in
microwave oven were used.
b. Food is not defrosted
completely.
c. Cooking time, power level
is not suitable.
d. Food is not turned or stirred.
Cooking time, power level is
not suitable.
a. Materials to be avoided in
microwave oven were used.
b. Food is not defrosted
completely.
c. Oven ventilation ports are
restricted.
d. Cooking time, power level is
not suitable.
a. Materials to be avoided in
microwave oven were used.
b. Cooking time, power level is
not suitable.
c. Food is not turned or stirred.
a. Cover or lid on food not
vented.
b. Door opened before sensor-
detected cooking time
appears in display.
Improper defrosting
Sensor cooked foods
not properly cooked
a. Use microwave-safe
cookwa re only.
b. Completely defrost food.
c. Check to see that oven venti-
lation ports are not restricted.
d. Use correct cooking time,
power level.
a. Use microwave-safe
cookwa re only.
b. Use correct cooking time,
power level.
c. Turn or stir food.
a. Cover or lid over food must
contain vent hole for escaping
steam.
b. Do not open door to stir or
turn food before sensor-
detected cooking time
appears in display.
EN-16

PRECAUCIONES PARA EVITAR POSIBLE
EXPOSICION A EXCESIVA ENERG|A
DE MICROONDAS
(a)
(b)
(c)
(d)
No intente operar este homo con la puerta abierta ya que esto
puede causar una exposici6n daffina a energia de microondas.
Es importante no quebrar u obstruir los cierres de seguridad.
No ubicar ning6n objeto entre la pared frontal del horno y la puerta
ni permitir que residuos de suciedad o limpiadores se acumulen en los
bordes.
No operar el horno sJ est,_ dahado. Es partJcularmente Jmportante
que la puerta del homo se cierre correctamente y que no haya dahos
en:
1. PUERTA(diente)
2. BISAGRASY PESTILLOS(quebrado o sueltos)
3. SELLOSDE LAS PUERTASY SUPERFICIESELLANTE
El homo no debera ser ajustado ni reparado por nadie excepto
por personal de servicio calificado apropiadamente.
Especificaciones
Modelo:
Alimentaci6n
Potencia de entrada
Potencia de salida de Microondas
Potencia de entrada (Grill)
Potencia de entrada (Convecci6n)
Capacidad
Di6metro de la bandeja
Dimensiones externas (An. x Prof. x AI.)
Peso nero
405.74159310/405.74153310
120 V_ 60 Hz
1500 W
1000 W
1300 W
1400 W
1.5 cu.ft./42 L
._ 13.6 inch/345 mm
21.73X20.08X12.83 inch/552x510x326 mm
Aproximadamente 43.65 Ibs/19.8 kg
SP-1

INSTRUCCIONES DE SEGURIDAD
IMPORTANTE$
ADVERTENCIA e,f,ndered0c,re,r,es0ode seprodu c(]n 0e-
m(]dur(]s0 un(] desc(]rg(] et_ctric(]_ un incendio_ lesiones
o exposiciones (] I(] energi(] microond(]s excesiv(] (]t mo-
mento de us(it este etectrodom_sfico, sig(] I(]s siguientes
prec(]uciones de segurid(]d basic(is:
1. Lea rod(is I(]s instrucciones antes de
ufitiz(]r el etectrodom_sfico.
2. Lea y preste (]tenci6n (] I(]s "Prec(]ucio-
nes par(] evit(]r un(] posible exposici6n (]
I(] energJ(] microond(]s excesiv(]" t(]t como
se det(]ll(] en I(] p(_gin(] 1.
3. Como con otros etectrodom_sficos de
cocin(]_ debe prest(]rse much(] (]tenci6n
par(] reducir et riesgo de que se produzc(]
fuego dentro de I(] c(]vid(]d det horno.
4. Con el fin de reducir el riesgo de que
se produzc(] fuego dentro de I(] c(]vid(]d
det homo:
i) No cocine los (]timentos de m(]ner(]
excesiv(]. Vigite el horno cu(]ndo, par(]
f(]citit(]r I(] cocci6n, se prepare (]timentos
utitiz(]ndo m(]terides de p(]pet o pl_stico u
otros m(]teri(]tes combustibles.
ii) Retire los cintitlos de (]t(]mbre o (is(is
de metal de I(]s bots(]s o env(]ses de p(]-
pel o ptastico antes de cotoc(]rtos dentro
det horno.
iii) Si cu(]lquier material dentro det homo
se prendier(] fuego, m(]nteng(] I(] puert(]
cerr(]d(]. Ap(]gue y desenchufe et electro-
dom_stico y desconecte I(] energi(] en I(]
c(]j(] o panel de fusibles o de interruptores
principal.
iv) No use I(] c(]vid(]d del horno par(] gu(]r-
d(]r objetos. No deje (]rficulos de p(]pet,
utensitios de cocin(] o (]timentos dentro
det horno cu(]ndo no Io est_ us(]ndo.
5. Este electrodom_stico debe conect(]rse
(] tierr(]. Enchgfeto sot(]mente (] un tom(]-
corriente con I(] debid(] s(]tid(] (] tierr(].
V_(]se I(]s "lnstrucciones de conexi6n (]
tierr(]" en I(] pagin(] 3.
6. Inst(]le y ubique este homo sol(]mente
de (]cuerdo con I(]s instrucciones de
inst(]t(]ci6n de este manual.
7. Algunos productos como huevos ente-
rosy env(]ses cerr(]dos herm@ic(]mente,
por ejempto fr(]scos de vidrio, podrJ(]n
explot(]r pot Io que no deben c(]tent(]rse
en este horno.
8. Utitice este etectrodom_stico s61o par(]
los fines que ha sido dise_(]do t(]t como
se describe en este manual. No utitice
quJmicos corrosivos u otr(]s sust(]nci(]s con
este etectrodom_stico. Este horno ha sido
dise_(]do especific(]mente par(] c(]lent(]r, co-
cin(]r o sec(]r (]limentos. No ha sido dise_(]do
par(] usos industri(]tes o de I(]bor(]torio.
9. Como con cu(]tquier otro etectrodom_sti-
co_ debe prest(]rse sum(] (]tenci6n si v(] (] ser
utitiz(]do pot p(]rte de ni_os.
] 0. No utitice et etectrodom_stico si el
cord6n o et enchufe se encuentr(]n d(]_(]-
dos_ si no funcion(] (]decu(]d(]mente o si ha
sufrido (]tggn tipo de d(]_o o c(]Jd(].
] ]. Todo servicio t_cnico debe set Ilev(]do
(] c(]bo pot p(]rte det personal t_cnico c(]ti-
fic(]do.
] 2. No cubr(] ni obstruy(] I(]s (]bertur(]s det
horno.
] 3. No gu(]rde ni utitice este etectrodom_sti-
co (]1 (]ire libre.
] 4. No utitice este homo cerc(] del (]gu(]_ por
ejempto cerc(] de un I(]v(]dero de cocin(]_
en un s6t(]no muy hgmedo_ cerc(] de un(]
piscin(] u otros tug(ires simil(]res.
] 5. No sumerj(] et cord6n ni el enchufe en
(]gu(].
] 6. M(]nteng(] et cord6n lejos de cu(]tquier
superficie c(]liente.
] 7. No permit(] que et cord6n cuelgue det
horde de I(] mesa o repostero de cocin(].
] 8. AI momento de efectu(]r I(] limpiez(] de
I(]s superficies de I(] puert(] y det horno que
entren en cont(]cto con et cierre de I(] puert(],
utitice un tipo de j(]b6n o detergente no
(]br(]sivo (]ptic(_ndolo con un(] esponj(] (] un
p(]go suave.
SP-2

] 9. Esta a plJcaci6n se dedica solamente para el usoprivado y dornestic_
20. Los lJquidos, tales como et agua, caf6 o t6 pueden sobrecatentarse m6s all6 del punto
de ebullid6n sin parecer haber hervido. El burbujeo o hervido visible de un redpiente al
momento de sacarlo det homo de microondas no siempre est6 presente. ESTO PODRIA
OCASIONAR QUE UN L[QUIDO CALIENTE REPENTINAMENTE ROMPA EL HERVOR AL
MOMENTO DE ACCIONAR ALGON MOVIMIENTO O METER UNA CUCHARA U OTRO
UTENSILIO DENTRO DEL L[QUIDO.
i) No sobrecaliente los IJquidos.
ii) Remueva et IJquido antes y a la mitad del proceso de catentamiento.
iii) No utitice envases o recipientes de lados verticales con cuetlos angostos.
iv) Despu6s de catentar, deje que el envase o redpiente repose dentro del homo a microon-
das durante un periodo corto antes de retirarlo.
v) Tenga sumo cuidado at momento de insertar una cuchara o cuatquier otto utensilio dentro
del envase o recipiente.
GUARDEESTASINSTRUCCIONES
INSTRUCCIONESDECONEXIONA TIERRA
PELIGRO
Petigro de descarga et6ctrica
Se podrJa producir lesiones serias o hasta
la muerte si se toca algunos de los compo-
nentes internos del horno. No desarme et
electrodom6stico.
ADVERTENCIA
Petigro de descarga et6ctrica
Un aparato inapropiadamente conectada
a tierra puede causar el impacto et6ctrico.
No enchufe et etectrodom6stico hasta que
6ste haya quedado correctamente instatado
y conectado a tierra.
Enchufe de tres extremidades
(con salida a tierra)
Este electrodom6sfico debe quedar conectado
a tierra. En el caso de un cortodrcuito, la
conexi6n a tierra reduce et riesgo de una
descarga el6ctrica ofredendo un cable de
escape para la corriente et6ctrica. Con et fin de
protegerse det impacto et6ctrico, este aparato
est6 equipado con un cord6n que tiene un
enchufe de tres dientes, conectado a tierra, para
la inserd6n en un adecuado redpiente conectado
a tierra. NI atterar el enchufe por otto de uso
para un recipiente de dos dientes. Si el enchufe no
acomoda at recipiente, hay que instalar un
recipiente apropiado, Io que se reatiza pot un
el6ctrico cattificado.
Consulte con un etectricista calificado o un
t6cnico sobre las instrucdones de conexi6n a
tierra si no las comprende totatmente o si tuvi-
era atguna duda de que su electrodom6stico
haya quedado correctamente conectado a
tierra. Si fuera necesario utiti zar un cable de
extensi6n, utitice un cable de 3 atambres que
cuente con un enchufe de 3 extremidades y
con un recept6culo de 3 ranuras donde se pu-
eda conectar el enchufe det etectrodom6stico.
La resistenda el6ctrica del cable de extensi6n
debe set iguat o mayor a la resistencia el6c-
trica del electrodom6stico.
SP-3
/