
www.kodak.com/go/slicesupport 1
ENGLISH
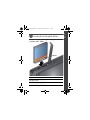
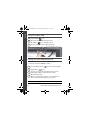
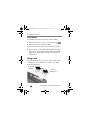
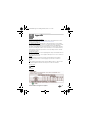
Loading the rechargeable battery
Charge the battery see page 2
Purchase extra batteries for
your trip or event
www.kodak.com/go/sliceaccessories
See the Extended user guide www.kodak.com/go/slicesupport
KODAK Li-Ion Rechargeable Digital Camera
Battery, KLIC-7000
Notch
urg_01090.book Page 1 Tuesday, March 2, 2010 11:11 AM

2 www.kodak.com/go/easysharecenter
ENGLISH
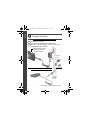
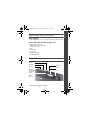
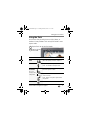
Charging the battery
Battery Charging light:
• Blinking: charging
• Steady: finished
Your adapter
may differ.
If your package includes a charger:
If your package includes an adapter:
Turn OFF the camera.
1
2
Your adapter
may differ.
Connect the KODAK Camera USB Cable,
Micro B / 5-Pin and charger. (Use only the cable
included with this camera!)
urg_01090.book Page 2 Tuesday, March 2, 2010 11:11 AM

www.kodak.com/go/slicesupport 3
ENGLISH
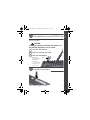
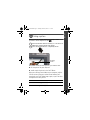
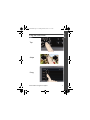
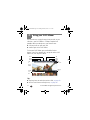
Storing pictures on a microSD/SDHC Card
You must purchase a microSD or microSDHC Card to store more
pictures and videos.
CAUTION:
Inserting or removing a card when the camera is on
may damage the pictures, card, or camera.
Turning on the camera
1
Turn off the camera.
2
Insert or remove the card.
3
Turn on the camera.
Notch
NOTE: Avoid
touching the card’s
metal contacts.
To clean the
contacts, use a dry
cotton swab or a
lint-free cloth.
urg_01090.book Page 3 Tuesday, March 2, 2010 11:11 AM

4 www.kodak.com/go/easysharecenter
ENGLISH
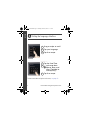
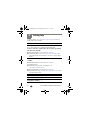
Setting the language, date/time
To learn more about using the touchscreen, see page 13.
Tap X to accept.
Tap your language.
Drag or swipe to scroll.
Tap X to accept.
to change date
format, date, and
time. (Tap/hold to
scroll quickly.)
Tap Set Date/Time.
1
2
3
1
2
3
urg_01090.book Page 4 Tuesday, March 2, 2010 11:11 AM

www.kodak.com/go/slicesupport 5
ENGLISH
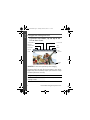
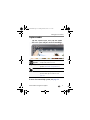
Taking a picture
IMPORTANT: When you take a picture, your camera saves:
■ full-size pictures on your card,
and
■ smaller copies of pictures in the SLICE Album
When you transfer pictures/videos to your computer, only the
full-size versions (from your card or internal memory) are
transferred. Your SLICE Album keeps copies, so you can relive
the experience of each picture!
Learn more about SLICE Album
see page 18
See the Extended user guide www.kodak.com/go/slicesupport
Press the Shutter button halfway to lock the focus.
When you turn on the camera, it’s ready to take
pictures in Smart Capture mode
When the framing marks turn green,
press the Shutter button completely down.
2
1
Framing
marks
.
urg_01090.book Page 5 Tuesday, March 2, 2010 11:11 AM

6 www.kodak.com/go/easysharecenter
ENGLISH
Using picture-taking shortcuts
IMPORTANT:
Know when your battery needs charging.
The battery level icon works like the gas gauge in your car but
appears only when the battery requires your attention. Charge
the battery whenever necessary.
Charge the battery see page 2
Purchase extra batteries for
your trip or event
www.kodak.com/go/sliceaccessories
Capture
mode
Exposure
Compensation
Flash mode
Self timer/Burst
Battery
level
Hide
shortcuts
Focus mode
Tag
Menu
If shortcuts are hidden, tap the top of the
LCD to show them.
urg_01090.book Page 6 Tuesday, March 2, 2010 11:11 AM

www.kodak.com/go/slicesupport 7
ENGLISH
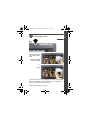
Reviewing pictures
If the microSD Card icon is displayed, the newest picture/video
from the card appears. (If the SLICE Album icon is displayed,
tap it, then tap the microSD Card icon.)
1
or
tap the left/right
side of the LCD
swipe
2
For previous/
next picture...
urg_01090.book Page 7 Tuesday, March 2, 2010 11:11 AM

8 www.kodak.com/go/easysharecenter
ENGLISH
Using the review shortcuts
See the Extended user guide www.kodak.com/go/slicesupport
Share
Select
Card
or
SLICE
Album
Delete
Thumbnail Bar
Tag
Edit
Battery
level
Menu
Hide
shortcuts
If shortcuts are hidden, tap the top of the
LCD to show them.
urg_01090.book Page 8 Tuesday, March 2, 2010 11:11 AM

www.kodak.com/go/slicesupport 9
ENGLISH
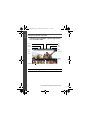
Transferring pictures to your computer
Download KODAK Software—so it’s easy to transfer and share pictures and
videos. Make sure the computer is connected to the Internet. When you
connect the camera to the computer, the KODAK Software Downloader
automatically runs. Follow the prompts to download and install KODAK
Software.*
Download Software later www.kodak.com/go/camerasw
Turn on the
camera.
3
1
Turn off the camera.
Follow the prompts to run the
KODAK Software Downloader
on your computer.
2
* If the KODAK Downloader does not run,
find and launch it here:
• WINDOWS OS: in My Computer
• MAC OS: on the Desktop
Use the KODAK Camera
USB Cable, Micro B /
5-Pin to connect
camera to computer.
(Use only the cable
included with this
camera!)
After the software is installed, follow the prompts to
transfer pictures and videos to your computer.
4
5
NOTE: You can also use a card reader to transfer your
pictures/videos.
urg_01090.book Page 9 Tuesday, March 2, 2010 11:11 AM

10 www.kodak.com/go/easysharecenter
ENGLISH
Using on-camera Help
Sharing via social networking sites
See the Extended user guide www.kodak.com/go/slicesupport
Drag or swipe to scroll through a Help topic.
Tap the Menu
1
2
icon.
3
On a main menu, Tap/hold a menu item.
(Or, when an
icon is available, tap it.)
IMPORTANT: To use the social networking features,
you need to download KODAK Software.
Press the Review button , then find a picture/video.
Tap the Share
icon.
Tap one or more social networking sites so a check
mark appears. (Drag or swipe the list of sites.)
When finished, tap X.
When you transfer the picture to your computer, it is
sent to the networking site(s) that you chose.
1
2
3
4
urg_01090.book Page 10 Tuesday, March 2, 2010 11:11 AM

www.kodak.com/go/slicesupport 11
ENGLISH
Keep learning about your camera!
Front view
Go to www.kodak.com/go/slicesupport for:
• the Extended user guide
• Step-by-Step Solutions & Repair
• interactive tutorials
• FAQs
• downloads
• accessories
• printing information
• product registration
Keep learning!
Finish reading this book, so you can take and share your best pictures!
Zoom
Shutter
Power
Micro-
phone
Video
Recording/
AF Assist
light
Review
Lens
Flash
urg_01090.book Page 11 Tuesday, March 2, 2010 11:11 AM

12 www.kodak.com/go/easysharecenter
ENGLISH
Back view
LCD
touchscreen
microSD, microSDHC
Card slot
USB
port
Battery
compartment
Strap
post
urg_01090.book Page 12 Tuesday, March 2, 2010 11:11 AM

www.kodak.com/go/slicesupport 13
ENGLISH
Using the touchscreen
Swipe
Drag
Tap
urg_01090.book Page 13 Tuesday, March 2, 2010 11:11 AM

14 www.kodak.com/go/easysharecenter
1 Taking pictures/videos
Taking a video
Reviewing the picture/video just taken
After you take a picture/video, the LCD displays a quickview for several
seconds. (To dismiss the quickview sooner, press the Shutter button
halfway or touch the screen.)
To review pictures/videos anytime, see
page 7.
Press the Shutter button completely down
and release. (To stop recording, press and
release again.)
.
Tap the Video icon
2
3
1
Tap the Capture icon.
Play a videoDelete
urg_01090.book Page 14 Tuesday, March 2, 2010 11:11 AM

Taking pictures/videos
www.kodak.com/go/slicesupport 15
Capture modes
To access the camera Help system, see page 10.
Capture mode For
Smart
Capture
General picture taking—it offers excellent
image quality and ease of use.
Program (P) More creative control. (See the Extended user
guide at www.kodak.com/go/manuals.)
Video Video with sound. (See page 14.)
Scene Point-and-shoot simplicity when taking
pictures under special conditions. (See
page 16).
Tap the Capture icon, then tap the mode
that suits your subjects and surroundings.
urg_01090.book Page 15 Tuesday, March 2, 2010 11:11 AM

Taking pictures/videos
16 www.kodak.com/go/easysharecenter
Scene modes
Scene modes are preset for a variety of unique situations.
1 Tap the Capture icon (see page 15), then tap Scene .
2 Tap a Scene mode to read its description.
NOTE: If the description turns off before you finish reading it, tap it again.
3 Tap X to choose a Scene mode (Portrait, Sport, Landscape,
Close-up, Sunset, Backlight, Children, Bright, Self-portrait,
Night Portrait, Night Landscape, High ISO, Panorama L-R,
Panorama R-L).
Using zoom
Use optical zoom to get up to 5X closer to your subject while
taking pictures. Press Telephoto (T) to zoom in. Press Wide
Angle (W) to zoom out.
Zoom in
(Telephoto)
Zoom out
(Wide)
urg_01090.book Page 16 Tuesday, March 2, 2010 11:11 AM

Taking pictures/videos
www.kodak.com/go/slicesupport 17
Using the flash
Use the flash when you take pictures at night, indoors, or
outdoors in heavy shadows. Flash settings are limited in some
capture modes.
Flash modes Flash fires
Auto When the lighting conditions require it.
Fill Every time you take a picture.
NOTE: Not available in Smart Capture mode.
Red-eye
Reduction
Choose a
setting in the
Setup menu.
Preflash A preflash fires, shrinking the eye pupil,
before the picture is taken.
Digital
Correction
A preflash does not fire; the camera
corrects red eye.
NOTE: Image processing takes longer than when
using preflash.
Off Never.
Tap the Flash icon to view flash modes.1
Tap the desired
Flash mode.
2
urg_01090.book Page 17 Tuesday, March 2, 2010 11:11 AM

18 www.kodak.com/go/easysharecenter
2 Using your SLICE Album
Your camera stores a copy of every picture you take, so your
collection—your SLICE Album—is always complete and
portable! When you take pictures, your camera saves:
■ full-size pictures on your card,
and
■ smaller copies in the SLICE Album
To view your SLICE Album, press and hold the Review
button—even if the camera is off—or tap the card or SLICE
Album icon, then tap SLICE Album.
Tips:
■ Tag the pictures to make them easier to find, see page 19.
■ Use the Search feature to find pictures, see page 20.
Share
Select
Card
or
SLICE
Album
Delete
Thumb-
nail
bar
Tag
Edit
Menu
Battery
level
Hide
shortcuts
urg_01090.book Page 18 Tuesday, March 2, 2010 11:11 AM

Using your SLICE Album
www.kodak.com/go/slicesupport 19
Tagging pictures so they are easy to find
Tag pictures to make them easy to find, later. You can tag
people, locations, or keywords. For example, the camera can
find pictures that contain “Mary” or “Boston” or “Dad’s 60th.”
Assigning people tags to pictures
1 Press the Review button. Tap the left/right side of the
screen (or swipe) to find a picture that contains faces.
2 Tap the Tag icon, tap Tag People, then tap Apply Tags.
A Name box is superimposed over each detected face (up to 5).
3 If the camera recognizes a face, confirm it. (If you do
nothing, the camera assumes that the names are correct.) If
the camera is not correct, tap the Name box, then choose an
existing name or add a new one.
Repeat these steps to assign names to other faces. When
finished, tap X.
Assigning location tags to pictures
1 Press the Review button, then find a picture to tag.
2 Tap the Tag icon, then tap Location.
3 Tap Enter New Location or Recent Location.
When finished, tap X.
Navteq is a trademark in the U.S. and other countries.
urg_01090.book Page 19 Tuesday, March 2, 2010 11:11 AM

Using your SLICE Album
20 www.kodak.com/go/easysharecenter
Assigning keyword tags to pictures
1 Press the Review button, then find a picture to tag.
2 Tap the Tag icon, then tap Keyword Tag.
3 Tap an existing keyword or tap Add New.
Using the Search feature to find pictures
Tag pictures to make them easy to find, later. (See page 19.)
1 Press the Review button.
2 Tap the microSD Card or SLICE Album icon.
■ To view the previous/next picture, either swipe left/right
or touch the left/right side of the screen.
■ To view thumbnails, tap (or drag up) the thumbnail bar.
■ To exit the Search feature, tap X.
By faces
All
By date
urg_01090.book Page 20 Tuesday, March 2, 2010 11:11 AM
Page is loading ...
Page is loading ...
Page is loading ...
Page is loading ...
-
 1
1
-
 2
2
-
 3
3
-
 4
4
-
 5
5
-
 6
6
-
 7
7
-
 8
8
-
 9
9
-
 10
10
-
 11
11
-
 12
12
-
 13
13
-
 14
14
-
 15
15
-
 16
16
-
 17
17
-
 18
18
-
 19
19
-
 20
20
-
 21
21
-
 22
22
-
 23
23
-
 24
24


