IMPORTANT SAFETY INFORMATION
GROUNDING INSTRUCTIONS
Usage situations where
appliance’s power cord will
be disconnected infrequently.
Because of potential safety
hazards under certain
conditions, we strongly
recommend against the
use of an adapter plug.
However, if you still elect
to use an adapter, where
local codes permit,
a TEMPORARY
CONNECTION may
be made to a properly
grounded two-prong wall
receptacle by the use of a
UL listed adapter which is
available at most local
hardware stores.
The larger slot in the
adapter must be aligned
with the larger slot in the
wall receptacle to provide
proper polarity in the
connection of the power
cord.
CAUTION: Attaching the
adapter ground terminal
to the wall receptacle cover
screw does not ground the
appliance unless the cover
screw is metal, and not
insulated, and the wall
receptacle is grounded
through the house wiring.
You should have the
circuit checked by a
qualified electrician to
make sure the receptacle
is properly grounded.
When disconnecting the
power cord from the
adapter, always hold the
adapter with one hand. If
this is not done, the adapter
ground terminal is very
likely to break with repeated
use. Should this happen,
DO NOT USE the appliance
until a proper ground has
again been established.
Usage situations where
appliance’s power cord will
be disconnected frequently.
Do not use an adapter plug
in these situations because
frequent disconnection of
the power cord places
undue strain on the adapter
and leads to eventual failure
of the adapter ground
terminal. You should have
the two-prong wall
receptacle replaced with a
three-prong (grounding)
receptacle by a qualified
electrician before using
the appliance.
ADAPTER PLUGS
A short power supply cord is
provided to reduce the risks
resulting from becoming
entangled in or tripping over
a longer cord.
Extension cords may be used
if you are careful in using
them.
If an extension cord is used—
1 The marked electrical
rating of the extension
cord should be at least as
great as the electrical
rating of the appliance;
2 The extension cord must
be a grounding-type
3-wire cord and it must
be plugged into a 3-slot
outlet;
3 The extension cord
should be arranged so
that it will not drape over
the countertop or tabletop
where it can be pulled on
by children or tripped
over unintentionally.
If you use an extension cord,
the interior light may flicker
and the blower sound may
vary when the microwave
oven is on. Cooking times
may be longer, too.
EXTENSION
CORDS
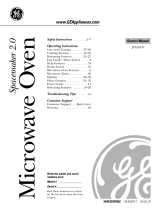
Ensure proper ground
and firm connection
before use.
TEMPORARY
METHOD
Align large
prongs/slots
(Adapter plugs not
permitted in Canada)
10