
STRENGTH
TRAINER
ST-2600
OWNERS MANUAL
INCLUDES:
SAFETY NOTICE
IDENTIFIER
UUCTIONS
DRAWING
PARTS LIST
ARRANTY
ING PARTS
HARDWARE
ASSEMBLEY INSTR
EXPLODED
W
ORDER

***Please read all instructions carefully before using this
roduct*** p
SAFETY TIPS
Consult with your physician before engaging in any vigorous exercise. Know your heart rate
and/or pulse as well as your physician-recommended heart rate training zone. Proper medical
yea heart respiratory problems.
re not tight or restricting.
ith proper technique and pass through a full range of motion.
ights.
Avoid over-training. You should be able to carry on a conversation while exercising.
After an exercise session. Cool down with slow stretching, cycling or walking.
clearance is recommended for anyone beginning an exercise program especially if you are 35
rs of age or older or suffer from
• Warm-up before any exercise program with 8 minutes of aerobic-like activity followed by
stretching from head to toe.
• Wear comfortable clothes that allow freedom of movement and a
• Wear comfortable shoes made with good support and non-slip soles.
• Breath naturally, never holding your breath during an exercise.
• Perform exercises consistently w
• Increase resistance by adding heavier weights. Decrease resistance by using lighter we
• Always use a spotter for safety.
•
•
EXERCISE DEFINITIONS
Sets: A set is one complete routine of exercises. Complete 1-3 sets for each exercise.
w. We
up to 12 reps as indicated below.
ps once you can complete two sets of 12 reps
onsecutively. Progress to the advanced level.
of 12 reps
DISCLAIMER:
Repetitions: (referred to as reps) are the number of times you perform an exercise in a ro
recommend beginning with 6 reps and increasing
Novice: start with one set of 8-12 reps. Once you can complete the entire set of 12 reps
consecutively, progress to the intermediate level.
Intermediate: complete 2 sets of 8-12 re
c
Advanced: complete 3 sets

Keys Fitness Products is not responsible for the misuse of any Keys Fitness Products nor for any
injury sustained while using any Keys Fitness Products. The consumer uses any or all of Keys
.
BEFORE YOU BEGIN
Fitness Products at their own risk
Before you begin assembly of your keys fitness product, please take a moment to review the
hardware and parts list on the following pages. Each part has been illustrated and numbered for
easy identification. Check this list against the contents of your package to make sure you have all
required parts. If any parts are missing, please do not return this product to the store. Contac
our servi
t
ce department immediately at 1-800-683-1236 and we will rush you any parts you may
TOOLS REQUIRED
require.
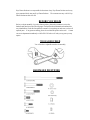
HARDWARE IDENTIFIER
You will need two adjustable wrenches for assembly

HARDWARE IDENTIFIER

HARDWARE IDENTIFIER

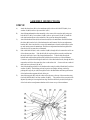
ASSEMBLY INSTRUCTIONS
Before beginning the assembly process take a few moments to familiarize yourself with the
specific parts and hardware. Make sure all the parts are included in the carton and examine them
for any damage that may have occurred in transport. During assembly it is only necessary to
tighten the nuts and bolts to finger tight. This will make it easier to complete certain steps during
cess. Do not tighten the bolts and nuts completely until instructed to do so in step
STEP #1
B) ith two bolts M10x90
D) top
mm (#3) down
nylon nut M8 (#C2)
)
of the backrest adjustm
the assembly pro
#3
A) Place the left (#5) and right (#11) uprights on the floor as illustrated. The brackets welded
down the side of each upright should be to the inside and facing each other.
Attach each end of the cross bar (#10) to the front of each upright w
(#A2), four washers 10 (#B1) and two nylon nuts M10 (#C1). Install a rectangular
reinforcement plate (#8) behind each upright during this assembly.
C) Push a weight storage tube (#7) into the hole in the angled brace behind each upright and
secure from below with one bolt M8x20 (#A6) and one washer 8 (#B2).
Push each crutch (#2) down into the top of each upright so that the longer bar catch at the
of each crutch is to the rear of the bench. Push the rect. out plug 50x70
around the top of each upright. Secure and adjust each crutch inside each upright using a
long knob bolt M12x80mm (#4) installed from the rear of each upright.
E) Push the threaded end of each safety hook (#1+) through the small welded tube at the top
rear of each crutch as illustrated. Secure each safety hook with one
F Place the backrest adjustment bar (#12) between the uprights so that the short pin at each end
ent bar is seated into the hole in a bracket.

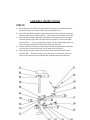
ASSEMBLY INSTRUCTIONS
STEP #2
B) ng two
C)
mainframe so that the welded tube is at the
D) f one
side hole of the other backrest tube, through the hole
E)
to an upright, military position by
F)
d can be
.
A) Attach the front base (#21) to the mainframe (#18) with two bolt M10X25(#A4), four
washers 10 (#B1) and two nylon nuts M10 (#C1)
Attach the mainframe/front base assembly to the center of the cross bar (#10) usi
bolts M10x75 (#A3), four washers 10 (#B1) and two nylon nuts M10 (#C1). Install the
oval reinforcement plate on the underside of the cross bar during this assembly.
Attach the backrest tubes (#14) and seat tubes (#24) to the mainframe. Push the backrest
fixed bar (#16) into the hole of the backrest tubes as illustrated. Set the seat adjustment
bracket (#23) down into the hole on top of the
top and resting across the mainframe. Push the seat adjustment bracket through the hole
near the front of one seat tube as illustrated.
Push a bolt M8x195 (#A1) with a washer 10 (#B1) through the hole nearest the end o
of the shorter seat tubes. Push the bolt all the way through the seat tube, and then into
the single side hole of one of the longer backrest tubes. Push the bolt through the
backrest tube and then through the small welded tube across the top of the mainframe.
Continue to push the bolt through the
nearest the end of the other seat tube, then out the other side. Secure with one washer 10
(#B1) and one nylon nut M10 (#C1).
Attach the backrest pad (#26) to the backrest tubes using four bolts M8x40 (#A5) and four
washers 10 (#B2). The backrest pad can be put in
pushing the long lock pin (#15) through the hole in the mainframe and resting the bottom
of the backrest tubes against the back of the pin
Attach the seat pad (#25) with the wider end to the rear, to the top of the seat tubes using
four bolts M8X40 (#A5) and four washers 10 (#B2). The position of the seat pa
adjusted by raising or lowering the front edge. Push the short lock pin (#19) through one
of the holes in the seat adjustment bracket and let it rest on top of the mainframe

ASSEMBLY INSTRUCTIONS
STEP #3
e.
C)
arm curl handle
be
E)
washers 8 (#B2). Push the arm curl post down into the top of the front base, adjust and
secure with one small knot bolt M12x60mm (#31) installed from behind the front base.
A) Attach the leg developer (#37) between the brackets on the front of the front base with one
bolt M10X75 (#A3), two washers 10 (#B1) and a nylon M10(#C1) nut.
B) Push a roller tube (#34) through the upper and lower holes in the leg developer and through
the tube welded to the back of the front base. Push a foam roll onto each side of each tub
Attach the arm curl handle (#39) between the brackets on the top front of the leg developer
with the ring head lock pin (#38). The attached arm curl pad (#27) on the
should face down. If you are using Olympic weights, slide the Olympic adapter (#35) onto
the leg developer weight holder and secure with the spring collar (#36).
D) Push the threaded end of the leg developer safety hook (#33) through the small welded tu
across the front of the front base secure with one small nylon nut M8 (#C2).
Attach the arm curl pad to the arm curl post (#28) with two bolts M8x20 (#A6) and two

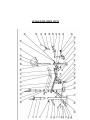
ST-2600 EXPLODED VIEW

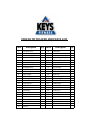
STRENGTH TRAINER 2600 PARTS LIST
Part# Description Q P # iption Q
ty art Descr ty
1 Left Safety Hook 1 30 Roller Foam 6
2 Crutch 2 31 Knob Bolt M12x60 1
3 Rect. Out Plug 50x70mm 2 32 Round Cap 1
4 Knob bolt M12x80 ety Hook 2 33 Leg Developer Saf 1
5 Left Upright 1 34 Roller Foam Tube 3
6 Round Inner Plug 9 35 Olympic Adaptor 1
7 Weight Storage 2 36 Spring Collar 1” 1
8 Rectangular Plate 2 37 Leg Developer 1
9 Sq. Inner Plug 50x70mm ck pin 4 38 Ring Head Lo 1
10 Cross Bar 1 39 Arm Curl Handle 1
11 Right Upright 1 40 Handle Grip 2
12 Backrest Adj Bar 0mm 1 41 Sq. Inner Plug 20x4 2
13 Small Rubber Plug mm 8 42 Sq. Inner Plug 32 2
14 Backrest Tube 2 43 Right Safety Hook 1
15 Long Lock Pin 1 A1 Bolt M10X195 1
16 Backrest Fixed Bar 1 A2 Bolt M10X90 4
17 Oval Reinforcement Plate 1 A3 Bolt M10X75 3
18 Main Frame 1 A4 Bolt M10X25 2
19 Short Lock Pin 1 A5 Bolt M8X40 8
20 Sq. Inner Plug 50mm 5 A6 Bolt M8X20 4
21 Front Base 1 B1 Washer 10/20 20
22 Sq. Inner Plug 25mm 9 B2 Washer 8/16 12
23 Seat Adj Bracket C1 ylon Nut M10 10 1 N
24 Seat Tube 2 C2 ylon Nut M8 N 3
25 Seat Pad 1

26 Backrest Pad 1
27 Arm Curl Pad 1
1
m 1
28 Arm Curl post
29 Rect. Outer Plug 50m
WARRANTY
Keys Fitness Products LP warrants this product for a period of 1 year on the Frame, 1 year on
Parts and 90 days on the Upholstery from the original date of purchase. This warranty covers
the product from defects in materials and workmanship for the original purchaser. Using this
roduct for commercial purposes, products damaged by misuse, abuse, or from shipping, moving
eplacement parts are available from Keys Fitness Products LP. To contact us for customer
service or replacement parts, call 1(800)683-1236.
p
and storage will void this warranty.
R
CUSTOMER SERVICE
If you have any questions regarding this or any Keys Fitness product, or if we may be of
ber 1(800)683-1236.
emember, before using any exercise product, consult a physician.
e, Suite 250
assistance in any way, please do not hesitate to call our toll free num
R
Keys Fitness Products, LP
4009 Distribution Driv
Garland, Texas 75041
-
 1
1
-
 2
2
-
 3
3
-
 4
4
-
 5
5
-
 6
6
-
 7
7
-
 8
8
-
 9
9
-
 10
10
-
 11
11


Keys Fitness STRENGTH TRAINER 2600 Owner's manual
- Type
- Owner's manual
- This manual is also suitable for
Ask a question and I''ll find the answer in the document
Finding information in a document is now easier with AI
Related papers
-
Keys Fitness ST-DB5 User manual
-
-
-
-
-
-
-
-
-
Other documents
-
Titan Fitness Adjustable Depth Wall Mounted Pull Up Bar User manual
-
NordicTrack NTBE01702 User manual
-
Life Fitness Olympic User manual
-
-
Trojan Power Cage 400 Owner's manual
-
Weider WECCBE7601 User manual
-
ProForm PFEVBE3805 Owner's manual
-
ProForm 831.150330 User manual
-
LifeGear 76310 Owner's manual
-