Techno line Model Owner's manual

Category
Weather stations
Type
Owner's manual

This manual is also suitable for

INSTRUCTION MANUAL OF WS 6720
Wireless Indoor and Outdoor Weather Station
P.1
QUICK START
1. Slide open the battery cover at the back of your wireless thermometer-clock.
2. Insert 2 x AAA batteries into the battery compartment by observing the correct + / - polarity
signs inside the battery compartment.
3. Replace the battery cover. In few seconds the LCD shows the default time, calendar and the
current indoor temperature and it starts to search for outdoor temperature signal.
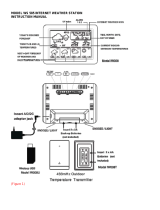
4. Then insert 2 x AA batteries into the outdoor sensor. The outdoor temperature will be displayed
with “CH1” shown on the lower line of the LCD. Your Thermometer-clock will be synchronized
with outdoor sensor at Channel 1, the outdoor temperature will be display.
Remarks:
Keep in mind that your outdoor sensor has a 30-meter open air transmission with no obstructions.
Actual transmission range will vary depending on what is in the path of the signal. Each obstruction
(roof, walls, floors, ceilings, thick trees, etc.) will effectively cut signal range in half.
TO SET CALENDAR, 12/24 TIME AND TIME
1. Press and hold SET / ALM SET for 2 seconds, time digits change to year “2008 YR” and flash.
Press
/ to set year.
2. Then press SET / ALM SET once again, month digits flash. Press
/ button to set month.
3. Then press SET / ALM SET once again, date digits flash. Press
/ button to set date.
4. Press SET / ALM SET once again, time digits change “24 Hr”, press
/ to select “12 Hr”
time format or “24 Hr” time format. When “12 Hr” is selected, AM / PM icon will be displayed.
5. Then press SET / ALM SET once again, time digits changes to “00”, press / to select your
time zone.
6. Then press SET / ALM SET once again, time digits “0:00” show up and the hour digits flash.
Press
/ to set the hours.
7. Then press SET / ALM SET once again, minute digits flash. Press
/ button to set the
minutes.
8. Press SET / ALM SET to return to normal mode, or it will return to normal mode in around 7
seconds if no press of any other buttons.
TO SET ALARM TIME
Press SET / ALM SET once, time digits change to alarm time digits “AM 7:00 AL”. Then press and
hold SET / ALM SET for 2 seconds, the hour digits flash. Press
/ to set your desired hours of
alarm time.
Press SET / ALM SET again, alarm minute digits flash. Press
/ to set alarm minutes.
Press SET / ALM SET again, time digits change to “05” and flash. Press
/ to set the snooze
duration from 1 to 20 minutes.
Press SET / ALM SET to return to normal mode, or it will return to normal mode in around 8 seconds if
no further press of any other buttons.
TO TURN ON OR OFF YOUR ALARM
Press SET / ALM SET once to display the alarm time. When alarm time is displayed, press
to turn
on / off the daily alarm. When the alarm function is turned on, the
icon appears between the hour
and minute digits.
TO USE SNOOZE ALARM
When time reaches your set alarm time, your clock will give beep sound to wake you up. The
icon will flash.
P.2
1. Press SNOOZE once to stop the alarm temporarily, the
icon keeps flashing. The alarm will
beep again in 5 minutes.
2. To stop the alarm, press
/ CHANNEL (ALM On-Off) once, the alarm beep will stop and the
icon become static, alarm will beep again same time next day.
Alarm Duration : 2 minutes
TO DISPLAY TEMPERATURE IN DEGREE °C OR °F
Simply press
(°C/°F) to display temperature in degree C or degree F.
To Read the Maximum-Minimum Temperature Records
Press MAX/MIN once to view the indoor-outdoor maximum or minimum temperatures.
When the maximum indoor-outdoor temperatures are displayed, press and hold the MAX will clear the
maximums and the unit will start to record and display fresh data again.
When the minimum indoor-outdoor temperature and humidity are displayed, press and hold the MIN
will clear the minimums and the unit will start to record and display fresh data again.
TO USE THE WEATHER FORECASTER
There are four types of weather display in your weather station :
SUNNY
SUNNY AND CLOUDY
CLOUDY
RAINY
Remarks: for better use of your weather station, place it at a location with open air circulation e.g.
close by an open window. Placing it at air-conditioned environment will affect its accuracy.
P.3
After your weather station is powered up, it will take around 24 hours to get stable. The weather icons
on the display give a reference to the next 6-12 hours weather conditions. It may not match with the
current weather condition outside.
TO SYNCHRONIZE YOUR CLOCK WITH MULTIPLE OUTDOOR SENSORS
Your wireless thermometer-clock is equipped with one outdoor sensor. You could purchase second or
third outdoor sensor to work with this thermometer-clock at the same time.
1. Press
/ CHANNEL (ALM On-Off) once, the lowest line of the LCD shows “CH2” and show “--“.
Then press and hold
/ CHANNEL / ALM On-Off for 2 seconds. Then insert 2 x AAA batteries
into the second outdoor sensor. The temperature of second outdoor sensor will be displayed on
the lower LCD.
2. You could repeat the same step to synchronize third outdoor sensor at “CH3”.
TROUBLE SHOOTING
1. In case your wireless thermometer-clock shows irrelevant information or digits, it maybe
affected by electrostatic discharge or interferences from other devices. Press the RESET button
once. Your unit will be reset to default setting of time and calendar and you need set time and
calendar again.
2. In case the outdoor temperature shows “--“ :
2.1) press
/ CHANNEL (ALM On-Off) to view the correct channel i.e. “CH1” is your default
channel
2.2) If Outdoor temperature shows “CH1”, press and hold / CHANNEL (ALM ON-OFF) for 2
seconds. The outdoor temperature should be displayed in around 1 minute.
2.3) if the above do not work, repeat 2.2), then bring in the outdoor sensor and press
RESET on the outdoor sensor.
Remark: if you observe a Low Battery icon on the lower left LCD, which means
your outdoor sensor is at low battery level, replace the batteries of your wireless transmitter with fresh
batteries.
CARE OF YOUR WEATHER SATATION CLOCK
1. Do not expose the unit to extreme temperature, water or direct sunlight
2. Avoid contact with any corrosive materials
3. Do not subject the unit to excessive force, dust or humidity
4. Do not open the inner back case or tamper with any components of this unit
SPECIFICATIONS
Indoor Temp. Range -10°C to +50°C (+14.2°F to +122°F)
Outdoor Temp. Range -50°C to + 70°C (-58°F to +158°F)
Out of Range Display Temperature: HH.H / LL.L
Outdoor Temperature Interval every 1 minute
Temperature Resolution 0.1°C
Alarm Duration 2 minutes
Transmission distance up to 30 meters
Transmission frequency 433Mhz
P.4
Words in the figure:
Figure English Other Language
FRONT VIEW
PM INDICATOR
TIME
DATE / MONTH
MAXIMUM / MINIMUM ICONS
LOW BATTERY OF OUTDOOR
SENSOR
SET / ALARM
/ (°C/°F)
MAX / MIN
RESET
/ CHANNEL (ALM ON-OFF)
SNOOZE
OUTDOOR TEMPERATURE
WIRLESS TRANSMISSION ICON
RF SENSOR CHANNEL
WEATHER FORECAST ICONS
ALARM ON
BACK VIEW
WALL HANGER HOLE
INSERT 2 X AAA BATTERIES
SIDE VIEW
FOLDING STAND
OUTDOOR TEMPERATURE
SENSOR
RESET
INSERT 2 X AA BATTERIES
Quartz clock
12 / 24 h display
Date display
Indoor and outdoor temperature in °C or °F
MIN / MAX recording
Alarm with snooze
Weather forecast (based on temperature/humidity)
P.5
  • Page 1 1
  • Page 2 2
  • Page 3 3
  • Page 4 4
  • Page 5 5

Techno line Model Owner's manual

Category
Weather stations
Type
Owner's manual
This manual is also suitable for

Ask a question and I''ll find the answer in the document

Finding information in a document is now easier with AI