
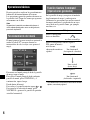
Customer Support Portal
If you have any questions or for the latest support
information on navigation, visit the website below:
http://www.navu.sony-europe.com/support
Bitte kreuzen Sie zunächst die genaue
Modellbezeichnung in dem dafür vorgesehenen Feld
an.
Tragen Sie danach die Seriennummer (SERIAL NO.) in
dem reservierten Feld ein. Sie finden diese auf einem
Aufkleber, der auf dem Gerätegehäuse angebracht ist.
Nehmen Sie den ausgefüllten Geräte-Pass
anschließend unbedingt aus der Bedienungsanleitung
heraus, falls Sie diese im Fahrzeug aufbewahren
möchten. Bitte bewahren Sie den Geräte-Pass an
einem sicheren Ort auf. Er kann im Falle eines
Diebstahls zur ldentifikation lhres Eigentums dienen.
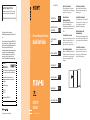
caraudio
Geräte-Pass
Dieser Geräte-Pass dient als Eigentumsnachweis
für Ihr caraudio-Gerät im Falle eines Diebstahls.
Wir empfehlen, den Geräte-Pass nicht im
Fahrzeug aufzubewahren, um Missbrauch zu
verhindern.
Modellbezeichnung
sNV-U72T
sNV-U52
Seriennummer (SERIAL NO.)
Guida rapida all’uso
3-198-859-21 (1)
Quick Start Guide
Anleitung zur schnellen
Inbetriebnahme
Guide de démarrage
rapide
Beknopte handleiding
Guía de inicio rápido
Snabbstartguide
Guia de iniciação rápida
GBGB
DE
FR
NL
ES
SE
PT
Sony Corporation Printed in Thailand
IT
NV-U72T
NV-U52
Personal Navigation System
Quick Start Guide
Personal Navigation System
© 2007 Sony Corporation
How to use this manual
When reading this manual, keep the control
layout illustration (on the rear of this page) open
for quick reference from any page.
Hinweis zu dieser
Bedienungsanleitung
Wenn Sie diese Bedienungsanleitung lesen,
klappen Sie die Abbildung mit den
Bedienelementen (auf der Rückseite dieser Seite)
auf. So haben Sie sie beim Lesen immer im
Blick.
Comment utiliser ce manuel
Lorsque vous lisez ce manuel, gardez le rabat des
illustrations des commandes (au verso de cette
page) ouvert pour pouvoir vous y référer
rapidement à partir de n’importe quelle page.
Deze handleiding gebruiken
Wanneer u deze handleiding doorleest, houdt u
de illustratie met de onderdelen van het apparaat
(aan de achterzijde van deze pagina) geopend
zodat u deze vanaf elke pagina snel kunt
raadplegen.
Uso del presente manuale
Durante la lettura del manuale, utilizzare le
illustrazioni sul retro di questa pagina come
riferimento rapido.
Cómo utilizar este manual
Al leer el manual, tenga a la vista la ilustración
de la distribución de los controles (en el reverso
de esta página) para poder consultarla
rápidamente desde cualquier página.
Hur du använder den här
bruksanvisningen
När du läser den här bruksanvisningen bör du ha
bilden över kontrollerna (på baksidan av den här
sidan) öppen för snabb referens från sidan du är
på.
Como utilizar este manual
Quando ler este manual, mantenha aberta a
ilustração do esquema de controlo (no verso
desta página) para possibilitar uma consulta
rápida a partir de qualquer página.
2
3

2
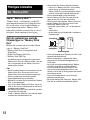
On copyrights
The map and POI data may contain copyrighted
material. Copyrighted data on a “Memory Stick
Duo” should be used within the limits of the
copyright law. Do not violate the previsions of the
copyright law.
On trademarks
• Microsoft and Windows are registered trademarks
of Microsoft Corporation.
• “Memory Stick”, , “Memory Stick Duo”,
, “Memory Stick PRO Duo”,
, “MagicGate”,
, “nav-u” and are
trademarks of Sony Corporation.
“MagicGate” is a generic name of a copyright
protection technology, developed by Sony
Corporation.
• All other trademarks are trademarks of their
respective owners.
© 1993 NAVTEQ. All Rights Reserved.
Ausw/Italy © 1994
Austria © 1996
Belgium © 1995
Benelux © 1993
Central Europe © 1993
Czech Republic © 2002
Denmark © 1997
Finland © 2001
France © 1993
Germany © 1993
Great Britain © 1993
Italy © 1994
Luxembourg © 1996
Mediterranean Coast © 1993
Norway © 2001
Portugal © 1997
Spain © 1997
Sweden © 1994
Switzerland © 1996
The Netherlands © 1993
Austria
© Bundesamt für Eich- und Vermessungswesen
Belgium
Traffic Information is provided by the Ministerie
van de Vlaamse Gemeenschap and the Ministèrie de
l’Equipement et des Transports.
Croatia, Estonia, Latvia, Lithuania, Poland,
Slovenia
© EuroGeographics
France
source: Géoroute® IGN France & BD Carto® IGN
France
Germany
Die Grundlagendaten wurden mit Genehmigung der
zuständigen Behörden entnommen
Great Britain
Based upon Crown Copyright material.
Greece
Copyright Geomatics Ltd.
Hungary
Copyright © 2003; Top-Map Ltd.
Italy
La Banca Dati Italiana è stata prodotta usando quale
riferimento anche cartografia numerica ed al tratto
prodotta e fornita dalla Regione Toscana.
Norway
Copyright © 2000; Norwegian Mapping Authority
Portugal
Source: IgeoE – Portugal
Spain
Información geográfica propiedad del CNIG
Sweden
Based upon electronic data © National Land Survey
Sweden.
Switzerland
Topografische Grundlage: © Bundesamt für
Landestopographie.
V-Trafic Information in France is
provided by Mediamobile
company.
Traffic Information in the UK is
provided by ITIS Holdings Plc.
V
O
I
C
E
C
H
G
P
O
S
.
T
M
C
A
N
T
R
E
S
E
T
DC IN
5
-
5
.2
V
The manufacturer of this product is Sony
Corporation, 1-7-1 Konan Minato-ku Tokyo,
108-0075 Japan.
The Authorized Representative for EMC and
product safety is Sony Deutschland GmbH,
Hedelfinger Strasse 61, 70327 Stuttgart, Germany.
For any service or guarantee matters please refer to
the addresses given in separate service or guarantee
documents.
Caution
IN NO EVENT SHALL SONY BE LIABLE
FOR ANY INCIDENTAL, INDIRECT OR
CONSEQUENTIAL DAMAGES OR OTHER
DAMAGES INCLUDING WITHOUT
LIMITATION LOSS OF PROFITS, LOSS OF
REVENUE, LOSS OF DATA, LOSS OF USE
OF THE PRODUCT OR ANY ASSOCIATED
EQUIPMENT, DOWNTIME, AND
PURCHASER’S TIME RELATED TO OR
ARISING OUT OF THE USE OF THIS
PRODUCT, ITS HARDWARE AND/OR ITS
SOFTWARE.
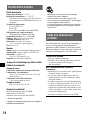
About this manual
• This Quick Start Guide contains instructions
for basic operations.
Before installing and operating this system,
read this manual and the supplied “Read
This First” (Installation Manual) thoroughly.
For more information, see the PDF manual
on the supplied Application Disc.
• Illustrations in this manual may differ from
the actual device.
• Retain this manual and “Read This First” in
a place where you can refer to them at any
future time.
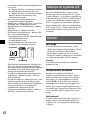
Disposal of Old Electrical &
Electronic Equipment (Applicable in
the European Union and other
European countries with separate
collection systems)
This symbol on the product or on its
packaging indicates that this product shall not be treated
as household waste. Instead it shall be handed over to the
applicable collection point for the recycling of electrical
and electronic equipment. By ensuring this product is
disposed of correctly, you will help prevent potential
negative consequences for the environment and human
health, which could otherwise be caused by inappropriate
waste handling of this product. The recycling of materials
will help to conserve natural resources. For more detailed
information about recycling of this product, please contact
your local Civic Office, your household waste disposal
service or the shop where you purchased the product.
Applicable accessory: Car battery adapter

3
Table of Contents
Warning . . . . . . . . . . . . . . . . . . . . . . . . . . . . . . . 4
Location of controls. . . . . . . . . . . . . . . . . . . . . . 5
Turning the unit on/off . . . . . . . . . . . . . . . . . . . 5
Performing initial setup . . . . . . . . . . . . . . . . . . . 5
Receiving GPS signals . . . . . . . . . . . . . . . . . . . 5
Basic Operations 6
Menu operation . . . . . . . . . . . . . . . . . . . . . . . . . 6
Gesture Command operation. . . . . . . . . . . . . . . 6
Keyboard operation . . . . . . . . . . . . . . . . . . . . . . 7
Route Searching 7
Setting the destination and
starting guidance. . . . . . . . . . . . . . . . . . . . . . 7
Setting the destination in other ways. . . . . . . . . 8
Guidance displays . . . . . . . . . . . . . . . . . . . . . . . 8
System Settings 10
Using the Supplied Software 10
Contents . . . . . . . . . . . . . . . . . . . . . . . . . . . 10
Connecting to your computer. . . . . . . . . . . 10
Additional Information 11
About the “Memory Stick”. . . . . . . . . . . . . . . 11
What is “Memory Stick”? . . . . . . . . . . . . . 11
Types of “Memory Stick Duo” that
the system can use . . . . . . . . . . . . . . . . . . . 11
Note on LCD panel. . . . . . . . . . . . . . . . . . . . . 12
Maintenance . . . . . . . . . . . . . . . . . . . . . . . . . . 12
Cleaning . . . . . . . . . . . . . . . . . . . . . . . . . . . 12
Fuse replacement . . . . . . . . . . . . . . . . . . . . 12
Notes on unit disposal. . . . . . . . . . . . . . . . . . . 12
Specifications . . . . . . . . . . . . . . . . . . . . . . . . . 13
Troubleshooting . . . . . . . . . . . . . . . . . . . . . . . 14
Resetting the unit . . . . . . . . . . . . . . . . . . . . 14

4
Warning
PLEASE READ THIS MANUAL AND THE
SUPPLIED READ THIS FIRST (INSTALLATION
MANUAL) COMPLETELY BEFORE
INSTALLING OR OPERATING YOUR
PERSONAL NAVIGATION SYSTEM.
IMPROPER INSTALLATION OR USE OF THIS
DEVICE MAY CAUSE ACCIDENT, INJURY OR
DEATH.
On safety
•Be sure to:
– install the navigation system in a safe place
where it does not obstruct the driver’s view.
– not install the unit above an airbag.
– place the cables and unit where they do not
obstruct driving.
– clean the surface of the suction cup and
attachment surface before attaching. When
installing on the dashboard, clean the surface on
which the suction cup will be attached. Also,
confirm that the suction cup is securely attached
after installation. Otherwise, the unit may fall.
Failure to do so may result in unsafe driving
conditions.
• Do not apply excessive force to the unit as it may
fall.
• Comply with local traffic rules, laws and
regulations.
• Do not continuously watch the unit while driving.
It is dangerous and may cause a traffic accident.
• If you need to operate the navigation system while
driving, be sure to stop the car in a safe place
before operating.
• Do not modify the unit.
• Do not disassemble the unit except when
disposing of it.
On handling
• When the unit is not in use, turn it off by pressing
?/1 (4). Disconnect the car battery adapter,
otherwise battery drain may result. Note the
following.
If your car’s cigarette lighter socket is not
connected to ACC on your ignition switch, power
will continue to be supplied to the unit’s built-in
power supply even when the ignition is off or the
unit is not in use.
• Do not connect any accessory other than those
supplied or optional.
• Do not expose the unit to fire or water, as it may
cause a malfunction.
• To disconnect a cable, pull it out by grasping the
plug, not the cable.
• Be sure to remove the unit out of the car when
leaving your car to prevent theft or high
temperature damage inside the car.
• Note that the built-in battery cannot be charged
outside the temperature range 5 – 45 ºC (41 –
113 ºF).
• Do not leave the unit in high ambient temperature
as the built-in battery capacity will deteriorate, or
it will become unchargeable.
On GPS
As GPS information is obtained from satellites, it
may be impossible or difficult to obtain information
in locations such as:
• Tunnel or underground
• Under a highway
• Between high buildings
• Between tall trees with dense foliage
Note
GPS signal reception may be poor depending on the
material of the car’s windscreen.
On the software
Read the “END-USER LICENSE AGREEMENT”
carefully before use.

5
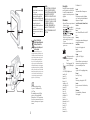
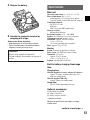
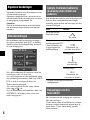
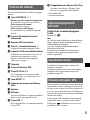
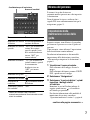
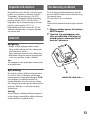
Location of controls
Refer to the pages listed for details.
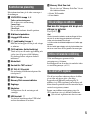
a VOICE/POS. button 6, 7
During route guidance:
To hear the next voice guidance.
In the menu display:
To show the map.
In the map display:
To show your current car position.
b Display window/touch screen
c Built-in GPS aerial
d ?/1 (on/standby) button 5
To turn the unit on/off.
e CHG (battery charge) indicator
Lights up in red while charging, and changes
to green when fully charged.
When the adapter is disconnected, the
indicator goes off.
f Nameplate
g TMC antenna (aerial) jack*
1
h DC IN 5-5.2V jack
To connect to the car battery adapter or AC
adapter*
2
.
i RESET button 14
j Memory Stick access indicator
k Suction cup
l Speaker
Outputs guidance and warnings.
m USB jack 10
To connect to a computer with the USB
cable.
n Memory Stick Duo slot
For “Memory Stick Duo” insertion for
functional expansion.
*1 TMC models only
*2 Optional accessory
Turning the unit on/off
To turn the unit on/off
Press ?/1 (4).
Note
If you do not use the unit for a long term, the built-in
battery may be depleted, and the unit will not turn on.
In such a case, connect the car battery adapter and
charge the unit.
After you charge the unit, it may take time to receive
GPS signals when turning on the unit.
Performing initial setup
Follow the on-screen instructions to perform the
setup.
The setting can then be further configured in the
setting menu at any time (page 10).
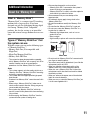
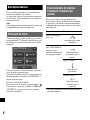
Receiving GPS signals
After the initial installation, park your car in a
safe, open place (no high buildings, etc.) for up
to 20 minutes to allow for GPS signals to
calculate the current car position properly before
using the navigation system.
The GPS signal reception condition icon is
displayed on the screen. The indicator lights
up in red when the signal cannot be received.

6
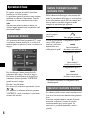
Basic Operations
Common procedures to operate the system are
explained.
General operations can be performed on the
touch screen. Touch the displayed icons with
your finger gently.
Note
Do not press the display with excessive force, or use
any sharp article, such as a pen, etc., to tap on the
display.
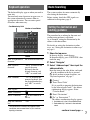
Menu operation
The top menu appears when turning on the unit
by pressing ?/1 (except during route guidance, in
which case the map appears).
To show the top menu from the map display,
touch the map.
To return to the top menu from any menu display,
press VOICE/POS., then touch the map.
During menu operation:
To return to the previous display, touch or
.
To cancel the menu selection, press VOICE/POS.
(the current car position display appears).
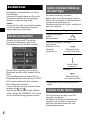
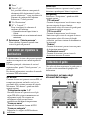
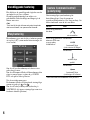
Gesture Command operation
In map displays (except in map scrolling mode),
by assigning a screen finger stroke such as line,
etc., frequently-used operations can be
performed easily.
* For details on Quick Links, see page 8.
To Draw
start navigation to
your home
a circumflex
start navigation to the
nearest POI (Point Of
Interest) stored on
Quick Links*
Quick Link 1
horizontal line
(left to right)
Quick Link 2
vertical line
(downwards)
Quick Link 3
horizontal line
(right to left)

7
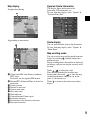
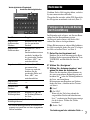
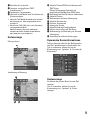
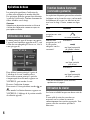
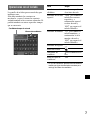
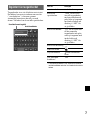
Keyboard operation
The keyboard display appears when you need to
enter text.
You need only enter characters in upper case, as
the system automatically converts them to
appropriate characters. You can enter special
characters when necessary.
* The candidate list automatically appears when
candidates are narrowed down as you continue
inputting characters.
Route Searching
The system searches for routes automatically
after setting the destination.
Before starting, check that GPS signals are
sufficient for navigation (page 5).
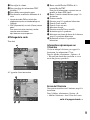
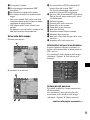
Setting the destination and
starting guidance
The procedure for searching for the route and
starting route guidance is explained.
As an example, setting the destination by the
address is introduced here.
For details on setting the destination in other
ways, see “Setting the destination in other ways”
on page 8.
1 Show the top menu.
In the map display, touch the map.
In the menu display, press VOICE/POS., then
touch the map.
2 Select “Navigate.”
3 Select “Address Input,” then input the
address details.
Input the items in the order below, and touch
or the candidate in the list to proceed.
For details on how to input characters, see
“Keyboard operation” on page 7.
1 “Country”
2 “Town / Postal Code”
If it is possible to pinpoint the destination
by the selected postal code*
1
, the address
confirmation display appears. Select
“Calculate Route.”
3 “Street / Destination”
4 “No.” or “Intersection”*
2
The address confirmation display appears.
*1 Available only in the UK and Netherlands.
*2 Selectable only if existent in the selected
street.
To Touch
enter an alphabetical
character
the desired character key
enter a special
character
“ÂÄÁ” to switch to the
special character
keyboard, then the
desired character; and
“ABC” to switch back
enter a number “123” to switch to the
numeric keyboard, then
the desired number key;
and “ABC” to switch
back
enter a space
delete a character
select a candidate or the candidate in
the list
show the candidate
list*
“List”
Candidate/entry field
Number of candidates
continue to next page t

8
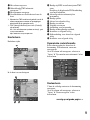
4 Select “Calculate Route.”
The route is calculated, and route guidance
starts.
Setting the destination in other
ways
You can also set the destination and search for
routes by the following methods.
From the top menu, select the items in the
following order, then “Calculate Route” (if
necessary).
For details, see the supplied PDF manual.
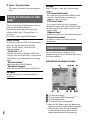
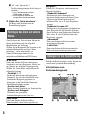
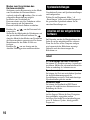
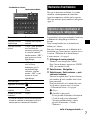
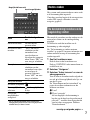
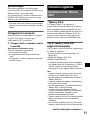
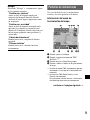
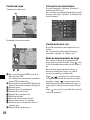
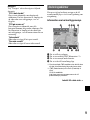
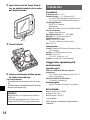
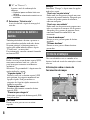
Guidance displays
Once a route has been calculated, visual
guidance navigates you to the destination along
with voice guidance.
Information on map tool menu
1 To adjust the volume.
2 To view detailed TMC information.*
1
*
2
3 To show option menu.
4 To switch to map scrolling mode.
*1 When the TMC model is used, this appears only
when the route that has been found is congested.
*2 iTMC (UK) and v-trafic (France) are optional.
To subscribe the service(s), please visit our
website. http://www.navu.sony-europe.com
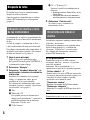
Search Nearby
Searches for routes to a POI, such as restaurant,
hotel, etc., near the current car position.
Select “Search Nearby,” then any of the
following options.
“Quick Link 1 - 3”
Searches for routes to the nearest POI of the
category stored on Quick Links. Categories on
Quick Links can be customized in the setting
menu.
“Search by Name”
Enter the name of the POI directly.
“Search by Category”
Select the desired POI category from the list.
Go Home
Searches for routes to your home when it is
registered.
Navigate
Select “Navigate,” then any of the following
options.
“POI Search Nationwide”
Set a wide search area but with limited search
categories. Suitable when searching big
landmarks such as an airport.
“POI Search Town”
Set a narrow search area but all categories
become the target of the search. Suitable when
searching small places such as a petrol station
and restaurant.
“Address Book”
Searches for routes to a saved destination point.
“Recent Destinations”
Searches for routes to recently searched
destinations.
A B 2C1
34EGFD

9
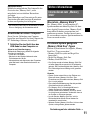
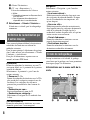
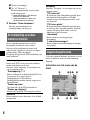
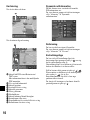
Map display
Straight-ahead driving
Approaching an intersection
A Current time/GPS status/Battery condition/
TMC status
For details, see the supplied PDF manual.
B Distance/ETA (Estimated Time of Arrival) to
destination
C Current position
D Distance to next turn
E Current street name
F Next street name
G North indicator
H Current direction/Current speed
I Instruction after next
J Bar indicator of the distance to next turn
K Next turn instruction
Dynamic Route Information
This display shows the distance to the
destination, POI information, etc.
To view, from map display, select “Options” c
“Dynamic Route Info.”
Route display
You can view the entire route to the destination.
To view, from map display, select “Options” c
“Show Route.”
Map scrolling mode
You can switch to map scrolling mode from map
display by touching , whether during route
guidance or not.
In map scrolling mode, the crosshair is displayed
on the map, and you can drag the screen to scroll
the map.
Touch / to adjust map scale.
Place the intersection of the crosshair on a
desired point, then touch to show the map
scrolling mode menu, where you can set the
point as a destination, etc.
Touch to return to the current car position
display.
H
J K
I

10
System Settings
Various settings related to the system and
memory are configurable.
From the top menu, select “More...” c “Settings”
c the desired category c the desired item to
make each setting.
Using the Supplied Software
The major functions of the software on the
supplied disc are introduced below.
If you insert the disc into your computer, the
screen appears automatically. Follow the on-
screen instructions.
Contents
* The Map Manager function can be used only for the
model with the disc containing map data.
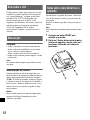
Connecting to your computer
Before connecting to your computer, install the
PC connection software (ActiveSync) to your
computer.
1 Connect the unit to your computer
with the USB cable.
Notes when transferring data
During transfer, do not
– disconnect the USB cable.
– enter unit standby mode, or reset the unit.
– shut down the computer, enter computer standby
mode, or restart the computer.
Install PC Connection Software
PC connection software (ActiveSync) can be
installed. Be sure to log on as administrator when
installing this software.
Language Manager
Language data for on-screen display and voice
guidance can be added to the unit, and
unnecessary language data can be deleted from
the unit.
Read the Manual
You can read the PDF manual which contains
further information on operations available.
Support Link
Easy access to the Sony navigation support site is
available.
Visit this site for technical support, such as
software updates, FAQs, etc.
Map Manager*
Map data can be added to the unit or “Memory
Stick” (not supplied) from the supplied disc.
When adding, you may need to delete
unnecessary map data to free up memory space.

11
Additional Information
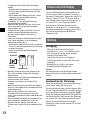
About the “Memory Stick”
What is “Memory Stick”?
“Memory Stick” is a compact-size IC recording
medium with a large capacity. It has been
designed not only for exchanging/sharing digital
data among “Memory Stick” compatible
products, but also for serving as an insertable/
removable external storage medium that can save
data.
Types of “Memory Stick Duo” that
the system can use
With the system, you can use the following types
of “Memory Stick Duo.”*
• Memory Stick Duo (Not compatible with
MagicGate)
• MagicGate Memory Stick Duo
• Memory Stick PRO Duo
* The system has been demonstrated as operable
with a “Memory Stick Duo” with a capacity of 4 GB or
smaller. However, we do not guarantee the
operations of all the “Memory Stick Duo” media.
Notes
• This system supports only the reading of data on a
“Memory Stick Duo.” “Memory Stick Duo” formatting
and writing cannot be performed.
• This system does not support parallel high-speed
data transfer.
• Standard-size “Memory Stick” cannot be used in this
system.
• When using a “Memory Stick Duo,” make sure to
check correct insertion direction. Wrong usage may
cause trouble with the system.
• Do not place the “Memory Stick Duo” within the
reach of a small child to prevent him from swallowing
it by accident.
• Avoid removing the “Memory Stick Duo” from the
system while the system is reading data.
• Data may be damaged in such occasions:
– “Memory Stick Duo” is removed or the system is
turned off during a read operation.
– “Memory Stick Duo” is used in a location subject to
static electricity or electrical noises.
• We recommend that you save backup of the
important data.
• Do not bend, drop or apply strong shock to the
“Memory Stick Duo.”
• Do not disassemble or modify the “Memory Stick
Duo.”
• Do not allow the “Memory Stick Duo” to get wet.
• Do not use or store the “Memory Stick Duo” in a
location that is subject to:
– Extremely high temperature, such as in a car
parked in the sun
– Direct sunlight
– High humidity or places with corrosive substances
• Do not touch the “Memory Stick Duo” connector with
your finger or metallic objects.
• You cannot record, edit or delete data if you slide the
write-protect switch to LOCK.
• When you slide the write-protect switch of the
“Memory Stick Duo,” use a thin-pointed device.
• When you use a “Memory Stick Duo” without the
write-protect switch, be careful not to edit or delete
the data by accident.
• When you write on the memo area of the attached
label, do not write forcefully.
• When you carry or store the “Memory Stick Duo,” put
it in the case supplied with it.
Connector
Write-protect
switch
Memo area

12
Note on LCD panel
Some stationary blue, red or green dots may
appear on the monitor. These are called “bright
spots,” and can happen with any LCD. The LCD
panel is precision-manufactured with more than
99.99 % of its segments functional. However, it
is possible that a small percentage (typically 0.01
%) of the segments may not light up properly.
This will not, however, interfere with your
viewing.
Maintenance
Cleaning
• Clean the surface of the suction cup with a soft,
wet lint-free cloth if it becomes dirty and
attachment strength weakens.
Be sure to dry the suction cup before
reattaching.
• Clean the display window with a commercially
available cleaning cloth.
Note
If the suction cup leaves a trace on the windscreen,
wipe with water.
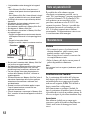
Fuse replacement
When replacing the fuse in the car battery
adapter, be sure to use one matching the
amperage rating stated on the original fuse (2.5
A). If the fuse blows, check the power
connection and replace the fuse. If the fuse blows
again after replacement, there may be an internal
malfunction. In such a case, consult your nearest
Sony dealer.
Warning
Never use a fuse with an amperage rating
exceeding the one supplied with the unit as this
could damage the unit.
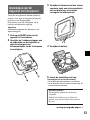
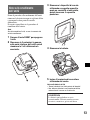
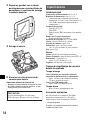
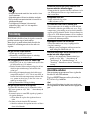
Notes on unit disposal
Remove the built-in lithium-ion battery when
disposing of the unit, and return the battery to a
recycling location.
The procedure for removing the battery is
explained below.
Note
Never disassemble the unit except when disposing of
it.
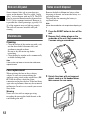
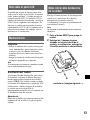
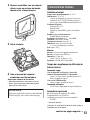
1 Press the RESET button to turn off the
unit.
2 Remove the 2 rubber plugs on the
underside of the unit, then remove the
2 screws using a screwdriver.
3 Detach the claws with a sharpened
object, such as a flat headed driver,
then remove the rear cover.

13
4 Remove the battery.
5 Insulate the connector terminal by
wrapping with a tape.
Notes on the lithium-ion battery
• Keep the battery out of the reach of children.
• Do not hold the battery with metallic tweezers,
otherwise a short-circuit may occur.
Specifications
Main unit
Operating temperature: 5 – 45 ºC (41 – 113 ºF)
Power requirements: DC 5 – 5.2 V
(from supplied 12 V/24 V car battery adapter
(negative ground (earth))/USB cable/AC adapter*)
Connection terminals:
DC IN 5-5.2V jack
USB jack
TMC aerial jack (TMC models only)
Memory card slot:
Memory Stick Duo slot
Reception frequency: 87.5 – 108.0 MHz
Speaker: 20 × 40 mm (0.8 × 1.6 in) oval speaker
Consumption current: Approx. 0.5 A
Dimensions: Approx. 108 × 82 × 48 mm
(4.3 × 3.2 × 1.9 in)
(w × h × d, protruding parts excluded)
Mass: Approx. 275 g (9.7 oz)
Monitor
System: Transmissive liquid crystal display
Drive system: a-Si TFT active matrix system
Dimensions: 3.5 in (4:3)
Approx. 70 × 53, 88 mm
(2.8 × 2.1, 3.5 in) (h × v, d)
Segment: 230,400 (960 × 240) dots
Built-in battery charging time/usage
time
Charging time
With the supplied car battery adapter/AC adapter*:
Approx. 3.5 hours (with unit turned on), or 2.5
hours (in standby mode)
With the supplied USB cable:
Approx. 4 hours (in standby mode)
Usage time
Up to 3.5 hours (depending on usage)
Optional accessories
Car Install Kit: XA-49FM
AC adapter: XA-AC13
Car battery adapter: XA-DC3
* Optional accessory
Design and specifications are subject to change
without notice.
WARNING
Battery may explode if mistreated.
Do not recharge, disassemble, or dispose of
in fire.
continue to next page t

14
Troubleshooting
The following checklist will help you remedy
problems you may encounter with your unit.
Before going through the checklist below, check the
connection and operating procedures.
Resetting the unit
If the navigation software freezes, try resetting
the unit.
Press the RESET button, then press ?/1 to turn
on the unit.
Note
After you reset the unit, it may take time to receive
GPS signals when turning on the unit.
The unit does not turn on.
t Charge the built-in battery.
t Check that the car battery adapter is securely
inserted into the cigarette lighter socket.
The built-in battery cannot be charged.
t Press ?/1 to turn on the unit, then press it again to
turn off the unit.
t If the car battery adapter is being used, disconnect
it from the cigarette lighter socket, then reconnect.
t The built-in lithium-ion battery can be charged at
temperatures between 5 – 45 ºC (41 – 113 ºF). The
battery may not be charged if the temperature
inside the unit increases because of direct sunlight
exposure, etc. This is not a malfunction.
t Turn on the computer during USB charge.
GPS signal cannot be received.
Firstly, read the GPS overview (page 4), then check the
GPS status by selecting “More…” in the top menu c
“GPS Status.”
• The system cannot receive GPS signals due to an
obstruction.
t Move your car to a place where signals can be
received clearly.
• There is an obstacle in front of the GPS aerial.
t Install the unit where the signal is not interrupted
by the body of the car, etc.
The car position on the map does not match
the current road.
The error margin of the signal from the GPS satellites
is too large. A maximum error margin of a few
hundred metres can exist.
• Halogenated flame retardants are not used in the
certain printed wiring boards.
• Use of rechargeable lithium ion batteries.
• Corrugated cardboard is used for the packaging
cushions.
• VOC (Volatile Organic Compound)-free vegetable
oil based ink is used for printing the carton.
Voice guidance cannot be heard.
The volume is set too low.
t Raise the volume (page 8).
The LCD is not displayed normally.
In high temperatures, the LCD may darken and not
display clearly. In low temperatures, afterimage may
occur on the LCD. These are not malfunctions, and the
LCD will return to normal when the temperature
returns to within the specified operating range.
The suction cup comes off the attachment
surface.
Attachment strength weakens if the surface of the
suction cup or attachment surface becomes dirty.
t Clean the surface of the suction cup and the
attachment surface with a soft, wet lint-free cloth
(page 12).
The demonstration mode starts automatically
even if no operation is performed.
t Turn off the auto demonstration mode by selecting
“More…” in the top menu c “Settings” c “General
Settings” c “Demo Mode.” Then, confirm that
“Demo Mode” is set to off.
Page is loading ...
Page is loading ...
Page is loading ...
Page is loading ...
Page is loading ...
Page is loading ...
Page is loading ...
Page is loading ...
Page is loading ...
Page is loading ...
Page is loading ...
Page is loading ...
Page is loading ...
Page is loading ...
Page is loading ...
Page is loading ...
Page is loading ...
Page is loading ...
Page is loading ...
Page is loading ...
Page is loading ...
Page is loading ...
Page is loading ...
Page is loading ...
Page is loading ...
Page is loading ...
Page is loading ...
Page is loading ...
Page is loading ...
Page is loading ...
Page is loading ...
Page is loading ...
Page is loading ...
Page is loading ...
Page is loading ...
Page is loading ...
Page is loading ...
Page is loading ...
Page is loading ...
Page is loading ...
Page is loading ...
Page is loading ...
Page is loading ...
Page is loading ...
Page is loading ...
Page is loading ...
Page is loading ...
Page is loading ...
Page is loading ...
Page is loading ...
Page is loading ...
Page is loading ...
Page is loading ...
Page is loading ...
Page is loading ...
Page is loading ...
Page is loading ...
Page is loading ...
Page is loading ...
Page is loading ...
Page is loading ...
Page is loading ...
Page is loading ...
Page is loading ...
Page is loading ...
Page is loading ...
Page is loading ...
Page is loading ...
Page is loading ...
Page is loading ...
Page is loading ...
Page is loading ...
Page is loading ...
Page is loading ...
Page is loading ...
Page is loading ...
Page is loading ...
Page is loading ...
Page is loading ...
Page is loading ...
Page is loading ...
Page is loading ...
Page is loading ...
Page is loading ...
Page is loading ...
Page is loading ...
Page is loading ...
Page is loading ...
Page is loading ...
Page is loading ...
Page is loading ...
Page is loading ...
Page is loading ...
Page is loading ...
Page is loading ...
Page is loading ...
Page is loading ...
Page is loading ...
Page is loading ...
Page is loading ...
Page is loading ...
Page is loading ...
-
 1
1
-
 2
2
-
 3
3
-
 4
4
-
 5
5
-
 6
6
-
 7
7
-
 8
8
-
 9
9
-
 10
10
-
 11
11
-
 12
12
-
 13
13
-
 14
14
-
 15
15
-
 16
16
-
 17
17
-
 18
18
-
 19
19
-
 20
20
-
 21
21
-
 22
22
-
 23
23
-
 24
24
-
 25
25
-
 26
26
-
 27
27
-
 28
28
-
 29
29
-
 30
30
-
 31
31
-
 32
32
-
 33
33
-
 34
34
-
 35
35
-
 36
36
-
 37
37
-
 38
38
-
 39
39
-
 40
40
-
 41
41
-
 42
42
-
 43
43
-
 44
44
-
 45
45
-
 46
46
-
 47
47
-
 48
48
-
 49
49
-
 50
50
-
 51
51
-
 52
52
-
 53
53
-
 54
54
-
 55
55
-
 56
56
-
 57
57
-
 58
58
-
 59
59
-
 60
60
-
 61
61
-
 62
62
-
 63
63
-
 64
64
-
 65
65
-
 66
66
-
 67
67
-
 68
68
-
 69
69
-
 70
70
-
 71
71
-
 72
72
-
 73
73
-
 74
74
-
 75
75
-
 76
76
-
 77
77
-
 78
78
-
 79
79
-
 80
80
-
 81
81
-
 82
82
-
 83
83
-
 84
84
-
 85
85
-
 86
86
-
 87
87
-
 88
88
-
 89
89
-
 90
90
-
 91
91
-
 92
92
-
 93
93
-
 94
94
-
 95
95
-
 96
96
-
 97
97
-
 98
98
-
 99
99
-
 100
100
-
 101
101
-
 102
102
-
 103
103
-
 104
104
-
 105
105
-
 106
106
-
 107
107
-
 108
108
-
 109
109
-
 110
110
-
 111
111
-
 112
112
-
 113
113
-
 114
114
-
 115
115
-
 116
116


Ask a question and I''ll find the answer in the document
Finding information in a document is now easier with AI
in other languages
- italiano: Sony NV-U52 Manuale utente
- français: Sony NV-U52 Manuel utilisateur
- español: Sony NV-U52 Manual de usuario
- Deutsch: Sony NV-U52 Benutzerhandbuch
- Nederlands: Sony NV-U52 Handleiding
- português: Sony NV-U52 Manual do usuário
- svenska: Sony NV-U52 Användarmanual
Related papers
Other documents
-
Eclipse AVN5495 Operating instructions
-
Clarion NAX983HD Owner's manual
-
Becker 7929 Owner's manual
-
Eclipse AVN 5500 Specification
-
Peugeot Nuvi 205 Series Owner's manual
-
Navman DRIVEDUO / DRIVE DUO SUV User manual
-
Clarion MAX983HD User manual
-
Eclipse - Fujitsu Ten AVX5000 User manual
-
Eclipse RMC105 Specification
-
Becker Professional 50 Owner's manual