Canton Chrono SL 596.2 Owner's manual
- Category
- Home cinema systems
- Type
- Owner's manual
Page is loading ...
Page is loading ...
Page is loading ...
Page is loading ...
Page is loading ...
Page is loading ...
Page is loading ...
Page is loading ...
Page is loading ...
Page is loading ...

Movie
Nederlands
English
Français
Español
Italiano
Русский
Svenska
Polski

12
ENG
Contents
Safety advice ................................ Page 15
Positioning in room ...................... Page 17
Setup and installation ................... Page 18
Connection subwoofer ................. Page 20
Connection of satellites ................. Page 23
Configuration ............................... Page 23
Operation ..................................... Page 24
Breaking in ................................... Page 26
Troubleshooting ........................... Page 26
Guarantee .................................... Page 39
ENG
Welcome to the world of pure music
We are delighted that you have chosen a Canton loudspeaker. Our products combine high
quality components with many years of development experience and meticulous production
methods. In order to get the best out of your loudspeaker you need to observe a few points,
as detailed in the Operating Instructions.
We hope you enjoy listening to pure music!
The user is responsible for ensuring
that the Movie System is correctly
positioned and connected. Canton
cannot accept any responsibility
for damages or accidents caused
by inappropriate positioning or
connection.
Page is loading ...
Page is loading ...

15
ENG
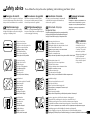
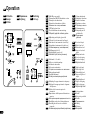
Do not use aggressive, alcohol-based or abrasive cleaning agents
FRA
Ne pas utiliser des produits agressifs, abrasifs ou contenant de l‘alcool
ESP
No utilice agentes agresivos de base alcohólica ni abrasivos para su limpieza
ITA
Per la pulizia non utilizzare sostanze detergenti aggressive, contenenti alcool o abrasive
RUS
При очистке не применять агрессивных, алкоголесодержащих или абразивных средств
SWE
Använd inga aggressiva, alkoholhaltiga eller skurande rengöringsmedel
NED
Voor de reiniging geen agressieve, alcoholhoudende of schurende middelen inzetten
POL
Do pielęgnacji nie należy używać środków korodujących, z zawartością alkoholu lub do szorowania
ENG
Choose a level surface
FRA
Choisir une surface plane
ESP
Colóquelos sobre una superficie lisa
ITA
Scegliere una superficie piana
RUS
Подыщите ровную основу
SWE
Välj ett jämnt underlag
NED
Kies een effen ondergrond
POL
Należy wybrać równe podłoże
ENG
Avoid moisture*
FRA
Eviter toute exposition à l‘humidité
ESP
Evite la humedad
ITA
Evitare l’umidità
RUS
Избегать влаги
SWE
Undvik fuktighet
NED
Vochtigheid vermijden
POL
Należy unikać wilgoci
ENG
Avoid vibrations
FRA
Eviter toute secousse
ESP
Evite vibraciones
ITA
Evitare gli urti
RUS
Избегать вибраций
SWE
Undvik vibrationer
NED
Trillingen vermijden
POL
Należy unikać wstrząsów
ENG
Keep away from heat sources
FRA
Placer à distance des sources de chaleur
ESP
Manténgalos alejados de cualquier fuente de calor
ITA
Tenere lontano dalle fonti di calore
RUS
Держать на расстоянии от источников тепла
SWE
Håll avstånd från värmekällor
NED
Afstand t.o.v. warmtebronnen
POL
Należy zachować odpowiedni odstęp od wszelkich źródeł ciepła
ENG
Do not open housing
FRA
Ne pas ouvrir le coffret
ESP
No abra la carcasa
ITA
Non aprire il l‘alloggiamento
RUS
Не открывать корпус
SWE
Öppna inte höljet
NED
Huis niet openen
POL
Nie należy otwierać obudowy
ENG
Avoid direct sunlight
FRA
Eviter toute exposition directe au soleil
ESP
Evite la luz solar directa
ITA
Evitare l’esposizione diretta ai raggi solari
RUS
Избегать прямого попадания солнечных лучей
SWE
Undvik direkt solljus
NED
Directe bezonning vermijden
POL
Należy unikać bezpośredniego oddziaływania promieni słonecznych
FRA
Consignes de sécurité
Prière de respecter les consignes de sécurité pour
le choix de l‘emplacement de votre Movie System,
ainsi que lors de son utilisation et de son entretien!
RUS
Указания по технике
безопасности
Пожалуйста, следуйте указаниям по тех-
нике безопасности при выборе соответ-
ствующего места установки для Вашего
сабвуфера, а также при управлении и
уходе за ним!
ESP
Precauciones de seguridad
Para ubicar correctamente su Movie System,
así como para el cuidado y manejo del mismo,
observe las precauciones de seguridad.
SWE
Säkerhetsanvisningar
Observera säkerhetsanvisningarna när du väljer
rätt plats för ditt Movie-system och när det gäller
rengöring och betjäning av det!
ITA
Avvertenze di sicurezza
Osservare le presenti avvertenze di sicurezza nella
scelta della posizione giusta del Sistema Movie,
nella sua cura e gestione!
POL
Wskazówki dotyczące
bezpieczeństwa
Przy doborze odpowiedniego miejsca oraz odpowiedniej
pielęgnacji i obsługi Państwa
systemu
Movie należy prze-
strzegać wskazówek dotyczących bezpieczeństwa!
NED
Veiligheidsaanwijzingen
Let a.u.b. op de veiligheidsaanwijzingen bij de
keuze van de juiste plaats voor uw Moviesysteem
en diens verzorging en bediening!
ENG
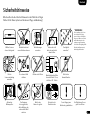
Safety advice Please follow the safety advice when positioning and maintaining your Movie System.
ENG
Protect against extreme cold
FRA
Ne pas exposer à de basses températures
ESP
Protéjalos del frío extremo
ITA
Proteggere da temperature estremamente basse
RUS
Защитить от внешнего холода
SWE
Skyddas mot extrem kyla
NED
Tegen extreme koude beveiligen
POL
Należy chronić przed ekstremalnie niskimi temperaturami
ENG
*WARNING:
To reduce the risk of fire or
electrical shock, do not
expose this product to rain
or moisture. The product
must not be exposed to
dripping and splashing and
no objects filled with
liquides such as a vase of
flowers should be placed
on the product.

16
ENG
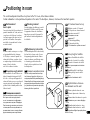
Maintain a minimum distance of 10 cm from walls and furniture and
1 m from tube TV sets
FRA
Distance minimum des murs et meubles: 10 cm, des téléviseurs à
tubes: 1 mètre
ESP
Distancia mínima a la pared y los muebles: 10 cm; a televisores de
tubo (CRT): 1 metro
ITA
Distanza minima da pareti e mobili: 10 cm, dai televisori a tubo
catodico: 1 metro
RUS
Минимальное расстояние до стен и мебели: 10 см, до ламповых
телевизоров: 1 метр
SWE
Minsta avstånd till väggar och möbler: 10 cm, till rör-TV: 1 meter
NED
Minimumafstand tegenover muren en meubels: 10 cm, tegenover
buistelevisie: 1 meter
POL
Minimalna odległość od ścian i mebli: 10 cm, od telewizora kineskopo-
wego: 1 metr
ENG
Safety advice
ENG
Do not reach inside the subwoofer
FRA
Ne pas introduire la main dans le subwoofer
ESP
No toque el subwoofer
ITA
Non toccare le parti sensibili del subwoofer
RUS
Внутрь сабвуфера не залазить
SWE
Grip inte in i subwoofern
NED
Niet in de subwoofer grijpen
POL
Nie należy dotykać membrany subwoofera
ENG
Unplug device during thunderstorms
FRA
Débrancher la prise secteur en cas d‘orage
ESP
En caso de tormenta desconecte la clavija del enchufe
ITA
Sconnettere la spina in caso di temporale
RUS
Во время грозы вытащить из розетки штепсельную вилку
SWE
Dra ut stickkontakten vid åskväder
NED
Netstekker bij onweer uittrekken
POL
Podczas burzy wtyczkę należy wyciągnąć z gniazda sieciowego
ENG
Never touch the power cable with wet hands
FRA
Ne pas toucher le câble secteur avec les mains mouillées
ESP
No toque el cable de alimentación con las manos mojadas
ITA
Non toccare il cavo con le mani bagnate
RUS
Не прикасаться к кабелю влажными руками
SWE
Ta inte i nätkabeln med våta händer
NED
Netkabel niet met natte handen vastnemen
POL
Kabla zasilającego nie należy dotykać mokrymi dłońmi
ENG
Do not discard in household rubbish
FRA
Ne pas jeter dans les ordures ménagères
ESP
No tirar a la basura doméstica
ITA
Non gettare tra i rifiuti domestici
RUS
Не кидать в бытовые отходы
SWE
Får inte kastas i hushållssoporna
NED
Niet bij het huisvuil gooien
POL
Nie należy wyrzucać do pojemników ze zwykłymi odpadami
ENG
Do not cover the subwoofer or place anything on it
FRA
Ne pas couvrir le subwoofer et ne rien poser dessus
ESP
No cubra ni ponga objetos sobre el subwoofer
ITA
Non porre oggetti sul subwoofer, né coprirlo
RUS
Сабвуфер ничем не покрывать и ничего на него не ставить
SWE
Täck inte över subwoofern och ställ inget på den
NED
De subwoofer niet afdekken en niets erop stellen
POL
Subwoofera nie należy przykrywać ani niczego na nim stawiać
ENG
In the case of overload turn the volume down
FRA
En cas de saturation, baisser le volume sur l’ampli tuner
ESP
En caso de sobrecarga, baje el sonido en el aparato de mando
ITA
In caso di sovraccarico abbassare il dispositivo di comando
RUS
При перегрузке снизить громкость на устройстве управления
SWE
Dra ner volymen på styrenheten vid överbelastning
NED
Bij overbelasting het besturingsapparaat zachter zetten
POL
W przypadku przeciążenia należy przyciszyć urządzenie sterujące
ENG
Ensure easy access to the mains plug
FRA
Assurer le libre accès à la prise secteur
ESP
Asegúrese un fácil acceso al enchufe
ITA
Garantire il libero accesso alla spina
RUS
Обеспечить свободный доступ к штепсельной вилке
SWE
Se till att stickkontakten är åtkomlig
NED
Vrije toegang tot de netstekker garanderen
POL
Należy umożliwić dostęp do wtyczki sieciowej
FRA
Consignes de sécurité
SWE
Säkerhetsanvisningar
RUS
Указания по технике
безопасности
ESP
Precauciones de seguridad
NED
Veiligheidsaanwijzingen
ITA
Avvertenze di sicurezza
POL
Wskazówki dotyczące
bezpieczeństwa

17
ENG
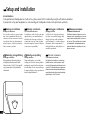
Positioning in room
FRA
Positionnement
dans la pièce
L’enceinte centrale doit être positionnées à
proximité immédiate de l’écran, au-dessus
ou au-dessous du téléviseur. Les subwoo-
fers Canton peuvent être placés en tout
point du local d‘audition. Leur emplace-
ment idéal est cependant entre les deux
enceintes frontales.
RUS
Размещение в комнате
Центральный громкоговоритель должен
быть расположен непосредственно
возле телевизионного изображения –
под экраном или над ним. Сабвуферы
Canton можно произвольно располагать
в помещении. Все же идеальным поло-
жением является место между обоими
фронтальными громкоговорителями.
ESP
Ubicación
El altavoz central conviene que se coloque
en la proximidad directa de la imagen
de TV, debajo o encima del aparato. Los
subwoofer de Canton se pueden colocar
en cualquier lugar de la sala de audición,
aunque lo ideal es ubicarlos
entre los dos altavoces frontales.
SWE
Placering i rummet
Centerhögtalaren ska ställas upp i omedel-
bar närhet till TV-bilden, under eller ovan-
för apparaten. Subwoofers från Canton
kan placeras var som helst i rummet. En
plats mellan de båda fronthögtalarna är
dock idealisk.
ITA
Disposizione negli ambienti
Si raccomanda di collocare il diffusore cen-
trale nelle immediate vicinanze della TV,
al di sotto o al di sopra dell’apparecchio. I
subwoofer Canton possono essere disposti
a proprio piacimento negli ambienti. La
posizione ideale è tuttavia quella tra i due
diffusori frontali.
NED
Positionering in de ruimte
De centerluidspreker moet in directe nabij-
heid van het tv-scherm, onder of boven
het apparaat geplaatst worden. Canton-
subwoofers kunnen op willekeurige wijze
in de ruimte gepositioneerd worden.
Ideaal is echter een plaats tussen beide
frontluidsprekers.
POL
Ustawienie w pomieszczeniu
Głośniki należy zamocować w uchwy-
tach ściennych zgodnie z ilustracją, a
następnie sprawdzić ich prawidłową pozycj.
Subwoofery rmy Canton można ustawić w
pomieszczeniu w sposób dowolny. Idealne
jest jednakże umiejscowienie pomiędzy
dwoma głośnikami przednimi.
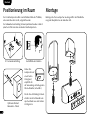
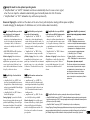
The centre loudspeaker should be set up close to the TV screen, either above or below.
Canton subwoofers can be positioned anywhere in the room. The ideal place, however, is between the two front speakers.
ENG
Optimal distance between
the subwoofer and the wall
FRA
Distance optimale subwoofer – mur
ESP
Distancia óptima entre el subwoofer y
la pared
ITA
Distanza ottimale tra subwoofer e parete
RUS
Оптимальное расстояние сабвуфер
– стена
SWE
Optimalt avstånd subwoofer – vägg
NED
Optimale afstand subwoofer – wand
POL
Optymalna odległość pomiędzy subwo-
oferem i ścianą
ENG
Set-up height of satellites
FRA
Hauteur d’installation des satellites
ESP
Altura de colocación de los satélites
ITA
Altezza di collocamento dei satelliti
RUS
Высота размещения сателлитных
динамиков
SWE
Uppställningshöjd för satelliterna
NED
Plaatsingshoogte van de satelliet-
luidsprekers
POL
Wysokość ustawienia satelit
ENG
5.1 Surround sound set-up
FRA
Utilisation en mode 5.1 Surround
ESP
5.1 Disposición en sistema Surround
ITA
Disposizione surround 5.1
RUS
Размещение системы
сурраунда 5.1
SWE
5.1 Surround-uppställning
NED
5.1 Surround-opstelling
POL
5.1 Ustawienie w systemie surround

18
ENG
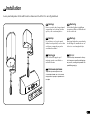
Setup and installation
Use of absorbers
If you position your loudspeaker on a hard surface, please ensure that it is isolated by using the self-adhesive absorbers.
If you wish to set up your loudspeaker as a freestanding unit, loudspeaker stands can be purchased separately
FRA
Montage et installation
Montage des absorbeurs
Si les enceintes sont posées sur une surface
dure, il est recommandé d‘utiliser les ab-
sorbeurs de silicone fournis avec l‘enceinte
(voir schéma). Pour le positionnement au
milieu de la pièce, il existe des piètements
dans le commerce spécialisé.
ESP
Montaje e instalación
Colocación de absorbedores
Si sus altavoces están colocados sobre una
superficie dura, se recomienda utilizar el
absorbedor de silicona que se incluye en
el suministro (véase fig.). Para el montaje
libre puede adquirir el soporte de altavoces
en un comercio especializado.
ITA
Montaggio e installazione
Montaggio absorber
Se i diffusori sono disposti su una super-
ficie dura, si raccomanda l’impiego degli
absorber in silicone forniti in dotazione
(vedi illustrazione). Se si desidera disporre
liberamente i diffusori negli ambienti, i
relativi piedistalli sono disponibili presso i
rivenditori specializzati.
POL
Montaż i ustawienie
Zastosowanie absorberów
Jeśli głośniki ustawiane są na twardym
podłożu zaleca się zastosowanie załą-
czonych silikonowych absorberów (patrz
rysunek). W celu dowolnego ustawienia w
pomieszczeniu można zastosować dostęp-
ne w sklepach specjalistycznych podstawy
głośnikowe z serii LS Canton.
RUS
Сборка и установка
Установка поглотителей
Если Ваши громкоговорители стоят на
твердой основе, рекомендуется исполь-
зовать любые силиконовые поглотите-
ли (см. рис.). Для свободной установки
в помещении в специализированном
магазине Вы можете приобрести стен-
ды для колонок.
SWE
Montering och uppställning
Montering av absorbers
Står högtalarna på ett hårt underlag är
det lämpligt att använda medföljande
silikon-absorbers (se bild). För fri uppställ-
ning i rummet finns det högtalarstativ i
fackhandeln.
NED
Montage en opstelling
Montage absorbers
Staan uw luidsprekers op een harde
ondergrond is het aan te raden gebruik te
makenvan de ingeslotensilicone-absorbers
(zie afbeelding). Voor de vrije opstelling in
de ruimte verkrijgt u in de gespecialiseerde
handel luidsprekerstaanders.

19
ENG
Installation
Secure your loudspeaker to the wall bracket as shown and check that it is correctly positioned.
FRA
Montage
Fixez vos enceintes dans le support mural
comme indiqué sur le schéma et vérifiez
qu‘elles y sont correcte ment placées.
RUS
Настенное крепление
Закрепите громкоговоритель в на-
стенном креплении, как это показано
на рисунке, и проверьте правильность
посадки.
ESP
Montaje
Fije sus altavoces en el soporte para la
instalación en la pared tal y como se indica
en la figura y compruebe que queden
correctamente asentados.
SWE
Montering
Sätt fast dina högtalare i vägghållarna
såsom visas på bilden och kontrollera att
de sitter som de ska.
ITA
Montaggio
Fissare i diffusori al supporto per il
montaggio a parete come illustrato e
verificarne la tenuta.
NED
Montage
Bevestig uw luidsprekers overeenkomstig
de afbeelding in de wandhouder en con-
troleer of ze correct aangebracht zijn.
POL
Montaż
Głośniki należy zamocować w uchwy-
cie ściennym w sposób przedstawiony
na rysunku, a następnie sprawdzić ich
prawidłową pozycję.

20
ENG
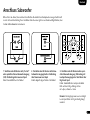
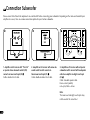
Connection Subwoofer
1. Amplifier or AV receiver with “Pre-Out”
or special stereo subwoofer outlet (LFE):
connect via Low Level Input (ill.
1
)
Cable: standard cinch cable
3. Amplifier or AV receiver without special
subwoofer outlet: connect with loudspeaker
outlets on amplifier via High Level Input
(ill.
3
)
Cable: standard speaker cable
Ensure correct polarity:
red = plus, black = minus
Note:
The Low Level and High Level Inputs may
not be used at the same time!
31
SUB
2
Please ensure that all electrical components are switched off before connecting your subwoofer. Depending on the make and model of your
amplifier or receiver, there are various connection options for your Canton subwoofer.
2. Amplifier or AV receiver with mono sub-
woofer outlet socket: connect via
Mono Low Level Input (ill.
2
)
Cable: double insulated cinch cable
Page is loading ...
Page is loading ...

23
NED
Aansluiting
satellietluidsprekers
Kabel: in de handel gebruikelijke luid-
sprekerkabel
Op de juiste polariteit letten a.u.b.:
rood = pluspool, zwart = minpool
NED
Configuratie
Voor een optimale klankbeleving moeten
de luidsprekers van uw Canton Moviesys-
teem aan de ruimtelijke omstandigheden
aangepast worden (set-up). Raadpleeg
hiervoor ook de gebruiksaanwijzing van
uw surroundversterker.
POL
Podłączenie satelit
kabel: dostępny w sprzedaży kabel
głośnikowy
Należy zwrócić uwagę na podłączenie do
odpowiednich biegunów:
czerwony = plus, czarny = minus
POL
Konguracja
W celu uzyskania optymalnej jakości
brzmienia głośniki systemu Movie rmy
Canton należy dopasować do warunków
pomieszczenia (set-up). W tym celu zaleca-
my również skorzystanie z instrukcji obsługi
wzmacniacza surround.
SWE
Anslutning satelliterna
Kabel: vanlig högtalarkabel
Beakta polariteten:
röd = plus, svart = minus
SWE
Konfiguration
Högtalarna i ditt Canton Movie-system
måste anpassas till förutsättningarna i
rummet för att du ska få bästa möjligt
klangupplevelse (setup). Läs även bruksan-
visningen för din surroundförstärkare.
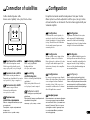
ENG
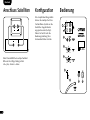
Connection of satellites
ENG
Configuration
Cable: standard speaker cable
Ensure correct polarity: red = plus, black = minus
For optimal surround sound the loudspeakers from your Canton
Movie System need to be adjusted to suit the space (set-up). Advice
on how to do this can be found in the instructions supplied with your
Surround amplifier.
FRA
Branchement des satellites
Câble: câble de haut-parleur courant
Veiller à respecter la polarité correcte:
rouge = pôle positif, noir = pôle négatif
FRA
Configuration
Pour obtenir une sonorité optimale, les
enceintes de votre Movie System Canton
doivent être adaptées à l’espace d’audition
(set-up). Consultez la notice d’utilisation
de votre ampli surround pour savoir
comment procéder.
ESP
Conexión de los satélites
Cable: Cable corriente para altavoces
Compruebe que la polaridad es la correcta:
rojo = positivo (+), negro = negativo (-)
ESP
Configuración
Para un resultado sonoro óptimo, deben
adaptarse los altavoces de su Canton
Movie-System a las condiciones de la sala
(set-up) Consulte también para ello las
instrucciones de manejo de sus amplifica-
dor surround.
ITA
Connessione dei satelliti
Cavo: comune cavo per diffusori
Selezionare la polarità giusta:
rosso = più, nero = meno
ITA
Configurazione
Per creare un’esperienza sonora ottimale, i
diffusori del sistema Canton Movie devono
essere configurati in base all’ambiente
circostante (set up). A tale scopo si rac-
comanda di consultare anche le istruzioni
d’uso dell’amplificatore surround.
RUS
Подключение
сателлитных динамиков
Кабель: стандартный кабель для гром-
коговорителей
Пожалуйста, следите за правильной
полярностью:
красный = плюс, черный = минус
RUS
Конфигурация
Для оптимального звучания необходимо
согласовать громкоговорители Вашей
системы Canton Movie с условиям поме-
щения (Установка). Для этого прокон-
сультируйтесь также с руководством
по эксплуатации Вашего усилителя
системы сурраунда.

24
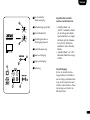
ENG
Operation
FRA
Utilisation
ESP
Manejo
ITA
Utilizzo
RUS
Управление
SWE
Betjäning
NED
Bediening
POL
Obsługa
ENG
1 On/Off power switch
FRA
1 Interrupteur ON-OFF alimentation secteur
ESP
1 Interruptor de alimentación
ITA
1 Interruttore alimentazione elettrica
RUS
1
Выключатель электроснабжения
SWE
1 Till/Från-brytare ström
NED
1 In-/uitschakelaar stroomvoorziening
POL
1
Włącznik/wyłącznik zasilania prądem
ENG
2 Operating mode display (green/red)
FRA
2 Témoin de fonctionnement (vert/rouge)
ESP
2 Indicador de funcionamiento (verde/rojo)
ITA
2 Segnalatore funzionamento (verde/rosso)
RUS
2
Рабочий индикатор (зеленый/красный)
SWE
2 Driftlampa (grön/röd)
NED
2 Bedrijfsdisplay (groen/rood)
POL
2
Wskaźnik trybu (zielony/czerwony)
ENG
3 Automatic “on” switch
FRA
3 Mise en circuit automatique
ESP
3 Activación automática
ITA
3 Accensione automatica
RUS
3
Устройство автоматического включения
SWE
3 Inkopplingsautomatik
NED
3 Inschakelautomaat
POL
3
Funkcja automatycznego włączania
ENG
4 Adjusting the upper transmission frequency
FRA
4 Réglage de la marge supérieure de la gamme
des fréquences
ESP
4 Ajuste de la frecuencia superior de
transmisión
ITA
4 Impostazione della frequenza di trasmissione
superiore
RUS
4
Настройка верхней передаваемой частоты
SWE
4 Inställning av den övre delningsfrekvensen
NED
4 Instelling van de bovenste overdracht-
frequentie
POL
4
Ustawienie górnej częstotliwości przejściowej
ENG
5 Volume adjustment
FRA
5 Adaptation du volume
ESP
5 Ajuste del volumen
ITA
5 Regolazione volume
RUS
5
Регулятор громкости
SWE
5 Volymanpassning
NED
5 Aanpassing van de
geluidssterkte
POL
5
Dopasowanie
głośności
ENG
6 Low Level Input
FRA
6 Entrée low level
ESP
6 Entrada Low Level
ITA
6 Ingresso Low Level
Input
RUS
6
Вход «Low Level»
SWE
6 Low-Level-ingång
NED
6 Low-level-ingang
POL
6
Wejście low-level
ENG
7 High Level Input
FRA
7 Entrée high level
ESP
7 Entrada High Level
ITA
7 Ingresso High Level
Input
RUS
7
Вход «High Level»
SWE
7 High-Level-ingång
NED
7 High-level-ingang
POL
7
Wejście high-level
ENG
8 Locking feature
FRA
8 Fusible
ESP
8 Protección por fusible
ITA
8 Fusibile
RUS
8
Предохранитель
SWE
8 Säkring
NED
8 Zekering
POL
8
Bezpiecznik
7
7

25
ENG
Amplifier mode has two optional operating modes
• “Amplier Mode” on “AUTO”: Subwoofer switches on automatically when it receives a music signal;
when the music stops the subwoofer automatically goes into standby mode after 5 to 15 minutes.
• “Amplier Mode” on “ON”: Subwoofer stays switched on permanently
Beware of clipping! Be careful to set the volume at the correct level, particularly when dealing with low power amplifiers,
to avoid damaging the loudspeakers. If distortion occurs, turn the volume down immediately.
FRA
Mode d‘amplification pour choisir
entre deux types de fonctionnement
• AMPLIFIER MODE sur AUTO: Le
subwoofer est automatiquement mis en
circuit à la réception du signal musical;
si la musique s‘arrête, le subwoofer se
met en mode standby au bout de 5 à 15
minutes.
• AMPLIFIER MODE sur ON: Le subwoo-
fer demeure toujours en circuit.
Attention clipping! Faites attention au
réglage du volume, surtout avec les
amplificateurs peu puissants, car un niveau
sonore trop élevé peut détériorer les en-
ceintes. Baissez immédiatement le volume
dès qu‘il y a distorsion du son.
ESP
Amplifier Mode para elegir entre
dos modos de funcionamiento
• “Amplier Mode” en “AUTO”: El
subwoofer se activa automáticamente
cuando detecta una señal de audio; si la
música para, el Subwoofer pasa automá-
ticamente a modo standby en un plazo
de 5 a 15 minutos.
• “Amplier Mode” en “ON”: El sub-
woofer permanece siempre encendido
¡Cuidado, clipping! Sobre todo, si utiliza
un amplificador de baja potencia, com-
pruebe que el volumen está correctamente
ajustado ya que, si no es así, podría dañar
los altavoces. Si hubiera distorsiones, baje
el volumen.
ITA
Amplifier Mode con possibilità di
scelta tra due modalità di funzionamento
• “Amplier Mode” su “AUTO”: il
subwoofer si attiva automaticamente in
caso di segnale musicale in arrivo; quan-
do il segnale si interrompe, il subwoofer
va automaticamente in stand-by dopo
5 - 15 minuti.
• “Amplier Mode” su “ON”: il subwoo-
fer è sempre accesso
Attenzione al clipping! Prestare attenzione
all’installazione corretta del volume degli
amplificatori meno potenti. I diffusori
possono infatti danneggiarsi. Se si verifi-
cano distorsioni, abbassare subito il
volume.
SWE
Amplifier-läge för val mellan två
driftsätt
• „Amplier Mode“ på „AUTO“: Sub-
woofern slås automatiskt på när en mu-
siksignal skickas. Slutar musiken övergår
subwoofern automatiskt till standby-läge
efter 5 till 15 minuter.
• „Amplier Mode“ på „ON“: Subwoo-
fern är alltid påslagen.
Varning clipping! I synnerhet vid förstär-
kare med svag prestanda ska man ge akt
på rätt volyminställning, eftersom högta-
larna annars kan skadas. Dra omedelbart
ner volymen om distorsion uppträder.
NED
Amplifier-modus om tussen twee
modi te kiezen.
• „amplier-modus“ op „AUTO“: De
subwoofer wordt bij voorhanden zijnd
muzieksignaal automatisch inge schakeld;
stopt de muziek, gaat de subwoofer na
5 tot 15 minuten automatisch naar de
standby-modus.
• „amplier-modus“ op „ON“: De sub-
woofer blijft steeds ingeschakeld.
Attentie: clipping! Let vooral bij capaci-
teits arme versterkers op de juiste geluids-
volume-instelling daar de luidsprekers
anders beschadigd kunnen worden. Zet
het volume a.u.b. zachter als vervormin-
gen optreden.
RUS
Режим «Amplifier» (усилитель)
для выбора между двумя режимами
работы
• Режим «Amplifier» установлен на
«AUTO»: Сабвуфер автоматически
включается при появлении входящего
музыкального сигнала; если музыка
прекращается, сабвуфер автомати-
чески переходит в ждущий режим
(«Standby») через 5-15 минут.
• Режим «Amplifier» установлен на
«ON»: Сабвуфер постоянно включен.
Осторожно: обрезание звуков!
В особенности при использовании ма-
лых по мощности усилителей следите
за правильной установкой звука, так
как громкоговорители могут повре-
диться. Если возникает искажение
звука, пожалуйста, немедленно убавьте
громкость.
POL
Amplier Mode do wyboru pomiędzy dwoma trybami eksploatacji
• „Amplier Mode“ w pozycji „AUTO“: Subwoofer włącza się automatycznie po otrzymaniu
sygnału muzycznego; 5 do 15 minut po wyłączeniu muzyki subwoofer automatycznie
przełącza się w tryb standby.
• „Amplier Mode“ w pozycji „ON“: Subwoofer jest cały czas włączony
Uwaga Clipping! Szczególnie w przypadku wzmacniaczy o mniejszej mocy należy zwrócić
uwagę na odpowiednią głośność, w przeciwnym razie głośniki mogą ulec uszkodzeniu.
Jeśli dźwięk ulegnie zniekształceniu należy natychmiast zmniejszyć głośność.

26
Maximum sound quality requires a breaking-in time
of 15 - 20 operating hours.
• During this time operate the loudspeaker at normal volume
• Avoid high noise levels • Listen to a variety of music
ENG
Breaking in
FRA
Rodage
Phase de rodage jusqu‘à épanouissement
maximal des caractéristiques acoustiques:
15 à 20 heures de fonctionnement.
• Ecoute uniquement à volume normal
pendant cette phase
• Evitez les niveaux de volume élevés
• Ecoutez différents types de musique
ESP
Rodaje
Fase inicial de rodaje hasta alcanzar la
máxima calidad de sonido: 15 - 20 horas de
funcionamiento.
• Durante este periodo utilice los altavoces a
un volumen normal
• Evite niveles extremadamente altos
• Escuche música variada
ITA
Messa in funzione
Fase di messa in funzione fino al raggiungi-
mento delle massime prestazioni sonore:
15 - 20 ore di funzionamento.
• Durante tale fase impostare un volume
normale
• Evitare picchi sonori estremi
• Riprodurre materiali musicali dei generi
più vari
RUS
Настройка
Фаза настройки до полного проявления
качеств звука: 15 - 20 часов работы.
• Пожалуйста, в течение этого времени
слушайте музыку на нормальной
громкости
• Избегайте очень высоких уровней звука
• Слушайте различную музыку
SWE
Inkörning
Inkörningsfas fram till dess att de maximala
klangegen skaperna kommer till sin rätt:
15 - 20 uppspelningstimmar.
• Lyssna på normal volym under denna tid
• Undvik extremt höga ljudnivåer
• Lyssna till olika typer av musik
NED
Inspelen
Inspeelfase tot de ontplooiing van de
maximale klankeigenschappen:
15 - 20 bedrijfsuren.
• In deze periode met normaal geluidsvolume
luisteren a.u.b.
• Extreem hoog geluidsvolume vermijden
• Verschillende soorten muziek luisteren
POL
Wygrzewanie
Faza wygrzewania niezbędna do osią-
gnięcia możliwie najlepszych właściwości
brzmienia: 15
-
20 godzin eksploatacyjnych.
• W tym czasie nie należy stosować zbyt
wysokiego poziomu głośności
• Należy unikać ekstremalnie wysokich
poziomów dźwięku
• Zaleca się słuchanie najróżniejszych
materiałów muzycznych
SWE
Felsökning
Nedan finner du en översikt över de
problem som oftast förekommer. Om du
har fler frågor vänd dig till din Canton-
återförsäljare, kontakta vår Service hotline
på tel + 49 (0) 6083 / 287-57 eller skicka
ett e-mail till [email protected].
FRA
Diagnostic des défauts
Vous trouverez ici un tableau synoptique
des problèmes les plus fréquents. Si vous
avez d’autres questions, adressez-vous à
votre revendeur Canton, contactez notre
hotline au n° +49 (0) 6083 / 287-57 ou
envoyez un e-mail à [email protected].
ESP
Detección de fallos
A continuación se adjunta una lista de los
problemas más habituales que pueden
presentarse. En caso de duda, diríjase a su
comercio especializado Canton, contacte
con nuestro servicio Service Hotline en el
Tel. +49 (0) 6083 / 287-57 o envíenos un
correo electrónico a [email protected].
ITA
Individuazione degli errori
Di seguito è riportata una panoramica
degli inconvenienti più frequenti. Qualora
abbiate altre domande, vi preghiamo di
rivolgervi al vostro rivenditore specia-
lizzato Canton, di contattare il nostro
servizio di assistenza telefonica al numero
+49 (0) 6083 / 287-57 o di inviarci una
e-mail all’indirizzo [email protected].
RUS
Поиск неисправностей
Ниже Вы найдете обзор наиболее часто
встречающихся проблем. Если у Вас
возникнут дальнейшие вопросы, об-
ратитесь, пожалуйста, к Вашему дилеру
Canton, свяжитесь с нами по линии
прямой связи для клиентов по теле-
фону +49 (0) 6083 / 287-57 или пришлите
нам сообщение по адресу электронной
почты: inf[email protected].
NED
Foutopsporing
Ingesloten vindt u een overzicht van de
problemen die het vaakst optreden. U
hebt nog meer vragen? Wendt u zich
dan a.u.b. tot uw Canton-specialist,
contacteer onze service hotline onder
tel.: +49 (0) 6083 / 287-57 of zend een
e-mail naar [email protected].
POL
Rozwiązywanie problemów
Poniżej przedstawiamy listę najczęściej
występujących problemów. W razie
dodatkowych pytań, prosimy o kontakt
ze sklepem specjalistycznym Cantona,
naszą infolinią pod numerem telefonu
+49 (0) 6083 / 287-57, lub o przesłanie
e-maila na adres [email protected].
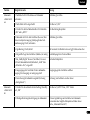
ENG
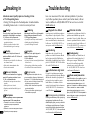
Troubleshooting
Here is an overview of the most common problems. If you have
any further questions please contact your Canton dealer, call our
Service Hotline on +49 (0) 6083 / 287 57 or send us an e-mail at

27
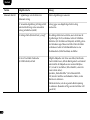
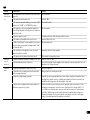
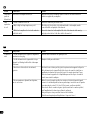
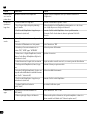
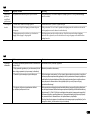
Problem Possible cause Solution
Subwoofer
does not turn
on
1. The power cable is not connected from the socket to the
subwoofer
Check connection
2. The power has not been turned on Switch to “ON”
3. The switch for automatic switching on is not in the “ON”
position or the “AUTO” or “AUTO HIGH” positions
Check switch setting
4. The subwoofer is not connected with the amplifier (re-
ceiver) through its speaker outlet (High Level) or subwoofer
outlet (cinch) cable
Check connection
5. Defective signal line (cinch) Test with another cinch cable and change cable if necessary
6. The volume of the amplifier has been set too low Increase volume level to test
7. With a “Dolby Digital” receiver (amplier): the receiver is
not set for subwoofer operation (operating method “Small”
or “ActiveSub = On”)
Check operating mode
8. The outlet level on the amplifier is set too low for the
subwoofer outlet (cinch outlet)
Increase the outlet level of the amplifier
9. The microfuse in the subwoofer has blown (fused) Get a specialist to change the microfuse
Subwoofer
does not
switch off
1. Switch for automatic switching on (Standby) set to “ON” Switch to “Auto” or “OFF”
2. Constant humming at inlet of subwoofer Use a shorter signal line from the amplifier to the subwoofer or remove any possible sources of
interference (see “Subwoofer hums”)
Subwoofer
hums
1. Signal line from amplifier to subwoofer too long Use shorter signal line
2. Signal line used is not fault-protected or the protection
has been damaged (defective)
Change signal line for a fault-protected line
3. Ground loop (ripple pickup) generated A ground loop can be generated when two or more devices connected via a signal line (cinch)
are plugged into separate sockets (e. g. amplifier and computer). All devices connected to the
amplifier should be plugged into the same multiple socket outlet
4. Another piece of equipment on the same circuit has no
interference suppression (e. g. fridge)
Switch off possible sources of interference to test; unplug the device concerned to see if the
humming noise disappears or connect the source of interference to a different circuit (L1, L2
or L3). (Where necessary take advice from your electrician.) Insert a special “ferrite common
mode lter” (available from specialist retailers) between the amplier and the subwoofer to
eliminate the humming. Disconnect and rotate the mains plug to reduce the so-called ripple
voltage. (Particularly important if the amplifier is not earthed)
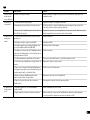
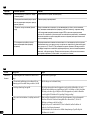
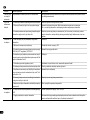
ENG

28
Problem Possible cause Solution
Loudspeakers
operate at
different levels
Sound level on the amplifier incorrectly set Adjust the sound level on the amplifier. (Advice on how to do this can be found in the
instructions supplied with your amplifier.)
Sound
reproduction
too soft
1. Volume of subwoofer set too low Increase the volume using the volume control
2. Only for High Level input: inputs reverse-poled Check the poles: the red outlet, or the outlet marked with + on the amplifier, must be
connected with the red input jack of the subwoofer
3. Outlet level on amplifier set too low for the subwoofer
outlet (cinch outlet)
Increase the volume level on the amplifier. If the level of the subwoofer outlet cannot go
any higher, reduce the level of the other outlets to the same level
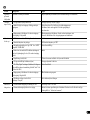
ENG
Problème Cause possible Solution
Le subwoofer
ronfle
1. Le câble de transmission des signaux de l‘amplificateur
au subwoofer est trop long
Utiliser un câble de transmission des signaux plus court
2. Le câble de transmission des signaux utilisé n‘est pas
déparasité ou le blindage du câble utilisé est interrompu
(défectueux)
Remplacer le câble par un câble blindé
3. Boucle de mise à la terre (boucle de ronflement)
«générée»
Une boucle de mise à la terre peut être générée lorsqu‘au moins deux appareils reliés par des
câbles de transmission des signaux (Cinch) à fiches de prise de courant de sécurité (par ex.
amplificateur et ordinateur) sont connectés à des prises de courant séparées dans l‘espace.
Connecter chacun des appareils reliés à l‘amplificateur par une fiche de prise de courant de
sécurité sur un même bloc multiprise.
4. Un consommateur non déparasité (un réfrigérateur,
par ex.) sur le secteur
Mettre les sources de parasites possibles hors circuit pour le test; faire déparasiter l‘appareil
concerné si le ronflement disparaît ou, dans un premier temps, connecter la source de parasites
à une autre phase du secteur (L1, L2 oder L3). (Si nécessaire, consulter un spécialiste.)
Connecter un «filtre de courant sur la gaine» spécial (en vente dans le commerce spécialisé)
entre l‘amplificateur et le subwoofer pour éliminer le ronflement
Faire pivoter la prise secteur pour réduire la tension dite d‘ondulation.
(Particulièrement important quand l‘amplificateur n‘est pas mis à la terre.)
FRA
Page is loading ...
Page is loading ...
Page is loading ...
Page is loading ...
Page is loading ...
Page is loading ...
Page is loading ...
Page is loading ...
Page is loading ...
Page is loading ...
Page is loading ...
Page is loading ...
-
 1
1
-
 2
2
-
 3
3
-
 4
4
-
 5
5
-
 6
6
-
 7
7
-
 8
8
-
 9
9
-
 10
10
-
 11
11
-
 12
12
-
 13
13
-
 14
14
-
 15
15
-
 16
16
-
 17
17
-
 18
18
-
 19
19
-
 20
20
-
 21
21
-
 22
22
-
 23
23
-
 24
24
-
 25
25
-
 26
26
-
 27
27
-
 28
28
-
 29
29
-
 30
30
-
 31
31
-
 32
32
-
 33
33
-
 34
34
-
 35
35
-
 36
36
-
 37
37
-
 38
38
-
 39
39
-
 40
40


Canton Chrono SL 596.2 Owner's manual
- Category
- Home cinema systems
- Type
- Owner's manual
Ask a question and I''ll find the answer in the document
Finding information in a document is now easier with AI
in other languages
- italiano: Canton Chrono SL 596.2 Manuale del proprietario
- français: Canton Chrono SL 596.2 Le manuel du propriétaire
- español: Canton Chrono SL 596.2 El manual del propietario
- Deutsch: Canton Chrono SL 596.2 Bedienungsanleitung
- русский: Canton Chrono SL 596.2 Инструкция по применению
- Nederlands: Canton Chrono SL 596.2 de handleiding
- polski: Canton Chrono SL 596.2 Instrukcja obsługi
- svenska: Canton Chrono SL 596.2 Bruksanvisning
Related papers
-
Canton SUB 601 Owner's manual
-
Canton AKTIVSUBWOOFER Owner's manual
-
Canton Atelier 500 Owner's manual
-
Canton 03000 User manual
-
-
Canton DM 8.2 Operating instructions
-
-
Canton Movie 60 CX Owner's manual
-
Canton PLUS MEDIA 3 Datasheet
-
Canton InCeiling 465 DT Owner's manual
Other documents
-
Magnat Interior 5.1X Owner's manual
-
Heco Ambient 5.1 A Owner's manual
-
-
Sony DAV-DZ120 Installation guide
-
 Magnat Audio Alpha RS 12 Owner's manual
-
Magnat Audio Interior 5001A Owner's manual
-
Magnat Audio Interior 5001A Owner's manual
-
Blaupunkt MPA 4 Owner's manual
-
Magnat Omega Sub 250 A LTD Owner's manual
-
