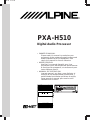
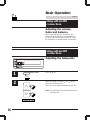
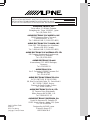
Alpine PXA-H510 Owner's manual
- Category
- Car media receivers
- Type
- Owner's manual

1
Français
Español
NEW 17-5-99
R
• OWNER'S MANUAL
Please read this manual to maximize your
enjoyment of the outstanding performance and
feature capabilities of the equipment, then
retain the manual for future reference.
• MODE D'EMPLOI
Veuillez lire ce mode d'emploi pour tirer
pleinement profit des excellentes performances
et fonctions de cet appareil, et conservez-le pour
toute référence future.
• MANUAL DE OPERACION
Lea este manual, por favor, para disfrutar al
máximo de las excepcionales prestaciones y
posibilidades funcionales que ofrece el equipo,
luego guarde el manual para usarlo como
referencia en el futuro.
Digital Audio Processor
PXA-H510
PRO LOGIC
A.PROC
DEF.
MODE / SUB W.
BAND
ENT
PXA-H510 CONTROL UNIT
RUA-4120
DIGITAL AUDIO PROCESSOR
DVD SOUND PROCESSOR
SURR OFF
PRO LOGIC
DIGITAL
PXA-H510

2
English
Precautions
WARNING
The exclamation point within an equilateral
triangle and "WARNING" are intended to alert
the user to the presence of important operating
instructions.
Failure to heed the instructions will result in
severe injury or death.
Le point d'exclamation dans un triangle
équilatéral et la mention "WARNING" sont
destinés à attirer l'attention de l'utilisateur sur la
présence d'instructions importantes.
Le non respect de ces instructions peut
provoquer de graves blessures, voire la mort.
El símbolo de exclamación dentro del triángulo
y "WARNING" tienen como fin alertar al usuario
de la presencia de instrucciones de operación
importantes.
El hacer caso omiso de las instrucciones podría
ocasionar heridas graves o la muerte.
DO NOT DISASSEMBLE OR ALTER.
Doing so may lead to accident, fire or
electric shock.
KEEP SMALL ARTICLES OUT OF
THE REACH OF CHILDREN. If
swallowed, consult a physician
immediately.
USE THE CORRECT AMPERE
RATING WHEN REPLACING
FUSES. Failure to do so may result in
fire or electric shock.
HALT USE IMMEDIATELY IF A
PROBLEM APPEARS. When prob-
lems occur such as a lack of sound or
video, foreign objects inside the unit,
smoke coming out, or noxious odors,
stop use immediately and contact the
dealer where you bought the equip-
ment. Failure to do so may result in
an accident or injury.
DO NOT OPERATE THE EQUIP-
MENT OR LOOK AT THE SCREEN
WHILE DRIVING THE VEHICLE.
Operating the equipment may distract
the driver from looking ahead of the
vehicle and cause accident. Always
stop the vehicle in a safe location
before operating this equipment.
Page is loading ...

4
English
DO NOT RAISE THE VOLUME
EXCESSIVELY. Keep the volume at a
level where you can still hear outside
noises while driving. Driving while
unable to hear outside noises could
be the cause of accident.
DO NOT USE THIS EQUIPMENT
FOR PURPOSES OTHER THAN
STATED FOR THE VEHICLE. Failure
to do so may result in electric shock or
injury.
Precautions
WARNING
Page is loading ...

6
English
The exclamation point within an equilateral triangle
and "CAUTION" are intended to alert the user to the
presence of important operating instructions.
Failure to heed the instructions will result in
severe injury or death.
Le point d'exclamation dans un triangle
équilatéral et la mention "CAUTION" sont
destinés à attirer l'attention de l'utilisateur sur la
présence d'instructions importantes.
Le non respect de ces instructions peut
provoquer de graves blessures, voire la mort.
El símbolo de exclamación dentro del triángulo
y "CAUTION" tienen como fin alertar al usuario
de la presencia de instrucciones de operación
importantes.
El hacer caso omiso de las instrucciones podría
ocasionar heridas graves o la muerte.
Precautions
CAUTION
DO NOT BLOCK VENTS OR RADIA-
TOR PANELS. Blocking them may
cause heat to build up inside and may
result in fire.
STOP THE VEHICLE IF UNIT OP-
ERATION MIGHT INTERFERE WITH
DRIVING.

7
Français
Español
Précautions Precauciones
NE PAS OBSTRUER LES SORTIES
D’AIR NI LES PANNEAUX DU
RADIATEUR. Une surchauffe interne
peut se produire et provoquer un
incendie.
ARRETEZ LE VEHICULE SI LE
FONCTIONNEMENT DE
L’APPAREIL GENE LA CONDUITE.
NO BLOQUEE LOS ORIFICIOS DE
VENTILACION O LOS PANELES
DEL RADIADOR. Si los bloquea el
calor se acumulará en el interior y
podría producirse un incendio.
PARE EL VEHICULO SI LA
OPERACION DE LA UNIDAD
PUEDE INTERFERIR CON LA
CONDUCCION.

8
English
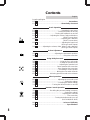
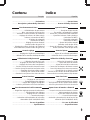
Contents
Page/Page/Página
10/ 11 ...........................................................................Precautions
12/ 13 .........................................................About Dolby Surround
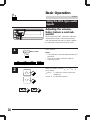
Basic Operation
14/ 15 ......................................................... Resetting the processor
14/ 15 ................................................. Turning the power on and off
14/ 15 .......................................... Turning the subwoofer on and off
16/ 17 ............................... Adjusting the volume, fader and balance
(Ai-NET connections)
16/ 17 .........................................................Adjusting the subwoofer
(Ai-NET connections)
18/ 19 ......................................................... Adjusting the input level
(RCA-type audio inputs)
20/ 21 ............ Adjusting the volume, fader, balance and subwoofer
(RCA-type audio inputs)
Before Adjustment
22/ 23 .........................................Adjusting the parametric equalizer
26/ 27 ............................................................. Using time correction
Using Dolby Surround
34/ 35 ......................................................Using the Pro Logic mode
38/ 39 ...................................................... Setting the speaker mode
42/ 43 .................................................... Adjusting the speaker level
46/ 47 .............................................. Center speaker time correction
50/ 51 ................................................. Rear speaker time correction
54/ 55 ...................................................Simulating a center speaker
58/ 59 .............................................. Mixing the rear audio channels
62/ 63 ............................. Achieving powerful sound at low volumes
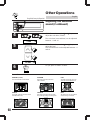
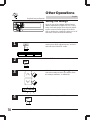
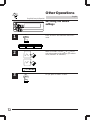
Other Operations
66/ 67 ................................................ Adjusting the surround sound
70/ 71 ................................................................ Storing the settings
72/ 73 .................................................. Recalling the stored settings
74/ 75 ................................... Turning the defeat function on and off
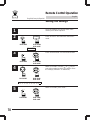
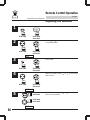
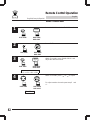
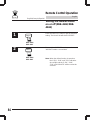
Remote Control Operation
76/ 77 .............................. Recalling the personal setting in memory
78/ 79 ................................................................ Storing the settings
80/ 81 ........................................................... Adjusting the surround
82/ 83 ...................................................................... Time correction
84/ 85 ..........................................Turning the defeat mode on or off
(RUE-4160/RUE-4162)
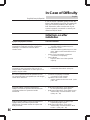
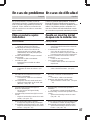
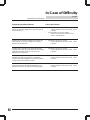
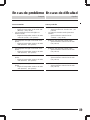
86/ 87 ..............................................................In Case of Difficulty
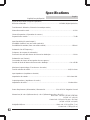
90/ 91 .......................................................................Specifications
Page is loading ...

10
English
Precautions
Temperature
Be sure the temperature inside the vehicle is
between +60˚C (+140˚F) and –10˚C (+14˚F)
before turning your unit on.
Fuse Replacement
When replacing the fuse(s), the replacement
must be of the same amperage as shown on
the fuse holder. If the fuse(s) blows more than
once, carefully check all electrical connections
for shorted circuitry. Also have your vehicle’s
voltage regulator checked.
Maintenance
If you have problems, do not attempt to repair
the unit yourself. Return it to your Alpine dealer
or the nearest Alpine Service Station for
servicing.
Installation Location
Make sure the PXA-H510 will not be exposed
to:
• Direct sun and heat
• High humidity
• Excessive dust
• Excessive vibrations
+60°C
–10°C
Page is loading ...

12
English
Dolby Digital
Dolby Digital is a digital audio compression
technology developed by Dolby Laboratories. It
is compatible with not only stereo (2-channel)
sound, but also 5.1-channel surround sound.
Each of the surround channels uses its own
discrete signal, making the sound mix very
much like that found in theaters. In addition,
Dolby Digital technology allows large quantities
of digital audio data to be recorded efficiently on
discs with little loss of sound quality.
Dolby Pro Logic
Dolby Pro Logic is a function which restores
signals recorded onto two channels into
surround signals upon playback.
To enjoy Dolby Surround sound
Using the PXA-H510 in combination with a
variety of mobile theater products makes it
possible to enjoy high quality sound with the
power and presence of a movie theater.
• Connect a DVD player.
• Connect a power amplifier.
• Connect six speakers (front left and right,
rear left and right, center and subwoofer).
Manufactured under license from Dolby
Laboratories. “Dolby”, “Pro Logic” and the
double-D symbol are trademarks of Dolby
Laboratories.
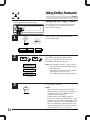
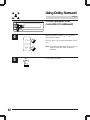
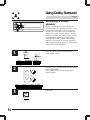
About Dolby Surround
Center Speaker/
Haut-parleur central/
Altavoz central
Front Speakers/
Haut-parleurs avant/
Altavoces frontales
Rear Speakers/
Haut-parleurs arrière/
Altavoces posteriores
Subwoofer/
Haut-parleur de sous-graves/
Altavoz de subgraves
Page is loading ...

14
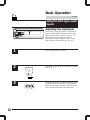
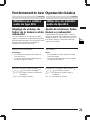
Basic Operation
English
Resetting the processor
Reset the processor when using it for the first
time, after installing a changer, etc., or after
replacing the vehicle’s batteries.
Press the reset switch with the tip of a pen, etc.
Note: When the processor is reset, all the
stored settings are cleared. Set them
again.
Turning the power on and
off
The PXA-H510 does not have a power switch.
Its power turns on and off when the head unit’s
power is turned on and off.
Turning the subwoofer on
and off
The subwoofer mode must be turned on before
adjusting the subwoofer level.
Press “SUB W.” for at least 2 seconds.
1
1
1
1
MODE / SUB W.
ON OFF
Page is loading ...

16
Basic Operation
English
1
1
2
2
MODE / SUB W.
SUB–W+10
Using with Ai-NET
connections
Adjusting the volume,
fader and balance
When using with Ai-NET connections, the
volume, fader and balance are adjusted from
the head unit (not from the PXA-H510). Only
the subwoofer is adjusted from the PXA-H510.
Using with Ai-NET
connections
Adjusting the Subwoofer
Press “SUB W.”.
Within 5 seconds, use the “ ” or “ ” key to
adjust the subwoofer level.
The level can be adjusted between 0 and +15.
Note: The subwoofer cannot be adjusted when
it is turned off.
Page is loading ...

18
Basic Operation
English
1
2
3
2
3
Using the RCA-type audio
inputs
Adjusting the input level
When using RCA-type inputs, the output level
from the head unit must be fixed and the PXA-
H510 will be used to control the volume. To
adjust the head unit output for optimum
performance of the PXA-H510, use a source
with a high recording level (pop, rock, etc.).
Turn on the head unit’s power.
Press the “ ” key on the PXA-H510 and set the
level to “0”.
Gradually increase the volume of the head unit.
Increase the volume until the “OVER” indicator
lights, then decrease it slightly. After doing this,
never change the volume of the head unit.
Page is loading ...

20
Basic Operation
English
1
2
MODE / SUB W.
VOL SUB W.FAD BAL
Using the RCA-type audio
inputs
Adjusting the volume,
fader, balance and sub-
woofer
When using the Ai-NET connection, adjust the
volume/balance/fader control from the head
unit. (Not allowed from the PXA-H510.) Adjust
the subwoofer control from the PXA-H510.
Press “MODE”.
Notes:
• The subwoofer cannot be adjusted when it is
turned off.
• There is no need to select the mode to
adjust the volume.
Within 5 seconds, use the “ ”, “ ” or “ ” , “ ”
key to adjust.
and : To adjust the volume, fader and
subwoofer
and : To adjust the balance
Page is loading ...

22
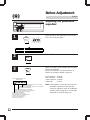
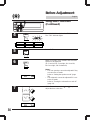
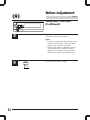
Before Adjustment
English
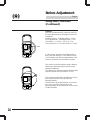
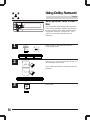
Adjusting the parametric
equalizer
Press “A.PROC” and select the “P.EQ” mode.
The “P.EQ” indicator lights.
Press “ENT”.
Within 5 seconds, press “BAND” and select the
band to be adjusted.
There are 11 bands. The band switches as
follows each time the button is pressed.
Front speakers : 4 bands
Rear speakers : 4 bands
Center speaker : 2 bands
Subwoofer : 1 band
Note: If the speaker is set to the off mode, the
parametric equalizer for that speaker
cannot be adjusted. Refer to “Setting the
speaker mode” (page 38) or “Turning the
subwoofer on and off” (page 14).
1
A.PROC
DEF.
IIIIIII SURROUND
DOLBY TIMETCRR PRIVATE
PARAMEEQ
2
ENT
3
BAND
125 2.0
-2
1
P.EQ indicator/Indicateur P.EQ /
Indicador P.EQ
Level (-2 in this example)/Niveau (-2 dans cet exemple)/
Nivel (-2 en este ejemplo)
Band and speaker being adjusted
(band 1, front speaker in this example)/
Bande et haut-parleur en cours de réglage (bande 1,
haut-parleur avant dans cet exemple)/
Banda y altavoz ajustados (banda 1,
altavoz frontal en este ejemplo)
Frequency being adjusted (125 Hz in this example)/
Fréquence en cours de réglage (125 Hz dans cet exemple)/
Frecuencia ajustada (125 Hz en este ejemplo)
Bandwidth (2.0 in this example)/Largeur de bande (2,0 dans cet exemple)/
Ancho de banda (2,0 en este ejemplo)
Page is loading ...

24
Before Adjustment
English
2
4
Adjusting the parametric
equalizer (Continued)
Within 5 seconds, use the “ ” or “ ” key to
adjust the frequency.
The frequency cannot be set any closer than 5
steps from the adjacent bands. (Refer to the
equalizer frequency steps on page 90).
For example, if the frequencies for the different
bands are set as shown below, the frequencies
of bands 1, 2 and 3 cannot be increased, and
the frequencies of bands 2, 3 and 4 cannot be
decreased.
Within 5 seconds, use the “ ” or “ ” key to
adjust the level.
The level can be adjusted between –5 and +5.
Within 5 seconds, press “BAND” for at least 2
seconds to adjust the bandwidth.
The band with can be adjusted in three steps:
1.0, 2.0 and 5.0.
Information:
The bandwidth indicates the sharpness of the
equalization curve at the selected frequency.
Specifically, it is the frequency of the peak “f”
divided by the frequency width (“> f” or the
difference between the –3dB points before and
after the selected frequency). The higher the
value of the bandwidth, the narrower the
adjusted range.
5
6
–3dB
FREQ.
LEVEL
f
BAND1 BAND3
BAND2 BAND4
Cannot be increased
Cannot be increased
Cannot be increasedCannot be decreased
Cannot be decreased Cannot be decreased
BAND
Q=
f
> f
Page is loading ...

26
Before Adjustment
English
Repeat steps 3 to 6 to adjust the various
bands.
To quit, press “A.PROC” 5 times.
Using time correction
In any car, it is nearly impossible to set in a spot
that is the same distance from each speaker.
Using this function, it is possible to delay the
sound from speakers closer to the listener. This
makes them sound like they are the same
distance as the speakers located farther away.
Sit in the listening position (driver’s seat, etc.)
and measure the distance (in meters) between
your head and the various speakers.
Calculate the difference between the distance
to the farthest speaker and the other speakers.
L= (distance to farthest speaker) – (distance to
other speakers)
Divide the distances calculated for the speakers
by the speed of sound (343 m/s at 20°C).
These values are the time correction values for
the different speakers.
7
8
1
2
3
Adjusting the parametric
equalizer (Continued)
A.PROC
DEF.
Page is loading ...

28
Before Adjustment
English
Example
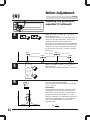
Here we calculate the time correction value for
the front right tweeter in the diagram at the left.
Conditions:
Farthest speaker – listening position: 2.25 m
Front right tweeter – listening position: 0.5 m
Calculation: L = 2.25 m – 0.5 m = 1.75 m
Time correction = 1.75 ÷ 343 x 1000 = 5.1 (ms)
In other words, giving the front right tweeter a
time correction value of 5.1 ms makes it seem
as if the distance to the front right tweeter is the
same as the distance to the farthest speaker.
The sound is not balanced because the distance
between the listening position and the various
speakers is different.
The difference in distance between the front right
speaker and the rear left speaker is 1.75 m.
Time correction eliminates the differences in the
time required for the sound to reach the
listening position.
The time of the front right speaker is corrected
by 5.1 ms so that its sound reaches the
listening position at the same time as the sound
of other speakers.
Using time correction
(Continued)
★
0.5m
2.25m
★
5.1ms
Page is loading ...

30
Before Adjustment
English
Press “A.PROC” and select the “TCR” mode.
The “TRC” indicator lights.
Press “ENT”.
Within 5 seconds, press “BAND” and select the
speaker to be adjusted.
(FL: Front left, FR: Front right, RL: Rear left,
RR: Rear right, SW: Subwoofer)
Notes:
• The rear speakers cannot be adjusted if they
are set to the off mode.
Refer to “Setting the speaker mode” (page
38).
• The subwoofer cannot be adjusted if it is set
to the off mode.
Refer to “Turning the subwoofer on and off”
(page 14).
Within 5 seconds, use the “ ” or “ ” key to
adjust the time correction.
4
A.PROC
DEF.
IIIIIII PARAMEEQ SURROUND
DOLBY TIMETCRR PRIVATE
5
BAND
ENT
6
FR
5.1
7
FR
0.0
Using time correction
(Continued)
Page is loading ...

32
Before Adjustment
English
Using time correction
(Continued)
Repeat steps 6 and 7 to adjust the time
correction for the various speakers.
Notes:
• This time correction function cannot be used
with the center speaker. Refer to “Center
speaker time correction” (page 46).
• After this procedure is completed, use the
“Rear speaker time correction” function
(page 50) as desired to achieve a sound
with an even greater sense of presence.
To quit, press “A.PROC” 2 times.
8
9
A.PROC
DEF.
Page is loading ...

34
Using Dolby Surround
English
1
2
3
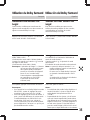
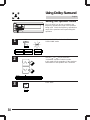
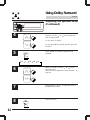
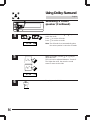
Using the Pro Logic mode
This function is for processing audio signals
recorded onto two channels into Dolby Pro
Logic surround signals.
Press “A.PROC” and select the “DOLBY
SURROUND” mode.
Press “ ” and set the “PRO LOGIC” mode.
The audio mode indicator lights (amber).
When “ ” is pressed, the off mode is set.
The audio mode indicator turns off.
Note: The operation in step 2 above cannot
be performed when Dolby Digital signals
are being input.
In this case, the Dolby Surround mode is
automatically set to “DIGITAL”.
The audio mode indicator lights (green).
To quit, press “A.PROC”.
Notes:
• When you want to enjoy sound of Dolby
Digital system in the PROLOGIC mode, set
the mode to “LPCM” in “Digital Output
Setting” of the DVD player.
• Sound volume in the digital mode and
PROLOGIC mode may differ with the sound
volume in the OFF mode, depending on the
settings and softeners to be playedback. In
this case, adjust the “Speaker Level” in the
digital mode and PROLOGIC mode so that
the sound difference does not occur.
Audio mode indicator/Indicateur du mode
audio/Indicador del modo de audio
A.PROC
DEF.
A.PROC
DEF.
IIIIIII SURROUND
DOLBY TIMETCRR PRIVATE
PARAMEEQ
SURR OFF
PROLOGIC
(OFF mode/Mode d'arrêt/
Modo desactivado)
(Prologic mode/Mode Prologic/
Modo Prologic )
DIGITAL
(Digital mode/Mode numérique/
Modo digital)
Page is loading ...

36
Using Dolby Surround
English
2
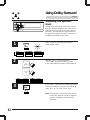
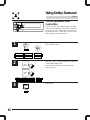
Using the Pro Logic mode
(Continued)
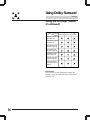
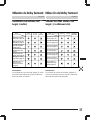
Setting the speaker
mode (page 38)
Adjusting the speaker
level (page 42)
Center speaker time
correction (page 46)
Rear speaker time
correction (page 50)
Simulating a center
speaker (page 54)
Mixing the rear audio
channels (page 58)
Achieving powerful
sound at low volumes
(page 62)
Lit amber
(Pro Logic mode)
Lit green
(Digital mode)
Off
(Off mode)
Dolby Surround operation
Audio mode indicator
Operation
Information:
The surround sound adjustments (pages 66
and 68) cannot be made when the audio mode
indicator is lit.
Page is loading ...
Page is loading ...
Page is loading ...
Page is loading ...
Page is loading ...
Page is loading ...
Page is loading ...
Page is loading ...
Page is loading ...
Page is loading ...
Page is loading ...
Page is loading ...
Page is loading ...
Page is loading ...
Page is loading ...
Page is loading ...
Page is loading ...
Page is loading ...
Page is loading ...
Page is loading ...
Page is loading ...
Page is loading ...
Page is loading ...
Page is loading ...
Page is loading ...
Page is loading ...
Page is loading ...
Page is loading ...
Page is loading ...
Page is loading ...
Page is loading ...
Page is loading ...
Page is loading ...
Page is loading ...
Page is loading ...
Page is loading ...
Page is loading ...
Page is loading ...
Page is loading ...
Page is loading ...
Page is loading ...
Page is loading ...
Page is loading ...
Page is loading ...
Page is loading ...
Page is loading ...
Page is loading ...
Page is loading ...
Page is loading ...
Page is loading ...
Page is loading ...
Page is loading ...
Page is loading ...
Page is loading ...
Page is loading ...
Page is loading ...
Page is loading ...
Page is loading ...
-
 1
1
-
 2
2
-
 3
3
-
 4
4
-
 5
5
-
 6
6
-
 7
7
-
 8
8
-
 9
9
-
 10
10
-
 11
11
-
 12
12
-
 13
13
-
 14
14
-
 15
15
-
 16
16
-
 17
17
-
 18
18
-
 19
19
-
 20
20
-
 21
21
-
 22
22
-
 23
23
-
 24
24
-
 25
25
-
 26
26
-
 27
27
-
 28
28
-
 29
29
-
 30
30
-
 31
31
-
 32
32
-
 33
33
-
 34
34
-
 35
35
-
 36
36
-
 37
37
-
 38
38
-
 39
39
-
 40
40
-
 41
41
-
 42
42
-
 43
43
-
 44
44
-
 45
45
-
 46
46
-
 47
47
-
 48
48
-
 49
49
-
 50
50
-
 51
51
-
 52
52
-
 53
53
-
 54
54
-
 55
55
-
 56
56
-
 57
57
-
 58
58
-
 59
59
-
 60
60
-
 61
61
-
 62
62
-
 63
63
-
 64
64
-
 65
65
-
 66
66
-
 67
67
-
 68
68
-
 69
69
-
 70
70
-
 71
71
-
 72
72
-
 73
73
-
 74
74
-
 75
75
-
 76
76
-
 77
77
-
 78
78
-
 79
79
-
 80
80
-
 81
81
-
 82
82
-
 83
83
-
 84
84
-
 85
85
-
 86
86
-
 87
87
-
 88
88
-
 89
89
-
 90
90
-
 91
91
-
 92
92
-
 93
93
-
 94
94


Alpine PXA-H510 Owner's manual
- Category
- Car media receivers
- Type
- Owner's manual
Ask a question and I''ll find the answer in the document
Finding information in a document is now easier with AI
in other languages
Related papers
-
Alpine DVA-5200 Owner's manual
-
-
-
-
-
-
-
-
-
Other documents
-
 Ruckus Wireless H510 Quick Setup Manual
-
Sanyo PLC-XE32 Owner's manual
-
Unika EQ-815 Owner's manual
-
Kicker 4-Channel Owner's manual
-
-
-
-
Clarion DVC920 Owner's manual
-
Rane ME60S User manual
-
Zeck Audio GF215 GF30de Owner's manual
