Asus ROG G750JS User manual

Category
Notebooks
Type
User manual

This manual is also suitable for

75
筆記型電腦使用手冊
本章節中的 BIOS 設定程式畫面僅供參考,實際畫面會因機
與銷售地區不同而有差異。
BIOS
Boot
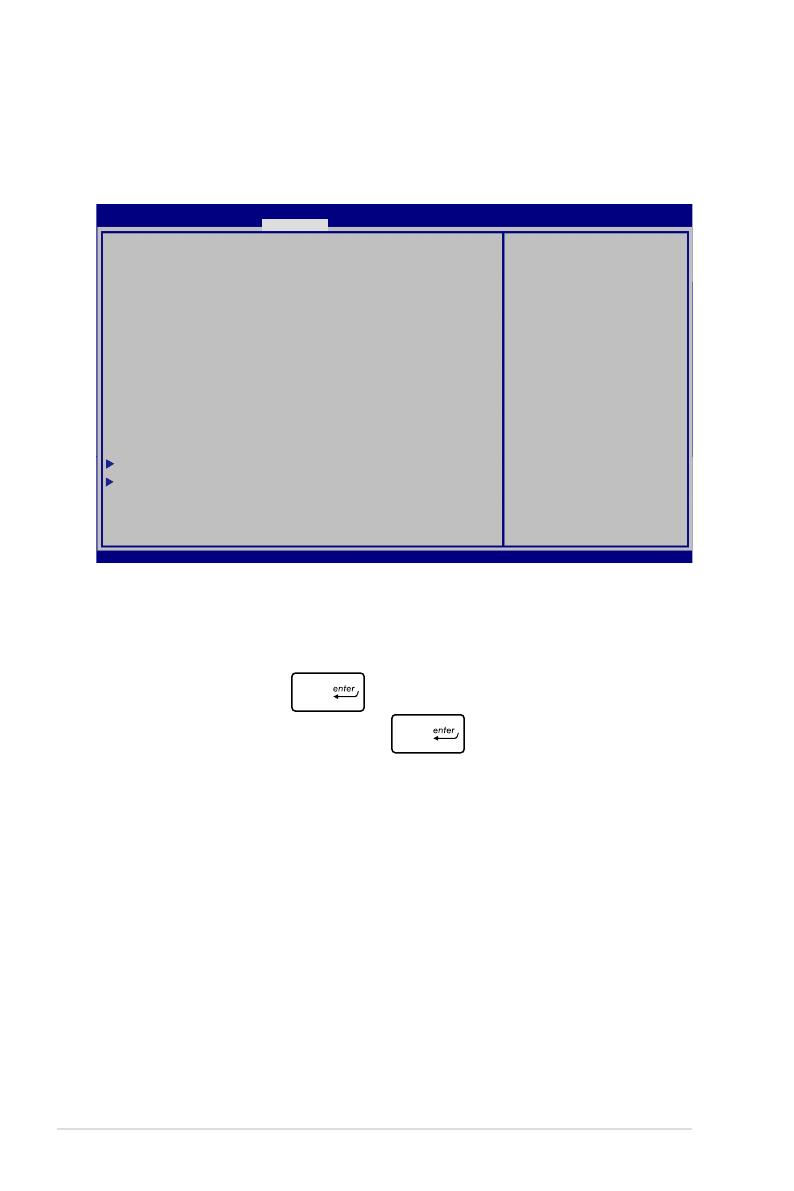
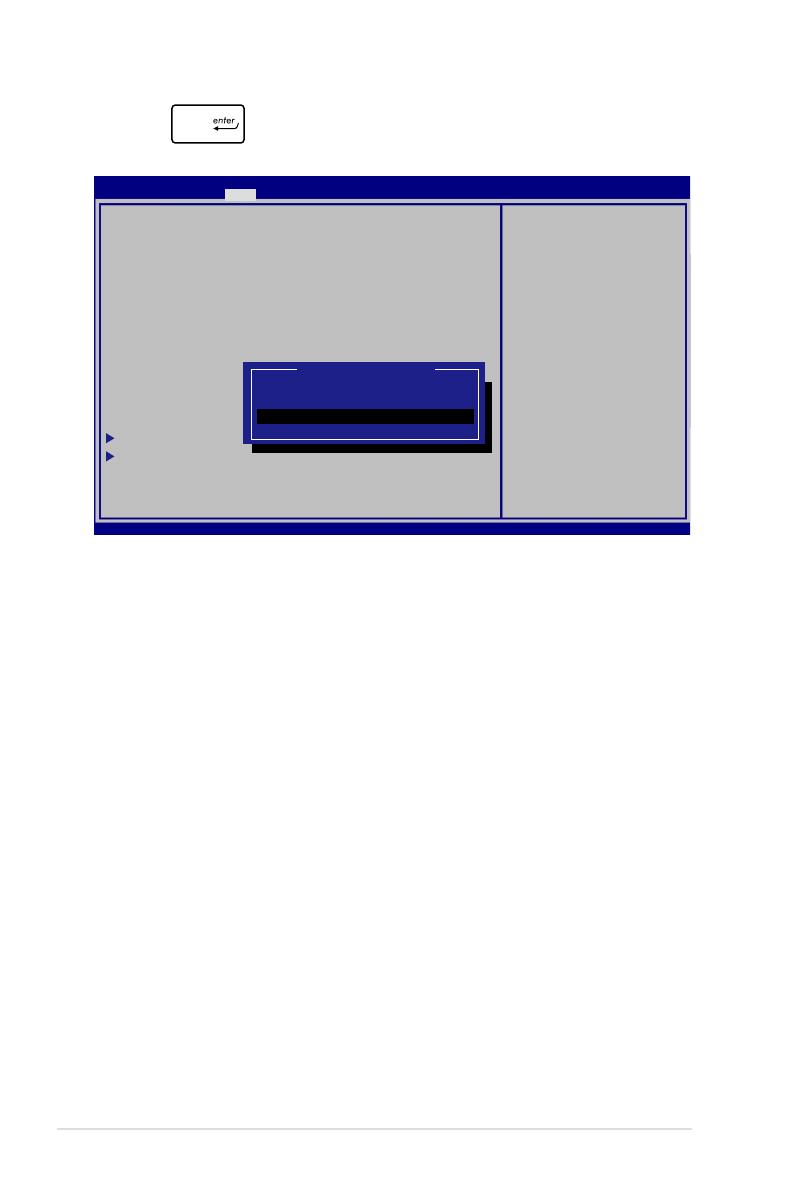
啟動選單可讓您設定開機磁碟與優先順序。請參考下列步驟設定開
機磁碟與優先順序。
1. Boot 選單中,選擇 Boot Option #1
Boot Conguration
Launch CSM [Enabled]
Launch PXE OpROM [Disabled]
Driver Option Priorities
Boot Option Priorities
Boot Option #1 [Windows Boot Manager]
Boot Option #2 [P1: Hitachi HTS547..]
Boot Option #3 [Atheros Boot Agent]
CD/DVD ROM Drive BBS Priorities
Network Device BBS Priorities
Add New Boot Option
Delete Boot Option
Aptio Setup Utility - Copyright (C) 2012 American Megatrends, Inc.
Main Advance Boot Security Save & Exit
Version 2.15.1231. Copyright (C) 2012 American Megatrends, Inc.
→← : Select Screen
↑↓ : Select Item
Enter: Select
+/— : Change Opt.
F1 : General Help
F9 : Optimized Defaults
F10 : Save & Exit
ESC : Exit
Sets the system boot
order
76
筆記型電腦使用手冊
2. 按下 並在 Boot Option #1 項目選擇優先開機磁碟。
Boot Conguration
Launch CSM [Enabled]
Launch PXE OpROM [Disabled]
Driver Option Priorities
Boot Option Priorities
Boot Option #1 [Windows Boot Manager]
Boot Option #2 [P1: Hitachi HTS547..]
Boot Option #3 [Atheros Boot Agent]
CD/DVD ROM Drive BBS
Network Device BBS Priorities
Add New Boot Option
Delete Boot Option
Aptio Setup Utility - Copyright (C) 2012 American Megatrends, Inc.
Main Advance Boot Security Save & Exit
Version 2.15.1231. Copyright (C) 2012 American Megatrends, Inc.
→← : Select Screen
↑↓ : Select Item
Enter: Select
+/— : Change Opt.
F1 : General Help
F9 : Optimized Defaults
F10 : Save & Exit
ESC : Exit
Sets the system boot
order
Boot Option #1
Atheros Boot Agent
P1: Hitachi HTS547575A9E384
Windows Boot Manager
Disabled
77
筆記型電腦使用手冊
Security
使
您控使腦硬/出(I/O USB
的權限。
請依照下列步驟設定密碼:
1. Security Administrator
Password User Password
2. 輸入密碼然後按下
3. 再次輸入密碼確認,然後按下
若您設定 User Password ,在每次進入筆記型電
腦作業系統之前,你都會被要求輸入密碼以進入系統。
若您設定了 Administrator Password ,在進入 BIOS
設定程式之前您都會被要求輸入密碼以進入 BIOS
Password Description
If ONLY the Admi nis tra tor s p ass w ord is s et, the n
t h i s o n l y l i m i t s a c c e s s t o S e t u p a n d i s o n l y
asked for whe n e nte ring S etup. If O NL Y th e us er
s password is set, then this is a power on password
a n d m u s t b e e n t e r e d t o b o o t o r e n t e r S e t u p . I n
S e t u p , t h e U s e r w i l l h a v e A d m i nistrator r i g h t s .
Administrator Password Status NOT INSTALLED
User Password Status NOT INSTALLED
Administrator Password
User Password
HDD User Password Status : NOT INSTALLED
Set Master Password
Set User Password
I/O Interface Security
Secure Boot Control [Enabled]
Set Administrator
Password. The password
length must be in the
following range:
Minimum length 3
Maximum length 20
Must type with
character:
a-z, 0-9
Aptio Setup Utility - Copyright (C) 2012 American Megatrends, Inc.
Main Advance Boot Security Save & Exit
→← : Select Screen
↑↓ : Select Item
Enter: Select
+/— : Change Opt.
F1 : General Help
F9 : Optimized Defaults
F10 : Save & Exit
ESC : Exit
Version 2.15.1231. Copyright (C) 2012 American Megatrends, Inc.
78
筆記型電腦使用手冊
I/O
Security 選單中,您可以進入 I/O I/O
Interface Security ,以鎖定或解除鎖定某些筆記型電腦的功能。
請依照下列步驟鎖定 I/O 連接埠:
1. Security I/O I/O
Interface Security
2. 選擇您要鎖定的連接埠然後按下
3. 選擇 LOCKED
請依照下列步驟清除密碼:
1. Security Administrator
Password User Password
2. 輸入現行密碼然後按下
3. 保持新密碼欄位空白,然後按下
4. 在確認框選擇 Yes 然後按下
I/O Interface Security
LAN Network Interface [UnLock]
Wireless Network Interface [UnLock]
HD AUDIO Interface [UnLock]
SATA 2nd HDD Interface [UnLock]
SATA ODD Interface
USB Interface Security
If Locked, LAN controller
will be disabled.
LAN Network Interface
Lock
UnLock
Aptio Setup Utility - Copyright (C) 2012 American Megatrends, Inc.
Security
→← : Select Screen
↑↓ : Select Item
Enter: Select
+/— : Change Opt.
F1 : General Help
F9 : Optimized Defaults
F10 : Save & Exit
ESC : Exit
Version 2.15.1231. Copyright (C) 2012 American Megatrends, Inc.
79
筆記型電腦使用手冊
USB
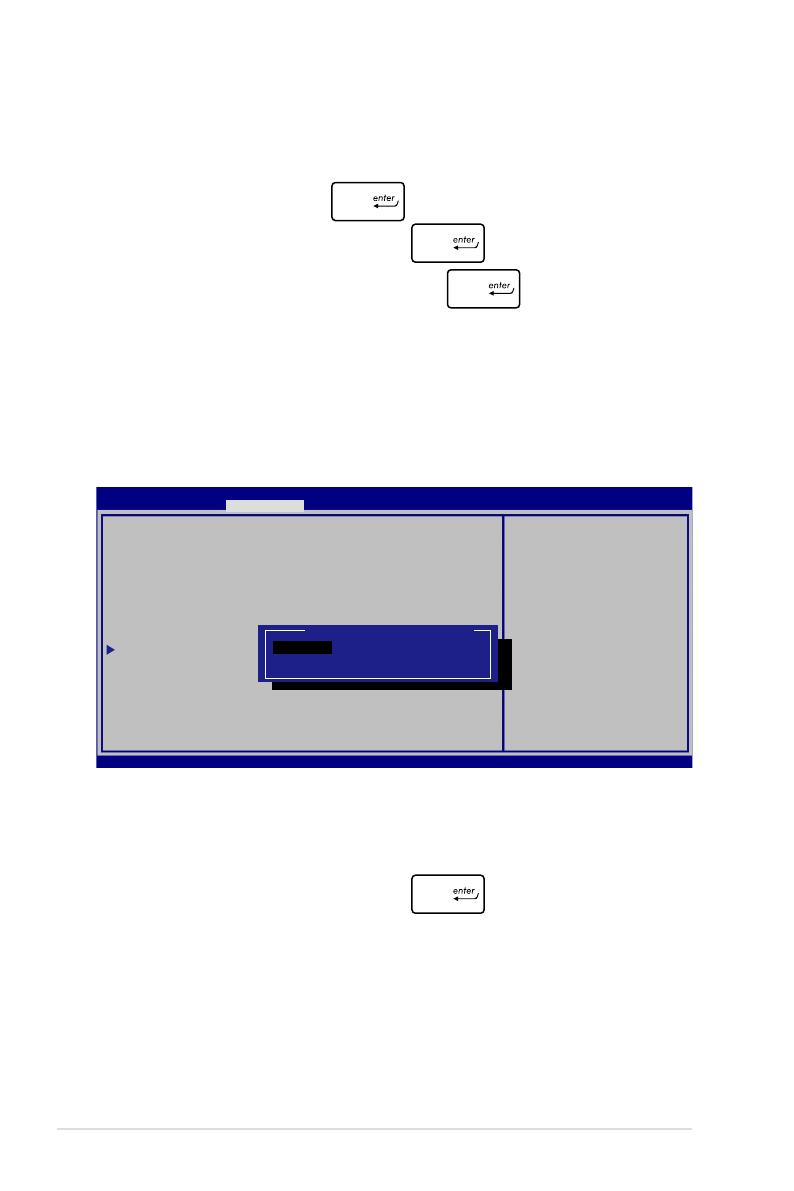
透過 I/O 連接埠安全設定選單,您也可以進入 USB
USB Interface Security 選單以鎖定或解除鎖定連接埠與裝置。
請依照下列步驟鎖定 USB 連接埠:
1. Security 畫面中,選擇 I/O Interface Security > USB
Interface Security
2. 選擇您想要鎖定的連接埠然後選擇 LOCKED
USB 連接埠設為鎖定後,也會鎖定並隱藏包含在 USB
USB Interface Security 單下的
External Ports 與其它裝置。
Version 2.15.1231. Copyright (C) 2012 American Megatrends, Inc.
USB Interface Security
USB Interface [UnLock]
External Ports [UnLock]
CMOS Camera [UnLock]
Card Reader [UNLOCKED]
If LOCKED, all USB
devices will
be disabled
USB Interface
Lock
UnLock
Aptio Setup Utility - Copyright (C) 2012 American Megatrends, Inc.
Security
→← : Select Screen
↑↓ : Select Item
Enter: Select
+/— : Change Opt.
F1 : General Help
F9 : Optimized Defaults
F10 : Save & Exit
ESC : Exit
80
筆記型電腦使用手冊
Security 選單中,可以使用 Set Master
Password 以設定使用密碼存取硬碟的權限。
請依照下列步驟設定硬碟密碼:
1. Security 面中選擇 Set Master
Password
2. 輸入密碼然後按下
3. 再次輸入密碼確認,然後按下
4. 選擇 Set User Password 然後重複上一個步驟
以設定使用者密碼。
Aptio Setup Utility - Copyright (C) 2011 American Megatrends, Inc.
Aptio Setup Utility - Copyright (C) 2012 American Megatrends, Inc.
Main Advance Boot Security Save & Exit
→← : Select Screen
↑↓ : Select Item
Enter: Select
+/— : Change Opt.
F1 : General Help
F9 : Optimized Defaults
F10 : Save & Exit
ESC : Exit
Version 2.15.1231. Copyright (C) 2012 American Megatrends, Inc.
Password Description
If ONLY the Administrator’s password is set,then this only
limits access to Setup and is only asked for when entering
Setup. If ONLY the user’s password is set, then this is
a power on password and must be entered to boot or enter
Setup. In Setup, the User will have Administrator rights.
Administrator Password Status NOT INSTALLED
User Password Status NOT INSTALLED
Administrator Password
User Password
HDD User Pwd Status : NOT INSTALLED
Set Master Password
Set User Password
I/O Interface Security
Secure Boot Control [Disabled]
Set HDD Master Password.
***Advisable to Power
Cycle System after
Setting Hard Disk
Passwords***
81
筆記型電腦使用手冊
Save & Exit
要儲存您的設定值,在離開 BIOS 前請選擇 Save
Changes and Exit
BIOS
1. 確認筆記型電腦型號後,接著從華碩網站下載該機型最新 BIOS
檔案。
2. 將下載的 BIOS 檔案備份並儲存至隨身碟中。
3. 將您的隨身碟連接至筆記型電腦。
4. 重新開機,然後在開機自我測試時按下 鍵。
5. BIOS 中選 Advanced > Start Easy Flash
鍵。
Aptio Setup Utility - Copyright (C) 2012 American Megatrends, Inc.
Main Advance Boot Security Save & Exit
→← : Select Screen
↑↓ : Select Item
Enter: Select
+/— : Change Opt.
F1 : General Help
F9 : Optimized Defaults
F10 : Save & Exit
ESC : Exit
Version 2.15.1231. Copyright (C) 2012 American Megatrends, Inc.
Save Changes and Exit
Discard Changes and Exit
Save Options
Save Changes
Discard Changes
Restore Defaults
Boot Override
Atheros Boot Agent
P1: Hitachi HTS547575A9E384
Windows Boot Manager
Launch EFI Shell from lesystem device
Exit system setup after
saving the changes.
82
筆記型電腦使用手冊
6. 在隨身碟中找到您所下載的 BIOS 檔案然後按下 鍵。
7. BIOS 更新程序之後,選擇 Exit > Restore Defaults 以將系統回
復至預設值。
Aptio Setup Utility - Copyright (C) 2011 American Megatrends, Inc.
Start Easy Flash
Internal Pointing Device [Enabled]
Wake on Lid Open [Enabled]
Power Off Energy Saving [Enabled]
ASUS USB Charger+ in battery mode [Disabled]
Intel Virtualization Technology [Enabled]
Intel AES-NI [Enabled]
CPU C states [Disabled]
VT-d [Enabled]
SATA Conguration
Graphics Conguration
Intel (R) Thunderbolt
USB Conguration
Intel (R) Anti-Theft Technology Corporation
Network Stack
Press Enter to run the
utility to select and
update BIOS.
Aptio Setup Utility - Copyright (C) 2012 American Megatrends, Inc.
Main Advance Boot Security Save & Exit
→← : Select Screen
↑↓ : Select Item
Enter: Select
+/— : Change Opt.
F1 : General Help
F9 : Optimized Defaults
F10 : Save & Exit
ESC : Exit
Version 2.15.1231. Copyright (C) 2012 American Megatrends, Inc.
ASUSTek Easy Flash Utility
FSO
FS1
FS2
FS3
0 EFI <DIR>
[
←→]:
Switch [
↑↓]:
Choose [q]: Exit [Enter]: Enter/Execute
Current BIOS
Platform: G750JX
Version: T30
Build Date: Dec 22 2012
Build Time: 12:43:56
New BIOS
Platform: Unknown
Version: Unknown
Build Date: Unknown
Build Time: Unknown
FLASH TYPE: Winbond 25X/Q Series
  • Page 1 1
  • Page 2 2
  • Page 3 3
  • Page 4 4
  • Page 5 5
  • Page 6 6
  • Page 7 7
  • Page 8 8
  • Page 9 9
  • Page 10 10
  • Page 11 11
  • Page 12 12
  • Page 13 13
  • Page 14 14
  • Page 15 15
  • Page 16 16
  • Page 17 17
  • Page 18 18
  • Page 19 19
  • Page 20 20
  • Page 21 21
  • Page 22 22
  • Page 23 23
  • Page 24 24
  • Page 25 25
  • Page 26 26
  • Page 27 27
  • Page 28 28
  • Page 29 29
  • Page 30 30
  • Page 31 31
  • Page 32 32
  • Page 33 33
  • Page 34 34
  • Page 35 35
  • Page 36 36
  • Page 37 37
  • Page 38 38
  • Page 39 39
  • Page 40 40
  • Page 41 41
  • Page 42 42
  • Page 43 43
  • Page 44 44
  • Page 45 45
  • Page 46 46
  • Page 47 47
  • Page 48 48
  • Page 49 49
  • Page 50 50
  • Page 51 51
  • Page 52 52
  • Page 53 53
  • Page 54 54
  • Page 55 55
  • Page 56 56
  • Page 57 57
  • Page 58 58
  • Page 59 59
  • Page 60 60
  • Page 61 61
  • Page 62 62
  • Page 63 63
  • Page 64 64
  • Page 65 65
  • Page 66 66
  • Page 67 67
  • Page 68 68
  • Page 69 69
  • Page 70 70
  • Page 71 71
  • Page 72 72
  • Page 73 73
  • Page 74 74
  • Page 75 75
  • Page 76 76
  • Page 77 77
  • Page 78 78
  • Page 79 79
  • Page 80 80
  • Page 81 81
  • Page 82 82
  • Page 83 83
  • Page 84 84
  • Page 85 85
  • Page 86 86
  • Page 87 87
  • Page 88 88
  • Page 89 89
  • Page 90 90
  • Page 91 91
  • Page 92 92
  • Page 93 93
  • Page 94 94
  • Page 95 95
  • Page 96 96
  • Page 97 97
  • Page 98 98
  • Page 99 99
  • Page 100 100
  • Page 101 101
  • Page 102 102
  • Page 103 103
  • Page 104 104

Asus ROG G750JS User manual

Category
Notebooks
Type
User manual
This manual is also suitable for

Ask a question and I''ll find the answer in the document

Finding information in a document is now easier with AI