
EU-KONFORMITÄTSERKLÄRUNG
Wir erklären hiermit, dass diese Funkanlage die wesentlichen Anforderungen der
R&TTE Direktive 1999/5/EG erfüllt. Eine Kopie der unterschriebenen und mit Datum
versehenen Konformitätserklärung erhalten Sie auf Anfrage unter info@tfa-dost-
mann.de. www.tfa-dostmann.de
DECLARATION OF CONFORMITY
Herewith we declare, that this wireless transmission device does comply with the
essentials requirements of R&TTE Directive 1999/5/EC. A copy of the signed and
dated Declaration of Conformity is available on request via [email protected].
www.tfa-dostmann.de
EU- DECLARATION DE CONFORMITE
Nous déclarons que cet appareil émetteur récepteur d'ondes radio répond aux exi-
gences essentielles de la directive R&TTE 1999/5/CE. Une copie signée et datée de la
déclaration de conformité est disponible sur demande auprès de info@tfa-dost-
mann.de. www.tfa-dostmann.de
DICHIARAZIONE DI CONFORMITÀ ’UE
Con la presente dichiariamo che questo impianto radio adempie alle prescrizioni
sostanziali della direttiva R&TTE 1999/5/CE. Una copia firmata e datata della
Dichiarazione di Conformità è disponibile, su richiesta all'inidirizzo info@tfa-dost-
mann.de. www.tfa-dostmann.de
EU-CONFORMITEITSVERKLARING
Hiermee verklaren wij, dat deze radiografische installatie voldoet aan de belan-
grijkste eisen van de R&TTE richtlijn 1999/5/EG. Een kopie van de getekende en
gedateerde Conformiteitsverklaring is op verzoek beschikbaar via info@tfa-dost-
mann.de. www.tfa-dostmann.de
UE-DECLARACIÓN DE CONFORMIDAD
Declaramos que esta instalación de radio cumple con los requisitos fundamentales
de la directiva R&TTE 1999/5/CE. Tiene a su disposición una copia firmada y sellada
de la Declaración de Conformidad, solicítela al [email protected].
www.tfa-dostmann.de
01/12
Bedienungsanleitung
Operating Instructions
Mode d’emploi
Istruzioni
Instrucciones para el manejo
Gebruiksaanwijzing
Kat. Nr. 35.1116
TFA_No_35.1116_Anl_ 31.01.2012 21:04 Uhr Seite 1
Page is loading ...
Page is loading ...
Page is loading ...
Page is loading ...
Page is loading ...
Page is loading ...
Page is loading ...
Page is loading ...
Page is loading ...

2120
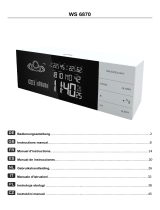
CULT – Wireless Weather Station
Thank you for choosing this instrument from TFA.
1. Before you use it
•
Please be sure to read the instruction manual carefully. This informa-
tion will help you to familiarise yourself with your new device, learn
all of its functions and parts, find out important details about its first
use and how to operate it, and get advice in the event of faults.
•
Following the instruction manual for use will prevent damage to the
device and loss of your statutory rights arising from defects due to
incorrect use.
•
We shall not be liable for any damage occurring as a result of not
following these instructions.
•
Please take particular note of the safety advice!
•
Please look after this manual for future reference.
2. Scope of supply
•
Wireless weather station (basic unit)
•
Outdoor transmitter with holder
•
Support for the weather station
•
Batteries 4 x 1.5 V AAA
•
Instruction manual
3. Field of operation and all of the benefits of your new instru-
ment at a glance
•
Outdoor temperature wireless (433 MHz), distance range up to 30 m
(free field)
•
Expandable up to 3 outdoor transmitters, also for the temperature
control of remote rooms, e.g. children’s room, wine-cellar
•
Indoor temperature
•
Tendency indicators and maximum / minimum values
•
Temperature alarm
•
Weather forecast with 7 symbols and tendency of atmospheric pres-
sure
•
Radio controlled clock with different alarms, date and day-of-week (7
languages)
•
Table standing
•
Very simple installation, no cables required
CULT – Wireless Weather Station
4. For your safety
•
The product is exclusively intended for the field of application
described above. The product should only be used as described with-
in these instructions.
•
Unauthorised repairs, modifications or changes to the product are
prohibited.
•
The product is not be used for medical purpose or for public informa-
tion, but is intended only for home use.
Caution!
Risk of injury:
•
Keep this instrument and the batteries out of reach of children.
•
Batteries must not be thrown into the fire, short-circuited, taken
apart or recharged. Risk of explosion!
•
Batteries contain harmful acids. Low batteries should be changed as
soon as possible to prevent damage caused by a leaking battery.
Never use a combination of old and new batteries together or batter-
ies of different types. Wear chemical-resistant protective gloves and
glasses when handling leaked batteries.
Important information on product safety!
•
Do not place the unit near extreme temperatures, vibration or shock.
•
Protect from moisture.
•
The outdoor transmitter is protected against splash water, but is not
watertight. Choose a shady and dry position for the transmitter.
5. Elements
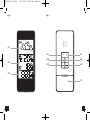
A: Display (Fig. 1)
:
A 1: Upper display
:
Weather forecast with symbols and tendency of atmospheric
pressure
A 2: Middle display
Outdoor temperature with reception symbol and channel number
Tendency indicator and in case battery symbol for transmitter
TFA_No_35.1116_Anl_ 31.01.2012 21:04 Uhr Seite 11

2322
CULT – Wireless Weather Station
Indoor temperature
Tendency indicator
A 3: Lower display
Radio-controlled time (DCF) with seconds/weekday and date
Radio-controlled reception symbol DCF
In case battery symbol for base station and alarm symbols
B: Buttons (Fig. 2)
:
B 1: ▲ button
B 2: ▼ button
B 3: mode button
B 4: mem button
B 5: alarm button
B 6: channel button
C: Housing (Fig. 2)
:
C 1: Battery compartment
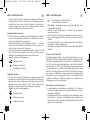
D: Transmitter (Fig. 3)
:
D 1: Holder for wall mount
D 2: Indentations for the holder
D 3: Holder for table standing
D 4: Battery compartment
6. Getting started
Insert batteries
:
•
Place both instruments on a desk with a distance of approximately
1.5 meter. Check that no other electronic devices are close.
•
Remove the holder of the transmitter and slide the battery compart-
ment lid downwards. Remove the insulation strip. Place the battery
compartment lid on the housing and slide it upwards.
•
Pull off the protection foil on the display of the station. Open the
battery compartment of the weather station by pushing the battery
compartment lid downwards with your thumbs. Remove the insula-
tion strip. Place the battery compartment lid on the housing and slide
it upwards.
CULT – Wireless Weather Station
Reception of outdoor temperature
•
The basic unit automatically starts scanning the 433 MHz signal to
register the thermo sensor unit after batteries are inserted. The unit
will scan (for 2 min.) the outdoor values.
•
If the reception of outdoor values fails, "- -" appears on the display.
Check the batteries and try it again. Check if there is any source of
interference.
•
Manual initialization can be helpful. Press and hold
▼
button for 2
seconds. The station will only select an outdoor transmitter on the
actual selected channel.
• There are 3 different reception icons:
- reception is active
- reception is successful
- no reception (1 hour)
Radio-controlled time reception
•
The clock will now scan the DCF frequency signal and the DCF symbol
flashes on the LCD. When the time code is received successfully after
3-8 minutes, the radio-controlled time is displayed and the date and
the DCF symbol are displayed steadily in the LCD. During the DCF
time reception period, no outdoor data will be transmitted.
• There are 4 different reception icons:
- reception is active
- reception is very good
- reception is weak
- no reception in the last 24 hours / time is set manual
No icon - reception is deactivated (press and hold ▲ button for 2 sec.)
• Press and hold ▲ button again for 2 seconds, to activate the reception
manually.
• If the clock cannot detect the DCF-signal (for example due to distur-
bances, transmitting distance, etc.), the time can be set manually.
TFA_No_35.1116_Anl_ 31.01.2012 21:04 Uhr Seite 12

2524
CULT – Wireless Weather Station
• The clock will then work as a normal quartz clock. (see Manual setting
of clock and calendar
• The radio-controlled clock receives the signals at 0:00, 3:00, 6:00 and
12.00 o'clock in the morning.
Note for radio-controlled Time DCF:
The time base for the radio-controlled time is a caesium atomic clock
operated by the Physikalisch Technische Bundesanstalt Braunschweig. It
has a time deviation of less than one second in one million years. The
time is coded and transmitted from Mainflingen near Frankfurt via fre-
quency signal DCF-77 (77.5 kHz) and has a transmitting range of approxi-
mately 1,500 km. Your radio-controlled clock receives this signal and
converts it to show the precise time. Changeover from summer time or
winter time is automatic. The quality of the reception depends mainly on
the geographic location. Normally there should be no reception problems
within a 1,500 km radius around Frankfurt.
Please take note of the following:
•
Recommended distance to any interfering sources like computer
monitors or TV sets is at least 1.5 - 2 metres.
•
Inside ferro-concrete rooms (basements, superstructures), the
received signal is naturally weakened. In extreme cases, please place
the unit close to a window to improve the reception.
•
During nighttime, the atmospheric interference is usually less severe
and reception is possible in most cases. A single daily reception is
adequate to keep the accuracy deviation below 1 second.
7. Operation
•
Important: Buttons will not function while scanning DCF signal.
•
The instrument will automatically quit the setting mode if no button
is pressed within 2 minutes.
•
Press and hold ▲ or ▼ button in the setting mode for fast running
7.1 TIME mode
•
Press the ▲ or ▼ button to enter the respective display area. When
changing the display area a brief beep tone will sound.
•
TIME flashes on the display.
•
You are now in the TIME mode.
CULT – Wireless Weather Station
7.2 Manual setting of clock and calendar
•
Press and hold mode button in the setting mode for fast running.
•
The day-of-week language digit is flashing. Press ▲ or ▼ button to
adjust it. Day-of-week language: German (DE), English (En), Swedish
(SW), Dutch (Du), Spanish (SP), Italian (IT) and French (Fr).
•
Press mode button and the setting sequence is shown as follows:
Year, month, date, month/day sequence (American version) or
day/month (European version) , 12 (PM appears on the display after
12 h) and 24 hours system indication, hours and minutes. Press ▲ or
▼ button to make the desired settings.
•
The manually set time will be overwritten by the DCF time when the
signal is received successfully.
7.3 Dual time
•
Press mode mode twice in TIME mode.
•
ZONE appears on the display.
•
Press and hold mode button.
•
00:00+ flashes on the display. Press ▲ or ▼ button to adjust the dual
time in 30 min. time zone steps (+15/-13 hours).
•
Press mode button four times to return to normal mode.
7.4 Indication of time
•
Each press on the mode button in TIME mode will change the display
between:
→ Time with seconds
→ Time with day-of-week
→ Dual time with day of week
→ Dual time with seconds
→ Date
7.5 Alarm clock function
7.5.1 Manual setting of alarm clock
•
Press alarm button in TIME mode.
→ W (Alarm time for Monday until Friday) and OFF or the last
adjusted alarm time appear on the display. You can now adjust
the alarm time.
•
Press and hold alarm button.
TFA_No_35.1116_Anl_ 31.01.2012 21:04 Uhr Seite 13

2726
CULT – Wireless Weather Station
•
The hour digit is flashing. Press ▲ or ▼ button to adjust hours.
•
Press alarm button again and adjust the minutes with the ▲ or ▼
button.
•
Confirm with alarm button.
•
Alarm time and W appears on the display. The alarm is activated.
7.5.2 Setting of the special alarm time
•
Press alarm button again.
→ S (alarm time for Saturday, Sunday or special alarm time) and
OFF or the last adjusted alarm time appear on the display.
•
Press and hold alarm button.
•
Set the alarm time in the same way.
•
Confirm with alarm button.
•
Alarm time and S appear on the display. The alarm is activated.
7.5.3 Setting the alarm for frost alert
(outdoor temperature at transmitter 1: ≤ 0°C)
•
Press alarm button again.
•
PRE-AL and OFF appear on the display.
•
Press and hold alarm button.
•
Select with ▲ or ▼ button, if you want to be woken up earlier 15, 30,
45, 60 or 90 minutes by risk of frost.
•
Confirm with alarm button.
7.5.4 Activate/turn off the different alarm times
•
Press mode button and you will return to normal mode.
•
The alarm time and the activated alarm symbols (S/W/PRE-AL) appear
on the display.
•
Once the alarm starts to ring, W,S and/or PRE-AL flashes.
•
Press alarm button to stop the alarm.
•
The alarm stays active from Monday until Friday (W).
•
Please consider that you have to activate the weekend or special
alarm time (S) always new.
•
To turn off the alarm function, press ▼ button in the respective alarm
mode.
•
OFF appears on the display.
CULT – Wireless Weather Station
•
To activate an alarm press ▲ button in the respective alarm mode.
The alarm time appears on the display.
•
To activate the alarm by risk of frost (PRE-AL) at least one alarm time
(S/W) has to be activated.
7.6 Temperature mode
•
Press the ▲ or ▼ button to enter the respective display area. When
changing the display area a brief beep tone will sound.
•
IN flashes on the display.
•
You are now in temperature mode.
7.7 Max/Min function
•
Press mem button in temperature mode and the lowest outdoor and
indoor temperature are displayed since the last reset.
•
MIN appears on the display.
•
Press mem button and the highest outdoor and indoor temperature
are displayed since the last reset.
•
MAX appears on the display.
•
Press mem button again and you will return to normal mode.
•
Press and hold mem button (approx. 3 sec.) in MAX/MIN-mode to
clear the recorded MAX/MIN readings.
•
The display shows the current temperature.
7.8 Temperature display
•
Press and hold mode button in temperature mode to select °C (Cel-
sius) or °F (Fahrenheit) as the temperature unit.
7.9 Trend pointers temperature
•
The trend pointers displayed on the LCD indicate if the temperature
values are increasing, steady or decreasing.
7.10 Outdoor temperature alarm
•
Press alarm button in temperature mode to enter the temperature
alarm function.
•
and OFF or the last adjusted upper temperature limit is indicated.
•
Press and hold alarm button for 3 seconds to enter the setting mode.
TFA_No_35.1116_Anl_ 31.01.2012 21:04 Uhr Seite 14

2928
CULT – Wireless Weather Station
•
The temperature indication flashes.
•
Press ▲ or ▼ button to adjust the upper temperature limit.
•
Confirm with alarm button.
•
Press alarm button twice to get to the lower temperature limit.
•
and OFF or the last adjusted lower temperature limit is indicated.
•
Press alarm button for 3 seconds to enter the setting mode.
•
The temperature indication flashes.
•
Press ▲ or ▼ button to adjust the lower temperature limit.
•
Confirm with alarm button.
•
Once the temperature alarm starts to ring, or is flashing. To
turn off the alarm function, press alarm button.
•
The alarm setting is always valid for all connected transmitters (CH 1,
2 and 3).
•
Press ▼ button to deactivate the alarm function in the corresponding
alarm mode.
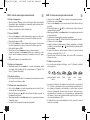
7.11 Weather forecast symbols
•
There are 7 different weather symbols:
•
The weather forecast relates to a range of 12 to 24 hours and indi-
cates only a general weather trend. For example, if the current
weather is cloudy and the rain icon is displayed, it does not mean the
product is faulty because it is not raining. It simply means that the air
pressure has dropped and the weather is expected to get worse but
not necessarily rainy. The accuracy is about 70 %.
•
The sun symbol also appears at night if there is a starry night.
7.12 Weather trend pointer
•
The trend pointer displayed on the LCD indicates if the atmospheric
pressure is increasing, steady or decreasing.
CULT – Wireless Weather Station
7.13 Outdoor transmitter
•
After batteries are inserted in the transmitter, the outdoor tempera-
ture will automatically be transmitted to the basic unit on channel 1.
•
After successful installation close the battery compartment of trans-
mitter carefully.
•
Please reset the instrument and follow the battery installation proce-
dure if the instrument does not work properly. Change the batteries.
7.14 Additional transmitters
•
For having more than one external transmitter (cat. no 30.3126),
select a different channel (2 or 3) for each transmitter by the chan-
nel switch inside the battery compartment of the transmitter.
•
Insert the batteries in the transmitter, making sure the polarity is cor-
rect.
•
Press and hold the ▼ button on the station for 3 sec. to start initializa-
tion manually.
•
If you have installed more than one transmitter, press channel but-
ton to change between the outdoor transmitters.
•
You can also choose an alternating channel display. Press and hold
channel button until the circle symbol appears for alternating
channel.
•
To deactivate the function press the channel button and the symbol
disappears.
7.15 Positioning of basic unit and transmitter
•
Choose a shady and dry position for the transmitter. (Direct sunshine
falsifies the measurement and continuous humidity strains the elec-
tronic components needlessly).
•
Place the weather station in the living room using the table stand.
Avoid the vicinity of any interfering field like computer monitors or
TV sets and solid metal objects.
•
Check the transmission of 433 MHz signal from the transmitter to the
display unit (transmission range 30 m free field). Within ferro-con-
crete rooms (basements, superstructures), the received signal is natu-
rally weakened.
•
If necessary choose another position for transmitter and/or basic unit.
sunny partly cloudy rainy heavy snowy heavy
cloudy rain snowfall
TFA_No_35.1116_Anl_ 31.01.2012 21:04 Uhr Seite 15

3130
CULT – Wireless Weather Station
•
Is the transmission is successfully, you can wall mount the transmitter.
Mount the bracket to the respective wall location. The transmitter
simply clicks into the holder. When inserting or removing the trans-
mitter from the wall holder please hold both units securely.
•
The transmitter can also be positioned on a flat surface by securing
the bracket to the bottom of the transmitter.
8. Care and maintenance
•
Clean the instrument and the transmitter with a soft damp cloth. Do
not use solvents or scouring agents.
•
Remove the batteries if you do not use the product for a lengthy
period.
•
Keep the instrument in a dry place.
8.1 Battery replacement
•
Replace the batteries when the battery symbol of the basic station
appears on the time display.
•
When the batteries of the transmitter are used up, the low battery
icon appears next to the outdoor temperature display.
•
Open the battery compartments and insert the new batteries. Make
sure they have the correct polarity. Close the covers again.
•
Please note: When the batteries are changed, the contact between
transmitter and receiver must be restored – so always insert new bat-
teries into both units or start a manual transmitter search.
9. Troubleshooting
Problems Solution
No display ➜ Ensure batteries polarity are correct
on the weather station ➜ Change batteries
No transmitter reception ➜ No transmitter installed
Display “---“ ➜ Check batteries of external transmitter
for channel 1/2/3 (do not use rechargeable batteries!)
➜ Restart the transmitter and
weather station as per the manual
➜ Start manual search for the transmitter
CULT – Wireless Weather Station
➜ Choose another place for the transmitter
and/or the weather station
➜ Reduce the distance between the
transmitter and the weather station
➜ Check if there is any source of
interference
No DCF reception ➜ See: “No reception of the transmitter“
➜ Manual time setting
➜ Wait for attempted reception during the
night
Incorrect display ➜ Change batteries
10. Waste disposal
This product has been manufactured using high-grade materials and
components which can be recycled and reused.
Never dispose empty batteries and rechargeable batteries
in household waste.
As a consumer, you are legally required to take them to
your retail store or to appropriate collection sites depend-
ing to national or local regulations in order to protect the
environment.
The symbols for the heavy metals contained are: Cd=cadmi-
um, Hg=mercury, Pb=lead
This instrument is labelled in accordance with the EU Waste
Electrical and Electronic Equipment Directive (WEEE).
Please do not dispose of this instrument in household
waste. The user is obligated to take end-of-life devices to a
designated collection point for the disposal of electrical
and electronic equipment, in order to ensure environmen-
tally-compatible disposal.
TFA_No_35.1116_Anl_ 31.01.2012 21:04 Uhr Seite 16

3332
CULT – Wireless Weather Station
11. Specifications
Basic unit:
Measuring range -5°… +50°C
Indoor temperature: +23°...+122 °F, °C/°F-switchable
Resolution: 0,1°C / 0,2°F
Power consumption: 2 x 1,5 V AAA
Housing dimension: 130 x 70 x 14 mm (without stand)
Transmitter:
Measuring range -20°...+60 °C /
Outdoor temperature: -4°...+140 °F, °C/°F switchable
Resolution: 0,1°C / 0,2°F
Transmission frequency: 433 MHz
Transmission time: approx. 45 seconds
Transmission range: max. 30 m
Power consumption: 2 x 1,5 V AAA
Housing dimension: 38 x 105 x 18 mm
TFA Dostmann GmbH & Co.KG, Zum Ottersberg 12, D-97877 Wertheim.
No part of this manual may be reproduced without written consent of TFA Dost-
mann. The technical data are correct at the time of going to print and may change
without prior notice.
DECLARATION OF CONFORMITY
Herewith we declare, that this wireless transmission device does comply with the
essentials requirements of R&TTE Directive 1999/5/EC. A copy of the signed and
dated Declaration of Conformity is available on request via [email protected].
www.tfa-dostmann.de 01/12
CULT – Station météo radio-pilotée
Nous vous remercions d'avoir choisi l'appareil de la Société TFA.
1. Avant d'utiliser l'appareil
•
Lisez attentivement le mode d'emploi. Pour vous familiariser avec
votre nouvel appareil, découvrez les fonctions et tous les compo-
sants, notez les détails importants relatifs à la mise en service et lisez
quelques conseils en cas de disfonctionnement.
•
En respectant ce mode d'emploi, vous éviterez d'endommager l'ap-
pareil et de perdre vos droits résultant d'un défaut pour cause d'uti-
lisation non-conforme.
•
Nous n'assumons aucune responsabilité pour des dommages qui
auraient été causés par le non-respect du présent mode d'emploi.
•
Suivez bien toutes les consignes de sécurité!
•
Conservez soigneusement le mode d'emploi!
2. Contenu de la livraison
•
Station météo radio-pilotée (station base)
•
Émetteur extérieur avec support
•
Support pour station
•
Piles 4 x 1,5 V AAA
•
Mode d'emploi
3. Aperçu du domaine d'utilisation et de tous les avantages de
votre nouvel appareil
•
Transmission de la température extérieure sans câble (433 MHz),
rayon d’action de 30 m au maximum (champ libre)
•
Extensible à 3 émetteurs au maximum, également pour le contrôle de
la température dans des pièces éloignées, par exemple chambre
d´enfants, cave
•
Température ambiante
•
Indicateurs de la tendance et valeurs maximales et minimales
•
Alarme de température
•
Prévisions météo par 7 symboles et tendance de la pression atmos-
phérique
•
Horloge radio-pilotée avec alarmes différentes, date et jour de
semaine (7 langues)
•
À poser
•
Installation ultrasimple sans câble
TFA_No_35.1116_Anl_ 31.01.2012 21:04 Uhr Seite 17
Page is loading ...
Page is loading ...
Page is loading ...
Page is loading ...
Page is loading ...
Page is loading ...
Page is loading ...
Page is loading ...
Page is loading ...
Page is loading ...
Page is loading ...
Page is loading ...
Page is loading ...
Page is loading ...
Page is loading ...
Page is loading ...
Page is loading ...
Page is loading ...
Page is loading ...
Page is loading ...
Page is loading ...
Page is loading ...
Page is loading ...
Page is loading ...
Page is loading ...
Page is loading ...
Page is loading ...
Page is loading ...
Page is loading ...
-
 1
1
-
 2
2
-
 3
3
-
 4
4
-
 5
5
-
 6
6
-
 7
7
-
 8
8
-
 9
9
-
 10
10
-
 11
11
-
 12
12
-
 13
13
-
 14
14
-
 15
15
-
 16
16
-
 17
17
-
 18
18
-
 19
19
-
 20
20
-
 21
21
-
 22
22
-
 23
23
-
 24
24
-
 25
25
-
 26
26
-
 27
27
-
 28
28
-
 29
29
-
 30
30
-
 31
31
-
 32
32
-
 33
33
-
 34
34
-
 35
35
-
 36
36
-
 37
37
-
 38
38
-
 39
39
-
 40
40
-
 41
41
-
 42
42
-
 43
43
-
 44
44
-
 45
45
-
 46
46


Ask a question and I''ll find the answer in the document
Finding information in a document is now easier with AI
in other languages
- italiano: TFA 35.1116 Manuale del proprietario
- français: TFA 35.1116 Le manuel du propriétaire
- español: TFA 35.1116 El manual del propietario
- Deutsch: TFA 35.1116 Bedienungsanleitung
- Nederlands: TFA 35.1116 de handleiding
Related papers
-
TFA 30.3157 Owner's manual
-
-
-
-
TFA Digital Thermometer for Indoor or Outdoor User manual
-
-
-
-
-
Other documents
-
Bresser Meteo NBF Colour DCF radio controlled Weather Station Owner's manual
-
Techno line Model Owner's manual
-
 Billiger WS 687 User manual
-
Elta 4521 User manual
-
-
Bresser 80-10011 MyTime Duo Owner's manual
-
Dostmann Pocket-DigiTemp Einstech-Thermometer User manual
-
Auriol 291528 Operation and Safety Notes
-
-
