Page is loading ...

REGISTRA IL TUO PRODOTTO
REGISTER YOUR PRODUCT
ENREGISTREZ VOTRE PRODUIT
REGISTRA TU PRODUCTO
GERÄTREGISTRIERUNG
REGISTE O SEU PRODUTO
www.polti.com
FAV 80_TURBO INTELLIGENCE
MANUALE DI
ISTRUZIONI
INSTRUCTION
MANUAL
MANUEL D’
INSTRUCTIONS
MANUAL DE
INSTRUCCIONES
BEDIENUNGS
ANLEITUNG
MANUAL DE
INSTRUÇÕES
FAV 70_INTELLIGENCE

TUBO FLESSIBILE VAPORE + ASPIRAZIONE
FLEXIBLE STEAM HOSE + VACUUM
TUBE FLEXIBLE VAPEUR + ASPIRATION
TUBO FLEXIBLE VAPOR + ASPIRACIÓN
DAMPF- UND SAUGSCHLAUCH
TUBO FLEXÍVEL VAPOR + ASPIRAÇÃO
BOCCHETTA VAPORE + ASPIRAZIONE
STEAM+SUCTION NOZZLE
PETIT EMBOUT VAPEUR+ASPIRATION
BOQUILLA VAPOR+ASPIRACIÓN
DAMPF-/SAUGDÜSE
BOCA PEQUENA VAPOR+ASPIRAÇÃO
CONCENTRATORE VAPORE + SET SPAZZOLINI COLORATI + LANCIA VAPORE
STEAM CONCENTRATOR + SET OF COLOURED BRUSHES + STEAM NOZZLE
CONCENTRATEUR VAPEUR + KIT BROSSES COLORÉES + LANCIA VAPEUR
CONCENTRADOR DE VAPOR + SET DE CEPILLOS DE COLORES + BOQUILLA VAPOR
DAMPFKONZENTRIERER + SATZ KLEINE FARBIGE BÜRSTEN + DAMPFDÜSE
CONCENTRADOR VAPOR + KIT ESCOVINHAS COLORIDAS + LANÇA VAPOR
TERGIVETRO 200 mm
200 mm SQUEEGEE INSERT
ACCESSOIRE RACLETTES VITRES 200mm
LIMPIA CRISTALES DE 200 mm
FENSTERREINIGER 200 mm
LIMPA-VIDROS DE 200 MM
TUBO PROLUNGA + TUBO PROLUNGA c/PARKING
E
XTENSION TUBE + EXTENSION TUBE w/PARKING
TUBE RALLONGE + TUBE RALLONGE a/PARKING
T
UBO ALARGADOR + TUBO ALARGADOR c/PARKING
V
ERLÄNGERUNGSROHR + VERLÄNGERUNGSROHR
MIT HALTERUNG
T
UBO EXTENSÃO + TUBO EXTENSÃO C/ ARRUMAÇÃO
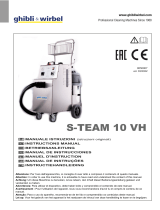
GUARNIZIONI DI RICAMBIO
SPARE SEALS
JOINTS DE RECHANGE
JUNTAS DE RECAMBIO
ERSATZDICHTUNGEN
GUARNIÇÕES DE SUBSTITUIÇÃO
N. 1 PANNO UNIVERSALE + 1 PARQUET
1 UNIVERSAL CLOTH + 1 PARQUET
1 LINGETTE UNIVERSELLES + 1 PARQUET
DÉLICATE + 1 PARQUET
1 PAÑOS UNIVERSALES + 1 PARQUET
1 UNIVERSALTÜCHER + 1 PARKETT TUCH
1 PANOS UNIVERSAIS + 1 + 1 PARQUET
C
U
F
F
I
A
CAP
B
ONNETTE
F
UND
A
HAUBE
PR
OTEÇÃO
FIALA BIOECOLOGICO
BIOECOLOGICO PHIAL
FLACON BIOECOLOGICO
AMPOLLA DE BIOECOLOGICO
BIOECOLOGICO-AMPULLE
FRASCO BIOECOLÓGICO
SPAZZOLINO PULIZIA SECCHIO
COLLECTOR CLEANING BRUSH
BROSSE NETTOYAGE BAC
CEPILLO DE LIMPIEZA EN SECO
REINIGUNGSBÜRSTE FÜR BEHÄLTER
ESCOVA LIMPEZA BALDE
D
C
A
B1
E F
G1
G
O
H
I
L
N
LANCIA ASPIRAZIONE
SUCTION LANCE
SUCEUR
LANZA DE ASPIRACIÓN
SAUGLANZE
LANÇA ASPIRAÇÃO
P
S
P
A
Z
Z
O
L
A
M
U
L
T
I
U
S
O
U
N
I
V
E
RSA
L
BRU
SH
BR
OSSE
MU
LT
I
F
ON
C
T
I
ON
S
BOQU
I
LLA
MU
LT
I
U
SOS
ME
HRZ
W
E
C
K
BÜ
R
ST
E
E
SC
OV
A
MU
LT
I
U
SO
B
TELAIO SETOLATO + TELAIO GOMMATO + TELAIO TAPPETI/MOQUETTE
BRISTLE FRAME + RUBBER FRAME + RUG/CARPET FRAME
BROSSE À SOIES + CADRE EN CAOUTCHOUC + CADRE TAPIS/MOQUETTE
CHASIS CON CERDAS + CHASIS ENGOMADO + CHASIS PARA ALFOMBRAS/
MOQUETAS
BÜRSTENAUFSATZ + GUMMIRAHMEN + RAHMEN FÜR TEPPICHE/TEPPICHBÖDEN
ESCOVA COM CERDA + ESCOVA DE BORRACHA + ESCOVA TAPETES/ALCATIFAS
B3
B2
M
CARAFFA
JUG
CARAFE
JARRA
NACHFÜLLBEHÄLTER
JARRA
H

| 3 |
FERRO DA STIRO ACCESSORIO
IRON ACCESSORY
FER À REPASSER ACCESSOIRE
P
LANCHA ACCESORIO
BÜGELEISEN ZUBEHÖR
FERRO DE ENGOMAR PROFISSIONAL
PFEU0021
OPTIONAL
PAEU0226
FILTRO HEPA
HEPA FILTER
FILTRE HEPA
FILTRO HEPA
H
EPA-FILTER
F
ILTRO HEPA
PAEU0292
MINI TURBO SPAZZOLA
MINI TURBO BRUSH
MINI TURBO BROSSE
MINI CEPILLO TURBO
MINITURBOBÜRSTE
MINITURBO ESCOVA
PAEU0297
N. 3 SPAZZOLINI c/SETOLE OTTONE
3 BRUSHES w/ BRASS BRISTLES
3 PETITES BROSSES a/SOIES EN LAITON
CEPILLOS DE COLORES c/CERDAS DE LATÓN
3 KLEINE BÜRSTEN MIT MESSINGBORSTEN
3 ESCOVAS COLORIDAS COM CERDAS BRONZE
PAEU0250
N. 3 SPAZZOLINI c/SETOLE NYLON
3
BRUSHES w/ NYLON BRISTLES
3 PETITES BROSSES a/SOIES EN NYLON
3 CEPILLOS c/CERDAS DE NYLON
3
KLEINE BÜRSTEN MIT NYLONBORSTEN
3
ESCOVAS COM CERDAS NYLON
PAEU0296
N. 3 SPAZZOLINI COLORATI c/SETOLE NYLON
3 COLOURED BRUSHES w/ NYLON BRISTLES
3 PETITES BROSSES COLORÉES a/SOIES EN NYLON
3 CEPILLOS DE COLORES c/CERDAS DE NYLON
3 BUNTE KLEINE BÜRSTEN MIT NYLONBORSTEN
3 ESCOVAS COLORIDAS COM CERDAS NYLON
PAEU0319
N. 1 PANNO UNIVERSALE + 1 DELICATO + 1 CUFFIA
1 UNIVERSAL CLOTH + 1 DELICATE + 1 CAP
1 LINGETTE UNIVERSELLES + 1 LINGETTE DÉLICATE + 1 BONNETTE
1 PAÑOS UNIVERSALES + 1 DELICADO + 1 FUNDA
1 UNIVERSALTÜCHER + 1 WEICHES TUCH + 1 HAUBEN
1 PANOS UNIVERSAIS + 1 DELICADO + 1 PROTEÇÃO
PAEU0316
N. 2 PANNI UNIVERSALI
2 UNIVERSAL CLOTHS
2 LINGETTES UNIVERSELLES
2 PAÑOS UNIVERSALES
2 UNIVERSALTÜCHER
2 PANOS UNIVERSAIS
PAEU0317
N. 2 PANNI DELICATI
2 DELICATE CLOTHS
2 LINGETTES DÉLICATES
2 PAÑOS DELICADOS
2 WEICHE TÜCHER
PANOS DELICADOS

ENGLISH
| 29 |
WELCOME TO THE WORLD
OF VAPORETTO LECOASPIRA
THE COMPLETE APPLIANCE FOR CLEANING THE HOUSE, IT CLEANS WITH THE
STEAM AND VACUUMS WITH WATER.
THIS DOUBLE FORCE OF NATURE HOLDS BACK 99.97% OF IMPURITIES
ACCESSORIES FOR ALL
NEEDS
On our web site
www.polti.com
and in good appliance shops
you will find a wide range of
accessories to increase the
performance and the practical
applications of your appliances
to make home cleaning even
easier.
To check the compatibility of an
accessory with your appliance,
search the code PAEUXXX /
PFEUXXXX listed next to each
accessory on page 3-4.
If the accessory code you wish
to buy is not listed in this
manual, please contact our
Customer Service team for more
information.
REGISTER YOUR PRODUCT
Visit our website
www.polti.com
or call our Customer Services
department to register your
product.
You can benefit from a special
welcome offer, in participating
countries, and keep up to date
on all the latest Polti news, as
well as buy accessories and
consumables.
To register your product, in
addition to your personal
information, you must enter the
serial number (SN) which you
will find on the silver label,
located on the box and
underneath the appliance.
To save time and have your
serial number to hand, write it in
the space provided on the back
cover of this manual.
OFFICIAL YOUTUBE
CHANNEL
Want to know more? Visit our
official channel:
www.youtube.com/poltispa.
Search the illustrative video for
Vaporetto Lecoaspira in order to
see a quick and easy overview of
all the features of this amazing
appliance.
In addition, the video guide will
lead you through use of the Va-
poretto Lecoaspira from prepa-
ration for use to simple mainte-
nance operations.
Sign up to the official channel to
keep yourself updated about our
video contents!
ATTENTION: The safety war-
nings are only indicated on this
manual.

| 30 |
ENGLISH
SAFETY WARNINGS
IMPORTANT PRECAUTIONS FOR USE
WARNING! BEFORE USING THE APPLIANCE,
CAREFULLY READ ALL THE INSTRUCTIONS AND
WARNINGS
IN THIS MANUAL,
AND ON THE
APPLIANCE ITSELF.
Polti S.p.A. declines all liability for any accident deriving from
any improper use of this appliance.
Correct use of the product is only as detailed in this instruction
manual.
Any use which does not comply with these instructions will
invalidate the warranty.
SAFETY SYMBOLS:
WARNING: High temperature. Risk of scalding!
If shown on the product, do not touch as parts may be
very hot.
WARNING: Steam.
Risk of scalding!
• Never disassemble or carry out maintenance on the
appliance apart from that indicated in this manual. In the
event of a fault or malfunction, do not try and repair the
appliance yourself. In the event of a heavy knock, fall,
damage or fall into water, the appliance may no longer be
safe to use. Incorrect use or a lack of respect for the
instructions herein may lead to serious accidents. Always
contact Authorised Service Centres.
• This appliance must not be used if it has been dropped, if
there are visible signs of damage or if it leaks.
• The plug must be removed from the socket before the
tank/boiler is filled with water.
• During use there is pressure inside the boiler. Do not remove
the boiler cap if the equipment is switched ON.

| 31 |
ENGLISH
• To carry out any maintenance or cleaning requiring access to
the boiler, ensure that the appliance is switched using the
power switches and disconnected from the mains for at least
two hours.
• This appliance can be used by persons with reduced physical,
sensory or mental capabilities or lack of experience and
knowledge if they have been given supervision or instruction
concerning use of the appliance in a safe way and understand
the hazards involved. Children must be supervised to ensure
they do not play with the appliance.
• Keep the appliance out of reach of children when it is
plugged in or cooling down.
• Keep all the parts of the packaging out of the reach of
children; they are not toys. Keep the plastic bag out of the
reach of children: danger of suffocation.
• The appliance must not be left unattended if plugged in to
the mains.
• Steam must not be directed towards equipment containing
electrical components, such as the interior of ovens.
• This appliance is destined exclusively for indoor domestic
use.
In order to reduce the risk of accidents, including: fires,
electrocution, personal injury and scalding, both during use
and during preparation, maintenance and storage, always
take the fundamental precautions listed in this manual.
RISKS CONNECTED TO THE POWER SUPPLY -
ELECTROCUTION
• The earthing system and highly sensitive residual-current
circuit breaker, complete with magnetothermic cut-out for
your domestic system, guarantee safe use of electrical
appliances.
Therefore, for your own safety, check that the electrical
system to which the appliance is connected complies with
current laws.
• Do not connect the appliance to the mains if the voltage does
not correspond with that of the domestic electrical circuit in
use.

| 32 |
ENGLISH
• Do not overload the sockets with adaptors and/or
transformers. Only connect the product to a single socket
with current that is compatible with the supplied plug.
• Do not use electrical extension leads that are unsuitable for
the power rating or which are not compliant with law. They
may overheat and possibly lead to short circuiting, fire,
power outage or damage to the equipment. Only use
extension leads which are certified, suitable for the power
rating, supporting 16A and earthed.
• Always turn the appliance off at the ON/OFF switch before
unplugging it.
• To remove the plug from the socket, do not pull the power
cable, but hold the plug itself to avoid damage to the plug
and the cable.
• Always unplug the appliance if it is not in use and before any
preparation, maintenance or cleaning operation.
• The appliance must not be left unattended if plugged in to
the mains.
• Fully unwind the cable from the cable winder before
connecting the appliance to the mains and before use.
Always use the product with the cable completely unwound.
• Do not pull or jerk the cable or expose it to tensions (twisting,
crushing or stretching). Keep the cable away from hot and/or
sharp surfaces and elements. Avoid crushing the cables in
doors and windows. Do not pull the cable tight around
corners. Avoid treading on the cable. Do not wind the power
cable around the appliance, especially if the appliance is hot.
Do not place the appliance on top of the power cable, this
can be dangerous.
• Do not substitute the plug on the power cable.
• If the power cable is damaged, it must be replaced by the
manufacturer, its service agent or similarly qualified persons
in order to avoid all possible hazards. Do not use the product
if the power cable is damaged.
• Do not touch or use the appliance barefoot and/or with wet
body or feet.
• Do not use the appliance near containers full of water, e.g.
sinks, baths and swimming pools.

| 33 |
ENGLISH
• Do not immerse the appliance, including the power cable and
plug, in water or other liquids.
RISKS DURING USE OF THE PRODUCT –
INJURIES/SCALDING
• The product should not be used in areas where there is a
danger of explosions or in the presence of toxic substances.
• Do not pour toxic substances, acids, solvents, detergents,
corrosive substances and/or explosives or perfumes into the
boiler.
• Only pour water or the water mix indicated in the Chapter
“WHICH WATER TO USE” into the boiler.
• Do not vacuum or direct the steam jet onto toxic substances,
acids, solvents, detergents or corrosive substances. The
handling and removal of dangerous substances must be
carried out according to the indications of the manufacturers
of these substances.
• Do not vacuum or direct the steam jet onto explosive
powders or liquids, hydrocarbons, open flames and or
extremely hot objects.
• Keep all
body parts away from the vacuum intake and from
any moving parts.
• Do not use the vacuum function on people and/or animals.
• Use the specific handle for transport. Do not pull the power
cable. Do not use the power cable as a handle. Do not lift the
appliance using the power cable or the steam hoses/vacuum
tubes. Do not lift the product by the dirt collector handle.
• Do not position the product near sources of heat such as
fireplaces, stoves and ovens.
• Do not position the product near electromagnetic fields such
as induction plates.
• Re-wind the cable when the appliance is not in use.
• Do not obstruct the openings and grills on the product.
• Do not direct the steam jet on any part of the body of people
or animals.
• Do not direct the steam jet on clothes while they are being
worn.
• Cloths and rags and fabrics which have been subjected to a

deep steam reach very high temperatures, above 100°C. Wait
a few minutes and check that they have cooled before
handling them. Therefore, avoid contact with the skin if they
have just been steamed.
• During use, keep the product in a horizontal position on
stable surfaces.
• The steam lock on the handle guarantees greater safety, as it
prevents the accidental activation of steam delivery by
children or people who are unaware of the function of the
appliance. When steam is not being used, apply the steam
lock.
To continue steam delivery, return the switch to its original
position.
RISKS RELATED TO USE OF THE IRONING ACCESSORY
• Iron only on supports that are heat resistant and which allow
the steam to permeate.
• When placing the iron on its stand, make sure that the
surface on which the stand is placed, is stable.
• If the iron rest mat needs to be replaced, only use original
spare parts.
• The iron must be used with the ironing mat provided.
• The iron must be used and rested on a flat stable surface.
• The iron is not to be used if it has been dropped, if there are
visible signs of damage or if it is leaking.
• Do not place the hot appliance on heat-sensitive surfaces.
• If ironing whilst sitting down, take care to ensure that the jet
of steam is not angled towards your legs. Steam can scald.
• Before connecting the appliance to the current, ensure that
the continuous steam jet button is not pressed (if present).
• Never leave the iron unattended when it is plugged in.
ENGLISH
| 34 |

ENGLISH
| 35 |
CORRECT USE OF THE PRODUCT
This appliance is intended for internal home
use as a steam cleaner and as a vacuum with
water filter for liquids, and dry and/or damp
material (dirt) from surfaces in accordance
with the instructions provided in this manual.
Please read these instructions carefully and
keep them. If this manual is lost, it can be
consulted and/or downloaded from the
website www.polti.com.
Only vacuum domestic dirt and/or water.
Do not use on debris or chalk, cement or
residues from building sites or brick laying.
Do not use on earth and sand/soil, etc.
Do not use on ash, soot and combustion
residues (fireplaces, barbecues, etc.).
Do not use on printer, photocopier or fax
toner and ink powder.
Do not vacuum pointed, sharp or stiff objects.
The appliance only functions correctly if the
dirt collector is inserted and complete with all
its parts.
Do not lift the product by the dirt collector
handle.
Never leave the appliance exposed to
weathering.
Do not vacuum when the water filter tank is
empty. For vacuuming always fill the water
filter tank as indicated in Section 1.
POLTI S.p.A. reserves the right to make the
aesthetic, technical and construction changes
it deems necessary, without prior notice.
Before leaving our factory all our products
are rigorously tested. This is the reason why
your Vaporetto Lecoaspira may contain some
residual water in the boiler and in the tank.
Correct use of the product is only as detailed
in this instruction manual. Any other use may
damage the appliance and invalidate the
warranty.
INFORMATION FOR USERS
Pursuant to European Directive 2012/19/EU,
regarding electric and electronic appliances,
this appliance must not be disposed of with
domestic waste, but sent to an official
collection facility. This appliance complies
with EU Directive 2011/65/EU.
The crossed-out bin symbol on the
appliance indicates that, at the end
of its useful lifespan, the product
must be disposed of separately from
other waste. Therefore, at the end of its life,
the user must handover the appliance to an
appropriate collection centre for electric and
electronic waste. Proper separate waste
collection to facilitate the subsequent
recycling, treatment and environmentally
compatible disposal of the appliance helps to
prevent negative effects on the environment
and human health, and promotes recycling of
the materials the product is made of.
Unlawful disposal by the owner involves the
application of the administrative sanctions
envisaged by current legislation.
WHICH WATER TO USE IN THE
BOILER
This appliance has been designed to function
with normal medium tap water between 8°F
and 20°F. If the tap water contains a lot of
limescale use a mix composed of 50% tap
water and 50% demineralised water which is
widely available to purchase. Do not use pure
demineralised water.
Warning: check the hardness of the water at
the technical office at your local council or
the local water supplier.
If you only use tap water, you can reduce the
formation of limescale by using the special
Kalstop FP2003 decalcifying product,
distributed by Polti, and available for sale at
all major domestic-appliance stores or online
at www.polti.com.
Never use distilled water, rain water or water
containing additives (e.g. starch, perfumes),
or water produced by other domestic
appliances, by water softeners or filter jugs.
Do not add chemical, natural, detergent, or
limescale removing substances, etc.
1. PREPARING FOR USE
1.1 Lift the handle of the water filter collector
and remove the collector from its housing (1-
2).
1.2 Turn the handle of the water filter
collector and remove the water filter unit (3-
4).
1.3 Fill the water filter collector with about
MAX
1.8 l
Use tap water in the water filter collector.
There could be accessories in the water filter
collector, therefore remove them before
using the appliance.

ENGLISH
| 36 |
1.2l of tap water up to the MAX indicator (5).
1.4 Replace the filter unit in the water filter
collector returning it to its original position
(7).
1.5 Reposition the water filter collector in its
housing and turn the handle until it returns to
its starting position (8-9).
1.6 Turn the door of the tank outwards (10)
and fill the tank with approximately 550 ml of
water using the special filler jug (H), at least
until the maximum-level float is visible (11).
Close the door.
This operation must always be carried out
when the boiler has cooled and with the
power cable disconnected from the mains.
1.7 Open the door of the built-in socket and
insert the built-in plug of the flexible
steam/vacuum hose (12).
1.8 Completely unwind the power cable and
connect it to an appropriate mains socket
(13). Always use the product with the cable
completely unwound.
1.9 The appliance is ready for use.
2. CONNECTION OF ACCESSORIES
All the Vaporetto Lecoaspira accessories can
be connected directly to the flexible
steam/vacuum hose or to the extension
hoses.
2.1 To connect the specific accessories for the
suction and steaming features proceed as
follows:
Move the locknut of the
accessory, if present, to
the OPEN position and
connect the accessories.
Move the accessory
locknut to the CLOSED
position. Check the
strength of the
connection.
On the extension tubes
there is an additional
fastening button: proceed
as described previously
for the accessories and release the tubes by
sliding the button as far as the lock position.
2.2 To connect the special accessories only
for suction it is only necessary to attach them
without coupling them to the locknut.
2.3 To connect the steam lance (F) with the
steam concentrator (D), simply screw it on.
The same operation can be carried out for
the coloured brushes (E), which can in turn
be screwed onto the steam concentrator and
onto the steam lance. The different colours
allow you to always use the same brush for
the same surface.
3. INTEGRATED CLEANING
PROGRAMS
The appliance is equipped with preset
programmes to automatically regulate the
steam pressure and the duration of suction
based on the surface in question.
3.1 Press the SET button on the control panel
(27). When it is turned on, the appliance
starts in manual mode (28). Using the buttons
and it is possible to select the desired
programme (27). Confirm the selection by
pressing the OK button (27).
To change the programme again, repeat the
operation indicated above.
FAV70
Add Bioecologico to the water in the water-
filter collector. This anti-foam and deodori-
sing liquid containing natural substances re-
leases a pleasant perfume into the room,
prevents the formation of foam in the water
filter, and guarantees the correct operation
of the appliance (Chapter 20)(6).
WARNING: Incorrectly inserting the water
filter collector can cause a reduction in the
suction capacity.
WARNING : Do not vacuum when the water
filter tank is empty. For vacuuming always
fill the water filter tank (5).
Avoid water leaks. Make sure that the water
does not overflow, to avoid wetting the sur-
face on which your Vaporetto Lecoaspira is
resting.
WARNING: When first operating steam, the-
re may be some drops of water mixed with
the steam due to temperature imbalances.
Direct the first jet of steam onto a rag.
To avoid any dirt in the dirt collector causing
bad smells, we recommend emptying and
cleaning after every use according to the
methods described in Chapter 16
WARNING: The preset programmes can vary
depending on the Lecoaspira model chosen.
On the appliance, under the handle, there is
a handy label listing the number and type of
programmes.

ENGLISH
| 37 |
FAV80
4. MANUAL OPERATION
In this mode, it is possible to manually adjust
the quantity of steam dispensed and the
suction speed.
Make sure that you have prepared the
appliance following the instructions provided
in Section 1.
4.1 For suction only, press the suction button
on the appliance (29) and proceed with
cleaning.
The suction power can be adjusted, based on
the surface to be cleaned, by holding the
suction button down. In this case the number
of segments on the suction indicators will
increase or decrease on the appliance control
panel (30).
Hold the suction button down to stop
suction.
4.2 For steam cleaning only, switch on the
boiler using the button (31). The pressure
and boiler indicators will start flashing. Select
the steam pressure desired by pressing the
button again. One of the 4 pressure
indicators lights up every time the button is
pressed, indicating the increase in the
pressure of the steam. Press the button to
reduce the steam pressure. One of the
pressure indicators goes off every time the
button is pressed, showing the reduction in
the steam pressure.
When the pressure indicator and the boiler
indicator remain lit, it means that the
appliance has reached the desired steam
pressure (32).
Ensure that the steam lock on the handle is
deactivated (33). Hold the steam trigger to
dispense steam (34), the relative indicator
will turn on.
To stop the steam flow, simply release the
steam button.
4.3 For steam cleaning and suction, carry out
points 4.1 and 4.2 at the same time.
USE OF FRAMES FOR FLOORS
5. CLEANING HARD FLOORS
(tiles, ceramic surfaces, etc.)
Make sure that you have prepared the
appliance following the instructions provided
in Section 1.
5.1 Connect the two extension tubes (C) to
the handle (A).
5.2 For suction only, connect the universal
brush (B) with the frame w/bristles (B1) and
follow the instruction indicated in point 4.1.
5.3 For steam cleaning and suction attach the
frame for liquids (B2) to the universal brush
(B).
5.4 Select programme
P1
for
model
, P0
for the
model , as indicated in
Section 3. This programme is
specifically for cleaning
parquet and delicate floors.
The function involves the combined action of
an intermittent flow of steam with adequate
suction force.
5.5 Wait for the indicators to remain lit.
5.6 Disconnect the steam lock on the handle
For safety reasons, engage the steam lock
on the handle during vacuuming.
Level 1 Curtains
Level 2 Sofas and cushions
Level 3 Rugs and carpets
Level 4 Floor or liquid collection
When the appliance is switched on again,
the suction level will be that set last time it
was used.
Steam
M
axi-
m
um
4 indicators
turned on
To remove scaling, stains,
and grease and sanitise
R
egular
s
team
2 or 3 indi-
cators tur-
ned on
F
or carpets, rugs, windows,
f
loors
Mini-
mum
steam
1
indicator
t
urned on
To steam plants, clean deli-
cate fabrics, wall coverings,
sofas, etc.
HARD FLOORS
DELICATE
FLOORS
RUGS/
CARPETS
BRISTLE FRAME
(B1) suction only
BRISTLE FRAME
(B1) suction only
BRISTLE FRAME
(B1) suction only
RUBBER FRAME
(B2) for steam
and suction. The
universal cloth
can be used com-
bined with the
RUGS/CARPET
FRAME (B3).
RUGS/CARPET
FRAME (B3) with
parquet cloth for
steam and suc-
tion
RUGS/CARPET
FRAME (B3) for
steam and suc-
tion
For safety reasons, engage the steam lock
on the handle during vacuuming.
FAV80
FAV70

(33) and hold the steam button down (34) to
start dispensing steam.
Steam starts to be dispensed continuously
and suction starts at the same time. Release
the steam button to stop the steam flow,
while suction will continue to dry the surface
treated.
If you need to restart the programme to
complete cleaning of the surface, just press
the steam button again.
The combined use of steam and suction
allows the most efficient sanitising of the
surface, dissolving dirt, eliminating grease,
germs and mites, and above all allows drying
of the surfaces.
In this position, it is also possible to vacuum
small quantities of liquids and dry the floor.
Once the cleaning cycle is finished, it is
possible to start suction by pressing the
suction button to remove any residual
humidity.
5.7 For steam cleaning only, proceed as
indicated in point 4.2. It is possible to use the
abrasive action of the universal cloth supplied
(L). Attach it to the universal brush (B)
before starting to clean the surface (21).
6. CLEANING DELICATE FLOORS
(wooden, stone, waxed surfaces,
etc.)
Make sure that you have prepared the
appliance following the instructions provided
in Section 1.
6.1 Connect the two extension tubes (C) to
the handle (A).
6.2 For suction only, connect the universal
brush (B) with the frame w/bristles (B1) and
follow the instruction indicated in point 4.1.
6.3 For steam cleaning and suction attach the
rug/carpet frame (B3) to the universal brush
(B). Attach the parquet cloth supplied (L)(21)
to the universal brush (B).
6.4 Select programme
P2
for
model
, P1
for the
model , as indicated in
Section 3. This programme is
specifically for cleaning
parquet and delicate floors.
The function involves the combined action of
a delicate intermittent flow of steam with
adequate suction force.
6.5 Wait for the indicators to remain lit.
6.6 Disconnect the steam lock on the handle
and hold the steam button down to start
dispensing steam.
Intermittent steam starts to be dispensed and
suction starts at the same time. Release the
steam button to stop the steam flow, while
suction will continue for a few seconds more
to dry the surface treated.
If you need to restart the programme to
complete cleaning of the surface, just press
the steam button again.
7. CLEANING RUGS AND CARPETS
Make sure that you have prepared the
appliance following the instructions provided
in Section 1.
7.1 Connect the two extension tubes (C) to
the handle (A).
7.2 Connect the universal brush (B) to the
rug/carpet frame (B3).
7.3 For suction only follow the instructions in
point 4.1.
The suction speed and the quantity of steam
are preset and therefore they cannot be
adjusted manually.
Before removing the cloth from the brush,
wait a few minutes to allow the cloth to cool.
WARNING: For additional safety, test steam
delivery on a hidden part, leave the steamed
part to dry to ensure that no changes in co-
lour or deformation have occurred.
Before using the appliance on delicate
surfaces, ensure that the part in contact with
the surface is free from foreign bodies that
could cause scratches.
For safety reasons, engage the steam lock
on the handle during vacuuming.
FAV80
FAV70
The suction speed and the quantity of steam
are preset and therefore they cannot be
adjusted manually.
Before removing the cloth from the brush,
wait a few minutes to allow the cloth to cool.
WARNING: Before cleaning fabrics with
steam, consult the manufacturer’s
instructions and always carry out a test on a
hidden part or on a sample of the material.
Allow the steamed part to dry to make sure
that no changes in colour or deformations
have occurred.
For safety reasons, engage the steam lock
on the handle during vacuuming.
ITALIANOENGLISH
| 38 |

7.4 For steam cleaning and
suction select Programme
P3
for model
, P2
for the
model , as indicated in
Section 3.
7.5 Wait for the indicators to
remain lit.
7.6 Disconnect the steam lock on the handle
(33) and hold the steam button down (34) to
start dispensing steam.
When releasing the steam button or after a
maximum of 150 seconds, the suction starts
automatically to dry the treated surface.
Suction stops automatically after a period of
time in proportion to the time the steam was
supplied.
If you need to restart the programme to
complete cleaning of the surface, just press
the steam button again.
8. CLEANING GLASS, WINDOWS
AND TILES
Make sure you have prepared
the appliance following the
instructions provided in
Section 1 and that you have
selected Programme
P4
for
model
, P3
for the
model , as indicated in Section 3.
8.1 Wait for the indicators to remain lit.
This programme alternates steam and
suction to remove grease and polish the
surfaces, removing smears and dissolving
limescale deposits.
8.2 Connect the nozzle for frames (G) to the
handle (A) or to the extension tubes (C)(22-
23) and attach the window cleaning
accessory (G1)(24).
Ensure that the steam lock on the handle is
deactivated (33).
8.3 Press and hold the steam trigger on the
handle (A) and steam the surface abundantly
to dissolve the dirt.
8.4 When releasing the steam button or after
a maximum of 30 seconds, the suction starts
automatically. Suction stops automatically
after a period of time in proportion to the
time the steam was supplied. In any case, it is
possible to stop the programme manually by
pressing the suction button.
If you need to restart the programme to
complete cleaning of the surface, just press
the steam button again.
Once the cleaning cycle is finished, it is
possible to start suction by pressing the
suction button to remove any residual
humidity.
The combined use of steam and suction
allows the most efficient sanitising of the
surface, dissolving dirt, and eliminating
grease and germs, and above all allows
drying of the surface.
9. CLEANING BEDS/MATTRESSES
Make sure that you have prepared the
appliance following the instructions provided
in Section 1.
9.1 For suction only, connect the nozzle for
frames (G) to the handle (A) and follow the
instruction indicated in point 4.1.
9.2 For steam cleaning and suction use the
nozzle for frames (G) with the cap cloth
(I)(25) attached and connect it to the handle
(A) or to the extension tubes (C)(22-23).
9.3 Follow the instructions provided in points
4.1 and 4.2.
Ensure that the steam lock on the handle is
deactivated (33).
9.4 It is possible to use the suction and steam
features either together or by alternating
them, activating both as described in the
previous points.
Combined use of steam and suction allows
the most efficient sanitising of the surface,
dissolving dirt and removing grease, germs
and mites; it allows brightens the colour of
fibres and dries surfaces more quickly.
The suction speed and the quantity of steam
are preset and therefore they cannot be
adjusted manually.
WARNING: To clean glass surfaces in
particularly cold seasons, preheat the
windows starting to vacuum from a distance
of about 50 cm from the surface.
FAV80
FAV70
The suction speed and the quantity of steam
are preset and therefore they cannot be
adjusted manually.
WARNING: Before cleaning leather or
fabrics with steam, consult the
manufacturer’s instructions and always carry
out a test on a hidden part or on a sample of
the material. Allow the steamed part to dry
to make sure that no changes in colour or
deformations have occurred.
For safety reasons, engage the steam lock
on the handle during vacuuming.
FAV80
FAV70
ENGLISH
| 39 |

9.5
For model
select
Programme
P5,
as indicated in
Section 2
.
Wait for the indicators to
remain lit.
This programme is ideal for
eliminating mites, and vacuuming hair, animal
fur and dust.
Steam the surface to be treated. Releasing
the steam button or after a maximum of 60
seconds, suction starts automatically, making
it possible to dry the treated surface.
If you need to restart the programme to
complete cleaning of the surface, just press
the steam button again.
In any case, it is possible to stop the
programme manually by pressing the suction
button.
10. UPHOLSTERY, WALL
COVERINGS, CAR INTERIORS
Make sure that you have prepared the
appliance following the instructions provided
in Section 1.
10.1 For suction only, connect the nozzle for
frames (G) to the handle (A) and follow the
instruction indicated in point 3.1.
10.2 For steam cleaning and suction use the
nozzle for frames (G) with the cap cloth
(I)(25) attached and connect it to the handle
(A) or to the extension tubes (C)(22-23).
10.3 Follow the instructions provided in
points 4.1 and 4.2.
Ensure that the steam lock on the handle is
deactivated (33).
10.4 It is possible to use the suction and
steam features either together or by
alternating them, activating both as
described in the previous points.
Combined use of steam and suction allows
the most efficient sanitising of the surface,
dissolving dirt and removing grease, germs
and mites; it allows brightens the colour of
fibres and dries surfaces more quickly.
10.5
For model
select
Programme
P6,
as indicated in
Section 3
.
Wait for the indicators to
remain lit. This programme is
ideal for eliminating mites, and
vacuuming hair, animal fur and dust.
Intermittent jets of steam are supplied and at
the same time suction begins.
When the steam button is released the flow
of steam stops, while suction will continue for
a few seconds more to dry the surface
treated. Suction stops automatically after a
period of time in proportion to the time the
steam was supplied.
If you need to restart the programme to
complete cleaning of the surface, just press
the steam button again.
In any case, it is possible to stop the
programme manually by pressing the suction
button.
11. CLEANING BATHROOM
FIXTURES, GROUTING AND
KITCHEN WORKTOPS
Make sure that you have prepared the
appliance following the instructions provided
in Section 1.
11.1 Connect the concentrator accessory (D)
equipped with bristly round brush (5) to the
handle (A)(26). The steam lance (F) can be
attached to the concentrator accessory (D).
This is recommended for reaching the most
difficult areas, ideal for cleaning radiators,
door and window frames, bathrooms and
shutters.
To connect the steam lance (F) to the
concentrator accessory (D) just screw it on
like the coloured brushes (26), which can be
screwed onto the lance and/or onto the
accessory directly.
11.2 Turn on the boiler and adjust the strength
of the steam following the instructions
provided in point 4.2.
11.3 Ensure that the steam lock is deactivated
(33) and press and hold the steam trigger on
the handle to begin cleaning.
11.4 Connect the suction lance (M) to the
concentrator accessory (D) and activate the
WARNING: Before cleaning leather or fa-
brics with steam, consult the manufacturer’s
instructions and always carry out a test on a
hidden part or on a sample of the material.
Allow the steamed part to dry to make sure
that no changes in colour or deformations
have occurred.
For safety reasons, engage the steam lock
on the handle during vacuuming.
FAV80
The suction speed and the quantity of steam
are preset and therefore they cannot be
adjusted manually.
Before steaming surfaces, we recommend
vacuuming up any hair or dust, using the va-
cuum only function in manual mode.
FAV80
ITALIANOENGLISH
| 40 |

suction function to begin vacuuming
immediately, removing dirt thanks to the
concentrated steam jet.
12. CLEANING FURNITURE AND
DELICATE SURFACES
12.1 Connect the suction lance (M) or the
nozzle for frames (G) to the handle (A) and
press the suction button on the appliance.
12.2 Turn on the boiler and adjust the
strength of the steam following the
instructions provided in point 4.2.
Press and hold the steam trigger on the
handle (34) and direct the jet onto a cloth.
12.3 Use the cloth previously steamed to
clean the surface, avoiding prolonged use on
the same spot.
13. OTHER GENERAL USES
13.1 BRIGHTENING UP CURTAINS AND
DRAPES
Mites and dust can be removed from curtains
and drapes by steaming the fabric with just
the handle. The steam is able to remove
odours and brighten up colours, allowing the
fabric to be washed less frequently.
For this surface, set the steam to
level 1
.
13.2 REMOVING STAINS FROM CARPETS
AND UPHOLSTERY
Connect the concentrator accessory (D)
without the bristly round brush; direct the
steam directly onto the stain with the
greatest angle possible (never vertically to
the surface to be cleaned) and place a cloth
beyond the stain to collect the dirt that has
been “blown” away by the steam pressure.
For this surface, set the steam to
level 1
.
Connect the suction lance (M) to the
concentrator accessory (D) and activate
suction to begin vacuuming the dirt removed
which has remained on the floor.
13.3 TAKING CARE OF PLANTS AND
HUMIDIFYING ROOMS
To take care of your house plants, remove
the dust from the leaves using just the
handle, vacuuming the surface: adjust the
steam to
level 1
and vacuum at a distance of
50 cm. Plants breathe better and will be
cleaner and brighter. Furthermore, you can
also use the steam to refresh spaces,
especially those frequented by smokers.
14. ECO PROGRAMME - P0
only for Model FAV80
The Eco function is specifically for cleaning
floors. Thanks to the ECO function, Vaporetto
Lecoaspira automatically sets the pressure of
the steam and suction to achieve significant
energy savings and at the same time provide
optimal performance for the cleaning of all
floors.
To activate the ECO Programme select
programme P0 , as indicated in Section 3. For
steam cleaning and suction of floors, please
refer to the table “Use of frames for floors” of
Section 4.
15. TURBO STEAM PROGRAMME
This programme automatically sets the
pressure of the steam at maximum power,
ideal for stubborn dirt.
To activate the Turbo Steam Programme
select Programme
P7
for model
, P5
for the model , as indicated in Section
3.
16. TURBO SUCTION PROGRAMME -
P8
only for Model FAV80
This programme automatically sets the
Vaporetto Lecoaspira at maximum suction
power. This programme allows you to
vacuum up dust and liquids or efficiently
remove animal hair. To activate the Turbo
Suction Programme select programme
P8
, as
indicated in Section 3.
17. IRON PROGRAMME (optional)
(only functions with Polti iron accessory
connected)
Make sure that you have prepared the
appliance following the instructions provided
WARNING: Do not direct the steam jet direc-
tly onto surfaces.
Before cleaning the surface, always do a test
on a hidden part and see how it reacts to the
application of steam.
WARNING: Before cleaning the surface,
always do a test on a hidden part and see
how it reacts to the application of steam.
WARNING: Steam.
Risk of scalding!
FAV80
FAV70
After 10 minutes of use, the programme re-
turns to manual.
The different coloured brushes allow for a
different colour for each surface or
environment.
ENGLISH
| 41 |

in Section 1.
This programme makes it possible to turn the
appliance into a powerful ironing system.
Open the door of the built-in socket and
insert the built-in plug of the iron accessory,
set Programme
P9
for model
, P4
for
model , as indicated in Section 3.
Adjust the quantity of steam by pressing the
UP and DOWN buttons, based on the type of
fabric to be ironed.
18. OUT OF WATER
Thanks to the self-filling system, it is not
necessary to wait for the appliance to cool
before refilling the boiler with water.
When the tank is out of water, the indicator
light on the control panel (tap or drop) will
turn on and you will hear a beep.
To continue with steam cleaning, simply open
the tank door and add water.
19. AUTOMATIC SUCTION LOCK
When the dirt sucked into the water filter
collector reaches the maximum level allowed,
suction will be automatically blocked by the
special safety float. This can also happen
when the water in the collector is very dirty.
In these cases, there is an increase in the
motor rpm: it is therefore necessary to
remove the water in the collector.
Turn off the appliance and only restart it
when the level of the water in the collector
has been restored as described inSection 1.
20. BIOECOLOGICO
Bioecologico is an anti-foaming and
deodorising product containing natural
substances. It prevents foaming inside the
water filter thus ensuring correct functioning
of the appliance. When diluted inside the dirt
collection tank, Bioecologico also acts as an
effective deodoriser and thanks to the natural
substances which it is composed of, it
prevents unpleasant smells inside the
collection tank and releases a fresh clean
fragrance into the environment.
Contents of the phial: 5 ml
Bioecologico is sold at all major domestic-
appliance shops or online at www.polti.com.
HOW TO USE BIOECOLOGICO
20.1 Add water to the water filter as
instructed in this manual.
20.2 Shake the phial before use.
20.3 Bend and break the phial cap.
20.4 Pour the contents of the phial into the
water filter collector of the appliance.
21. GENERAL MAINTENANCE
To clean the outside of the appliance, only
use a damp cloth and tap water.
All accessories can be cleaned using running
water, ensuring they are completely dry
before the next use (37).
Do not use detergents of any type.
22. CLEANING THE WATER FILTER
COLLECTOR
(ordinary maintenance)
22.1 Ensure that the appliance is switched off
and disconnected from the mains.
22.2 Lift the water filter collector removing it
from its housing using the special handle (2).
22.3 Turn the handle backward and remove
the water filter unit (3-4).
22.4 Empty the tank by tilting it towards the
spout (35).
22.5 Turn the elbow tube downward until it
In order to optimise ironing times, we re-
commend starting to iron the more delicate
fabrics first (steam quantity 0 or 1) and then
moving on to fabrics that require greater
steam pressure. Otherwise, although the
supply of steam is not prevented, it will be
necessary to wait for the boiler to cool down
to allow the appliance to reach the steam
pressure selected.
In this programme, if the iron accessory is
not inserted steam is not dispensed.
To vacuum surfaces it is not necessary to fill
the tank, simply turn the boiler off.
WARNING: Immediately turning the applian-
ce back on, without replacing the water,
could damage the air outlet filter.
Use 1 phial per use.
A possible change in the colour of the liquid
does not alter the functioning or the efficacy
of the product.
WARNING: Never poor Bioecologico into
the boiler.
FAV80
FAV70
N
o sections lit:
SYNTHETIC FABRICS and SILK
3
sections lit: LINEN
2 sections lit: COTTON
1 sections lit: WOOL
ITALIANOENGLISH
| 42 |

slides off the filter unit (36).
22.6 Separate all the components and rinse
them under running water (37).
22.7 Dry the various components of the filter,
reassemble it and reinsert it into the dirt
collector.
22.8 Reposition the water filter collector in
the appliance.
23. CLEANING THE HEPA FILTER
(extraordinary maintenance)
23.1 Ensure that the appliance is switched off
and disconnected from the mains.
23.2 Lift the water filter collector removing it
from its housing using the container handle
(2).
23.3 Lift the release lever of the HEPA filter
and remove it from its housing (39).
23.4 Rinse the HEPA filter using running
water only and shake gently to remove any
excess dirt or water residue; before replacing
the filter in the appliance, leave to dry
naturally away from sources of heat for at
least 24 hours.
The HEPA filter should be fully cleaned
approximately three times per year.
24. SPARE SEALS
Periodically check the status of the coloured
washer located in the built-in socket. If
necessary, replace with the corresponding
spare part, as described below.
Perform the same check on the connection
seals of the extension tubes and the handle of
the hose. If necessary, operate as follows.
25. STORAGE
25.1 Turn off the appliance and disconnect
from the mains electricity.
25.2 Remove the water filter collector as
indicated in Section 1.
25.3 Manually wind the cable evenly and
replace it into the holder, passing it into the
power cable storage space (40).
25.4 Replace the water filter collector in its
housing, making sure to position it correctly.
25.5 The hoses, brush and flexible hose can
be housed on the body of the appliance,
sliding the hook on the universal brush into
the parking system on the appliance (40).
To clean the water filter collector and the
extension tubes, if they are especially dirty,
once the cleaning operations have been
completed, empty the container as descri-
bed and replace it in its housing in the ma-
chine. Connect the appliance to the mains.
Then vacuum up approximately 1.5 litres of
clean water using the suction function for a
few seconds. The water vortex created insi-
de the collector will rinse the sides and re-
move any dirt. The clean water will also
clean the inside of the tubes as it travels th-
rough them. Empty the collector again and
put Vaporetto Lecoaspira away.
WARNING: Check the filters during cleaning.
Replace the filters when visibly damaged.
WARNING: Do not clean the filter with the
brush as it can be damaged, thereby redu-
cing its filtering capacity. Do not use deter-
gents, do not rub the filter, and do not wash
it in a dishwasher.
- Remove the damaged washer.
- Insert the new washer, attaching it
on the steam nozzle and pushing it
i
nto place.
-
Lubricate the gasket with silicone
g
rease or Vaseline, or alternatively
w
ith small quantities of vegetable
o
ils.
-
Remove the damaged washer.
- Insert the new washer, applying it on
t
he steam nozzle and pushing it into
place.
-
Lubricate the gasket with silicone
g
rease or Vaseline, or alternatively
with small quantities of vegetable oil.
The hook is present only on extension tubes.
Incorrect assembly of the two extension tu-
bes will prevent the use of the appliance
parking system.
WARNING: Check the filters during cleaning.
Replace the filters when visibly damaged.
ENGLISH
| 43 |

26. TROUBLESHOOTING - TIPS
PROBLEM CAUSE SOLUTION
The appliance does not start. No power. Check that the appliance has
been disconnected from the
mains, as indicated in Section 1.
Suction power is decreased. Nozzle, flexible suction
hose or rigid suction
hose are clogged.
HEPA filter is blocked or
dirty.
Turn the appliance off and un-
plug it. Clean the filter and re-
move any blockages of tubes
and accessories.
Proceed as described in Sec-
tion 23.
Water leaks out when vacuu-
ming liquids.
Float blocked. Clean the water filter assembly.
The extension tubes and the
accessories are loose.
The locknut is OPEN. Turn the locknut to the
CLOSED position as indicated
in Section 2.
The appliance won’t dispense
steam.
Boiler switched off.
Boiler out of water.
Steam lock activated.
The boiler is not yet pres-
surised.
Monobloc plug not inser-
ted correctly.
Press the boiler button (see pa-
ge 5).
Add water to the boiler as de-
scribed in Section 12.
Disconnect the steam lock on
the handle.
Wait until the steam lamp turns
off.
Insert the monobloc plug cor-
rectly.
Steam does not come out and
the cap won’t unscrew.
Steam button broken.
Machine off.
Take the appliance to an
Authorised Service Centre.
Turn the appliance on making
sure that steam comes out.
Steam is dispensed mixed with
drops of water.
The steam hose and/or the
telescopic tube are cold.
Direct the steam jet onto a
cloth to heat up the tubes.
Loss of steam or drops of wa-
ter between the connection of
the accessories.
The seals are damaged. Replace the seals, as indicated
in Section 24.
ITALIANOENGLISH
| 44 |

Should the problems persist, contact an Authorised Polti Service Centre (see www.polti.com
for the up-to-date list) or Customer Services.
PROBLEM CAUSE SOLUTION
Accessories are difficult to
assemble.
The seals produce friction.
The locknut is not in the
correct position.
Lubricate the seals with silicone
grease or Vaseline, or alternati-
vely with a small amount of ve-
getable oil.
Turn the locknut to the correct
position as indicated in Section
2.
After vacuuming liquids, the
liquid vacuumed comes out
of the brush.
Liquid remains inside the
tubes.
Floor is still not dry.
Suck in air for a few seconds to
allow the transfer of the liquid to
the tank.
Repeat the vacuuming opera-
tion.
The filling pump of the boiler
continues to operate.
There is air in the boiler
circuit.
Switch off the appliance and let it
cool, after which repeat the ope-
rations described in Section 1.
The appliance turns off while
using suction.
Water filter collector full
or
motor overheated.
Turn off anddisconnect the ap-
pliance from the mains. Empty
the dirt collector and clean it. If
the problem persists, turn off
and disconnect the appliance
from the mains and wait 60 mi-
nutes for it to cool.
The appliance stops and the
wording “E1” appears on the
display
The circuit board has de-
tected a fault in the boiler.
Turn the appliance off for a few
minutes and then start it again.
Should the problem occur again,
contact an Authorised Service
Centre.
The appliance stops and the
wording “E2” appears on the
display
The circuit board has de-
tected a fault relative to
incorrect operating tem-
perature.
Turn the appliance off for a few
minutes and then start it again.
Should the problem occur again,
contact an Authorized Service
Centre.
The maintenance indicator li-
ghts up on the display
The appliance does not
warm up correctly.
Turn the appliance off for a few
minutes and then start it again.
Should the problem occur again,
contact an Authorized Service
Centre.
ENGLISH
| 45 |
/