Kohler K-9530-BN Installation guide

Category
Sanitary ware
Type
Installation guide

This manual is also suitable for

Thank You For Choosing Kohler Company
We appreciate your commitment to Kohler quality. Please take a few
minutes to review this manual before you start installation. If you
encounter any installation or performance problems, please don’t
hesitate to contact us. Our phone numbers and website are listed on
the back cover. Thanks again for choosing Kohler Company.
Tools and Materials
Before You Begin
WARNING: Risk of personal injury. This product is a diverter
valve only and should never be used as a shut-off valve. Use as
a shut-off valve will allow cross flow between the hot and cold
water supplies and will create a serious scalding hazard.
Please read all instructions before you begin.
Observe all local plumbing and building codes.
Shut off the main water supply.
Provide an access panel for all installations.
Carefully read this entire instruction manual before beginning the
installation; the illustrations do not show all possible
configurations.
This diverter can be installed to decks with a maximum thickness
of no more than 1-1/4 (3.2 cm).
Carefully inspect waste and supply tubing for any sign of
damage. Replace if needed.
• Supply piping,
connectors, and caps
Plus:
Adjustable
Wrench
Tape
Measure
3/32" Hex
Wrench
Solder
Propane
Torch
Drill and
Hole Bit
113228-2-CC 2 Kohler Co.
Before You Begin (cont.)
You can extend the distance between the water source and the
braided hose connection with 1/2 copper piping below the rim
of the bath/whirlpool, but it may not be safe or practical. A long
run of piping will mean a long run of room-temperature standing
water when the handshower is first activated for use.
This diverter can be used in either a deck-mount or wall-mount
installation. Refer to the Diverter Configurations section for any
special considerations.
Do not install spouts with flow restrictors or handheld shower
units on the large (5/8 OD) bath outlet.
The Kohler two-way diverter is designed for use with Kohler
non-diverting bath spouts.
Remove all internal components of the diverter valve before
soldering. Kohler Co. recommends soldering supply and optional
outlet connections to avoid potential leakage.
Kohler Co. reserves the right to make revisions in the design of
products without notice, as specified in the Price Book.
Kohler Co. 3 113228-2-CC
1. Diverter Configurations
Configurations for Deck-Mount Installations
The small port is for the handshower (or showerhead).
The port directly across from the small port is for the bath spout.
Default flow is through this port.
The remaining two ports are for the hot and cold water inlet
supplies. They are interchangeable. If only one of these ports is
needed, cap the other port.
Configurations for Wall-Mount Installations
When diverting between the bath spout and handshower (or
showerhead):
The small port is for the handshower (or showerhead).
The port directly across from the small port is for the bath spout.
Default flow is through this port.
Cartridge
3/4"-14
NPSM
Thread
1/2"-14 NPSM
Thread
Spout 1/2" Nominal
(5/8" OD)
Handshower 3/8"
Nominal (1/2" OD)
Hot or
Cold 1/2"
Nominal
(5/8" OD)
Hot or
Cold 1/2"
Nominal
(5/8" OD)
Deck-Mount
Wall-Mount
From Mixer
Handshower or
Showerhead
Review instructions for
specific configurations.
1/2" Nominal (5/8" OD)
3/4"-14 NPSM Thread
3/8" Nominal (1/2" OD)
1/2"-14 NPSM Thread
Showerhead
or Bath Spout
Cartridge
From Mixer
113228-2-CC 4 Kohler Co.
Diverter Configurations (cont.)
The remaining two ports are for the hot and cold water inlet
supplies. They are interchangeable. If only one of these ports is
needed, cap the other port.
When diverting between the showerhead and handshower:
The small port is for the handshower.
The port directly across from the small port is for the
showerhead. Default flow is through this port.
The remaining two ports are for the inlet supply. They are
interchangeable. If only one of these ports is needed, cap the
other port.
Kohler Co. 5 113228-2-CC
2. Piping Configurations
Verify the location of the components and the orientation of all
ports.
Decide in advance on the location and orientation of the diverter.
The location of the shower, and the handshower, as well as the
direction in which the inlets/outlets point, will affect the piping
and connectors needed.
Allow clearance for the valve outlets, handles, and handshower
hoses. For use with an optional spout, also allow clearance for the
spout connection.
You can extend the distance between the transfer valve and the
braided hose connection with 1/2 copper piping below the rim
of the bath/whirlpool, but it may not be safe or practical. A long
run of piping will mean a long run of room-temperature standing
water when the handshower is first activated for use.
Secure long runs of piping to the underside of the deck or rim. If
the piping cannot be secured at a point near the transfer valve,
secure the piping from underneath with lumber or other suitable
support.
Jog in Piping
Jog in Piping
Diverter
Mixer Valve
To Handshower
To Shower
Wall-Mount Deck-Mount
113228-2-CC 6 Kohler Co.
3. Preparation
Provide an access panel for all installations.
Allow for access to the connection between the shower
high-pressure hose and the shower interlock hose.
For easiest installation, do not install the bath unit until all
soldering (except supplies) is complete. Then install the bath and
connect the supplies.
If used, install the bath spout shank at this time according to the
spout installation instructions. If possible, do not install the
finished trim until all other installations and construction are
completed.
For spouts with a supply tee: Solder in an adapter and a 1/2
copper tube. Cap to close the extra port.
Install the valve bodies according to the valve body installation
instructions.
Loosely secure the valve bodies.
Follow the handle installation instructions to temporarily
assemble the handles in order to adjust the valves to the proper
height before connecting the lines to the diverter or supply.
NOTE: The cartridge assembly is easier to remove before the
diverter is installed. You can remove the assembly now or after the
diverter installation.
Spout
Supply
Tee
1/2"
Nominal
Copper Cap
1/2"
Nominal
Copper
Adapter
(Supplied
with Spout)
Kohler Co. 7 113228-2-CC
Preparation (cont.)
Use a wrench to loosen the cartridge assembly from the diverter
body. Continue to unthread the assembly to remove.
Set the assembly aside. Protect the seals and O-rings from
becoming dirty, damaged, or misaligned.
113228-2-CC 8 Kohler Co.
4. Install the Diverter
If installing to a finished deck: At the diverter install location,
drill a 1-1/2 (3.8 cm) hole.
NOTE: You may need assistance to align and secure the diverter.
Thread the mounting nut all the way down onto the diverter
body.
Slide the friction washer followed by the rubber washer over the
diverter body and down to the mounting nut.
Insert the diverter body through the deck/rim/wall.
Slide the washer onto the diverter body.
Thread the escutcheon onto the diverter body until the top of the
escutcheon is flush with the top of the diverter body. This will
allow ample clearance for proper handle function.
Align the inlets and outlets.
Hand tighten the mounting nut.
Deck/Rim
Escutcheon
Washer
Brass
Mounting
Nut
Friction
Washer
Rubber
Washer
Kohler Co. 9 113228-2-CC
5. Complete the Diverter Installation
CAUTION: Risk of product damage. Verify that the diverter
body is secure before removing the cartridge. If not secured, the
process of removing the cartridge may damage the pipe and
connections.
CAUTION: Risk of product damage. Excessive heat will damage
the internal plastic components. Follow these steps to avoid
product damage.
IMPORTANT! If there is limited access to the solder connections, or
if any other risk of excessive heat being applied to the brass body
exists, remove the cartridge prior to soldering. If you remove the
cartridge, protect the seals and O-rings from becoming dirty,
damaged, or misaligned.
IMPORTANT! Do not apply excessive heat while soldering. Direct
the torch flame away from the brass body.
IMPORTANT! Only apply direct heat to the connectors and
extensions.
If not already removed, remove the diverter cartridge assembly.
Dry fit all piping and connectors.
Solder piping for the optional spout or wall shower.
Connect the hot and cold lines from the valves to the diverter.
While supporting from below, carefully install and wrench tighten
the cartridge assembly into the diverter body.
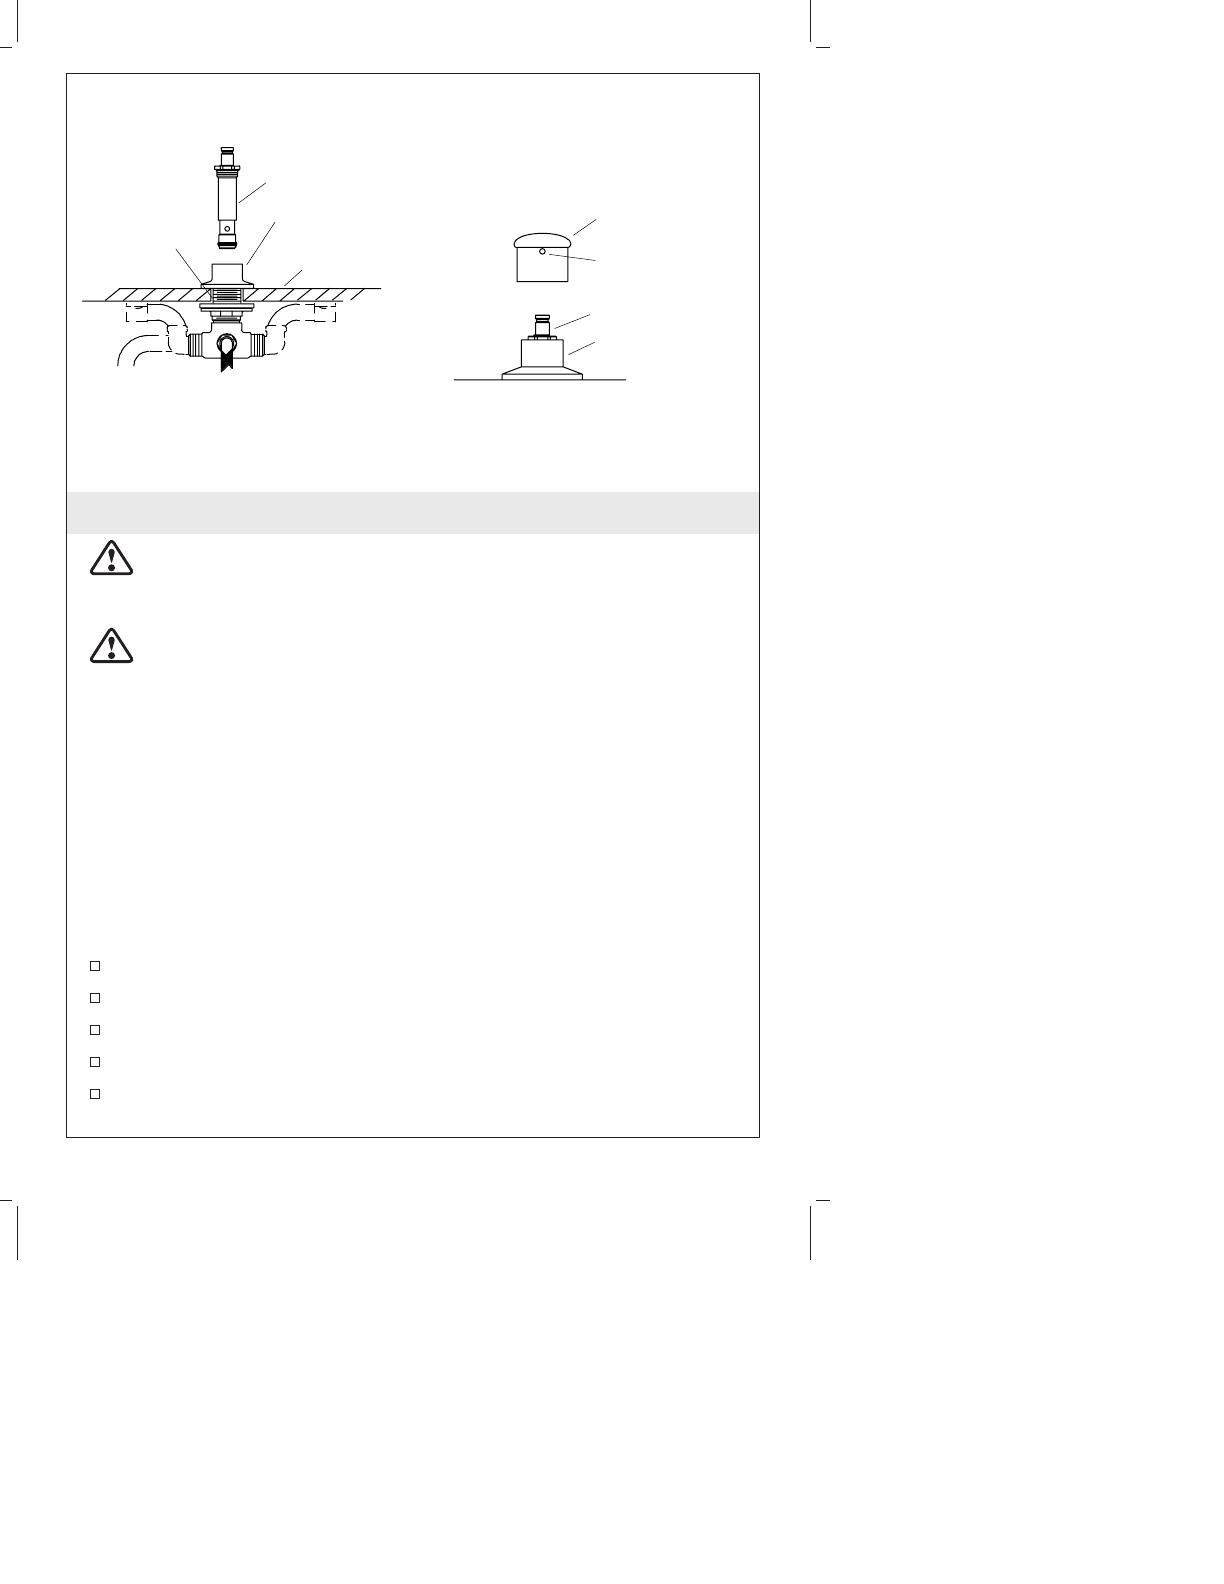
Note: Provide Diverter Support
Diverter
Valve Body
Diverter
Cartridge
Escutcheon
Deck/Rim
Setscrew
Stem
Escutcheon
Diverter Handle
113228-2-CC 10 Kohler Co.
Complete the Diverter Installation (cont.)
Install the diverter handle. Use a hex wrench to tighten the
setscrew.
6. Installation Checkout
Complete the installation of the valve, valve trim and any other
components according to the instructions packed with the
product.
Ensure all connections are tight.
Open the drain.
Turn on the main water supply and check for leaks. Repair as
needed.
Open both hot and cold valves and run water through the spout
(if installed) to remove debris. Check for leaks.
Confirm proper diverter operation.
Turn the valves to the closed position.
Kohler Co. 11 113228-2-CC
  • Page 1 1
  • Page 2 2
  • Page 3 3
  • Page 4 4
  • Page 5 5
  • Page 6 6
  • Page 7 7
  • Page 8 8
  • Page 9 9
  • Page 10 10
  • Page 11 11
  • Page 12 12
  • Page 13 13
  • Page 14 14
  • Page 15 15
  • Page 16 16
  • Page 17 17
  • Page 18 18
  • Page 19 19
  • Page 20 20
  • Page 21 21
  • Page 22 22
  • Page 23 23
  • Page 24 24
  • Page 25 25
  • Page 26 26
  • Page 27 27
  • Page 28 28
  • Page 29 29
  • Page 30 30
  • Page 31 31
  • Page 32 32

Kohler K-9530-BN Installation guide

Category
Sanitary ware
Type
Installation guide
This manual is also suitable for

Ask a question and I''ll find the answer in the document

Finding information in a document is now easier with AI