Page is loading ...

3
Important Safety Instructions
This symbol warns the user of dangerous voltage levels
localized within the enclosure.
This symbol advises the user to read all accompanying
literature for safe operation of the unit.
∆ Read, retain, and follow all instructions. Heed all warnings.
∆ Only connect the power supply cord to an earth grounded AC
receptacle in accordance with the voltage and frequency ratings
listed under INPUT POWER on the rear panel of this product.
∆ WARNING: To prevent damage, fire or shock hazard, do not
expose this unit to rain or moisture.
∆ Unplug the power supply cord before cleaning the unit exterior
(use a damp cloth only). Wait until the unit is completely dry
before reconnecting it to power.
∆ Maintain at least 6 inches (15.25 cm) of unobstructed air space
behind the unit to allow for proper ventilation and cooling of the
unit.
∆ This product should be located away from heat sources such as
radiators, heat registers, or other products that produce heat.
∆ This product may be equipped with a polarized plug (one blade
wider than the other). This is a safety feature. If you are unable
to insert the plug into the outlet, contact an electrician to replace
your obsolete outlet. Do not defeat the safety purpose of this
plug.
∆ Protect the power supply cord from being pinched or abraded.
∆ This product should only be used with a cart or stand that is
recommended by the manufacturer.
∆ The power supply cord of this product should be unplugged from
the outlet when left unused for a long period of time, or during
electrical storms.
∆ This product should be serviced by qualified service personnel
when: the power supply cord or the plug has been damaged; or
objects have fallen, or liquid has been spilled onto the product;
or the product has been exposed to rain; or the product does not
appear to operate normally or exhibits a marked change in
performance; or the product has been dropped, or the enclosure
damaged.
∆ Do not drip nor splash liquids, nor place liquid filled containers on
the unit.
∆ CAUTION: No user serviceable parts inside, refer servicing to
qualified personnel only.
∆ Fender
®
amplifiers and loudspeaker systems are capable of
producing very high sound pressure levels which may cause
temporary or permanent hearing damage. Use care when
setting and adjusting volume levels during use.
Instrucciones de Seguridad Importantes
Este símbolo advierte al usuario que en el interior de la
carcasa hay niveles peligrosos de voltaje.
Este símbolo advierte al usuario que lea toda la
documentación adjunta para utilizar la unidad con
seguridad.
∆ Lea las atentamente instrucciones y sígalas al pie de la letra.
Tenga en cuenta todas las instrucciones.
∆ Conecte únicamente el cable de alimentación eléctrica a una
toma de CA de acuerdo con las especificaciones de voltaje y
frecuencia que se indican en la potencia de entrada INPUT
POWER del panel posterior de este producto.
∆ ADVERTENCIA: Para evitar daños, incendios y descargas
eléctricas, no exponga esta unidad a la lluvia ni a la humedad.
∆ Antes de limpiar el exterior de la unidad, desconecte el cable de
alimentación (utilícese únicamente un paño húmedo). Deje que
la unidad se seque completamente antes de volver a conectarla
a la corriente.
∆ Para una ventilación y refrigeración adecuadas, deje un espacio
mínimo de 15.25 cm detrás de la unidad.
∆ Este producto deberá estar situado lejos de fuentes de calor
tales como radiadores, registros de calefacción u otros
productos que generen calor.
∆ Es posible que este producto esté equipado con un enchufe
polarizado (un blade más ancho que el otro). Esta es una
función de seguridad. Si no puede introducir el enchufe dentro
de la toma de corriente, póngase en contacto con un electricista
para que la cambie ya que podría estar anticuada. No anule el
propósito de seguridad de este enchufe.
∆ Tenga cuidado de que el cable de alimentación no se pinche ni
se erosione.
∆ Este producto sólo se debe utilizar con el soporte recomendado
por el fabricante.
∆ El cable de alimentación de este producto deberá estar
desconectado de la toma de corriente cuando no se vaya a
utilizar durante un período de tiempo largo o en caso de
tormenta eléctrica.
∆ Este producto deberá ser reparado por personal cualificado si:
el cable de alimentación o el enchufe están dañados, ha caído
algún objeto o se ha derramado líquido encima, el producto ha
estado expuesto a la lluvia, no funciona normalmente o muestra
signos de cambio en el rendimiento, ha sufrido algún golpe o la
caja esta dañada.
∆ Evite que goteen o salpiquen líquidos y no coloque recipientes
con líquidos sobre la unidad.
∆ PRECAUCIÓN: Contiene piezas cuyo mantenimiento no lo
puede realizar el usuario, sino sólo personal cualificado.
∆ Los amplificadores y altavoces Fender
®
pueden producir niveles
de presión acústica muy elevados, que pueden provocar daños
temporales o permanenetes en el oído. Utilice la precaución al
ajustar el volumen nivela.

DEUTSCH
DEUTSCH
ITALIANO
ITALIANO
FRAN
çAIS
FRAN
çAIS
ESPAÑOL
ESPAÑOL
ENGLISHENGLISH
ENGLISH
PRESENCEREVERBMASTERMIDDLEBASSTREBLEDRIVEVOLUMEINPUTS
12
NORMAL
BRIGHT
MORE
DRIVE
CHANNEL
SELECT
PREAMP
OUT
POWER
AMP IN
FOOT
SWITCH
ON ON
OFFSTANDBY
1
2
3
4
5
6
7
8
9
10
11
12
1
2
3
4
5
6
7
8
9
10
11
12
1
2
3
4
5
6
7
8
9
10
11
12
1
2
3
4
5
6
7
8
9
10
11
12
1
2
3
4
5
6
7
8
9
10
11
12
1
2
3
4
5
6
7
8
9
10
11
12
1
2
3
4
5
6
7
8
9
10
11
12
1
2
3
4
5
6
7
8
9
10
11
12
A
B
C
D
E
F
G
I
J
K
L
M
H
N
O
P
Q
R
S
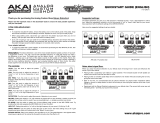
A. INPUT 1 - Plug in connection for most guitars.
B. INPUT 2 - Plug in connection for high-output/
pre-amplified instruments. Provides 6dB less gain
(sensitivity) than INPUT 1 if used alone - both inputs are
identical if used simultaneously.
C. NORMAL/BRIGHT - Provides a high-frequency boost
for the Normal channel.
Normal Bright
D. VOLUME - Adjusts the loudness of the Normal channel.
E. MORE DRIVE - Provides gain boost for the Drive
channel.
Drive More Drive
F. DRIVE - Adjusts the gain level of the Drive/
More Drive channel. Use together with MASTER {L} to
adjust the loudness of the Drive/
More Drive channel.
G. CHANNEL INDICATOR -
Off
Normal channel is active
Yellow
Drive channel is active
Red
More Drive channel is active
H. TREBLE - Adjusts the high-frequency tone.
I. BASS - Adjusts the low-frequency tone.
J. MIDDLE - Adjusts the mid-frequency tone.
K. CHANNEL SELECT -
Normal channel Drive channel
L. MASTER - Adjusts the loudness of the Drive/
More Drive channels in conjunction with DRIVE {F}.
M. REVERB - Adjusts the Reverb level.
N. PRESENCE - Adjusts the tone at a point in the signal
path after the distortion circuitry for unique ultra high-
frequency tone shaping.
O. PRE AMP OUT / POWER AMP IN -
(1) Effects Loop - Connect PREAMP OUT to the input of
an effects device and the output of the effects device to
POWER AMP IN.
(2) Multiple Hot Rod™ Amps - Connect PREAMP OUT
on the primary unit to POWER AMP IN on the auxiliary
unit. The primary unit is used to control all auxiliary
units, except for REVERB and PRESENCE which
remain active on each unit.
(3) Recording or Sound Reinforcement - Connect
PREAMP OUT to the input jack of sound equipment.
Use standard cables with TS (Tip-Sleeve)
plugs for connections. Both jacks are before Reverb
and Presence in the signal path.
P. FOOTSWITCH (Included) - Connect the footswitch here
to enable remote selection of Normal/Drive/More Drive
channels. When connected, the footswitch overrides
the corresponding panel controls. NOTE: A speaker
grade patch cord is preferable to a coax guitar cord for
connecting the footswitch.
Q. POWER INDICATOR - Illuminates when the unit is on.
Unscrew the red jeweled cover to access the bulb (type
T47) for replacement.
R. STANDBY - Use STANDBY instead of switching the
power off during short breaks to eliminate the tube
warm-up delay upon returning to play. Use STANDBY
for 30 seconds when first switching the power on.
Using these standby procedures will extend the life
span of your amplifier tubes.
S. POWER SWITCH - Turns the unit on and off.
Your new Hot Rod™ Deluxe delivers world–class
Fender
®
tone and world–standard Fender
®
quality.
• 40 watts output into 4Ω or 8Ω
• All tube preamp and power amp provide
harmonically rich distortion and touch-sensitive
dynamics
• Three selectable channels offer a sonic arsenal from
sparkling clean tones to virtually unlimited gain
fueled by 12AX7 Fender
®
Groove Tubes™
• Output tubes are performance tested and matched
GT6L6B Fender
®
Groove Tubes™
• Two-button footswitch (included) enables remote
Normal/Drive/More Drive channel selection
•
PREAMP OUT / POWER AMP IN
jacks for effects,
amplifiers, recording or sound reinforcement setups
• EXTERNAL SPEAKER jack offers flexibility of
optional speaker array connections
• Rugged cabinet construction and durable vinyl cover
Thank you for choosing Fender
Thank you for choosing Fender
®
®
—T
—T
one, T
one, T
radition and Innovation—since 1946
radition and Innovation—since 1946
Panel Functions
Panel Functions
6
wwwwww
..
ffeennddeerr..ccoomm
✧
wwwwww
..mmrrggeeaarrhheeaadd..nneett
Fender
Fender
®
®
Hot Rod™ Deluxe
Hot Rod™ Deluxe

DEUTSCH
DEUTSCH
ITALIANO
ITALIANO
FRAN
çAIS
FRAN
çAIS
ESPAÑOL
ESPAÑOL
ENGLISH
ENGLISHENGLISH
T. POWER CORD - Connect the power cord in
accordance with the voltage and frequency ratings
listed on the rear panel of the unit.
U. FUSE - The fuse protects the unit from electrical
faults. Replacement fuses must match the type and
rating specified on the fuse holder. If the unit
repeatedly blows fuses, have the unit tested at an
authorized Fender
®
Service Center.
V. MAIN SPEAKER - One of the following speaker load
configurations (internal or external) must always be
connected as shown below, when the unit is on:
*Insert an open plug (no speakers connected) for this
configuration.
W. EXTERNAL SPEAKER - This jack is wired in parallel
with the main speaker jack and must only be used
with something connected to the main speaker jack
as shown in the MAIN SPEAKER {V} description
above.
X. FENDER
®
/GROOVE TUBES™ GT6L6B - The
output tubes in your new Hot Rod™
amplifier are performance matched and
labeled as a color-coded pair. When
replacing these tubes, we recommend
selecting new tubes that have the same red, white or
blue color labels as the originals. Otherwise, tube
bias may need adjustment. See Specifications
below for your color coded part number.
Y. PREAMP TUBE STABILIZER -
A vibration–absorbing stabilizer is
installed around the preamp tubes to
minimize tube microphonics that
normally develop over time. The stabilizer can be
used with all preamp tubes compatible with your
Hot Rod™ amplifier.
1.
2.
3.
*
V. W.
TYPE: PR 247
PART NUMBERS: 021-3202-000 (120V, 60Hz) USA
021-3232-000 (240V, 50Hz) AUS
021-3242-000 (230V, 50Hz) UK
021-3262-000 (230V, 50Hz) EUR
021-3272-000 (100V, 50/60Hz) JPN
POWER REQUIREMENT: 180W
POWER OUTPUT: 40W into 8Ω or 4Ω at 5% THD
INPUT 1/2 IMPEDANCES: 1 MΩ / 136 kΩ
PRE-AMP OUTPUT IMPEDANCE: 1.5 kΩ Max
POWER-AMP INPUT SENSITIVITY: 200 mV for clipping
POWER-AMP INPUT IMPEDANCE: 54 kΩ
TUBES: Three Fender Groove Tube GT12AX7 (099-4005-000)
*(Tube label color: Red=1, White=2, Blue=3) Two Fender Groove Tube GT6L6B (099-4401-*02)
FUSE: 3A 250V fuse (100V and 120V versions)
1.6A 250V fuse (230V and 240V versions)
SPEAKER: One 12” 8Ω Fender Re-issue
Gold Label (037617)
FOOTSWITCH: 2 Button: Gain, Channel (050419)
DIMENSIONS HEIGHT: 18.75 in (47.6 cm)
WIDTH: 23.5 in (59.7 cm)
DEPTH: 10.5 in (26.7 cm)
WEIGHT: 49.5 lb (22.5 kg)
Product specifications are subject to change without notice.
7
Specifications
Specifications
wwwwww
..
ffeennddeerr..ccoomm
✧
wwwwww
..mmrrggeeaarrhheeaadd..nneett
Fender
Fender
®
®
Hot Rod™ Deluxe
Hot Rod™ Deluxe

A PRODUCT OF:
FENDER MUSICAL INSTRUMENTS CORP.
CORONA, CA USA
Hot Rod™ is a trademark and Fender® is a registered trademark of FMIC,
other trademarks are properties of their respective owners.
Copyright © 2002 P/N 050393 REV C
/