Page is loading ...

USER MANUAL
SECURA ELECTRIC HOT AIR FRYER
www.thesecura.com
MODEL: TXG-DS15
BEFORE USE, PLEASE READ AND FOLLOW ALL IMPORTANT SAFEGUARDS,
WARNINGS, CAUTIONS AND OPERATING INSTRUCTIONS.

Congratulations on your new purchase from Secura!
We believe in providing the best products to our
customers, and all Secura products meet strict standards
for manufacturing, performance, and safety. We believe
in providing the best customer service, and that is why
we offer a two year warranty that will ensure customer
satisfaction. You can expect to continue enjoying your
new appliance for many years.
WELCOME
1
Copyright © 2016 – Secura Inc. - All rights are reserved. http://www.thesecura.com

Copyright © 2016 – Secura Inc. - All rights are reserved.
The material in this publication is protected under International and
Federal Copyright Laws and Treaties, and as such, any unauthorized
reprint or use of this material is strictly prohibited.
No part of this book may be reproduced or transmitted in any form without
the written permission of the author, except for the inclusion of brief
quotations in a review.
Reproduction or translation of any part of this work without the permission
of the copyright holder is against the law.
2
Copyright © 2016 – Secura Inc. - All rights are reserved. http://www.thesecura.com

3
Copyright © 2016 – Secura Inc. - All rights are reserved. http://www.thesecura.com
Read this user manual carefully before you use
the appliance and save it for future reference.
• Never immerse the housing, which contains the heating elements and other electrical
components, in water or rinse under the tap.
• To prevent electric shock do not let any water or other liquid enter the appliance.
• To prevent the ingredients being fried from coming into contact with the heating
elements always place the ingredients in the basket, being careful not to overfi ll the basket.
• Do not cover the air inlet and the air outlet openings while the appliance is operating.
• Do not fi ll the pan with oil as this may cause a fi re hazard.
• Never touch the inside of the appliance while it is operating.
• This appliance is not intended for use by children, persons with reduced physical,
sensory or mental capabilities, or lack of experience and knowledge, unless they have
been given supervision or instruction concerning the use of this appliance by a person
responsible for their safety.
• Make sure the voltage indicated on the appliance corresponds to the local voltage
before you connect the appliance.
• Do not use the appliance if the plug, the power cord or the appliance itself is damaged.
• If the power cord is damaged, you must have it replaced by the manufacturer, its
service agent or similarly qualifi ed persons in order to avoid the hazard of fi re or shock.
• Children should be supervised to ensure that they do not play with the appliance.
Cleaning and user maintenance should not be done by children.
• Keep the appliance and its power cord out of the reach of children when the appliance
is switched on or is cooling down.
• Keep the power cord away from hot surfaces.
• Do not plug in the appliance or operate the control panel with wet hands.
• Only connect the appliance to a grounded wall socket. Always make sure that the plug
is inserted into the wall socket properly.
DANGER !
WARNING !

4
Copyright © 2016 – Secura Inc. - All rights are reserved. http://www.thesecura.com
• Never connect this appliance to an external timer switch or separate remote-control
system in order to avoid a hazardous situation.
• Do not place the appliance on or near combustible materials such as a tablecloth or
curtain.
• Do not place the appliance against a wall or against other appliances. Leave at least 4
inches free space on the back and sides and 4 inches free space above the appliance. Do
not place anything on top of the appliance.
• Do not use the appliance for any other purpose than described in this manual.
• Do not leave the appliance unattended while it is operating.
• During hot air frying, hot steam is released through the air outlet openings. Keep your
hands and face at a safe distance from the steam and from the air outlet openings. Also be
careful of hot steam and air when you remove the pan from the appliance.
• The accessible surfaces may become hot during use.
• After using the appliance, the metal basket and interior are very hot, avoid contact with
the hot metal after cooking.
• Immediately unplug the appliance if you see dark smoke coming out of the appliance.
Wait for the smoke emission to stop before you remove the pan from the appliance.
• Place the appliance on a horizontal, even and stable surface.
• This appliance is intended for normal household use only. It is not intended for use in
environments such as staff kitchens of shops, offi ces, farms or other work environments.
Nor is it intended to be used by clients in hotels, motels, bed and breakfasts and other
commercial living environments.
• If the appliance is used improperly or for professional or semi-professional purposes
or if it is not used according to the instructions in the user manual, the guarantee becomes
invalid and we could refuse any liability for damage caused.
• Always unplug the appliance after use.
• Let the appliance cool down for approx. 30 minutes before you handle or clean it.
• Always remove burnt remnants.
• The appliance has an automatic shut-off feature that is activated if the pan is removed
while cooking is taking place.
CAUTION !
SECURA ELECTRIC HOT AIR FRYER

5
Copyright © 2016 – Secura Inc. - All rights are reserved. http://www.thesecura.com
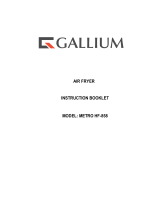
INTRODUCTION
GENERAL DESCRIPTION OF MAIN PARTS
Your new air fryer allows you to prepare your favorite ingredients and snacks in a
healthier way. The air fryer uses hot air in combination with high-speed air circulation (rapid
hot air) and a top grill to prepare a variety of tasty dishes in a healthy, fast and easy way.
Your ingredients are heated from all sides at once and there is no need to add oil to most of
the ingredients.
1. Timer (0-60 min.)/ power-on knob
2. Heating light
3. Power light
4. Temperature control knob
5. Release button cover
6. Basket release button
7. Basket handle
8. Pan
9. Skewers
10. Toaster Rack
11. Basket
12. Air Inlet
⑿
⑾
⑽
⑼
⑻
⑻
⑺
⑹
⑸
⑷
⑶
⑵
⑴

6
Copyright © 2016 – Secura Inc. - All rights are reserved. http://www.thesecura.com
OVERHEATING PROTECTION
AUTOMATIC SWITCH-OFF
ELECTROMAGNETIC FIELDS (EMF)
SPECIFICATIONS
This appliance has a built-in overheating protection system; if the inner temperature
control system senses an extreme overheating condition, the overheating protection is
automatically triggered and the appliance will no longer function. Unplug the power cord, let
the appliance cool down, and then send it to an authorized service center for repair.
This appliance is equipped with a timer. When the timer has counted down to 0, the
appliance produces a bell sound and switches off automatically. To switch off the appliance
manually, turn the timer knob counterclockwise until it reaches 0.
Note: If the pan is removed during cooking, the appliance will switch off automatically
but the timer will continue to count down.
This appliance complies with all standards regarding electromagnetic fi elds (EMF). If
handled properly and according to the instructions in this user manual, the appliance is safe
to use based on scientifi c evidence available today.
Power Source
Output
Capacity
Weight
120V/60Hz
1500 watts
4.0 liters/4.2 qt.
10 lbs. 7 oz.
SECURA ELECTRIC HOT AIR FRYER

7
Copyright © 2016 – Secura Inc. - All rights are reserved. http://www.thesecura.com
BEFORE FIRST USE
PREPARING FOR USE
1. Remove all packaging material.
2. Remove any stickers or labels from the appliance.
3. Thoroughly clean the basket and pan with hot soapy water and a non-abrasive sponge.
Note: These parts are also dishwasher safe.
4. Wipe the inside and outside of the appliance with a moist cloth.
1. Place the appliance on a stable, horizontal and level surface.
Do not place the appliance on non-heat-resistant surfaces.
2. Place the basket into the pan. It will "lock" into place.
3. Put the pan into the machine.
Note: the pan MUST be put into the appliance properly, otherwise the appliance will not
work!
4. Plug the appliance into a grounded power outlet.
This is an air fryer that works on hot air. Do not fi ll the pan with oil or any other
liquid.
Do not put anything on top of the appliance.
Do not block the air-inlets on either side of the appliance, this disrupts the airfl ow
and affects the hot air frying results.

8
Copyright © 2016 – Secura Inc. - All rights are reserved. http://www.thesecura.com
USING THE APPLIANCE
The air fryer can prepare a large range of ingredients. Please refer to the table in
the section “Settings” for recommended cooking temperatures, times and additional
information about air frying.
Hot air frying
1. Connect the power cord to a grounded power outlet.
2. Carefully pull the pan out of the air fryer.
3. Put the ingredients in the basket and make sure the basket is "locked" in place in the pan.
Note: Never overfi ll the basket or exceed the recommended amount (see section
‘Settings’ in this chapter), as this could negatively affect the quality of the end results.
4. Slide the pan back into the air fryer (you will feel a “catch” when it has been inserted
correctly).
Never use the pan without the basket in it.
If the pan isn’t inserted into the air fryer properly, the appliance won’t work!
Caution: Do not touch the pan during and immediately after use, as it gets very hot. Only
hold the pan by the handle.
5. Turn the temperature control knob to the required temperature. See the table in the
section “Settings” in this chapter to determine the recommended temperature.
6. Determine the required preparation time for the ingredient (see the table in the section
“Settings” in this chapter).
7. The timer control knob acts as the “ON/OFF” switch for the Air Fryer. Turn the timer knob
to the required preparation time:
Tip: Add 3 minutes to the preparation time when the appliance is cold or you can preheat
the Air Fryer without any ingredients inside. To preheat, turn the temperature knob to the
temperature you will be frying at and then turn the timer knob to more than 3 minutes
and wait until the heating-up light goes out (after approx. 3 minutes). Then remove the
empty pan & basket, fi ll the basket with your choice of ingredients, replace the fi lled pan
& basket assembly into the fryer and turn the timer knob to the required preparation time.
The pan & basket will be hot at this time, so be careful when handling it and fi lling it with
ingredients.
a. The power light and the heating light illuminate.
b. The timer starts counting down from the set preparation time and the cooking process
begins.
c. During the hot air frying process, the heating light comes on and goes out from time to
SECURA ELECTRIC HOT AIR FRYER

9
Copyright © 2016 – Secura Inc. - All rights are reserved. http://www.thesecura.com
time. This indicates that the heating element is switched on and off to maintain the correct
(set) temperature.
d. Excess oil from the ingredients is collected on the bottom of the pan.
8. Some ingredients require shaking halfway through the cooking process (see section
“Settings” in this chapter). To shake the ingredients, pull the pan out of the appliance by
the handle and shake it. Then slide the pan back into the air fryer and continue cooking.
Caution: Do not press the button on the handle during shaking as this will cause
the basket to separate from the pan.
Tip: To reduce the weight, you can remove the basket from the pan and shake the
basket only. To do so, pull the pan out of the appliance, place it on a heat-resistant
surface and press the button on the handle to release the basket.
Tip: If you set the timer to half the preparation time, the timer bell will go off when you
have to shake the ingredients. However, this means that you have to set the timer again
to the remaining preparation time after shaking.
Tip: If you set the timer to full preparation time, there will be no timer bell halfway
through cooking. You will need to monitor the cooking process to determine the halfway
point for shaking the pan. You can pull the pan out at any time to check the ingredients
cooking condition, the power will shut down automatically and resume after you slide
the pan back into the appliance (the timer always continues to count down in this
situation).
9. When you hear the timer bell, the set cooking time has elapsed. Pull the pan out of the
appliance and place it on a heat-resistant surface.
Note: You can also switch off the appliance manually. To do this, turn the temperature
control knob counterclockwise to 0, or remove the pan.
10. Check if the ingredients are ready.
If the ingredients are not yet ready, simply slide the pan back into the appliance and set
the timer
for a few extra minutes.
11. To remove small ingredients (e.g. fries), place the pan on a heat resistant surface, press
the basket release button and lift the basket out of the pan.
Do not turn the basket upside down with the pan still attached to it, as any excess
oil that has collected on the bottom of the pan will leak onto the ingredients.
After hot air frying, the pan and the ingredients are hot. Depending on the type of
the ingredients in the air fryer, steam may escape from the pan.

10
Copyright © 2016 – Secura Inc. - All rights are reserved. http://www.thesecura.com
After hot air frying, the pan, basket and the inside of the appliance are hot, avoid
touching them.
12. Empty the contents of the basket into a bowl or onto a plate.
Tip: To remove large or fragile ingredients, use a pair of tongs to lift the ingredients out
of the basket.
13. The air fryer is instantly ready for cooking and does not need to cool down between
cooking batches of food.
Settings
The table below provides recommendations for the basic settings for the ingredients you
want to prepare.
Note: Keep in mind that these settings are suggestions. As ingredients differ in origin, size,
shape as well as brand, we cannot guarantee the best setting for your ingredients.
Because the rapid hot air technology instantly reheats the air inside the appliance, pulling
the pan briefl y out of the appliance during hot air frying barely disturbs the process.
Tips:
• Shaking smaller ingredients halfway through the cooking process optimizes the end
result and can help prevent unevenly fried ingredients.
• Add some oil to fresh potatoes for a crispy result. Fry your ingredients in the air fryer
within a few minutes after you added the oil.
• Do not prepare extremely greasy ingredients such as sausages in the air fryer.
• Snacks that can be prepared in an oven can also be prepared in the air fryer.
• The optimal amount for preparing crispy fries is 18 oz/500 grams.
• Use pre-made dough to prepare fi lled snacks quickly and easily. Pre-made dough also
requires a shorter cooking time than home-made dough.
• Place a baking tin or oven dish in the air fryer basket if you want to bake a cake or
quiche or if you want to fry fragile ingredients or fi lled ingredients.
• You can also use the air fryer to reheat ingredients. To reheat ingredients, set the
temperature to 148°C/300°F for up to 10 minutes.
SECURA ELECTRIC HOT AIR FRYER

11
Copyright © 2016 – Secura Inc. - All rights are reserved. http://www.thesecura.com
Min-max
Amount
(oz/g)
Time
(min.)
Temperature
(°C/°F)
Shake Extra information
Potatoes & fries
Thin frozen fries
10-25
300-700
9-16 200/390 shake
Thick frozen fries
10-25
300-700
15-20 200/390 shake
Home-made fries
(1/4” x 6”)
10-28
300-800
20-30 200/390 shake Add 1/2 tbsp of oil
Home-made potato wedges
10-28
300-800
18-22 182/360 shake Add 1/2 tbsp of oil
Home-made potato cubes
10-26
300-750
12-18 182/360 shake Add 1/2 tbsp of oil
Rosti
9
250
15-18 182/360 shake
Potato gratin
18
500
15-18 200/390 shake
Meat & Poultry
Steak
4-18
100-500
10-18 182/360
refer to meat temp chart for
desired doneness
Pork chops
4-18
100-500
15-20 182/360
refer to meat temp chart for
desired doneness
Hamburger
4-18
100-500
7-14 182/360
refer to meat temp chart for
desired doneness
Sausage roll
4-18
100-500
13-15 200/390
Drumsticks
4-18
100-500
18-22 182/360
refer to meat temp chart for
desired doneness
Chicken breast
4-18
100-500
10-15 182/360
refer to meat temp chart for
desired doneness
Snacks
Spring rolls
4-14
100-400
8-10 200/390 shake
Frozen chicken nuggets
4-18
100-500
6-10 200/390 shake
Frozen fi sh fi ngers
4-14
100-400
6-10 200/390
Frozen bread crumbed
cheese snacks
4-14
100-400
8-10 182/360
Stuffed vegetables
4-14
100-400
10 160/320
Baking
Cake
10
300
20-25 160/320
Quiche
14
400
20-22 182/360
Muffi ns
10
300
15-18 200/390
Sweet snacks
14
400
20 160/320
Note: Add 3 minutes to the cooking time when you start frying while the air fryer is still cold or preheat
the air fryer with no ingredients in the basket.

12
Copyright © 2016 – Secura Inc. - All rights are reserved. http://www.thesecura.com
MEAT Rare Med Rare
Medium
Med Well Well Done
Ground Beef 160°F/71°C
Ground Poultry 165°F/74°C
Beef 125°F/52°C 140°F/60°C 150°F/66°C 160°F/71°C 165°F/74°C
Veel 125°F/52°C 140°F/60°C 150°F/66°C 160°F/71°C 165°F/74°C
Chicken 165°F/74°C
Pork 160°F/71°C 165°F/74°C 170°F/77°C
Poultry 165°F/74°C
Lamb 140°F/60°C 145°F/63°C 160°F/71°C 165°F/74°C 170°F/77°C
Fish 145°F/63°C
Program 145°F/63°C
Meat Temperatures & Doneness Chart Recommended by USDA
CLEANING
Clean the appliance after every use.
Always allow the Air Fryer to cool down before cleaning.
Do not use metal utensils to remove or stir ingredients in the basket or abrasive cleaning
materials on the pan or the basket as this may damage the non-stick coating.
1. Remove the power cord from the wall socket and let the appliance cool down.
Note: Remove the pan to let the air fryer cool down more quickly.
2. Wipe the outside of the appliance with a moist cloth.
3. Clean the pan and the basket with warm soapy water and a non-abrasive sponge or
wash them in the dishwasher.
Tip: If food is stuck to the basket or the bottom of the pan, fi ll the pan with hot soapy
water and put the basket in the pan and let the pan and the basket soak for approximately
10 minutes.
4. Clean the inside of the appliance with hot water and a non-abrasive sponge.
5. Clean the heating element with a cleaning brush to remove any food residues.
SECURA ELECTRIC HOT AIR FRYER

13
Copyright © 2016 – Secura Inc. - All rights are reserved. http://www.thesecura.com
TROUBLESHOOTING
problem Possible cause Solution
The air fryer does
not work
The appliance is not
plugged in.
Plug the appliance into a grounded electrical
socket.
You have not set the timer.
Turn the timer knob to the required cooking time to
switch on the appliance.
The pan is not put into the
appliance properly.
Slide the pan into the appliance properly.
The ingredients
fried with the air
fryer are not done.
The basket is too full.
Put smaller batches of ingredients in the basket.
Smaller batches fry faster and more evenly.
The temperature is set too
low.
Turn the temperature control knob to the required
temperature setting (see section “Settings” in the
chapter ‘Using the appliance’).
The cooking time is too
short.
Turn the timer knob to the required cooking time
(see section “Settings” in the chapter’ Using the
appliance’).
The ingredients
are fried unevenly
in the air fryer.
Certain types of ingredients
need to be shaken halfway
through the cooking
process.
Ingredients that lie on top of or across each other
(e.g.fries) need to be shaken halfway through the
preparation time. See section ”Settings” in the
chapter ‘Using the appliance’.
Fried snacks are
not crispy when
they come out of
the air fryer.
You used a type of snack
meant to be prepared in a
traditional deep fryer.
Use oven snacks or lightly brush some oil onto the
snacks for a crispier result.
I cannot slide
the pan into the
appliance properly.
There are too many
ingredients in the basket.
Do not fi ll the basket beyond full, refer to the table
in the “Setting” section.
The basket is not placed in
the pan correctly.
Push the basket down into the pan until you hear a
click.
White smoke
comes out of the
appliance.
You are preparing greasy
ingredients.
When you fry greasy ingredients in the air fryer, a
large amount of oil will leak into the pan. The oil
produces white smoke and the pan may heat up
more than usual. This does not affect the appliance
or the end result.
The pan still contains
grease residues from
previous use.
White smoke is caused by grease heating up in the
pan. Make sure you clean the pan properly after
each use.
Fresh fries are
fried unevenly in
the air fryer.
You did not use the right
type of potato.
Use fresh potatoes and make sure they stay fi rm
during frying.
You did not rinse the potato
sticks properly before you
fried them.
Rinse the potato sticks properly to remove starch
from the outside of the sticks.
Fresh fries are not
crispy when they
come out of the air
fryer.
The crispiness of the fries
depends on the amount of
oil and water in the fries.
Make sure you dry the potato sticks properly before
you add the oil.
Cut the potato sticks smaller for a crispier result.
Add slightly more oil for a crispier result.

14
Copyright © 2016 – Secura Inc. - All rights are reserved. http://www.thesecura.com
RECIPES
SECURA ELECTRIC HOT AIR FRYER

15
Copyright © 2016 – Secura Inc. - All rights are reserved. http://www.thesecura.com
Blooming Onion
Servings 4
Ingredients
1 Large white onion
0.25 cup Milk, nonfat
2 Large eggs
0.75 cup Panko
0.75 cup fl our
1.5 teaspoon Paprika
1 teaspoon Garlic powder
1 tablespoon canola oil
0.5 teaspoon Cajun seasoning
0.5 teaspoon black pepper
1 teaspoon Sea Salt
Directions
1. Mix breadcrumbs with olive oil & Cajun seasoning. In a separate dish, mix salt & pepper
into the fl our. In a bowl, mix milk with egg.
2. Peel onion, cut off top. Place cut side down onto a cutting board.
3. Starting at 2 inch from the root, cut downward, all the way to the cutting board. Repeat to
make 4 evenly spaced cuts around the onion.
4. Continue slicing between each section until you have made 8 cuts total.
5. Place sliced onion in ice water for at least 2 hours / overnight. Remove from water, pat
dry. Open onion so its petals are exposed.
6. Beat eggs with 2 Tbsp. milk. Place onion on a tray or in a bowl.
7. Sprinkle onion generously with fl our mixture. Make sure to get in between all its petals.
Turn onion upside down to remove excess fl our mixture.
8. Using a ladle, ladle the egg mixture into every crevice. Lift up onion and turn to make
sure excess egg drips off.
9. Sprinkle onion very generously with bread crumb mixture. Press into place.
10. Place the blooming onion into the fry basket and cover the top with aluminum foil (like a tent).
11. Place the basket back into pan and slide the pan into the Air Fryer.
12. Set the temperature to 182°C/360°F.
13. Set the timer to 10 minutes.
14. When the timer is done, check crispness of the onion. Cook 5-10 more minutes to
desired crispness.
15. When done, remove carefully and serve with Ranch dressing.

16
Copyright © 2016 – Secura Inc. - All rights are reserved. http://www.thesecura.com
Fried Chicken
Servings 3
Ingredients
3 Chicken thighs with skin, raw
3 Chicken legs with skin, raw
2 cup Flour, white
1 tablespoon black pepper
1 tablespoon Garlic powder
1 teaspoon onion powder
0.5 teaspoon poultry seasoning
1 teaspoon cumin (optional)
1 tablespoon Paprika
1 tablespoon olive oil
1 cup Buttermilk, whole
Directions
1. Soak chicken in buttermilk in the fridge for 2 hours.
2. Add seasonings to the fl our. Mix well.
3. Dip chicken into the fl our mix, then buttermilk, and back into the fl our.
4. Place the chicken into the Fry Basket.
5. Mist chicken with olive oil.
6. Insert Fry Basket into the Air Fryer.
7. Set the temperature knob to 200°C/390°F.
8. Set the timer knob to 20 minutes.
9. Turn chicken every 5 minutes.
10. Serve when chicken is cooked to desired crispiness (ensure the internal temperature is
at least 74°C/165°F).
Hot Wings
Servings 2
Ingredients
12 chicken wings, drumettes raw
1 cup buffalo wing sauce
Directions
1. Place the wings into a bowl with 1 tbs of cooking oil. Toss to coat the wings with a light
coating of oil.
SECURA ELECTRIC HOT AIR FRYER

17
Copyright © 2016 – Secura Inc. - All rights are reserved. http://www.thesecura.com
Roast Pork Loin with Red Potatoes
Servings 2
Ingredients
2 pound pork loin
2 red potatoes large diced
1 teaspoon salt
1 teaspoon pepper
0.5 teaspoon Garlic powder
0.5 teaspoon red pepper fl akes
1 teaspoon parsley
0.5 cup balsamic glaze
Directions
1. Sprinkle the dry seasonings over the pork loin, and potatoes.
2. Place the pork loin, then the potatoes next to the pork in the basket and place the basket
& pan into the Air Fryer.
3. Set the temperature knob to 182°C/360°F and the timer knob to 25 minutes.
4. Once the timer has elapsed remove the pork loin from the Air Fryer, check the internal
temperature for the desired degree of doneness (70°C/160°F=med 75°C/170°F=well
done). If the meat is not at the correct temperature, remove the potatoes and put the pork
back into the Air Fryer for 5 minutes or until desired temperature is attained. Once the
pork is cooked, let it rest for a few minutes before slicing.
5. Plate the roasted potatoes.
6. Slice the pork. Place 4-5 slices over the potatoes and drizzle the balsamic glaze over
the pork.
7. Enjoy.
2. Place the wings into the Fry Basket/Pan and then into the Air Fryer.
3. Set the temperature knob to 200°C/390°F and set the cooking time to 25 minutes.
4. Half way through the time, shake the wings.
5. When the timer goes off, remove the wings, place them in a bowl and toss with the
sauce.
6. Return the wings to the Air Fryer & cook for 8 more minutes at 200°C/390°F.
7. Toss half way through.
8. Serve with Ranch Dressing &/or Bleu Cheese Dressing and additional buffalo wing
sauce.

18
Copyright © 2016 – Secura Inc. - All rights are reserved. http://www.thesecura.com
Country Fried Steak
Servings 2
Ingredients
2 6 ounce sirloin steaks-pounded thin
3 eggs, beaten
1 cup fl our
1 cup Panko
1 teaspoon onion powder
1 teaspoon Garlic powder
1 teaspoon salt
1 teaspoon pepper
6 ounce ground sausage meat
2 tablespoon fl our
2 cup milk
1 teaspoon pepper
Directions
1. Season the panko with the dry spices
2. Dredge the steak in this order. Flour, egg, and seasoned panko
3. Place the breaded steak into the basket of the Air Fryer and place the basket & pan into
the Air Fryer.
4. Set the temperature knob to 185°C/365°F and the timer for 12 minutes.
5. Once the timer has elapsed remove the steak and serve with mash potatoes and
sausage gravy.
Sausage Gravy
1. In a pan cook the sausage until well done. Drain fat, reserving 2 tbsp in the pan.
2. Add in the fl our to the pan with sausage, mix until all the fl our is incorporated.
3. Slowly mix in the milk. Stir over a med heat until the milk thickens.
4. Season with pepper. Cook for 3 minutes to cook out the fl our.
SECURA ELECTRIC HOT AIR FRYER

19
Copyright © 2016 – Secura Inc. - All rights are reserved. http://www.thesecura.com
Bacon Wrapped Tater Tots
Servings 4
Ingredients
1 large bag frozen tater tots, extra crispy
1 pound bacon, sliced medium
4 Scallions
3 tablespoon sour cream
0.5 cup cheddar cheese, shredded
Directions
1. Wrap each tater tot with a piece of bacon and place into the Air Fry Basket. Do not
overcrowd.
2. Place the Fry Basket into the Air Fryer.
3. Set the temperature knob to 200°C/390°F.
4. Set the cooking time to 10 minutes.
5. When the timer is done, transfer tater tots to a plate.
6. Spread cheese and scallions over the hot tater tots. Serve with sour cream.
Home-Made French Fries
To make home-made fries, follow the steps below.
1. Peel the potatoes and cut them into ¼” thick sticks.
2. Soak the potato sticks for 30 minutes, then drain them and dry them with a paper towel.
3. Pour 1/2 tablespoon of cooking oil in a bowl, put the sticks on top and mix until the sticks
are coated with oil.
4. Remove the sticks from the bowl with your fi ngers or a kitchen utensil so that excess oil
stays behind in the bowl. Put the sticks in the basket.
Note: Do not tilt the bowl to put all the potato sticks in the basket at once, to prevent
excess oil from ending up on the bottom of the pan.
5. For best results, preheat the Air Fryer to 200°C/390°F.
6. Fry the potato sticks according to the instructions in the table contained in the "Settings"
portion of this guide.
/