
Thank you for purchasing the CANDY induction hob. Please read this instruction manual
carefully before using the hob and keep it in a safe place for future reference.
MODEL : CFID36 WIFI
UK
ENGLISH
ITALIAN
SPANISH
POLISH
HUNGARY
PORTUGUESE
SLOVENIAN
Instruction Manual For Induction Hob
Manuale di istruzioni per piano cottura a
induzione
Manual de instrucciones para encimera de
inducción
Instrukcja uĪytkowania indukcyjnej páyty
grzejnej
Manual de Instruções da placa de indução
þ
Navodila za uporabo indukcijskih kuhalnih
ploš
GREECE
İndüksiyonlu Ocak için Kullanım Kılavuzu
TÜRKÇE
УКР
Інструкція на індукційну варильну поверхню
MANUAL DE UTILIZARE PENTRU PLITE CU INDUCŢIE
ROMANIAN
Indukciós tűzhelylap
Felhasználói kézikönyv

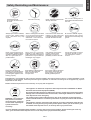
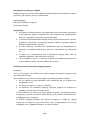
WARNING: The appliance and its accessible parts become hot
during use. Care should be taken to avoid touching heating
elements.
Children under 8 Year of age must be kept away from the
appliance unless they are continuously supervised.
This appliance can be used by children aged from 8 years and
above and persons with reduced physical, sensory or mental
capabilities or lack of experience and knowledge if they have
been given supervision or instruction concerning use of the
appliance in a
safe way and understand the hazards involved.
Children must not play with the appliance.
Cleaning and user maintenance shall not be made by children
without supervision
WARNING: Unattended cooking on a hob with fat or oil can be
dangerous and may result in fire.
NEVER try to extinguish a fire with water, but switch off the
appliance and then cover flame e.g. with a lid or a fire blanket.
WARNING: Danger of fire: do not store items on the cooking
surfaces.
WARNING: If the surface is cracked, switch off the appliance to
avoid the possibility of electric shock.
Do not use a steam cleaner for cleaning operations
LSXWfk KW_[`V[`Y S`V GS[`fW`S`UW=
EN-1

Metallic objects such as knives, forks, spoons and sauce pan
lids must not be placed on the hob surface as they can get hot.
Any spillage should be removed from the lid before opening.
The hob surface must be allowed to cool down before closing
the lid.
After use, switch off the hob element by its control. Do not
rely on the pan detector.
This appliance is not intended to be operated by means of an
external timer or separate remote - control system.
The means for disconnection must be incorporated in the fixed
wiring in accordance with the wiring rules.
The instructions state the type of cord to be used, taking into
account the temperature of the rear surface of the appliance.
If the supply cord is damaged, it must be replaced by the
manufacturer, its service agent or similarly qualified persons in
order to avoid a hazard.
CAUTION: In order to avoid a hazard due to inadvertent
resetting of the thermal cutout, this appliance must not be
supplied through an external switching device, such as a timer,
or connected to a circuit that is regularly switched on and off
by the utility.
EN-2

]fi kf[Xp
-
BVRc Afde`^Vc>
Oc\Xj\ i\X[ k_`j `ejkilZk`fe dXelXc ZXi\]lccp Y\]fi\ lj`e^ k_\ _fY Xe[ b\\g `k `e X jX]\ gcXZ\
]fi ]lkli\ i\]\i\eZ\3
Jc`UfTe E_ec`UfTeZ`_
P`c\Z_X JcZ_TZa]V
2*.3-8/+ +/6+9/8
+-6*2/+ .1*77 51*8-
/3,9+8/43 +4/1
y3,9+-, +966-387
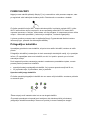
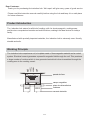
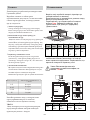
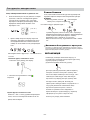
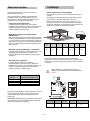
S_\ `e[lZk`fe _fY ZXk\ij ]fi Xcc b`e[ f] Zffb`e^1 n`k_ `kj \c\ZkifdX^e\k`Z
S_Xeb pfl ]fi gliZ_Xj`e^ `e[lZk`fe _fY3
LXel]XZkli\[ n`k_ jg\Z`Xccp `dgfik\[ dXk\i`Xcj1 k_\ `e[lZk`fe _fY `j \oki\d\cp lj\i2
]i`\e[cp1
[liXYc\ Xe[ jX]\3
Zffb`e^ qfe\j1
d`Zif2Zfdglk\i`j\[ Zfekifcj Xe[ dlck`2]leZk`fej1 dXb`e^ `k k_\ `[\Xc Z_f`Z\
j
]Xd`cp3
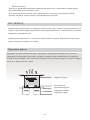
this
THIS INFORMATION IS IN ANOTHER INDUCITON HOB AND IS A BETTER
EXPLAINATION
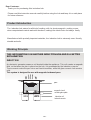
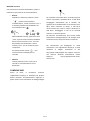
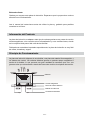
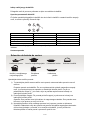
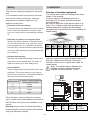
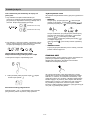
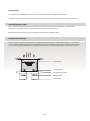
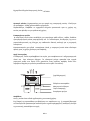
INDUCTION
An electronic generator powers a coil located inside the appliance. This coil creates a magnetic
field, so that when the pan is placed on the hob, it is permeated by the induction currents.
These currents make the pan into a real heat transmitter, while the glass ceramic hob remains
cold.
This system is designed for use with magnetic-bottomed pans.
pan
EN-3

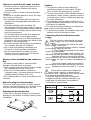
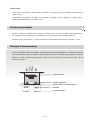
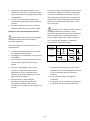
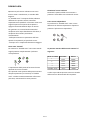
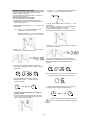
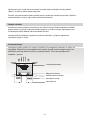
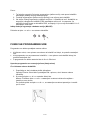
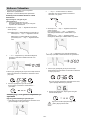
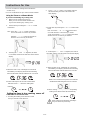
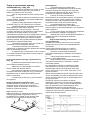
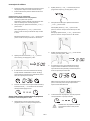
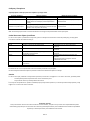
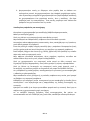
Jc`eVTeZ`_ Wc`^ `gVc1YVReZ_X
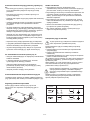
A j\ejfi dfe`kfij k_\ k\dg\iXkli\ `e k_\ Zffb`e^
qfe\j3 V_\e k_\ k\dg\iXkli\ \oZ\\[j X jX]\
c\m\c1 k_\ Zffb`e^ qfe\ `j XlkfdXk`ZXccp jn`kZ_\[
f]]3
BVeVTeZ`_ `W d^R]] `c _`_1^RX_VeZT ZeV^d
V_\e X gXe n`k_ X [`Xd\k\i f] c\jj k_Xe =5 dd1
fi jfd\ fk_\i jdXcc `k\d .\3^3 be`]\1 ]fib/ fi
X efe2dX^e\k`Z gXe .\3^3 Xcld`e`ld/ _Xj Y\\e
KVdZUfR] YVRe hRc_Z_X
V_\e k_\ _fY _Xj Y\\e fg\iXk`e^ ]fi jfd\ k`d\1
k_\i\ n`cc Y\ jfd\ i\j`[lXc _\Xk3 S_\ c\kk\i ~G*
Xgg\Xij kf nXie pfl
?fe` dYfeU`h_
Aefk_\i jX]\kp ]\Xkli\ f] k_\ `e[lZk`fe _fY `j Xlkf
j_lk[fne3 S_`j fZZlij n_\e\m\i pfl ]fi^\k kf
jn`kZ_ f]] X Zffb`e^ qfe\3 S_\ [\]Xlck j_lk[fne
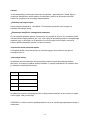
k`d\j Xi\ j_fne `e k_\ kXYc\ Y\cfn?
V_\e k_\ gXe `j i\dfm\[ ]ifd k_\ Zffb`e^
qfe\1
PRc_Z_X> Aepfe\ n_f _Xj Y\\e ]`kk\[ n`k_ X
_\Xik gXZ\dXb\i j_flc[ Zfejlck X [fZkfi Y\]fi\
lj`e^ k_\ `e[lZk`fe
S_`j _fY nXj [\j`^e\[ ]fi
[fd\jk`Z
lj\3
He `kj ZfejkXek j\XiZ_ kf `dgifm\ gif[lZkj1
JIKI D HJ
JIKI D JJ
JIKI B HJ
A`i \o`k
LRWVej
E_deR]]ReZ`_
ENGLISH
Oem[h b[l[b
R^[ ^[Wj_d] ped[ i^kj Zemd
WkjecWj_YWbbo W\j[h
6q:
;q65
66q69
= ^ekhi
9 ^ekhi
7 ^ekhi
6:
6^ekhi
i\j\im\j k_\ i`^_k kf df[`]p Xep
k\Z_e`ZXc1
gif^iXdd\ fi X\jk_\k`Z Xjg\Zkj f]
k_\
Xggc`XeZ\ Xk Xep k`d\3
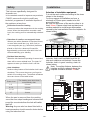
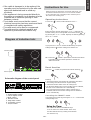
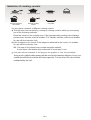
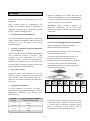
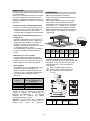
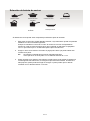
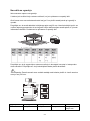
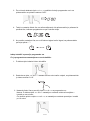
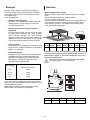
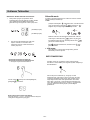
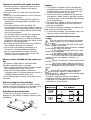
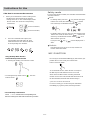
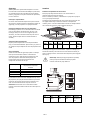
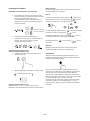
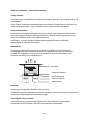
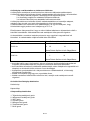
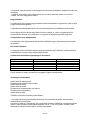
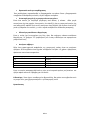
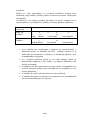
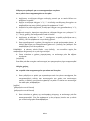
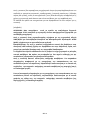
Selection of installation equipment
Cut out the work surface according to the sizes
shown in the drawing.
For the purpose of installation and use, a
minimum of
around the hole.
Be sure the thickness of the work surface is at
least 30mm. Please select heat-resistant work
surface material to avoid larger deformation
caused by the heat radiation from the hotplate. As
shown below:
L(m
m)
W(m
m)
H(m
m)
D(m
m)
A(m
m)
B(m
m)
X(m
m)
590 520 60 56 560+
4
+1
490+
4
+1
50
mini
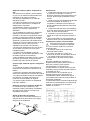
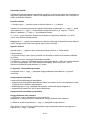
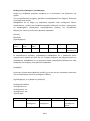
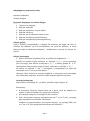
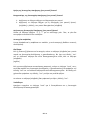
Induction hob is well ventilated and the air
inlet and outlet are not blocked. Ensure the
Induction hob is in good state. As
shown below
Note: The safety distance between the
hotplate and the cupboard above the
hotplate should be at least 760mm.
A(mm) B(mm) C(mm) D E
760 50
mini
20
mini
Air
intake
Air exit
min.5mm
specifically
our
CANDY
50mm space needs to be left
placed on the hob, a buzzer will sound for
approximately one minute, after which the hob
will automatically go to standby.
M ake sure the
working
that the hob is still hot.
hob.
the zone stops heating and a buzzer will
sound for one minute then the hob will switch
itself off.
EN-4

Before you install the hob, make sure that
• the work surface is square and level, and no
structural members interfere with space
requirements
• the work surface is made of a heat-resistant
material
• if the hob is installed above an oven, the oven
has a built-in cooling fan
• the installation will comply with all clearance
requirements and applicable standards and
regulations
• a suitable isolating switch providing full
disconnection from the mains power supply is
incorporated in the permanent wiring, mounted
and positioned to comply with the local wiring
rules and regulations.
The isolating switch must be of an approved
type and provide a 3 mm air gap contact
separation in all poles (or in all active [phase]
conductors if the local wiring rules allow for this
variation of the requirements)
• the isolating switch will be easily accessible to
the customer with the hob installed
• you consult local building authorities and
by-laws if in doubt regarding installation
• you use heat-resistant and easy-to-clean
finishes (such as ceramic tiles) for the wall
surfaces surrounding the hob.
When you have installed the hob, make sure
that
• the power supply cable is not accessible
through cupboard doors or drawers
• there is adequate flow of fresh air from outside
the cabinetry to the base of the hob
• if the hob is installed above a drawer or
cupboard space, a thermal protection barrier is
installed below the base of the hob
• the isolating switch is easily accessible by the
customer
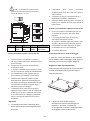
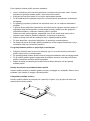
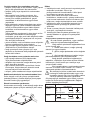
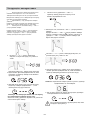
Before locating the fixing brackets
The unit should be placed on a stable, smooth
surface (use the packaging). Do not apply force
onto the controls protruding from the hob.
Adjusting the bracket position
Fix the hob on the work surface by screwing 4
brackets on the bottom of hob(see picture) after
installation.
Cautions
1. The induction h
qualified personnel or technicians. Please
never conduct the poeration by yourself.
2. The hob must not be installed directly above a
dishwasher, fridge, freezer, washing machine
or tumble dryer, as the humidity may damage
the hobs electronics
3. The induction hob should be installed in such
ion can be ensured
4. The wall and induced heating zone above the
table surface shall withstand heat.
5. To avoid any damage, the sandwich layer and
adhesive must be resistant to heat.
Connecting the hob to the mains power
supply
This hob must be connected to the mains
power supply only by a suitably qualified
person.
Before connecting the hob to the mains
power supply, check that:
1. The domestic wiring system is suitable
for the power drawn by the hob.
2. The voltage corresponds to the value
given in the rating plate
3. The power supply cable sections can
withstand the load specified on the rating plate.
The power supply cable must not touch
any hot parts and must be positioned so that its
temperature will not exceed 75
˚
C at any
point.
Check with an electrician whether the
domestic wiring system is suitable without
alterations. Any alterations must only be made
by a domestic qualified electrician.
The power supply should be connected in
compliance with the relevant standard, or a
single-pole circuit breaker. the method of
connection is shown below.
50/60Hz
50/60Hz
jZi\n
YiXZb\k
YXj\
jZi\n _fc\
ob must be installed by
a way that better heat radiat
to enhance its reliability.
Adapters,reducers or branching devices
must not be used to connect the hob to the mains
power supply, as they can cause overheating and
fires.
EN-5

ENGLISH
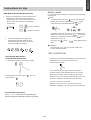
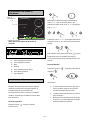
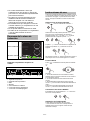
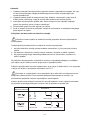
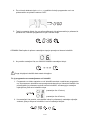
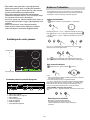
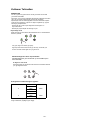
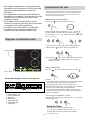
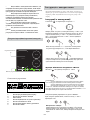
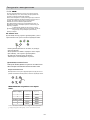
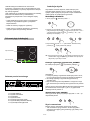
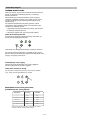
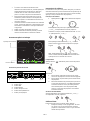
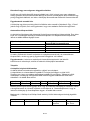
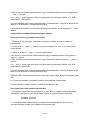
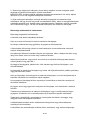
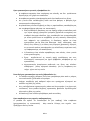
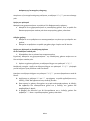
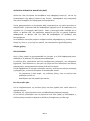
Cfekifc gXe\c
C\iXd`Z gcXk\
LTYV^ReZT UZRXcR^ `W eYV T`_ec`] aR_V]
BZRXcR^ `W Z_UfTeZ`_ Y`S>
1. Power regular control
2. Timer regular control
3. WIFI control
6. Lock/Inlock control
7. On/Off control
1
2
6
7
4 5
5. Keep warm control
4. Booster control
3 1
E_decfTeZ`_d W`c NdV
• If the cable is damaged or to be replaced, the
operation must be carried out by the after-sale
agent with dedicated tools to avoid any
accidents.
• If the appliance is being connected directly to
the mains an omnipolar circuit-breaker must be
installed with a minimum opening of 3mm
between contacts.
• The installer must ensure that the correct
electrical connection has been made and that it
is compliant with safety regulations.
• The cable must not be bent or compressed.
• The cable must be checked regularly and
replaced by authorised technicians only.
U^[d j^[ fem[h _i im_jY^[Z ed1 j^[ Xkpp[h m_bb
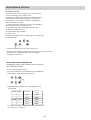
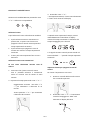
Operating instructions
--
Boost function
Warning:
2. The boost function works on the all cooking zone.
Cancelling the "BOOST" mode
1.Press the " " control, all the indicators show "--".
Press the“ " control, the power level indicator showing " "
iekdZ edY[
WdZ Wbb j^[ _dZ_YWjehi m_bb Yec[ ed
\eh ed[ i[YedZ WdZ j^[d
]e 3 R^[ ^eX _i dem
_d ijWdZXo ceZ[3
ObWY[ j^[ fWd _d
j^[
Y[djh[ e\ j^[ Yeea_d] ped[3
Select the power level by pressing the "+" or "-" control for the
relevant cooking zone. To begin with the indicator shows" "or " "
by pressing the "+" or "-" control. Adjust up or down by pressing
the "+" or "-" control.
If you press the "+" and "-" controls simultaneously, the power
setting returns to" "and the cooking zone switches off.
NB : When the " " control is pressed, the induction hob returns
to standby mode if no other operation is carried out
within one minute.
1. The boost function only operates for 5 minutes, after which
the cooking zone will revert to its original setting.
Cancel the "Boost" mode by pressing the "+" or "-" control of the
corresponding zone.
3. As the boost function of 1st or 3rd cooking zone is activated,
the PRO zone is limited at level 2 automatically.
Vice versa if the boost function of PRO cooking zone is
activated, both the 1st and 3rd cooking zone are limited at
level 2 automatically.
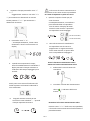
Using the Timer
You can use the timer in two different ways:
• You can use it as a minute minder. In this case,
the timer will not turn any cooking zone off when
the set time is up.
off
EN-6

E_decfTeZ`_d W`c NdV
• You can set it to turn cooking zones off after the
set time is up.
• You can set the timer for up to 9 hour and 59 minutes.
Using the Timer as a Minute Minder
If you are not selecting any cooking zone
1. Make sure the cooktop is turned on.
Note: you can use the minute minder even
if you’re not selecting any cooking zone.
2. Set the time by touching the “ - ” or “ + ” control
of the timer
Hint: Touch the “ - ” or “ + ” control of the timer
once to decrease or increase by 1 minute.
Hold the “ - ” r “ + ” control of the timer to
decrease or increase by 10 minutes.
3. Touching the “ - ” and “ + ” together, the timer
is cancelled, and the”0:00” will show in the minute
display.
4. When the time is set, it will begin to count down
immediately. The display will show the remaining
time and the timer indicator will flash for 5 seconds.
5. Buzzer will beep for 30 seconds and the timer
indicator shows “- - “ when the setting time
finished.
Setting the timer to turn cooking
zones off
If the timer is set on one zone:
1. Touching the heating zone selection control
that you want to set the timer for.
.
.
.
.
2. Touch “ - ”or “ + ” control , The minder indicator
will start flashing and “0:10” will show in the
timer display.
3. Set the time by touching the“ - ”or “ + ” control of the
timer
Hint: Touch the “ - ” or “ + ” control of the timer
once will decrease or increase by 1 minute.
Touch and hold the “ - ” or “ + ” control of the timer
will decrease or increase by 10 minutes.
4. Touching the “ - ” and “ + ” together, the timer is
cancelled, and the” 00” will show in the minute display.
5. When the time is set, it will begin to count down
immediately. The display will show the remaining
time and the timer indicator flash for 5 seconds.
NOTE: The red dot next to power level indicator
will illuminate indicating that zone is selected.
6. When cooking time expires, the corresponding
cooking zone will be switch off automatically.
Other cooking zone will keep operating if
they are turned on previously.
:
.
.
.
.
EN-7

ENGLISH
E_decfTeZ`_d W`c NdV
If the timer is set on more than one zone:
1. When you set the time for several cooking zones
simultaneously, decimal dots of the relevant
cooking zones are on. The minute display shows
the min. timer. The dot of the corresponding
zone flashes.
(set to 15 minutes)
(set to 45 minutes)
2. Once the countdown timer expires, the
corresponding zone will switch off. Then
it will show the new min. timer and the dot
of corresponding zone will flash.
Using the Keep Warm function
Actived the Keep warm function
1. Touching the heating zone selection control
2. Touching the keep warm control ,the zone
indicator show “ “
Cancel the keep warm function
:
.
.
Touch "-" or "+" control of the corresponding zone,
then the cooking zone will revert to the level you select.
Safety mode
Unlock:
Lock:
To ensure the safety of children, the induction hob is fitted with
an safety lock.
In working mode, press the " " key, the hob then goes
into the lock mode, timer will display " " and the
rest of the keys are disabled except the " " key.
In standby mode, press the "lock" key, the hob then goes
into the lock mode, the timer shows " " and the rest
of the keys are disabled. The timer shows" " for a
while and then goes off.
If you press the control , " " will be displayed for a
while.
Hold down the "Lock" key for 3 second, and the lock
function will be deactivate.
First of all, you should download SSimply-Fy and install to your
To use the WIFI function, switch the hob on and press
the WIFI control.The wifi LED will flash fast for 5 seconds
which means the WIFI module is booting up. If the WIFI
module connects to the router, the wifi LED will remain on all
cycles of 1 second on 1 second off.
WIFI FUNCTION
portable device. Then enroll your induction hob.
Refer to annex for details.
all the time. Otherwise, the WIFI LED will be flashing in
When the connection is made, you can find numerous
information on Simply-Fy, e.g. Zone power, time remaining etc.
EN-8

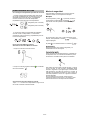
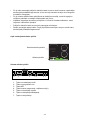
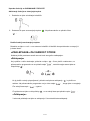
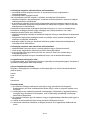
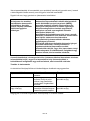
FLEXIBLE AREA
This area can be used as a single zone or as two different
zones, accordingly to your cooking needs.
Flexible area is made of two independent inductors that can
be controlled separately. When working as a single zone,
the part that is not covered by cookware is automatically
switched off after one minute.
- Anywhere with bigger cookware.
To grant a correct pan detection and a even heat distribution,
the cookware should be correctly placed:
- In the front or rear side of the flexible zone when the
cookware is smaller than 22 cm.
As large zone
To activate the flexible area as a single large zone, simply press
the dedicated keys.
The power setting works as any other cooking zone.
If the pan is moved from the front to the rear part of the zone (or vice versa),
the flexible area automatically detects the new position,
keeping the same power.
As two independent zones
To use the flexible area as two different zones with different
power settings, press the dedicated controls.
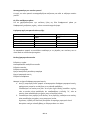
6
7
8
Beeij
1800
MehcWb
3000
Heating
Zone
The maximum power of cooking zones is
as follows:
R^[ WXel[ cWo lWho e j^[ i_p[
e\
j^[
fWd WdZ
j^[ cWj[h_Wb _j _i cWZ[ \hec
WYYehZ_d] j
3000
Flexible
Area
9
1800
000
3000
Deactivation of the continuum zone
the continuum key again
Resetting the power of the continuum zone or
pressing
1800
4000
1800
3
E_decfTeZ`_d W`c NdV
3000
EN-9

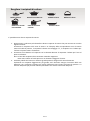
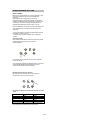
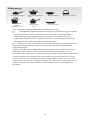
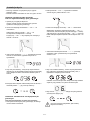
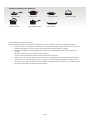
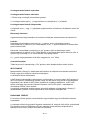
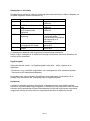
Hife f`c ]ip`e^ gXe RkX`ec\jj jk\\c gfk Hife gXe
EeXd\c jkX`ec\jj
jk\\c b\kkc\
EeXd\c Zffb`e^
lk\ej`c
Hife b\kkc\
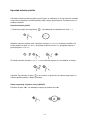
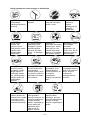
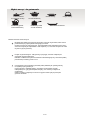
Wfl dXp _Xm\ X eldY\i f] [`]]\i\ek Zffb`e^ m\jj\cj
S_`j `e[lZk`fe _fY ZXe `[\ek`]p X mXi`\kp f] Zffb`e^ m\jj\cj1 n_`Z_ pfl ZXe k\jk Yp
fe\ f] k_\ ]fccfn`e^ d\k_f[j?
OcXZ\ k_\ m\jj\c fe k_\ Zffb`e^ qfe\3 H] k_\ Zfii\jgfe[`e^ Zffb`e^ qfe\ [`jgcXpj
X gfn\i c\m\c1 k_\e k_\ m\jj\c `j jl`kXYc\3 H]
,
T
,
]cXj_\j1 k_\e k_\ m\jj\c `j efk jl`kXYc\
]fi lj\ n`k_ k_\ `e[lZk`fe _fY3
Gfc[ X dX^e\k kf k_\ m\jj\c3 H] k_\ dX^e\k `j XkkiXZk\[ kf k_\ m\jj\c1 `k `j jl`kXYc\
]fi lj\ n`k_ k_\ `e[lZk`fe _fY3
MB? S_\ YXj\ f] k_\ m\jj\c dljk ZfekX`e dX^e\k`Z dXk\i`Xc3
6
Hife gcXk\
LV]VTeZ`_ `W T``\Z_X gVddV]d
Hk dljk _Xm\ X ]cXk Yfkkfd n`k_ X [`Xd\k\i f] dfi\ k_Xe Zd3
14
Use pans whose diameter is as large as the graphic of the zone selected.
6
Using a pot a slightly wider energy will be used at its maximum efficiency.If you use
smaller pot efficiency could be less than expected. Pot less than 140 mm could be
undetected by the hob.
EN-10

ENGLISH
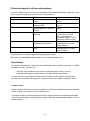
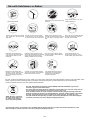
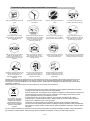
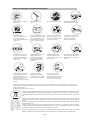
Cc\Xe k_\ `e[lZk`fe _fY
i\^lcXicp kf jkfg ]fi\`^e fYa\Zkj
]ifd ^\kk`e^ `ekf k_\ ]Xe Xe[
gi\m\ek`e^ k_\ Xggc`XeZ\ ]ifd
nfib`e^ gifg\icp3
Df efk jkfi\ [\k\i^\ekj fi
]cXddXYc\ dXk\i`Xcj Y\e\Xk_
k_\ _fY3
AcnXpj fg\e j\Xc\[ ZfekX`e\ij1
jlZ_ Xj ZXej1 Y\]fi\ _\Xk`e^
k_\d1 fk_\in`j\ k_\p dXp
\ogcf[\3
M\m\i _Xm\ k_\ `e[lZk`fe
_fkgcXk\ kf nfib n`k_flk ]ff[
`ej`[\1 fk_\in`j\ `kj fg\iXk`feXc
g\i]fidXeZ\ dXp Y\ X]]\Zk\[
Xe[ [Xe^\i dXp _Xgg\e3
Df efk gcXZ\ ifl^_ fi le\m\e
m\jj\cj fe k_\ _fY1 Xj k_\p
dXp [XdX^\ k_\ Z\iXd`Z
jli]XZ\3
H] k_\ jli]XZ\ f] k_\ _fY `j
ZiXZb\[1 jn`kZ_ f]] k_\
Xggc`XeZ\ kf Xmf`[ Xep
gfjj`Y`c`kp f] \c\Zki`Z j_fZbj3
Df efk c\Xm\ d\kXcc`Z fYa\Zkj1
jlZ_ Xj be`m\j1 ]fibj1 jgffej
Xe[c`[jfek_\_fYXjk_\pdXp
^\k _fk3
A [\[`ZXk\[ gfn\i
gifk\Zk`fe X`i jn`kZ_ dljk
Y\ lj\[3
M\m\i nXj_ k_\ `e[lZk`fe _fY
[`i\Zkcp n`k_ nXk\i3
M\m\i lj\ k_\ `e[lZk`fe _fY
e\Xi Xefk_\i Xggc`XeZ\ n_`Z_
^\e\iXk\j X _`^_ k\dg\iXkli\1
jlZ_ Xj X ^Xj Zffb\i fi X
gXiX]]`e _\Xk\i3
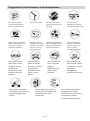
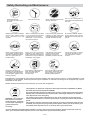
BELJIL?F> B` _`e UZda`dV
eYZd ac`UfTe Rd f_d`ceVU
^f_ZTZaR] hRdeV2 A`]]VTeZ`_
`W dfTY hRdeV dVaRcReV]j W`c
daVTZR] ecVRe^V_e Zd
_VTVddRcj2
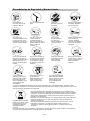
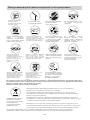
MYZd Raa]ZR_TV Zd ]RSV]]VU Z_ T`^a]ZR_TV hZeY Cfc`aVR_ UZcVTeZgV 64463=:3CA W`c PRdeV
C]VTecZTR] R_U C]VTec`_ZT CbfZa^V_e .PCCC/2
@j V_dfcZ_X eYRe eYZd Raa]ZR_TV Zd UZda`dVU `W T`ccVTe]j0 j`f hZ]] YV]a acVgV_e R_j a`ddZS]V
UR^RXV e` eYV V_gZc`_^V_e R_U e` Yf^R_ YVR]eY0 hYZTY ^ZXYe `eYVchZdV SV TRfdVU ZW Ze
hVcV UZda`dVU `W Z_ eYV hc`_X hRj2
MYV dj^S`] `_ eYV ac`UfTe Z_UZTReVd eYRe Ze ^Rj _`e SV ecVReVU Rd _`c^R] Y`fdVY`]U
hRdeV2 Ee dY`f]U SV eR\V_ e` R T`]]VTeZ`_ a`Z_e W`c eYV cVTjT]Z_X `W V]VTecZTR] R_U V]VTec`_ZT
X``Ud2
MYZd Raa]ZR_TV cVbfZcVd daVTZR]Zde hRdeV UZda`dR]2 D`c WfceYVc Z_W`c^ReZ`_ cVXRcUZ_X eYV
ecVRe^V_e0 cVT`gVcj R_U cVTjT]Z_X `W eYZd ac`UfTe a]VRdV T`_eRTe j`fc ]`TR] T`f_TZ]0 j`fc
Y`fdVY`]U hRdeV UZda`dR] dVcgZTV0 `c eYV dY`a hYVcV j`f afcTYRdVU Ze2
D`c ^`cV UVeRZ]VU Z_W`c^ReZ`_ RS`fe ecVRe^V_e0 cVT`gVcj R_U cVTjT]Z_X `W eYZd ac`UfTe0 a]VRdV T`_eRTe j`fc ]`TR] TZej
`WWZTV0 j`fc Y`fdVY`]U hRdeV UZda`dR] dVcgZTV `c eYV dY`a hYVcV j`f afcTYRdVU eYV ac`UfTe2
V_\e X Zffb`e^ qfe\ _Xj Y\\e
fe ]fi X cfe^ k`d\ k_\ jli]XZ\
i\dX`ej _fk ]fi jfd\ k`d\
X]k\inXi[j 2 jf [f efk kflZ_
k_\ Z\iXd`Z jli]XZ\3
Fifd k`d\ kf k`d\ Z_\Zb k_Xk
efk_`e^ .\3^3 ^cXjj1 gXg\i1 \kZ3/
`j fYjkilZk`e^ k_\ X`i `ekXb\
Y\e\Xk_ k_\ `e[lZk`fe _fY3
J\\g Z_`c[i\e fi `e]`id g\ijfej
XnXp ]ifd k_\ Xggc`XeZ\3
M\m\i c\k k_\d lj\ `k
lejlg\im`j\[3
H] k_\ gfn\i ZXYc\ `j [XdX^\[
`k j_flc[ Y\ i\gcXZ\[ Yp fli
j\im`Z\ X^\ek fi Yp Xefk_\i
jl`kXYcp hlXc`]`\[ g\ijfe3
Ffi `e[ffi lj\ fecp3
LRWVej KV^Z_UZ_X R_U GRZ_eV_R_TV>
This appliance is not intended for use by persons (including children) with reduced physical, sensory or mental capabilities, or lack
of experience and knowledge, unless they have been given supervision or instruction concerning use of the appliance by a person
responsible for their safety.
Children should be supervised to ensure that they do not play with the appliance.
EN-11

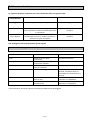
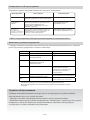
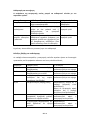
H] Xep XYefidXc`kp fZZlij1 k_\ `e[lZk`fe _fY n`cc XlkfdXk`ZXccp ^f `ekf gifk\Zk`m\ df[\ Xe[ [`jgcXp
fe\ f] k_\ ]fccfn`e^ Zf[\j?
S_\ XYfm\ kXYc\ j_fnj _fn kf Xjj\jj Xe[ Z_\Zb Zfddfe ]Xlckj3
Df efk [`jdXekc\ k_\ Xggc`XeZ\ pflij\c]1 fk_\in`j\ pfl dXp [XdX^\ k_\ `e[lZk`fe
_fY3
K`^_k Cc\Xe`e^ jgfe^\
Q`e^j Xe[ c`d\
jZXc\
Aggcp n_`k\ m`e\^Xi kf k_\ Xi\X1 n`g\ n`k_
X jf]k Zcfk_ fi lj\ X Zfdd\iZ`Xccp
XmX`cXYc\ gif[lZk
Tj\ X jg\Z`Xc jZiXg\i ]fi Z\iXd`Z ^cXjj
kf i\dfm\ i\j`[l\ .X j`c`Zfe gif[lZk `j
Y\jk/
Rg\Z`Xc X[_\j`m\ ]fi Z\iXd`Z
^cXjj
Rg\Z`Xc X[_\j`m\ ]fi Z\iXd`Z
^cXjj
MYV dfcWRTV `W eYV Z_UfTeZ`_ Y`S ^Rj SV VRdZ]j T]VR_VU Z_ eYV W`]]`hZ_X
MB? D`jZfee\Zk k_\ gfn\i jlggcp Y\]fi\ Zc\Xe`e^3
MjaV `W T`_eR^1
Z_ReZ`_
GVeY`U `W T]VR_Z_X
A]VR_Z_X ^ReVcZR]d
R_U GRZ_eV_R_TV
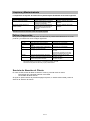
DRZ]fcV BZda]Rj R_U E_daVTeZ`_
H] X ]Xlck j_flc[ fZZli1 Y\]fi\ ZXcc`e^ A]k\i RXc\j R\im`Z\1 gc\Xj\ [f k_\ ]fccfn`e^?
2C_\Zb k_Xk k_\ Xggc`XeZ\ `j Zfii\Zkcp gcl^^\[ `e
2Q\X[ k_\ ]X`cli\ Xe[ [`jgcXp kXYc\ XYfm\
H] pfl Xi\ jk`cc leXYc\ kf i\jfcm\ k_\ gifYc\d1 jn`kZ_ f]] k_\ Xggc`XeZ\1 [f efk kip kf [`jdXekc\ `k1
Xe[ ZXcc
A]k\i RXc\j R\im`Z\3
Afde`^Vc ARcV LVcgZTV
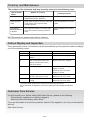
Problem Possible causes What to do
F1-F6 Temperature sensor failure Please contact the supplier.
F9-FA
Temperature sensor of the IGBT
failure.
Please contact the supplier.
FC
The connection between the
display board and the main
board has failed.
Please contact the supplier.
E1/E2
Abnormal supply voltage Please inspect whether power
supply is normal.
Power on after the power
supply is normal.
E3/E4
Temperature sensor of the
ceramic glass plate is high
Please restart after the
induction hob cools down.
E5
Temperature sensor of the IGBT
Please restart after the
induction hob cools down.
is high
Cleaning
ways:
THE HOB SHOULD NOT BE
IMMERSED IN HOT WATER!!!
Food residue,
melted aluminium
or plastics
EN-12
Page is loading ...
Page is loading ...
Page is loading ...
Page is loading ...
Page is loading ...
Page is loading ...
Page is loading ...
Page is loading ...
Page is loading ...
Page is loading ...
Page is loading ...
Page is loading ...
Page is loading ...
Page is loading ...
Page is loading ...
Page is loading ...
Page is loading ...
Page is loading ...
Page is loading ...
Page is loading ...
Page is loading ...
Page is loading ...
Page is loading ...
Page is loading ...
Page is loading ...
Page is loading ...
Page is loading ...
Page is loading ...
Page is loading ...
Page is loading ...
Page is loading ...
Page is loading ...
Page is loading ...
Page is loading ...
Page is loading ...
Page is loading ...
Page is loading ...
Page is loading ...
Page is loading ...
Page is loading ...
Page is loading ...
Page is loading ...
Page is loading ...
Page is loading ...
Page is loading ...
Page is loading ...
Page is loading ...
Page is loading ...
Page is loading ...
Page is loading ...
Page is loading ...
Page is loading ...
Page is loading ...
Page is loading ...
Page is loading ...
Page is loading ...
Page is loading ...
Page is loading ...
Page is loading ...
Page is loading ...
Page is loading ...
Page is loading ...
Page is loading ...

Jc`eVTeZ`_ Wc`^ `gVc1YVReZ_X
A j\ejfi dfe`kfij k_\ k\dg\iXkli\ `e k_\ Zffb`e^
qfe\j3 V_\e k_\ k\dg\iXkli\ \oZ\\[j X jX]\
c\m\c1 k_\ Zffb`e^ qfe\ `j XlkfdXk`ZXccp jn`kZ_\[
f]]3
BVeVTeZ`_ `W d^R]] `c _`_1^RX_VeZT ZeV^d
V_\e X gXe n`k_ X [`Xd\k\i f] c\jj k_Xe =5 dd1
fi jfd\ fk_\i jdXcc `k\d .\3^3 be`]\1 ]fib1 b\p/ fi
X efe2dX^e\k`Z gXe .\3^3 Xcld`e`ld/ _Xj Y\\e
c\]k fe k_\ _fY1 X Ylqq\i jfle[j ]fi Xggifo`dXk\cp
fe\ d`elk\1 X]k\i n_`Z_ k_\ _fY ^f\j XlkfdXk`ZXccp
fe kf jkXe[Yp3
KVdZUfR] YVRe hRc_Z_X
V_\e k_\ _fY _Xj Y\\e fg\iXk`e^ ]fi jfd\ k`d\1
k_\i\ n`cc Y\ jfd\ i\j`[lXc _\Xk3 S_\ c\kk\i ~G*
Xgg\Xij kf nXie pfl kf b\\g XnXp ]ifd `k3
?fe` dYfeU`h_
Aefk_\i jX]\kp ]\Xkli\ f] k_\ `e[lZk`fe _fY `j Xlkf
j_lk[fne3 S_`j fZZlij n_\e\m\i pfl ]fi^\k kf
jn`kZ_ f]] X Zffb`e^ qfe\3 S_\ [\]Xlck j_lk[fne
k`d\j Xi\ j_fne `e k_\ kXYc\ Y\cfn?
V_\e k_\ gXe `j i\dfm\[ ]ifd k_\ Zffb`e^
qfe\1 `k jkfgj _\Xk`e^ `dd\[`Xk\cp Xe[ jn`kZ_\j
`kj\c] f]] X]k\i k_\ Ylqq\i _Xj jfle[\[ ]fi fe\
d`elk\3
PRc_Z_X> Aepfe\ n_f _Xj Y\\e ]`kk\[ n`k_ X
_\Xik gXZ\dXb\i j_flc[ Zfejlck X [fZkfi Y\]fi\
lj`e^ k_\ `e[lZk`fe _fkgcXk\3
S_`j _fY nXj jg\Z`Xccp [\j`^e\[ ]fi [fd\jk`Z
lj\3
He `kj ZfejkXek j\XiZ_ kf `dgifm\ `kj gif[lZkj1
JIKI D HJ
JIKI D JJ
JIKI B HJ
A`i \o`k
LRWVej
E_deR]]ReZ`_
i\j\im\j k_\ i`^_k kf df[`]p Xep
k\Z_e`ZXc1
gif^iXdd\ fi X\jk_\k`Z Xjg\Zkj f]
k_\
Xggc`XeZ\ Xk Xep k`d\3
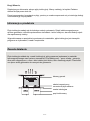
Selection of installation equipment
Cut out the work surface according to the sizes
shown in the drawing.
For the purpose of installation and use, a
minimum of 5 cm space shall be preserved
around the hole.
Be sure the thickness of the work surface is at
least 30mm. Please select heat-resistant work
surface material to avoid larger deformation
caused by the heat radiation from the hotplate. As
shown below:
L(m
m)
W(m
m)
H(m
m)
D(m
m)
A(m
m)
B(m
m)
X(m
m)
590 520 60 56 560+
4
+1
490+
4
+1
50
mini
Under any circumstances, make sure the
Induction cooker hob is well ventilated and the air
inlet and outlet are not blocked. Ensure the
Induction cooker hob is in good work state. As
shown below
Note: The safety distance between the
hotplate and the cupboard above the
hotplate should be at least 760mm.
A(mm) B(mm) C(mm) D E
760 50
mini
20
mini
Air
intake
Air exit
min.5mm
6q:
;q65
66q69
6:
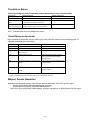
de cozedura desliga-se
automaticamente após
Nível de potência
A zona
8 horas
4 horas
2 horas
1 hora
PT-5

Before you install the hob, make sure that
• the work surface is square and level, and no
structural members interfere with space
requirements
• the work surface is made of a heat-resistant
material
• if the hob is installed above an oven, the oven
has a built-in cooling fan
• the installation will comply with all clearance
requirements and applicable standards and
regulations
• a suitable isolating switch providing full
disconnection from the mains power supply is
incorporated in the permanent wiring, mounted
and positioned to comply with the local wiring
rules and regulations.
The isolating switch must be of an approved
type and provide a 3 mm air gap contact
separation in all poles (or in all active [phase]
conductors if the local wiring rules allow for this
variation of the requirements)
• the isolating switch will be easily accessible to
the customer with the hob installed
• you consult local building authorities and
by-laws if in doubt regarding installation
• you use heat-resistant and easy-to-clean
finishes (such as ceramic tiles) for the wall
surfaces surrounding the hob.
When you have installed the hob, make sure
that
• the power supply cable is not accessible
through cupboard doors or drawers
• there is adequate flow of fresh air from outside
the cabinetry to the base of the hob
• if the hob is installed above a drawer or
cupboard space, a thermal protection barrier is
installed below the base of the hob
• the isolating switch is easily accessible by the
customer
Before locating the fixing brackets
The unit should be placed on a stable, smooth
surface (use the packaging). Do not apply force
onto the controls protruding from the hob.
Adjusting the bracket position
Fix the hob on the work surface by screw 4
brackets on the bottom of hob(see picture) after
installation.
Cautions
1. The induction hotplate must be installed by
qualified personnel or technicians. We have
professionals at your service. Please never
conduct the operation by yourself.
2. The hob will not be installed directly above a
dishwasher, fridge, freezer, washing machine
or clothes dryer, as the humidity may damage
the hob electronics
3. The induction hotplate shall be installed such
that better heat radiation can be ensured to
enhance its reliability.
4. The wall and induced heating zone above the
table surface shall withstand heat.
5. To avoid any damage, the sandwich layer and
adhesive must be resistant to heat.
Connecting the hob to the mains power
supply
This hob must be connected to the mains
power supply only by a suitably qualified
person.
Before connecting the hob to the mains
power supply, check that:
1. the domestic wiring system is suitable
for the power drawn by the hob.
2. the voltage corresponds to the value
given in the rating plate
3. the power supply cable sections can
withstand the load specified on the rating plate.
To connect the hob to the mains power
supply, do not use adapters, reducers, or
branching
devices, as they can cause overheating
and fire.
The power supply cable must not touch
any hot parts and must be positioned so that its
temperature will not exceed 75˚C at any
point.
Check with an electrician whether the
domestic wiring system is suitable without
alterations. Any alterations must only be made
by a qualified electrician.
The power supply should be connected in
compliance with the relevant standard, or a
single-pole circuit breaker. the method of
connection is shown below.
50/60Hz
50/60Hz
jZi\n
YiXZb\k
YXj\
jZi\n _fc\
PT-6

ENGLISH
Cfekifc gXe\c
C\iXd`Z gcXk\
LTYV^ReZT UZRXcR^ `W eYV T`_ec`] aR_V]
BZRXcR^ `W Z_UfTeZ`_ Y`S>
1. Power regular key
2. Timer regular key
3. WIFI key
6. Lock/Inlock key
7. On/Off key
1
2
6
7
4 5
5. Keep warm key
4. Booster key
3 1
E_decfTeZ`_d W`c NdV
• If the cable is damaged or to be replaced, the
operation must be carried out the by after-sale
agent with dedicated tools to avoid any
accidents.
• If the appliance is being connected directly to
the mains an omnipolar circuit-breaker must be
installed with a minimum opening of 3mm
between contacts.
• The installer must ensure that the correct
electrical connection has been made and that it
is compliant with safety regulations.
• The cable must not be bent or compressed.
• The cable must be checked regularly and
replaced by authorised technicians only.
U^[d j^[ fem[h _i im_jY^[Z ed1 j^[ Xkpp[h m_bb
Operating instructions
--
Boost function
Warning:
2. The boost function works on the all cooking zone.
Cancelling the "BOOST" mode
1.Press the " " key, all the indicators show "--".
Press the“ " key, the power level indicator showing " "
iekdZ edY[
WdZ Wbb j^[ _dZ_YWjehi m_bb Yec[ ed
\eh ed[ i[YedZ WdZ j^[d
]e ekj3 R^[ ^eX _i dem
_d ijWdZXo ceZ[3
ObWY[ j^[ fWd _d
j^[
Y[djh[ e\ j^[ Yeea_d] ped[3
Select the power level by pressing the "+" or "-" key for the
relevant hotplate. To begin with the indicator shows" "or " "
by pressing the "+" or "-" key. Adjust up or down by pressing
the "+" or "-" key.
If you press the "+" and "-" keys simultaneously, the power
setting returns to" "and the cooking zone switches off.
NB : When the " " key is pressed, the induction hob returns
to standby mode if no other operation is carried out
within one minute.
1. The boost function only operates for 5 minutes, after which
the cooking zone will revert to its original setting.
Cancel the "Boost" mode by pressing the "+" or "-" key of the
corresponding zone.
3.As the boost function of 1st or 3rd cooking zone is activated,
the PRO zone is limited at level 2 automatically.
Vice versa if the boost function of PRO cooking zone is
activated, both the 1st and 3rd cooking zone are limited at
level 2 automatically.
Using the Timer
You can use the timer in two different ways:
• You can use it as a minute minder. In this case,
the timer will not turn any cooking zone off when
the set time is up.
PT-7

E_decfTeZ`_d W`c NdV
• You can set it to turn cooking zones off after the
set time is up.
• You can set the timer for up to 9 hour and 59 minutes.
Using the Timer as a Minute Minder
If you are not selecting any cooking zone
1. Make sure the cooktop is turned on.
Note: you can use the minute minder even
if you’re not selecting any cooking zone.
2. Set the time by touching the “ - ” or “ + ” control
of the timer
Hint: Touch the “ - ” or “ + ” control of the timer
once to decrease or increase by 1 minute.
Hold the “ - ” r “ + ” control of the timer to
decrease or increase by 10 minutes.
3. Touching the “ - ” and “ + ” together, the timer
is cancelled, and the”0:00” will show in the minute
display.
4. When the time is set, it will begin to count down
immediately. The display will show the remaining
time and the timer indicator will flash for 5 seconds.
5. Buzzer will beep for 30 seconds and the timer
indicator shows “- - “ when the setting time
finished.
Setting the timer to turn cooking
zones off
If the timer is set on one zone:
1. Touching the heating zone selection control
that you want to set the timer for.
.
.
.
.
2. Touch “ - ”or “ + ” control , The minder indicator
will start flashing and “0:10” will show in the
timer display.
3. Set the time by touching the“ - ”or “ + ” control of the
timer
Hint: Touch the “ - ” or “ + ” control of the timer
once will decrease or increase by 1 minute.
Touch and hold the “ - ” or “ + ” control of the timer
will decrease or increase by 10 minutes.
4. Touching the “ - ” and “ + ” together, the timer is
cancelled, and the” 00” will show in the minute display.
5. When the time is set, it will begin to count down
immediately. The display will show the remaining
time and the timer indicator flash for 5 seconds.
NOTE: The red dot next to power level indicator
will illuminate indicating that zone is selected.
6. When cooking timer expires, the corresponding
cooking zone will be switch off automatically.
Other cooking zone will keep operating if
they are turned on previously.
:
.
.
.
.
PT-8

E_decfTeZ`_d W`c NdV
If the timer is set on more than one zone:
1. When you set the time for several cooking zones
simultaneously, decimal dots of the relevant
cooking zones are on. The minute display shows
the min. timer. The dot of the corresponding
zone flashes.
(set to 15 minutes)
(set to 45 minutes)
2. Once the countdown timer expires, the
corresponding zone will switch off. Then
it will show the new min. timer and the dot
of corresponding zone will flash.
Using the Keep Warm function
Actived the Keep warm function
1. Touching the heating zone selection control
2. Touching the keep warm control ,the zone
indicator show “ “
Cancel the keep warm function
:
.
.
Touch "-" or "+" control of the corresponding zone,
then the cooking zone will revert to the level you select.
Safety mode
Unlock:
Lock:
To ensure the safety of children, the induction hob is fitted with
an interlock device.
In working mode, press the " " key, the hob then goes
into the lock mode, timer will display " " and the
rest of the keys are disabled except the " " key.
In standby mode, press the "lock" key, the hob then goes
into the lock mode, the timer shows" " and the rest
of the keys are disabled.The timer shows" " for a
while and then goes out.
If you press the key, " " will be displayed for a
while.
Hold down the"Lock" key for 3 second, and the lock
function will be deactivate.
First of all,you should download SSimply-Fy and install to your
To use the WIFI function, switch the hob on and press
the WIFI key.The wifi LED flash fast for 5 seconds
which means the WIFI module is booting.If the WIFI
module connects the router,the wifi LED will remain on all
the time.Otherwise,the WIFI LED will be flashing in
cycles of 1 second on 1second off.
If connect correctly,you can find many hob information
from SSimply-Fy,e.g.Zone power,remaining heat time.
WIFI FUNCTION
portable device. Then enroll your induction hob.
Refer to annex for details.
PT-9

FLEXIBLE AREA
This area can be used as a single zone or as two different
zones, accordingly to the cooking needs anytime.
Flexible area is made of two independent inductors that can
be controlled separately. When working as a single zone,
the part that is not covered by cookware is automatically
switched off after one minute.
- Anywhere with bigger cookware
To grant a correct pan detection and a even heat distribution,
the cookware should be correctly placed:
- In the front or rear side of the flexible zone when the
cookware is smaller than 22 cm
As big zone
To activate the flexible area as a single big zone, simply press
the dedicated keys.
The power setting works as any other normal area.
If the pot is moved from the front to the rear part (or viceversa),
the flexible area detects automatically the new position,
keeping the same power.
As two independent zones
To use the flexible area as two different zones with different
power settings, press the dedicated keys.
6
7
8
Beeij
1800
MehcWb
3000
Heating
Zone
The maximum power of cooking zones is
as follows:
R^[ WXel[ cWo lWho e j^[ i_p[
e\
j^[
fWd WdZ
j^[ cWj[h_Wb _j _i cWZ[ \hec
WYYehZ_d] j
3000
Flexible
Area
9
1800
000
3000
Deactivation of the continuum zone
the continuum key again
Resetting the power of the continuum zone or
pressing
1800
4000
1800
3
E_decfTeZ`_d W`c NdV
3000
PT-10

Hife f`c ]ip`e^ gXe RkX`ec\jj jk\\c gfk Hife gXe
EeXd\c jkX`ec\jj
jk\\c b\kkc\
EeXd\c Zffb`e^
lk\ej`c
Hife b\kkc\
Wfl dXp _Xm\ X eldY\i f] [`]]\i\ek Zffb`e^ m\jj\cj
S_`j `e[lZk`fe _fY ZXe `[\ek`]p X mXi`\kp f] Zffb`e^ m\jj\cj1 n_`Z_ pfl ZXe k\jk Yp
fe\ f] k_\ ]fccfn`e^ d\k_f[j?
OcXZ\ k_\ m\jj\c fe k_\ Zffb`e^ qfe\3 H] k_\ Zfii\jgfe[`e^ Zffb`e^ qfe\ [`jgcXpj
X gfn\i c\m\c1 k_\e k_\ m\jj\c `j jl`kXYc\3 H]
,
T
,
]cXj_\j1 k_\e k_\ m\jj\c `j efk jl`kXYc\
]fi lj\ n`k_ k_\ `e[lZk`fe _fY3
Gfc[ X dX^e\k kf k_\ m\jj\c3 H] k_\ dX^e\k `j XkkiXZk\[ kf k_\ m\jj\c1 `k `j jl`kXYc\
]fi lj\ n`k_ k_\ `e[lZk`fe _fY3
MB? S_\ YXj\ f] k_\ m\jj\c dljk ZfekX`e dX^e\k`Z dXk\i`Xc3
6
Hife gcXk\
LV]VTeZ`_ `W T``\Z_X gVddV]d
Hk dljk _Xm\ X ]cXk Yfkkfd n`k_ X [`Xd\k\i f] dfi\ k_Xe Zd3
14
Use pans whose diameter is as large as the graphic of the zone selected.
6
Using a pot a slightly wider energy will be used at its maximum efficiency.If you use
smaller pot efficiency could be less than expected.Pot less than 140 mm could be
undetected by the hob.
PT-11
Page is loading ...
Page is loading ...
Page is loading ...
Page is loading ...
Page is loading ...
Page is loading ...
Page is loading ...
Page is loading ...
Page is loading ...
Page is loading ...
Page is loading ...
Page is loading ...
Page is loading ...
Page is loading ...
Page is loading ...
Page is loading ...
Page is loading ...
Page is loading ...
Page is loading ...
Page is loading ...
Page is loading ...
Page is loading ...
Page is loading ...
Page is loading ...
Page is loading ...
Page is loading ...
Page is loading ...
Page is loading ...
Page is loading ...
Page is loading ...
Page is loading ...
Page is loading ...
Page is loading ...
Page is loading ...
Page is loading ...
Page is loading ...
Page is loading ...
Page is loading ...
Page is loading ...
Page is loading ...
Page is loading ...
Page is loading ...
Page is loading ...
Page is loading ...
Page is loading ...
Page is loading ...
Page is loading ...
Page is loading ...
Page is loading ...
Page is loading ...
Page is loading ...
Page is loading ...
Page is loading ...
Page is loading ...
Page is loading ...
Page is loading ...
Page is loading ...
Page is loading ...
Page is loading ...
Page is loading ...
Page is loading ...
Page is loading ...
Page is loading ...
Page is loading ...
-
 1
1
-
 2
2
-
 3
3
-
 4
4
-
 5
5
-
 6
6
-
 7
7
-
 8
8
-
 9
9
-
 10
10
-
 11
11
-
 12
12
-
 13
13
-
 14
14
-
 15
15
-
 16
16
-
 17
17
-
 18
18
-
 19
19
-
 20
20
-
 21
21
-
 22
22
-
 23
23
-
 24
24
-
 25
25
-
 26
26
-
 27
27
-
 28
28
-
 29
29
-
 30
30
-
 31
31
-
 32
32
-
 33
33
-
 34
34
-
 35
35
-
 36
36
-
 37
37
-
 38
38
-
 39
39
-
 40
40
-
 41
41
-
 42
42
-
 43
43
-
 44
44
-
 45
45
-
 46
46
-
 47
47
-
 48
48
-
 49
49
-
 50
50
-
 51
51
-
 52
52
-
 53
53
-
 54
54
-
 55
55
-
 56
56
-
 57
57
-
 58
58
-
 59
59
-
 60
60
-
 61
61
-
 62
62
-
 63
63
-
 64
64
-
 65
65
-
 66
66
-
 67
67
-
 68
68
-
 69
69
-
 70
70
-
 71
71
-
 72
72
-
 73
73
-
 74
74
-
 75
75
-
 76
76
-
 77
77
-
 78
78
-
 79
79
-
 80
80
-
 81
81
-
 82
82
-
 83
83
-
 84
84
-
 85
85
-
 86
86
-
 87
87
-
 88
88
-
 89
89
-
 90
90
-
 91
91
-
 92
92
-
 93
93
-
 94
94
-
 95
95
-
 96
96
-
 97
97
-
 98
98
-
 99
99
-
 100
100
-
 101
101
-
 102
102
-
 103
103
-
 104
104
-
 105
105
-
 106
106
-
 107
107
-
 108
108
-
 109
109
-
 110
110
-
 111
111
-
 112
112
-
 113
113
-
 114
114
-
 115
115
-
 116
116
-
 117
117
-
 118
118
-
 119
119
-
 120
120
-
 121
121
-
 122
122
-
 123
123
-
 124
124
-
 125
125
-
 126
126
-
 127
127
-
 128
128
-
 129
129
-
 130
130
-
 131
131
-
 132
132
-
 133
133
-
 134
134
-
 135
135
-
 136
136
-
 137
137
-
 138
138
-
 139
139
-
 140
140
-
 141
141
-
 142
142
-
 143
143
-
 144
144
-
 145
145
-
 146
146
-
 147
147


Ask a question and I''ll find the answer in the document
Finding information in a document is now easier with AI
in other languages
- italiano: Candy CFID 36 WIFI Manuale utente
- español: Candy CFID 36 WIFI Manual de usuario
- polski: Candy CFID 36 WIFI Instrukcja obsługi
- Türkçe: Candy CFID 36 WIFI Kullanım kılavuzu
- română: Candy CFID 36 WIFI Manual de utilizare
Related papers
-
Candy CIE 3640 B3 Owner's manual
-
-
Candy CH630C User manual
-
-
-
-
Candy CH64CB User manual
-
-
-
Other documents
-
Hoover HPI44PW User manual
-
-
-
ROSIERES RPI346 AUS User manual
-
ROSIERES RBI65MM Owner's manual
-
-
Gorenje ICG2000SP User manual
-
ROSIERES RBI 637 Owner's manual
-
-