Page is loading ...

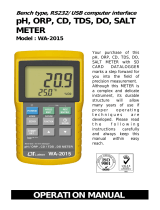
Pen type, all in one, IP-67
CONDUCTIVITY METER
Model : PCD-431
Y
our purchase of this
CONDUCTIVITY METER
marks a step forward for
you into the field o
f
precision measurement.
A
lthough this METER is a
complex and delicate
instrument, its durable
structure will allow many
years of use if proper
operating techniques are
developed. Please read
the following instructions
carefully and always keep
this manual within easy
reach.
OPERATION MANUAL

TABLE OF CONTENTS
1. FEATURES................................................................1
2. SPECIFICATIONS......................................................2
3. FRONT PANEL DESCRIPTIONS...................................5
3-1 Battery compartment/Cover................................. 5
3-2 Display...............................................................
.
5
3-3 Power Button...................................................... 5
3-4 Hold Button, Unit Button......................................5
3-5 REC Button ( / Button ).................................℃℉ 5
3-6 Sensing Electrode........................................... 5
3-7 Protection Cover..................................................5
4.MEASURING PROCEDURE.......................................... 6
4-1 Conductivity measurement...................................6
4-2 TDS measurement...............................................7
4-3 Data hold............................................................8
4-4 Data record ( Max., Min. reading )........................8
4-5 Change Temp. unit , ....................................
.
℃℉ 9
4-6 Auto power off management................................9
5.CALIBRATION.......................................................... 9
6. REPLACEMENT OF BATTERY.................................... 10
7. OPTIONAL ACCESSORIES..........................................10

1. FEATURES
* All in one pen type conductivity meter provides fast,
accurate readings with digital reading.
* Conductivity measurement ( uS, mS ) or TDS
( Total Dissolved Solids, ppm ) can be selected.
* Conductivity : Two ranges, 2,000 uS, 20.00 mS.
* TDS : Two ranges, 20,000 ppm, 2,000 ppm.
* Carbon rod electrode for long life.
* Build in temperature sensor, ATC ( auto temperature
compensation ).
* Temperature measurement, , .℃℉
* IP67, water proof and protection.
* LCD with two displays show conductivity and Temp.
value at same time.
* Data hold function for freezing the desired value.
* Auto power off to save the battery life.
* Records max. and min. value with recall.
* Microcomputer circuit, intelligent function, high accuracy.
* Compact size, light weight.
* Power supply by DC 1.5 V battery ( UM4/AAA ) x 4 PCs,
* Available for wide applications, such as aquarium,
beverage, fish hatcheries, food processing,
photography, laboratory, quality control, school &
colleges, swimming pools, water conditions.
1

2. SPECIFICATIONS
Display LCD, size : 20 mm x 28 mm.
Measurement * Conductivity ( uS, mS )
* TDS ( Total Dissolved Solids, ppm )
* Temperature ( , )℃℉
Ranges
Conductivity:
* two ranges
2000 uS, 20.00 mS
* auto range TDS :
2,000 ppm 20,000 ppm
Temperature Automatic from 0 to 60 (32 - 140 ),℃℉
Compensation with temperature compensation factor
variable between 0 to 5.0% per C.
Conductivity Carbon rod electrode for long life.
Probe
Structure
Data Hold Freeze the display reading.
Memory Recall Maximum & Minimum value.
Sampling Approx. 0.8 second.
Time
Circuit Custom one-chip of microprocessor LSI
circuit.
Power off Auto shut off saves battery life or
manual off by push button.
* Power will off automatically after
10 min., if no button be pressed.
Operating 0 to 50 ( 32 to 140 ).℃℉
Temperature
Operating Less than 80% RH.
Humidity
2

Power Supply DC 1.5V battery ( UM-4/AAA ) x 4 PCs.
Power Approx. 5.7 mA.
Consumption
Dimension 190 x 40 x 40 mm
( 7.5 x 1.6 x 1.6 inch ).
Weight 171 g/0.38 LB.
Standard Instruction Manual......................... 1 PC
Accessories
Power off Auto shut off saves battery life or
manual off by push button.
* Power will off automatically after
10 min., if no button be pressed.
Standard Instruction Manual......................... 1 PC
Accessories
Optional * Soft carrying case with sash
Accessories ( 210 x 80 x 50 mm ), Model : CA-52A
* Hard carrying case
( 280 x 195 x 65 mm ), Model : CA-06
3

2-2 Electrical Specifications (23±5 )℃
A. Conductivity
Range Measurement Resolution Accuracy
2000 uS 2 to 2000 uS 1 uS ± (3% F.S.+1d)
20 mS 2 to 20.00 mS 0.01 mS * F.S. - Full scale
* Auto range.
* Temperature Compensation :
Automatic from 0 to 60 ( 32 - 140 ), with temperature℃℉
compensation factor variable between 0 to 5.0% per C.
* mS - milli Simens * uS - micro Simens * 23± 5 ℃
B. TDS ( Total Dissolved Solids )
Range Measurement Resolution Accuracy
2,000 ppm 132 to 1,320 ppm 1 ppm ± (3% F.S.+1d)
20,000 ppm 1,320 to 13,200 ppm 10 ppm * F.S. - Full scale
* Auto range.
* Temperature Compensation :
Automatic from 0 to 60 ( 32 - 140 ), with temperature℃℉
compensation factor variable between 0 to 5.0% per .℃
* ppm - parts per million * 23± 5 ℃
C. Temperature
Function Measuring Range Resolution Accuracy
℃ 0 to 60 ℃℃ 0.1 ℃ 0.8 ℃
℉ 32 to 140 ℉℉ 0.1 ℉ 1.5 ℉
* @ 23± 5 ℃
*
Above specification tests under the environment RF Field Stren
g
th less than 3 V/M
& frequency less than 30 MHz only.
4

3. FRONT PANEL DESCRIPTION
3-1 Battery compartment/Cover
3-2 Display
3-3 Power Button
3-4 Hold Button, Unit Button
3-5 REC Button ( / Button )℃℉
3-6 Conductivity Electrode
3-7 Protection Cover
5

4. MEASURING PROCEDURE
4-1 Conductivity measurement
1)Turn on the meter by pressing the " Power Button "
( 3-3, Fig. 1 ) momentarily.
* Press the " Power Button " ( 3-3, Fig. 1 )
momentarily again will turn off the meter.
The " Display " ( 3-2, Fig. 1 ) will show the unit as :
uS 0
xx,x ℃
Now the meter is ready for the conductivity measurement.
2)Hold the meter by hand and immerse the " Sensing
Electrode " ( 3-6, Fig. 1 ) immersed wholly into the
measured solution. Shake the " Sensing Electrode " to
let the electrode's internal air bubble drift out from the
sensing Electrode.
" Display " ( 3-2, Fig. 1 ) will show the conductivity
mS ( uS ) values, at the same time the left bottom
display will show the Temp. value of the measured
solution.
6

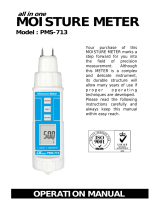
When make the
measurement should
immerse the " Sensing
Electrode " immersed
wholly into the measured
solution.
4-2 TDS measurement
Same procedures as above " 4-1 Conductivity
measurement " but should select the measuring unit to
" ppm " at first, the procedures are following :
Press " Unit Button " ( 3-4, Fig. 1 ) continuously at
least two seconds until the " Display " show the unit
" ppm " instead of " uS ", then release the button.
Now the meter is ready for TDS ( Total Dissolved Solids )
measurement.
Remark :
If the measurement value > 9990 ppm, then the last
digit will present in the low display as :
For example :
1235 12350 ppm
0 ppm
7

4-3 Data Hold
1)During the measurement, press the " Hold Button "
( 3-4, Fig. 1 ) momentarily to hold the measured
value. The LCD will show a " HOLD " symbol.
2)Press the " Hold Button " once again to release the
data hold function.
4-4 Data Record ( Max., Min. reading )
1)The data record function records the maximum and
minimum readings. Press the " REC Button " ( 3-5, Fig. 1 )
momentarily to start the Data Record function,
shows " REC " on the display.
2)With the " REC " symbol on the display.
a)Press the " REC Button " ( 3-5, Fig. 1 ) momentarily,
the " REC MAX " symbol along with the maximum
value will appear on the display.
b)Press the " REC Button " ( 3-5, Fig. 1 ) momentarily
again, the " REC MIN " symbol along with the
minimum value will appear on the display.
* When display shows " REC MAX " or " REC MIN ",
press the " Hold Button " ( 3-4, Fig. 1 )
momentarily will delete the max. ( min. ) value,
the display will show the " REC. " only and
execute the memory function continuously.
c)To exit the memory record function, press the
" REC " button for 2 seconds at least. The display will
revert to the current reading, not show " REC "
indicator.
8

4-5 Change Temp. unit , ℃℉
1)The temperature units can be selected to
or .℃℉
2)Pressing the " REC Button, / Button " ( 3-5, Fig. 1 )℃℉
continuously at least 2 seconds, then Temp. unit
will change from to or to .℃℉℉℃
3)After the temperature unit is selected, it will be
memorized into the memory circuit . If power off and
on again will present the existing selection Temp. unit.
4-6 Auto power off management
The meter has built-in "Auto Power Shut-off " function in
order to prolong battery life. The meter will switch off
automatically if none of the buttons are pressed within
10 min..
5. CALIBRATION
The meter already made the calibration precisely during
the production in the factory. When the user get the meter,
the calibration are not necessary. However after use the
meter for a long period, if necessary to make the
calibration, please contact the distributor and should
calibrated by the authorized technician people only.
9

6. REPLACEMENT OF BATTERY
1)When the LCD display show " " ,
it is necessary to replace the battery. However, in-spec
measurement may still be made for several hours after
Low Battery Indicator appears before the instruments
instrument become inaccurate.
2)To replace the battery, rotate and remove the
" Battery Cover " ( 3-1, Fig. 1 ), take out the old
b
a
DC 1.5V battery ( UM-4/AAA ) x 4 PCs.
3
)
When install the batteries, should make attention
the battery polarity.
4)After install the batteries, reinstall the battery cover
again.
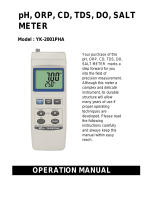
7. OPTIONAL ACCESSORIES
Hard carrying case. Soft carrying case.
Model : CA-06 Model : CA-52A
280 x195 x 65 mm 210 x 80 x 50 mm
10
0612-PCD431
/