Page is loading ...

DANE 3 LIGHT/ 4 LIGHT VANITY LIGHT
ASSEMBLY/INSTALLATION INSTRUCTIONS
Please read carefully and
s
ave these instructions, as you may need them at a later date.
CAUTION
GENERAL
Turn off the main power at the circuit breaker before installing the fixture, in order to prevent
possible shock
.
All electrical connections must be in accordance with local and National Electrical Code (N.E.C.)
standards. If you are unfamiliar with proper electrical wiring connections obtain the services of a
qualified electrician.
Remove the fixture and the mounting package from the box and make sure that no parts are
missing by referencing the illustrations on the installation instructions.
GENERAL
ASSEMBLY AND INSTALLATION
Turn off the power at fuse or circuit breaker.
1
Before beginning the installation carefully unpack and identify all parts
TOOLS REQUIRED
Phillips Screwdriver.
1
.
Before
beginning
the
installation
,
carefully
unpack
and
identify
all
parts
.
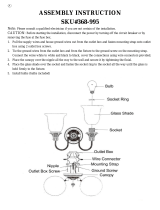
2. Using (2) JUNCTION BOX SCREWS, securely fasten the MOUNTING STRAP to the
JUNCTION BOX.
NOTE: This fixture also provided with 2 wood screws for optional channel shape
MOUNTING BRACKET installation. It will be necessary to mark the location of the keyhole
slots on the mounting surface and drill holes for fasteners. Use fasteners suitable for the
mounting surface. The narrow end of the KEYHOLE SLOTS should face up. Fit the heads of
the wood screws through the KEYHOLE SLOTS in the MOUNTING STRAP, pull down the
MOUNTING STRAP until the wood screw heads are seated at the small ends of the
KEYHOLE SLOTS, and secure both wood screws.
3. MAKE CONNECTIONS: (We recommend 2 people for the remainder of installation)
Position the FIXTURE in front of the JUNCTION BOX, connect the SUPPLY GROUND
WIRE to the FIXTURE GROUND WIRE with a wire nut and secure them to the
MOUNTING STRAP with GREEN GROUND SCREW. Usin
g
wire connectors
,
connect the
g,
SUPPLY WHITE WIRE(S) to the FIXTURE WHITE (or RIBBED) LEAD(S); Connect the
SUPPLY BLACK (or RED) WIRE to the FIXTURE BLACK (or SMOOTH) LEAD(S).
Wrap all connections with approved electrical tape.
4. Place the BACKPLATE over the MOUNTING STRAP and secure it with (2) LOCKING
BALLS.
5. Locate the GLASS SHADE(S) and pass over the SOCKET(S). Thread the SOCKET
COLLAR(S) onto the end of the SOCKET(S) Hand tighten until snug
#578831 #578849
COLLAR(S)
onto
the
end
of
the
SOCKET(S)
.
Hand
tighten
until
snug
.
6. Install LIGHT BULB(S) (Sold separately). The bulb quantities depend on the style (Refer to
Figure 2).
Turn on the power at fuse or circuit breaker.
Customer Service: 1-800-558-8700
IF IN DOUBT ABOUT ELECTRICAL INSTALLATION,
CONSULT A LICENSED ELECTRICIAN.
/