Page is loading ...

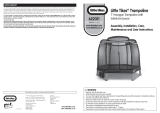
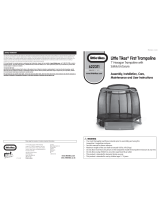
TRAMPOLINE CANOPY
User Guide
WARNING: Read these assembly instructions carefully
before attempting to assemble or use this product. Keep
this user guide in a safe place for future reference.
Got a Problem building your Trampoline tent?
Call us on 1-877-927-8777 and we can help

The owner and supervisors of the trampoline canopy are responsible to make sure all the users are
aware of practices specified in this manual.
Trained Spotter supervision is recommended.
The trampoline should be placed on a soft level surface at least 2m away from any structure or
obstruction, also provide adequate overhead clearance.
Inspect the trampoline / enclosure and Trampoline Canopy before each use, and replace any worn,
defective, or missing parts.
Remove any obstructions from beneath the trampoline before each use.
Do not allow more than one person on the trampoline. Use by more than one person at the same time
can result in serious injury.
Use the trampoline only with appropriate adult supervision.
Do not attempt or allow somersaults. Any misuse can result in broken bones or injuries to the head,
neck, legs and back. Landing on the head or neck can cause serious injury, paralysis, or death, even
landing on the middle of the bed.
Bounce only when the surface of the bed is dry. Wind or air movement should be calm to gentle. The
trampoline/Trampoline canopy must not be used in gusty or severe winds, rain or adverse weather
conditions.
Warning! Keep away from fire.
Not waterproof or made for camping.
Never shelter in the trampoline canopy during a thunderstorm.
Do not attempt to put up this product in windy, rainy conditions.
Do not continue to use this product if any part of the frame becomes either bent or broken.
Warning. Only for domestic use.
Warning! Not suitable for children under 36 months. Small parts. Choking hazard!
Remove the trampoline canopy when not in use.
WARNING
:
1.
2.
3.
4.
5.
6.
7.
8.
9.
10.
11.
12.
13.
14.
15.
16.
17.
IMPORTANT INFORMATION
WARNING! ADULT SUPERVISION & GUIDANCE REQUIRED AT ALL TIMES.
Recommended age 6+ years.
Only
Before assembling your tent please ensure you have assembled your Trampoline correctly and read
all warnings in the manual.
1 user allowed at a time.
2

CARE AND MAINTENANCE
PART LIST
3
We recommend the following to maintain the longest life from your trampoline canopy:
Remove trampoline canopy from the trampoline during harsh weather conditions, or
when not in use.
Store away in a dry place, ensuring trampoline canopy is completely dry before pack-
ing away.
Do not allow pets or animals on the trampoline or inside the trampoline canopy. Claws
may damage the netting and fabric.
Prolonged exposure to the sun, especially ultraviolet rays, will shorten the life of the
tent fabric.
Key Listing
Picture
Description
Quantity
Trampoline
Skirt Sleeve
Canopy
Fiber glass poles
(Black)
Fiber glass poles
(Blue)
1
6
28
A
B
C D
To order replacement parts, visit our Website or call our Customer Hot Line(1-877-927-8777). To
help us assist you, please provide the following information when calling:
the NAME and MODEL of of the product.
the KEY NUMBER and DESCRIPTION of the part (see the PART LIST above)
the quantity needed
the desired method of shipping
ORDERING REPLACEMENT PARTSORDERING REPLACEMENT PARTS

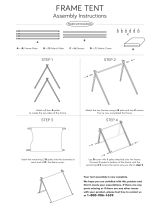
Step 1
Step 2
Step 3
Please unfold the FRP poles Black and Blue and join them together to make
long poles.
On the inside of the canopy roof, insert the black FRP poles through the sleeves and
into the pocket in the centre. Fix the poles to the canopy with the Velcro straps.
Close the velcro pocket at the edge of canopy. Repeat this for the 3
remaining poles.
4
ASSEMBLY
a.
b.
c.
Slot one of the Blue FRP poles through the sleeve on bottom of the Trampoline canopy. Slot
the another Blue FRP poles through sleeve on bottom of the trampoline canopy.
You will now join the two ends of Blue FRP poles together with fitted pole connectors, this will
require two people. Both people hold two of the poles end sections and walk towards each
other to bend the poles into a circle.
As soon as the poles are bent enough, insert the connectors into the socket on the other pole
(1). Push the pin inwards (2) and fully insert the connector. Ensure the pin is protruding
through the slot in the socket.

5
Step 5
Step 4
Slide canopy over top of trampoline safety net so canopy is on the outside
Clip the skirt sleeve based on your Trampoline Enclosure poles quantity 4 or 5 or 6 pcs.
Skirt sleeve for 4 pcs
Enclosure poles
Skirt sleeve for 5 pcs
Enclosure poles
Skirt sleeve for 6 pcs
Enclosure poles
(see diagram).
Position the canopy poles so they align with the safety net poles. Person 1
should stand inside the trampoline on the bounce mat to guide the poles into
position, whilst Person 2 stands outside the trampoline to help.
Note: The canopy poles rest on the hoop, beside the top cap of the safety net
poles.
Carefully pull down the sides of the canopy around the frame of the enclo-
sure.

Strap with plastic hook on bottom of
canopy.
Top rail
Spring
Cross the strap with plastic
hook over the toprail frame
to hook onto the V-ring.
Cross the strap with plastic hook over the toprail frame to hook onto the
V-ring of the trampoline. (See diagram)
Repeat this step with the remaining straps.
The Trampoline Canopy is now full assembled. Make sure all parts are securely
attached.
Step 5
6
/