Page is loading ...

FREEDOM COLLECTION
AOE- BASIC & HINGED
ee the cloc in each section for estimated installation time
ee et het thorouhy uo reet efore trt the tto
or e hrre te hou e reorte th hour of ree th
het f you ee te o r fro T
Notes: Please measure your actual product for rough-in details. All product dimensions have a tolerance of ±1/2". Install
this product according to the installation instructions. American Bath Factory reserves the right to make revisions
without notice to product specifications. For most current guide, visit our site: americanbathfactory.com
lcoe hower ystem nstallation uide for asic inged acages
o rtuto o the urh e of you r e hoer e Th ue e you
the truto o the tto of yo ur e ho er
istine tone
showers are ideal for an eperienced er lease read through this entire installation
guide before beginning your installation f you feel you can not confidently install this shower by
yourself hire a licensed contractor, handyman, or professional instal ler that can do it for you
nstallation time may ary depending on your eperience, compleity of shower, and re-nstall rep
or which may include plumbing and/or drain relocation, bathroom demolition, and suaring up
studs and floor
th our tto rout eo o erthftoryoeeo
rior to demolition, scheduling your installer, or building your shower, double chec that you hae all
the parts from the factory ome applications may reuire a licensed plumber or contractor o not
use any product spec sheets to begin installation before receiing product hese spec sheets are for
reference only se actual product measurements only he diagrams throughout this guide illustrate a
shower with a hinged door epending on the sie of the shower purchased, actual parts
may ary in sie from the diagrams shown Please see last page for list of items needed for installation.
ur goal is to help you achiee a uic and successful shower installation
ABF Alcove Freedom BGH Install Guide Rev A

O NT NT OT N T
ae sure you hae receied all the items necessary for the installation his will also familiarie you with all the
parts and hardware you will need to install your shower acage contents are dependent upon which
pacage you ordered
D
D
D
D
D
D
2
etal ea-ree einforced an
hreshold for oor eersible
hannel hreshold for lass anel
eersible
lass oor
ied lass anel
oor andle
inges op ottom nstalled
op inge all racet
oor ottom weep
oor eal/ top
rain ssembly may be sold separately
D
D
D
D
TD
T
T
T
D
T
ac all anel op ottom
eft all anel op ottom
ight all anels op ottom
osaic or tone iner ac
osaic or tone iners ight eft ide ide
asing for lass oor ap
ide asing for lass anel ap
e toe te
y the out o o the
ee to te

his shower system is designed to be installed on a leel, bare floor t is necessary for any eisting shower to be
completely remoed ear out and remoe all old material to epose the wall studs lean up the shower
area, remoing all dust and old material from the area
o ether r e recommend not installing your shower below the temperature of he shower
will be fine in cold weather after installation, but during installation bending and handling shower components
in cold weather can cause breaage rigid conditions can mae some shower components brittle and
susceptible to cracing during rough installation handling
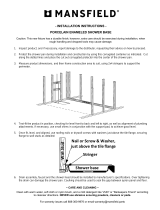
DTTN T N
to
/ cement board
stud
metal flange
pan
diaram
floor of pan
silicone bead
t is easier to chec alignment of studs and pan without the
drain installed into the pan
lace the pan in the planned position hec to see that
the spacing between the metal pan flange and studs
are flush ome shimming or sanding of the studs may
be reuired to flush the studs with the metal pan flange
hen screwing in the / cement board the metal flange
will pull fast to the studs, and will secure the metal pan in
place dia.
D

TD NNT OTONN
to
NTN DN y e o ertey
to
ocate the drain assembly to install into pan
pply a generous bead of silicone around the
shower pan drain hole and around the outside of the drain
collar , insert the drain collar into the drain hole
pply a generous bead of silicone around the drain
collar from the underside of the pan
nstall the rubber gaset oer the drain collar , to the
underside of the pan, net install the slide ring
crew on the drain loc nut and hand tighten urn drain
loc nut approimately / turn with the wrench to ensure
a water-tight fit hec for a good seal
ipe off ecess silicone and allow to dry ollow the
manufacturers directions for application and drying time
trim plate
drain tool
pressure ring
rubber seal
apply silicone
around drain collar
sides and under lip
floor hole with
drain pipe
drain collar
pan
rubber gaset
slide ring
drain loc nut
diaram
D
sing the pan and wall panels, you will be able to chec to mae sure your studs are in the needed
position and supported adeuately ou will see in dia etra studs are added to the door and glass side
thresholds for etra strength ou may need to mae adjustments for your a shampoo shelf hen you place the
bottom sections of the wall into the shower pan, you can also calculate the needed width and height of areas
to eep free of studs
ee installation instructions for shampoo shelf his is also when you should add your etra
support bracing for those who need them for your other accessories such as the shower ale, grab bars,
benches or sheles
/ oerhang when using triple studs, no oerhang
when using double studs double studs reuired, triple
studs recommended for etra-strength
diaram
for shampoo shelf
minimum gap
reuired for
shampoo shelf
triple studs

NT OD NTTON
apply silicone
diaram
e recommend the use of / thic cement board as your shower bacer his is a common bacer for stone
and tile sing this bacer will help comply with almost all city codes cement-based product lie
onderoard or ardieacer may also be used if it meets your local codes ome codes reuire a apor
barrier to be installed as well e recommend a water/apor barrier of mil plastic be installed before installing
the cement board o do this, staple plastic so that it hangs aboe the floor oofing nails may be used to
attach the cement board instead of screws, this preents the plastic from wrapping around the screws
OTNT se your cement board as an indicator of suareness he
cement board comes in suare sheets f you see gaps or areas where the
cement board is not fitting flush, fi the problem by remoing the cement
board and shimming the board until its suare and flush f the seams of the
cement board are not flush and suare, your wall panels will not be suare
and flush
ut a notch in cement board to fit around threshold flange anding or
shimming the s at the top rim of the pan may be reuired to flush the
cement board dia
lace a bead of silicone on the front face of the shower
pan flange he bead should be in a ig-ag pattern dia
lace the cement board against the studs and rest it inside the shower
pan against the bac flange ttach the cement board to the studs with
screws or nails DO NOT screw or nail into the metal shower pan flange
ontinue installing the remaining cement board
notch
diaram
TTN N
ow that the drain is installed into the pan dry fit the pan and drain for
alignment, chec to mae sure the drain pipe is in the center of the pan
drain hole dia. se the drain collar by itself remoe the rubber seal,
nut and gasets from the drain assemblydia. , reious ae ush the
drain collar into the drain hole between the pan and the pipe ith
the drain collar pushed flush to the pan surface, the drain pipe should
not etend past the inside threads of the drain collar
ae sure the pan and drain fit leel to the floor
emoe pan and apply ilicone to floor dia
arefully lift the shower pan and set into place ae sure the pipe is
still centered
ush and secure the rubber seal onto the pipe
hread on the brass pressure ring around the drain pipe with the
proided tool emoe the tool after the brass pressure ring is installed
est and snap the decoratie diamond trim plate into positionemoe
the decoratie trim plate and store in secure area until installation is complete,
dr
ain will be grouted when shower is grouted
fter installing pan, coer with cardboard or drop cloth to protect pan
from scuffs
silicone

N TOD T
diaram
diaram
cement
board
diaram
diaram
diaram
metal pan
hreshold for oor
A T
ocate the threshold pieces
dia.
ry fit thresholds onto the front of the metal pan he oor threshold
does not hae a channel in it he door rail is reersible and can be
placed on the left or right
dia.
emoe and place silicone in the an where the bottom of
thresholds rest, and in the bottom channels under the thresholds, re-
install thresholds into pan
here will be a small gap between the bottom of thresholds and
the floor, this can be grouted later if it is still eposed after installing
bathroom flooring
ocate
ocate
silicone
TD
diaram
metal pan
threshold for panel
silicone
TD
T
metal pan threshold for door
hreshold for anel
T
oor side asings
ap
D
panel channel side
asings ap
D
glass door side casing
glass panel channel side casing cap
dia.
silicone
reersible
t TD T th oe o y ter r to the
o help with the side casing installation, use a leel and draw a
plumb line from the inside of the pan threshold up to the top of the
shower o this on both sides his line will be where the side casings
and the wall anels meet, this will gie you a isual reference point
when dry-fitting your wall panels
pply silicone, using a circular pattern, to the cement
board along the plumb line, approimately inches wide, to the
edge of the shower pan
dia.
lace the first side casing into position maing sure to align the side
rail with the ertical plumb line preiously drawn on the cement
board pply pressure to the side casing to bond it to the cement
board he side casing will be flush with the inside of the shower pan
threshold and hae a small gap where the pan threshold slopes
dia. ou can shim the gap if neededae sure to also align the
channels
lace the remaining side casings into position, to each side and
cap se a leel and the plumb line preiously drawn on the cement
board to align the side casings ertically
T
TD
flush with threshold
small gap

NN NTTON
A I W L
nspecting panels at this point will gie you confidence that the wall panels are straight and suare from the
factory hen installing wall panels, you may need to mae adjustments to the panels to accommodate for
uneenness of your eisting walls uring the inspection process and/or dry-fitting process, if you hae any
concerns about the alignment or fit of the wall panels, please call us and we will gladly assist you with your install
ind a large flat area to layout and inspect all panels
lign all panels and liners to chec for straightness ae sure grout lines are straight and suare to each
other
istine tone wall panels are made to be fleible and may hae a slight bow his condition is normal and wall
panels will flatten out when properly installed f wall panels hae been stored improperly or hae become
ecessily bowed, they can be corrected before installation
ee troubleshootin section on last ae or details
B W L
lace your first bottom bac panel
into position dia est onto the
pan floor use spacers between the floor and the panel to mae the top of
the panel leel
lace the bac liner into position ae sure the grout lines are aligned,
use spacers to mae the top leel nspect the spacing between the wall
panels and the side threshold plumb line
lace the top panel
into position, push the two panels together ae
sure the grout lines are aligned, use spacers to mae the top of the panel
leel nspect the spacing between the wall panels and the side threshold
plumb line
epending on your cement board alignment, some sanding of the wall
panel edges may be reuired for a tight fit
S No you he for
eee rout e et etee u e
diaram
diaram
olding the upper panels and liner in place with another persons help,
chec the length and oerlap alignment ome fitting may be reuired
lace one of the bottom side panels into position and chec for
leelness and length
lace the side liner into position dia
lace one of the top side panels
into position
epeat steps through for other side of shower
epending on your faucet selection, you may need to mar and cut
out holes for your faucet and other accessories
ie shampoo shelf to fit
through before you can place the panel into position emember
measure twice, cut once, you can cut our walls with most cutting tools
T

NN NTTON otue
C I
ress the wall firmly into position e sure to use spacers between
the bottom panel and the shower pan to ensure panel is leel
dia
nstall the panels in the same order as you dry-fitted the panels
re y e reure to ee fuh
OTON OO NTTON
n the tiles the hampoo helf will be replacing,
mar from the outside of the grout line, the cut-
out area will be ut out the hole for the
helf he smaller the hole the better
ry-fit the hampoo helf for alignment of grout
lines
sing ilicone in-place with a generous
bead around the bac of the lip, wipe off ecess
silicone with tissue
he hampoo helf was designed to match your tile
sie tiles, the cut-out hole sie is
here is a lip or frame around the hampoo helf,
this will be the water sealed area for the hampoo
helf
he best way to cut the hole is with a small round
diamond blade and with a jigsaw to cut the corners
S S
S
8
T
T
T
emoe all dust and dirt with a clean dry cloth his will increase
the bond to the silicone
tart with the bottom panel
apply a generous amount of
silicone to the cement board and to the bac side of the wall
panel efer to the manufacturers recommendations for
application and drying time

hinge
pin
side
plate
side
plate
hinge
pin
teflon slide
washer
teflon slide
washer
hinge wall
bracet
screw
places
pply a generous amount of silicone onto the hinge and side plate
osition the hinge onto the glass door lining up the holes so that the screws are
on the inside of the shower door
ttach the side plate with silicone applied to the glass and tighten the screws
until the hinge is secure ipe off the ecess and allow to dry
epeat these steps for the bottom hinge
ou will also find a inyl ater hield for the bottom hinge his can be added
in between the glass door and the side plate to help eep water in the shower
should you hae a smaller shower or a shower-head pointed towards the door
dia a ee mages below for illustrated installation eamples ou may trim
the ater hield as needed
9
A H I
et the glass door in a position to enable the assembly of the handle
oosen the set screws so you can separate the handles
nscrew the long bolt from the handle eep all rubber pieces attached to
the screw
emoe the first set of flat, clear washers from the bolt
tart with the top hole on the glass door lace the long bolt through the hole
in the
door eeping the remaining rubber pieces on the bolt n the other side of
the glass place the flat washers onto the threaded portion of the bolt dia
diaram
clear washer
clear
spacer
clear
washer
set screw
shower
inside
shower
outside
e refu ot to ret the ee of the oor o hr urfe Teere
ery tro t rett ut t eet ot t o the ee
bolt
D
D
ae one side of the handle and screw the long bolt into the end ust start the
bolt until a few threads catch eep loose dia
ut the second bolt through the lower hole lace the flat washer onto the
bolt crew the bolt into the bottom handle dia
lign the handle on the door and carefully tighten the long bolts o not oer
tighten
lace the opposite handle oer the long bolts and tighten the set screws to
secure the handle
B H I
ocate the top hinge
and remoe the side plate by loosening the two
screws
dia
inyl water shield
side
plate
DOO ND N NTTON

10
I F G & G
ocate the clear door sweep and attach it to the bottom of the glass door he
reflectie shield should face into the shower
dia The oor ee ht ee
the oor oe djust the door seal until the reuired tension is achieed he door
sweep has been cut to fit oer the hinge ut off the ecess length opposite of
hinge side
e hae proided door seals for water sensitie areas such as wood floors f glass
panels and door are installed correctly with the proper spacing, outside water
spillage will be minimal and the side seals wont be necessary
f you would lie to use these side seals, follow the steps below
he shaped seal goes along the hinge side of the door on the threshold trim
pieces dia
lace the seal along the edge of the glass and cut the seal to the proper
length
emoe the bacer from the seal eposing the double-sided tape, only remoe
a small amount at a time
tarting from the top, align the seal along the edge of the door and stic the
seal to the threshold
or your way down the door o small sections at a time, slowly peeling the
bacer off the seal
ocate the plastic h-shaped seal
t goes on the fied glass, net
to the
handle edge
dia easure and cut the seal to length
tarting from the top, push the seal onto the glass panel, slowly woring your
way down
diaram
lass
oor
to inside
of shower
o eep door
closed adjust height
of door sweep to
proide proper
tension and seal
hower hreshold
diaram
glass
panel
strie
side
door
hinge
side
inside shower
outside shower
D
side wall
casing
top hinge
pin bracet
/ pin hole
pan threshold
C F G & G
ently insert the side glass panel into the channels ou will be adjusting the fied
glass panel so its leel with the door and has an een gap between the door
and the glass panel se rubber setting bloc to adjust height and leel if necessary
et, to determine the position of the bottom hinge pin hole, place the top hinge
pin bracet upside down on bottom pan threshold as a template
dia. lign
bracet hole to center of side glass panel ar the hole and remoe the bracet
arefully drill dia hole for hinge pin approimately deep into the threshold
ic up the door you hae installed the hinges and handle onto, and gently place
the bottom hinge pin into the / hole you hae drilled into the pan threshold
maing sure you hae the eflon slide washer on the pin
ith someone helping to hold the shower door, place the top hinge mounting
bracet
dia oer the top hinge pin maing sure you hae the eflon slide washer
on the pin hec to mae sure door is plumb and leel, then mar with a pencil
through the holes on top hinge mounting bracet
oe door and top hinge mount to one side and pre-drill the holes into the studs
he drilled holes should be large enough so the screws dont bind in the stone
nsert and tighten screws
et dry-fit the fied panel into the correct alignment with the door, remoe the
glass and apply a / bead of silicone into the channels e-insert the
fied glass panel and chec alignment again llow the silicone to dry ou can
silicone any gaps between the stone and glass to ensure water tightness
E I S & S
h-seal
-seal
hinge
pin
side
plate
side
plate
hinge
pin
eflon slide
washer
teflon slide
washer
hinge wall
bracet
screw
places

OT
SHOWER SYSTEM TROUBLESHOOTING
DO NOT N TN TON T NT TNN TON TNN N or
other chemicals that attac the structural integrity of esin ased tone se of these chemicals will destroy the
surface of the stone and oid your warranty oapy water, ammonia based cleaners omet will remoe most
dirt and residue from all types of finishes or stubborn stains you may use a non-abrasie cotchbrite pad
ightly scrub the stained area in a circular motion to aoid discoloration he stone is naturally waterproof and
will not absorb spills or soil, simply wipe away with a damp sponge eriodic cleaning with a sponge and warm,
soapy water will remoe any build up of dust or grime eriodically chec the grout and silicone for any cracs
and repair as needed
CARE & MAINTENANCE OF YOUR SHOWER SYSTEM
orret oe e istine tone all anels are made to be fleible and may hae a slight bow his
condition is normal and the panels will flatten when properly installed f the panels hae been stored
improperly or hae become ecessiely bowed, follow instructions below sing a hair dryer or heating pad/
blanet, warm up the bacside of the panel in the most bowed area nce the panel becomes malleable, lay
panel on a flat surface and apply weight until cool and flat
re Te s with any tile project, a tile can become damaged imply cut out the damaged tile, silicone a
replacement tile in place, and grout
re e e f your wall panel deeloped a crac in a grout line, simply grout oer the craced
seam when it is installed he grout will correct the problem, you will not be able to tell the crac was eer there
rthe ehe an be remoed by wet-sanding the tile surface ae sure tile surface and sandpaper
are wet, and sand tiles until scratches and blemishes are remoed
Door Not ty oe djust height of door sweep to proide proper tension and seal
Door e he shower doors are designed not to lea under normal
usage when installed properly, and the
water flow is not pointed directly at the inyl seals, hinges or opening
our merican ath actory shower has a non-porous surface, which maes it easy to clean rout used must
contain an to ensure proper bonding to the tiles e suggest grouting in eery union joint of
shower components ecoratie lines in the shower walls and floors can be grouted if preferred, but it is not
necessary
ecommended grout e ecommend a water based non-sanded ile rout in a cauling tube not
silicone caul ou may also use powdered non-sanded grout, but wed suggest using an acrylic additie to
aid adhesion
ae sure you do not let the grout dry completely onto the shower before remoing and cleaning off the
ecess grout f grout is allowed to dry onto the shower components, it will liely be difficult if not impossible to
remoe without damaging the showers surface
Note rout ot oere y rrty
11

et r r tto ue
ur etal grab rails are designed to gie you added security with an elegant
appearance ollow the instructions below to properly install your grab rail
ue Neee
• encil
• eel
• rill and / rill it
• ilicone aul un
• hillips crew rier
• lean loth
ecide where you want to place the grab bars he rab ars can be placed in any position
horiontal, ertical, or angled as long as the screws in the mounting bases are attached to the
studs in the wall ll of the screws from each mounting base ut screw into a stud for full
support and be compliant
lace the grab bar in desired position ou may want to leel if desired oe the escutcheon
coers to reeal the wall plate and mar the wall for holes on each wall plate
rill the holes you just mared using a / drill bit pply silicone into each of the holes
hen secure each wall plate with the screws proided and then slide the escutcheons oer the
wall plates t is not necessary, but you can silicone around the escutcheons ipe any ecess
silicone epeat for each grab bar llow hrs for silicone to fully dry before using
mm
mm
mm
mm
mm
mm
mm
mm
• erall imensions
• ounting ardware ncluded
• lated to match your hardware
• -guage grade stainless steel construction
• compliant when properly mounted into a structural support
• an support in ecess of lbs when properly mounted
• efore installing your shower walls, install bracing between the
wall studs where the wall plates will be mounted
ide iew
op iew
12

Rectangle Bench Installation ue
OTNT efore you install the bench, please inspect each piece for any
damage that may hae occurred during shipping he underside of the bench may
hae an unfinished surface but does not affect the structure of the bench t this time
you can drill ilot holes should you wish to attach the bench to to your studs.
ae sure the bench pieces and the location where you will install it is clean from
any dirt or oils ailure to do so can cause a poor bond and cause the bench to brea
free from the walls
ry fit the bench in place he legs should be at a minimum of apart ar
around the legs, bench top and the pilot holes should you choose to screw the
bench top to your walls with a soft pencil to help guide you for placement or
added adhesion you can sand any edge or surface on the bench that will touch the
shower with grit sandpaper ipe away any dust to ensure all surfaces are clean
and dry
pply a bead of silicone in a ig ag pattern along the bottom of the bench legs
and any edge or side that will adhere to the wall igure ollow the manufacturers
instructions for applying the silicone
lace the bench legs into place and apply pressure holding in position while
sueeing out any ecess silicone and wipe away any ecess et, apply silicone to
the edges of the bench top igure and to the top of each bench leg lace into
position, again applying pressure to sueee out ecess silicone ipe clean and allow
to dry o assist the bench top to adhering to the legs you can add some eenly
dispersed weight to the bench top to hold it down until it fully dries For additional
security, you may screw the bench seat to your studs.
fter the bench is securely bonded, finish by applying grout and/or silicone around
the bench, shower walls and floor
llow at least hours for the silicone and grout to dry
/
bead of silicone normally cures in hours he cure time could ary depending on the moisture in the
air ac of humidity will mae the curing process slower t might tae up to hours for silicone to cure under
cooler or dryer conditions or full cure strength allow days
Bench Troubleshooting
Use 100% RTV ilicone ONLY
DO NOT use LIQUID NAILS as the adhesie
DO NOT N TN TON T NT TNN TON TNN N or other hrh he tht
tt the trutur terty of e e toe e of thee he etroy the urfe of the toe o your rrty
istine tone is a hard non-porous surface that preents dirt from accumulating and resists stains egular cleaning with a sponge and
warm, soapy water will remoe most build-up of dust or grime or tougher jobs, use can use an ammonia based cleaner or comet to
remoe tougher dirt and residue. For stubborn stains, you may use the aforementioned cleansers with a non-abrasive Scotch rite pad.
“Lightly” scrub the stained area in a circular motion to avoid discoloration lways mae sure to rinse well
ery month you should inspect all joints for cracs or other signs of separation eapply cauling to any joint showing signs of wear or
cracing ailure to inspect the bench and repair any cauling joints will oid the warranty
Scratches & Blemishes Can be removed by wet-sanding the bench surface. Make sure both the surface and sandpaper are wet, and
lightly sand until scratches and blemishes are removed.
Bench breaks free from Wall his could be due to a rea was not clean as silicone will not get a good adhesion to a dirty or greasy
surface. b Too much silicone may have been used, if excessive silicone is applied silicone will become dry on the outside but will remain
wet on the inside, never drying. c Not enough time allowed for silicone to become activated and tacky. lease mae sure to fully read
the instructions on how to apply your silicone and if any curing or priming is necessary o resole, you can clean the bench and surface
and re-install in place or please contact ustomer erice for further instructions
ure
ure
re tee
Th ou for your urhe of the er th tory ete hoer eh
his guide was written to help you with the installation ue to ariances in local building codes and reuirements, the installation instructions proided are only suggestions and
it is adised that you contact a ualified contractor for application specific adice and comply with local building codes he bench can support static loads of up to lbs
when properly installed and used o aoid potential injuries, DO NOT use bench if weight eceeds lbs his bench is intended for use for sitting purposes only by -person
DO NOT use the bench to stand on, step up, neel or use for any other application other than sitting mproper use and/or installation may cause damage and bodily harm
iscontinue use of the bench if there are any isual signs of fatigue or wear becomes eident egular inspections should be made to confirm that the bench is still in good
condition f the bench starts to show signs of wear discontinue use and call our ustomer erice epartment for further instructions
egs must be at
least apart
13

orner helf nstall uide
eel
auling un ilicone
rill it
horoughly clean the surface on which the shelf will be adhered
lan height for installation of the shelf ry fit the shelf and sand the bac edge
as needed to allow for a good fit
ou can install the shelf with silicone or the screws included
a oe tto pply silicone to the bac edge of shelf and
press rmly in place applying een pressure ou may use painters
tape to help hold it in place while it dries llow to dry for hours
b re tto irst, place your shelf in desired location se a
pencil to mar the mounting holes et, drill out the pilot holes nsert
the anchor through pilot holes, apply silicone to bac edge of shelf
and then screw shelf to wall
nce silicone has fully cured, apply a bead of silicone caul around the
perimeter of the shelf to seal out water se a wet finger to smooth the caul
and then clean off ecess with a damp sponge
llow to fully dry before use
Back edge of shelf
NT
hen figuring out the proper height for your shelf, its a good idea to consider eeryone that will use the shower
eriodically chec the silicone and caul for any wear or deterioration and correct as necessary
Tooue
encil
rill
ainters ape
aul
hillips ead crewdrier
ponge
lean loth
ine rit andpaper
TOO ND O ND TO NT O O
o / for some installs you may need mil water/apor barrier plastic sheeting
o
o powdered non-sanded with additie for adhesion or pre-mied non-sanded
o
o
o / /
o
o or
o iamond ip recommended
o
o /
o
o
o
o
o /
o
o
o
o
o
o
o
o
o
o
stelle treet, orona, alifornia
hone a
isit us at wwwamericanbathfactorycom
14
/