Page is loading ...

Copy right c 2002 Dogtra Company
REMOTE CONTROLLED
DOG TRAINING COLLARS
OWNER’S MANUAL
www.dogtra.com

OVERVIEW
MAIN FEATURES
SAFETY
COLLAR PACKAGE CONTENTS
DESCRIPTION OF TRANSMITTER PARTS
DESCRIPTION OF COLLAR PARTS
BATTERY CHARGER
CHARGING THE BATTERIES
TESTING YOUR
COLLAR
OPERATING INSTRUCTIONS
TRAINING INFORMATION
ACCESSORIES
WARRANTY AND REPAIR
INFORMATION
3
5
6
7
8
15
20
21
24
26
30
33
34
1
CONTENTS

OVERVIEW
training collars give you the
ability to communicate with your dog in a
timely manner even when the dog is at a
distance from you. This makes it much easier
for the dog to learn its lessons because late
corrections are very confusing to the dog.
remote collars offer three
different kinds of stimulation:
Pressing the “Nick” button causes a very
short single pulse of electrical stimulation. It
automatically shuts off in a fraction of a
second, no matter how long the button is held
down.
The “Nick” is used as a substitute for leash
corrections when the dog is off lead.
It is mild but motivating!
OVERVIEW

COLLAR RECEIVER - Newly designed to
make adjusting the collar strap easy.
WATERPROOF HOUSING - The trainer s
transmitter is water - resistant. and the
dog
s collar is waterproof.
USER-FRIENDLY SIZE - The compact
transmitter with large control buttons is
easy to use.
NON - EXPOSED ANTENNA - The dog’s
collar is lightweight and non - obtrusive in
appearance.
EFFECTIVE RANGE - Delivers
stimulation up to 200-plus yards.
ONE CHARGER SYSTEM - Charges both
the trainer’s transmitter and the dog’s collar
at the same time. Lasts up to one week
between charges with everyday use.
MAIN FEATURES
MAIN FEATURES
Pressing the “Constant” button causes the
collar to emit electrical stimulation that stays
on for up to twelve seconds as long as the
button is held down. “Constant” stimulation is
used for low level applications for guiding
dogs into the desired behavior or as a reserve
high to stop unsafe behaviors such as chasing
animals or cars.
Pressing the Pager button causes the
dog s collar to vibrate like a phone pager. It
allows you to train with a non-electrical type
stimulation. It’s a great attention getter.
All collars come complete with a
handheld transmitter, dog collar with receiver,
battery charger and owner’s manual.
4
OVERVIEW

PACKAGE INCLUDES
Transmitter
Receiver
Battery charger and splitter cable
Owner’s manual
COLLAR
PACKAGE CONTENTS
6
SAFETY
collars use state-of-the-art micro-
computer technology. Both the transmitter and
receiver have an automatic control which
limits the stimulus to twelve seconds when
used in the “Constant” mode. The nick mode
gives the dog a momentary burst of
stimulation. A filtering system prevents
reception from sources other than your
transmitter.
SAFETY

TRANSMITTER
Transmitter Antenna
The has a 200 -yard range
with a 1.6 inch long fixed antenna.
8
Antenna
Indicator Light
Nick Button
Pager Button
Intensity
Selection Dial
Constant Button
transmitter

10
Intensity Selection Dial
The intensity selection dial is located on the
top of the transmitter. One is the lowest setting
and one hundred is the highest.
Transmitter Battery Charging Receptacle
Located on the side of the transmitter, the
charging receptacle is covered by a rubber plug.
Insert one end of the battery charging cable into
the receptacle to charge the battery.
(See Battery Charging Procedure.)
After charging is completed, close the
receptacle with its rubber plug to make sure dirt
does not get inside.

BUTTON FUNCTION
The transmitter for has three
buttons(two on the face of the transmitter and one on
the side.)
On the face of the transmitter the top button gives
a pre-measured “Nick” of stimulation when pressed.
The bottom or “Constant” button gives
stimulation for as long as you hold down the button
for up to twelve seconds.
The button on the side is the “Pager” button.
When pressed, the “Pager” button causes the collar
receiver to vibrate. The pager mode does not
implement any electrical stimulation.
BUTTON FUNCTION
Constant
Nick
12
Transmitter Indicator Light (LED)
The transmitter indicator light is located
between the antenna and the intensity selection
dial.
When a button on the transmitter is pushed,
the red light comes on to indicate that the
transmitter is being activated.
When the battery needs to be recharged the
indicator light will emit a blink every
0.5 seconds.
Pager

COLLAR
DESCRIPTION OF
COLLAR PARTS
Collar
Contact Points
Battery
Charging
Receptacle and
Cover
Collar Strap
14
BUTTON FUNCTION
“Nick” Button
When the “Nick” button is pushed, the
receiver emits an extremely short pulse of
electrical stimulation that automatically shuts off
no matter how long you leave your finger on the
button. The “Nick” is mild but motivating!
“Constant” Button
Pressing the “Constant” button gives
stimulation for up to twelve seconds, at which
time, the collar will turn off. The collar will
reactivate, when you push the button again.
“Pager” Button
Pressing the “Pager” button on the side of the
transmitter causes the collar to vibrate. It’s a
great way of communicating with your dog using
non-electrical stimulation. It is useful as an
attention getter, giving you added training
finesse.

COLLAR
Receiver Indicator Light (LED)
Located on the front of the collar, the indicator
light comes on and blinks once every 2 seconds
after the collar is turned on.
The blinking will change from a single flash to
a double flash when the collar needs to be
recharged.
When the
Constant button on the transmitter
is pushed, the collar indicator light will glow
steadily for as long as you hold the button down,
for up to 12 seconds. When the Nick button is
pushed, the light comes on for a fraction of a
second.
16
COLLAR
On/Off Magnetic Switch
To deactivate the hold the red
line on the transmitter to the red line on the collar
for a moment.
The led light will stop blinking, the unit is now
shut off. To attain maximum battery life, deactivate
the unit when not in use.

COLLAR
Receiver Battery Charging Receptacle
On the inside of the collar, next to the collar
strap, is a battery charging receptacle with a
rubber cover plug.
Internal Antenna
The has no external antenna
on the collar. The Antenna is inside the collar
receiver.
Receiver
Charging
Receptacle
18
COLLAR
Contact Points
The collar should be fitted so that the
stainless steel contact points press firmly against
the dog’s skin.
A loose fit can allow the collar to move
around on the dog’s neck. When this happens,
the contact points may rub the skin and cause
irritation. If the collar is too loose, electrical
contact will be inconsistent and your corrections
will be inconsistant also.

CHARGING THE BATTERIES
uses Ni-MH (Nickel-Metal-Hydride)
batteries that do not set a memory and can be
charged on a regular basis without harm to the
battery. Allow batteries to drain completely
every 4 months to maximize battery life.
1. Charge the batteries for 14 hours before using
the collar for the first time.
2. Do not charge the batteries near any
flammable substances.
CHARGING THE BATTERIES
20
BATTERY CHARGER
The battery charger and charging cables allow
you to charge both the transmitter and receiver at
the same time.
The battery charger is designed for a 110 volt
wall outlet. (European 220 volt AC chargers and
12-volt field charger for your automobile are also
available).
BATTERY CHARGER
Charging Cable
220 volt Charger

CHARGING THE BATTERIES
Battery Charging Procedure
1. Attach the charging cables to both the
transmitter and receiver(s), as shown on page 21.
2. Plug the charger into a 110-volt wall outlet as
if using the accessory field charger plug into
a cigarette lighter.
(Use 220-volt European charger for Europe)
When properly plugged in, all indicator lights
should glow red.
The receiver automatically turns off when you
insert the charging cable into the battery
charging receptacle on the receiver.
3. After charging, cover the battery charging
receptacles with the rubber plugs on the
transmitter and receiver.
4. Battery is fully charged with a 14-hour charge.
22
CHARGING THE BATTERIES
3. Fully charge the batteries for 14 hours if the
collar is to be stored without use for a period
of a month or more.
4. Recharge the battery if
- the indicator light on the collar is emitting a
double blink every 2 seconds
- the indicator light on the transmitter or
receiver will not come on
- the indicator light on the transmitter or
receiver comes on momentarily but will not
stay on when the “Constant” button is
pushed.

TESTING
2. As a safety feature the will
automatically shut off if the constant
stimulation button is depressed for 12 seconds
or longer. To reset the unit, release the button
for three seconds.
24
TESTING
1. To activate the place the red line
on the back of the transmitter to the red line on the
collar. Hold the two red marks together for a
moment until the LED indicator light comes on.
The indicator light will blink every two seconds
showing the unit is charged and ready to use.
(If the red indicator light emits a double blink
every two seconds, the batteries need to be
charged.)
TESTING YOUR
COLLAR

OPERATING
Intensity selection
To select the intensity level, start on the
“zero” setting. Gradually increase the level until
you get a response from the dog that would be
equivalent to a quick pull or “JERK” with a
leash.
Remember that you will need to adjust the
setting (upward or downward) as the dog’s
attitude changes, especially during times of
increased excitement or distraction.
26
OPERATING
Fitting the collar
The collar strap should be adjusted so that the
contact points are held firmly against the dog’s
skin. If the collar is too loose, it can cause
irritation from the contacts rubbing against the
skin.
If the dog has a heavy coat, move the receiver
up and down to work the contact points down
into the coat.
ATTENTION!
Avoid having the dog wear the collar with
the contact points in the same place for more
than two hours at a time. Leaving the points
on the same spot for extended periods of time
can cause skin irritation. If the dog is to wear
the e-collar for long periods, occasionally
reposition the collar so that the contact points
are moved to a different spot on the dog’s
neck.
OPERATING INSTRUCTIONS

MAINTENANCE
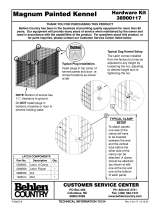
Reception
The collar has a range of
200 yards plus. Depending on the way you use
your transmitter, the transmitting range may
vary.
You will have extended range if you hold the
transmitter away from your body when you push
the button.
Maximum Range
Typical Range
Minimum Range
If your finger touches the antenna near the dial
on the top of the transmitter, the actual range
may be reduced while you push the button on
the transmitter
28
OPERATING
Maintenance
Always clean and rinse the collar thoroughly
with tap water after use in salt water.
The receiver and collar strap should be
periodically cleaned with detergent and water to
prevent malfunction.

TRAINING INFORMATION
When the dog complies with the command use
praise, as positive reinforcement.
Beginning Electric Collar Training
When you feel your dog understands the
obedience commands on the leash, you can then
start with the electric collar training. With the
dog on the leash wearing the electric collar
continue with your obedience drills. Apply light
stimulation (nick or constant) as a command is
given. Remove the stimulation as the dog
complies. Through repetition, a dog learns to
turn off the stimulation by performing the
command. Electric collar training is another
form of negative reinforcement, similar to the
leash and metal collar training. When the dog
complies with the command, we use
praise/positive reinforcement. The final step is
the avoidance phase in which the dog learns that
he can avoid the stimulation altogether by
performing your commands. When these
training procedures are complete, the electric
collar is used as a reminder when the dog does
not comply with your commands at home or in
the field. Keep initial training sessions short and
positive. Dogs have short attention spans,
especially young dogs.
30
TRAINING INFORMATION
Getting Started With Your Dogtra Training
Collar
Before implementing any stimulation with the
electric collar, your dog must know some very
basic obedience commands. A dog learns by
first being shown a command, followed by lots of
repetition over an extended period. As the dog
becomes proficient at these commands, the
trainer can introduce distractions and different
locations to strengthen them. Throw in the
correct amount of positive and negative
reinforcement and you should end up with a well
mannered dog.
Obedience Training On The Leash
Your dog must fully understand the
obedience commands (sit, stay, here, heel and
kennel) before using the e-collar for
reinforcement of these commands. A metal
training collar also known as the choke chain or
pinch collar is used to implement the negative
reinforcement on the leash. A sharp jerk with the
chain and leash reinforces commands such as
SIT, STAY, HERE, HEEL OR KENNEL.
TRAINING INFORMATION

32
TRAINING INFORMATION
How Much Stimulation To Use
Always start with low levels of stimulation
and work your way up depending on the
personality of your dog and any given situation.
By using only enough stimulation to get your
point across, you will have a more controllable
environment and a dog that is under less stress.
Animals (and humans) perform better in a less
stressful environment.
ACCESSORIES
The following items may be purchased
separately.
Dummy Collar
A dummy collar is recommended for use
with very sensitive dogs to get them used to the
size and weight of the collar.
Eeropean Charger
Designed for use with 220V AC electrical
outlets in Europe.
Field Charger
Designed for use with the 12-volt cigarette
lighter in your car.
ACCESSORIES

34
WARRANTY
Warranty Repair
Dogtra Company provides the original
purchaser a one-year limited warranty on parts and
labor from the date of the original purchase. The
warranty does not cover failure resulting from
damage, abuse or loss of parts. The warranty is void
if the unit has been altered or an unauthorized person
has attempted work.
A copy of the sales receipt showing purchase
date is required before warranty work is begun.
Write a note briefly explaining the problem and
include your name, address, city/state/zip code,
daytime and evening phone numbers.
Ship to :
22912 Lockness Avenue
Torrance, CA 90501
For any questions concerning your dogtra products
call us Toll Free at 1-888-811-9111.
WARRANTY AND
REPAIR INFORMATION
35
Send repair units to :
Dogtra Company / Repairs
22912 Lockness Avenue
Torrance, CA 90501
U.S.A.
Out of Warranty Repair
For repair work that is no longer covered by
warranty, the cost of repair will include parts,
labor and shipping. Write a note briefly
explaining the problem. Include your name,
address, city/state/zip code, daytime phone
number and evening phone number.

/