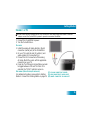
Dish Network PocketDISH User manual
- Category
- Digital Video Recorders (DVR)
- Type
- User manual

i
SAFETY ............................................... III
PORTABLE MEDIA RECORDER......... 1
O
VERVIEW .................................... 2
C
ONTROLS AND INDICATORS.......... 3
C
ONNECTORS - POCKETDISH....... 4
C
ONNECTORS - DOCKING STATION 4
GETTING STARTED............................. 5
U
NPACK THE POCKETDISH........... 6
F
IRST TIME USE............................ 7
B
ASIC OPERATION......................... 8
C
ONNECT A DISH NETWORK DVR 9
C
ONNECT A COMPUTER............... 10
C
ONNECT A TV........................... 11
C
ONNECT AN AUDIO DEVICE........ 12
C
ONNECT THE DOCKING STATION 13
C
ONNECT A USB MASS
S
TORAGE DEVICE .................... 14
M
ENU STRUCTURE...................... 15
R
EMOTE CONTROL (RCU)........... 16
DISH NETWORK AUDIO/VIDEO........ 17
I
NTRODUCTION............................ 18
S
END MY RECORDINGS FROM
THE DISH NETWORK DVR....... 19
P
LAYBACK THE DISH NETWORK
R
ECORDINGS............................20
A
DDITIONAL OPTIONS...................21
SECOND SOURCE AUDIO/VIDEO.... 23
I
NTRODUCTION.............................24
I
NTERNET LINKS...........................24
T
RANSFER AUDIO/VIDEO FILES ....25
P
LAY BACK A COMPATIBLE
VIDEO FILE...............................26
P
LAY BACK A COMPATIBLE
S
ONG.......................................30
C
REATE PLAYLISTS......................33
P
LAY BACK PLAYLISTS.................33
I
NSTALL THE MPEG-4
TRANSLATOR............................35
THE PHOTO ALBUM ......................... 37
I
NTRODUCTION.............................38
T
RANSFER DIGITAL PHOTOS/
IMAGES FROM THE COMPUTER ..39
T
RANSFER DIGITAL PHOTOS FROM
YOUR CAMERA..........................40
V
IEW A COMPATIBLE PHOTO OR
IMAGE ......................................41
V
IEW A SLIDESHOW .....................42

ii
Table of contents
THE BROWSER.................................. 45
D
ESCRIPTION.............................. 46
H
OW TO USE THE BROWSER....... 47
THE VIDEOCORDER.......................... 49
D
ESCRIPTION.............................. 50
O
PERATION................................. 51
T
HE VIDEOCORDER
S
ETTINGS MENU ...................... 52
V
IDEO EDITING............................ 53
THE SCHEDULER.............................. 55
D
ESCRIPTION.............................. 56
O
PERATION................................. 57
THE AUDIOCORDER......................... 59
D
ESCRIPTION.............................. 60
O
PERATION................................. 61
I
NCREMENTAL RECORDING........... 62
E
DITING...................................... 63
SYSTEM SETUP................................. 65
D
ESCRIPTION.............................. 67
D
ISPLAY MENU ........................... 67
A
PPEARANCE MENU.................... 67
S
OUND MENU ............................. 68
P
LAYMODE MENU....................... 68
C
LOCK MENU.............................. 69
P
OWER MENU............................. 69
L
OCKS MENU.............................. 70
S
YSTEM MENU.............................70
I
NSTALL A PERSONAL
W
ALLPAPER..............................71
S
OFTWARE UPGRADES
FROM THE INTERNET.................72
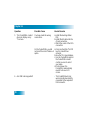
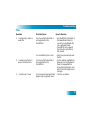
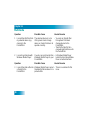
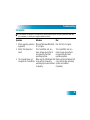
TROUBLESHOOTING........................ 73
APPENDIX ........................................A-1

iii
SAFETY
SAFETY CONVENTIONS
Throughout this user guide, there may be blocks of text indicated by symbols and printed in a
different way than the surrounding text. These blocks of text require the attention of the reader to
avoid hazardous situations. The hazard levels are indicated as:
BATTERY SAFETY
Your PocketDISH has a rechargeable Lithium Ion (Li-Ion) battery.
This warning indicates a hazardous situation which, if not avoided, could result in serious injury.
This caution indicates a situation which, if not avoided, could damage the equipment or other properties.
This note indicates additional information to make you aware of possible problems and information of
any importance to help you to understand, to use and to maintain the PocketDISH.
The Li-Ion battery is a high capacity power source.
For your safety:
• To charge the Li-Ion battery, only use the AC/DC adapter that came with the PocketDISH.
• Never leave the PocketDISH in a hot environment like your car. Ambient temperature may not exceed
140F/60
O
C.
Failing to do so can cause permanent damage to equipment and can result in serious personal injury.
Important Safety Precautions

iv
Safety
GENERAL SAFETY
1 Carefully read and understand the warranty terms in the back of this manual.
2 Heed all warnings and follow all instructions.
3 Do not use this product near water or in extreme cold.
4 Clean only with a dry cloth.
5 Do not install near any heat sources such as radiators, heat registers, stoves, or other
equipment (including amplifiers) that produce heat.
6 Protect the power cord from being walked on or pinched, particularly at plugs,
convenience receptacles, and the point where they exit from this product.
7 Use only attachments/accessories specified by the manufacturer.
8 Disconnect the AC/DC adapter from the power during lightning storms or when unused
for long periods of time.
9 To help avoid possible damage to the PocketDISH electronics, do not expose the
PocketDISH to excessive vibration, or any magnetic objects, such as speakers, electric
motors, transformers, etc.
10 Refer all servicing to qualified service personnel. Servicing is required when this product
or its accessories have been damaged in any way, such as the power cord or plug is
damaged, liquid has been spilled or objects have fallen into the product, the product has
been exposed to rain, or to moisture, does not operate normally, or has been dropped.
Do not expose the AC/DC adapter to rain or excessive moisture to avoid the risk of shock or permanent
damage.

v
Safety
AVOID HEARING DAMAGE
SAFE USE
SAFE BATTERY HANDLING
SAFE DISPOSAL
Your PocketDISH respects the current regulations for limiting the output volume of consumer audio
devices to a safe level while using the headphones that came with the PocketDISH. Permanent damage
to your ears will occur if headphones or ear buds are used at a high volume level. Over time you might
get used to a higher volume level that may sound normal, but the risk of permanent damage to your ears
is still present. Set the volume level of your PocketDISH to a safe level before permanent damage to
your ears has occurred. If you start to hear ringing in your ears, reduce the volume level or stop using
the headphones or ear buds.
Do not use headphones or ear buds while you drive. The use of headphones or ear buds can be
disruptive or distracting when you have to pay attention. Therefore the use of headphones or ear buds is
not recommended while you drive or even if you are just a pedestrian. Please note that in some areas
the use of headphones or ear buds is considered to be illegal.
• Never leave loose Li-Ion batteries in a hot environment like your car.
• Do not put loose Li-Ion batteries in a pocket, bag, or drawer where they could short-circuit against
other items. Prevent battery tabs for short circuit.
• Do not place loose Li-Ion batteries on any conductive surface, such as a metal-topped table.
• Keep loose Li-Ion batteries WELL out of reach of children and pets!
• Only buy original replacement or extra batteries.
Your PocketDISH has a rechargeable Lithium Ion (Li-Ion) battery. Dispose of the PocketDISH and its
batteries in accordance with local regulations. Make sure the Li-Ion battery is fully discharged before
disposal to avoid the possibility of a short-induced fire after disposal.

vi
Safety
NOTES

1
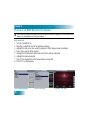
PORTABLE MEDIA RECORDER
This chapter gives you an overview and a description of your Portable Media
Recorder.
•OVERVIEW
•CONTROLS AND INDICATORS
•CONNECTORS - POCKETDISH
•CONNECTORS - DOCKING STATION
Portable Media Recorder
About Your PocketDISH

2
Chapter 1
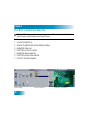
OVERVIEW
Features include the following:
• Video Recorder & Player:
DISH Network content,
and MPEG-4.
• Music Recorder & Player:
DISH Network content,
MP3, WMA and WAV.
• Photo Viewer/Slideshow:
JPG, JPEG, BMP.
• Scheduler:
to set your timers for
scheduled recording.
• Built-in Help:
Additional on-screen
information.
• Built-in Microphone:
To make digital (voice)
recordings
• Built-in Hard Drive:
USB Mass Storage Device
for any file type.

3
Portable Media Recorder
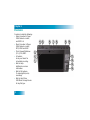
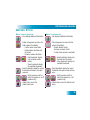
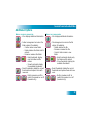
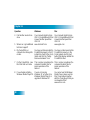
CONTROLS AND INDICATORS
1
CHG: a solid light
indicates
that the PocketDISH is connected to the battery
charger. If charging is complete, the light flashes.
2
HDD:
indicates
that the hard drive is active.
3
ON: indicates that the PocketDISH is turned on.
4
TV OUT: shows that the screen content is displayed on a TV.
5
TV/LCD key: switches between the PocketDISH screen and a TV.
6
Remote control eye: receives the commands from the remote control.
7
Speaker: reproduces the audio.
8
MIC: to make digital (voice) recordings.
9 : moves the cursor left or right.
Previous, Next: makes a selection, advances or reverses quickly through a file.
: moves the cursor up or down or increases/decreases the volume (+/-).
10
Page Up: moves the cursor up one page. Skips video and music ahead 30
seconds.
11
ON: press and hold to turn on PocketDISH.
Play: starts the playback of a selection.
Enter: acknowledges a selection.
12
Page Down: moves the cursor down one page. Skips video and music back
30 seconds.
13
OFF: press and hold to turn off PocketDISH.
Stop: stops the playback of a selection.
Escape: quits a selection without saving.
14
Upper, Center and Bottom Setup keys: to open and navigate through the Setup
menus, sub-menus and options to personalize your settings.

4
Chapter 1
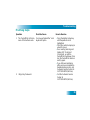
CONNECTORS - POCKETDISH
CONNECTORS - DOCKING STATION
The USB Host and Device connector types used on the PocketDISH are: USB Mini Type A (USB-A) and
USB Mini Type B (USB-B).
USB-A (Host): connect USB (mass storage device) compatible equipment, like a
camcorder, digital photo camera or a USB flash drive.
USB-B (Device): connect to a DISH Network DVR or computer.
DC IN (Power): connect to the AC/DC power adapter that came with the PocketDISH.
Headphones/AV: connect to the headphones that came with the PocketDISH.
Multi-connection: install the multi-connector for use with other multimedia devices or
connect to the Archos FM Radio & Remote Control (not included).
DC IN (Power): connect to the AC/DC power adapter that came with the PocketDISH.
Video: record video only from any S-Video source. For recording the audio, also connect
the analog AV-cable to the AV in connector.
AV out: send the audio and video from the PocketDISH to a TV.
AV in: record audio and video from any audio or video device onto the PocketDISH.

5
GETTING STARTED
Use this information to get started and connect your PocketDISH to other devices.
•UNPACK THE POCKETDISH
•FIRST TIME USE
•BASIC OPERATION
•CONNECT A DISH NETWORK DVR
•CONNECT A COMPUTER
•CONNECT A TV
•CONNECT AN AUDIO DEVICE
•CONNECT THE DOCKING STATION
•CONNECT A USB MASS STORAGE DEVICE
•MENU STRUCTURE
•REMOTE CONTROL (RCU)
Getting Started
Connections and Setup

6
Chapter 2
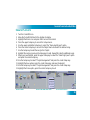
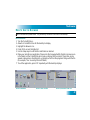
UNPACK THE POCKETDISH
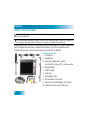
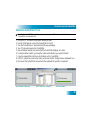
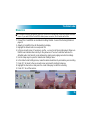
Carefully unpack the contents of the box and confirm that all the parts are included. Examine all
parts for damage that may have occurred during shipment. If you find any damage, stop
unpacking the box and contact the store where you bought the PocketDISH.
Keep the plastic packaging away from children. The plastic packaging may cling to the nose and mouth
and cause suffocation.
Keep the packaging materials for a period of time. In case of warranty claims, return the PocketDISH in
the original packaging to protect the electronics. Failing to do so might void the warranty.
CONTENTS OF THE BOX
1 PocketDISH
2 Headphones
3 Analog AV (audio/video) cable (2)
red = right (R), white = left (L), yellow = video
4 Docking station
5 AC/DC adapter
6 USB cable
7 USB adapter cable
8 Documentation (not shown)
9 Remote Control with batteries (not shown)
10 Protective carrying case (not shown)

7
Getting Started
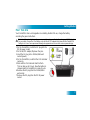
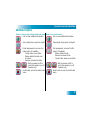
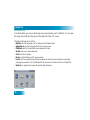
FIRST TIME USE
Your PocketDISH has a rechargeable Li-Ion battery. Before first use, charge the battery
according the given instructions.
The Li-Ion battery is a high capacity power source. Do not use another battery charger or AC/DC adapter.
For your safety, charge the Li-Ion battery only with the AC/DC adapter that came with the PocketDISH.
Failing to do so can cause permanent damage to equipment and can result in serious personal injury.
1 On the PocketDISH, install the DC plug into the
DC IN power socket.
2 On the AC/DC adapter, flip down the pins.
3 Insert the AC plug into a 110Vac/60Hz wall
socket (power).
4 On the PocketDISH, note that the CHG indicator
comes on.
5 Wait until the CHG indicator starts to flash.
This can take up to 4 hours. Now the battery is
charged and the PocketDISH is ready for use.
6 Remove the AC plug from the 110Vac/60Hz
wall socket.
7 Remove the DC plug from the DC IN power
socket.

8
Chapter 2
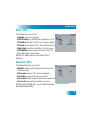
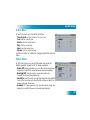
BASIC OPERATION
The PocketDISH has a battery saver which shuts down the display or the entire PocketDISH after a
certain period of time. You can change these settings in the Setup - Power menu. Note that any change
will influence battery power life span.
ON
1 Press ON for at least four seconds.
• The ON indicator comes on.
• Allow the PocketDISH time for the
desktop to display.
• If the PocketDISH does not start up
or shuts down immediately, use the
AC/DC adapter to power the
PocketDISH and charge the battery.
• When initially connected to power,
PocketDISH comes on and goes into
standby automatically.
OFF
1 Press OFF for at least four seconds.
• The shut down screen displays.
• Allow the PocketDISH time to shut
down.
2 Connect the AC/DC adapter as
described to make sure that the battery
stays charged and ready for use.
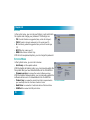
BASIC NAVIGATION
1 Use the keys to navigate.
2 Press ON to access a feature.
3 Press OFF to exit a feature.
POWER SETTINGS - BATTERY SAVING
1 Press any Setup key to open the Setup
menus.
2 Use the upper and bottom Setup key to
highlight the Display setup screen
option.
3 Press the center Setup key and use the
keys to highlight the Power
icon and press ON.
4 Use the keys to navigate through
the Battery and DC-power operation
settings for Power Off, Standby,
Backlight Off and Hard Drive.
5 Use the keys to change the setting.
6 Press OFF to activate the settings and
exit the menu.

9
Getting Started
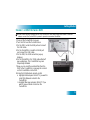
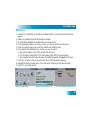
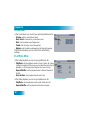
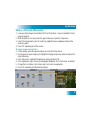
CONNECT A DISH NETWORK DVR
When connected to an external device, the PocketDISH uses more energy than normal. Therefore
always connect the PocketDISH to power to prevent an unwanted shutdown.
1 Connect the PocketDISH to power.
2 Turn the DVR and the PocketDISH on.
3 On the DVR, locate the USB port and connect
the USB cable.
4 On the PocketDISH, locate the USB-B port
and connect the USB cable.
5 On the DVR, the USB connection pop-up
displays.
6 On the PocketDISH, the "USB cable attached"
pop-up displays. The PocketDISH keys are
temporarily disabled.
7 Now you can send the selected files from the
DVR to the PocketDISH or manage the content
on the PocketDISH via the DVR.
8 Using the DISH Network remote control:
a Highlight Add and press SELECT if you want to
send DISH Network content to the
PocketDISH.
b Highlight Manage and press SELECT if you
want to view or delete content on the
PocketDISH.

10
Chapter 2
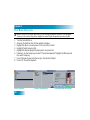
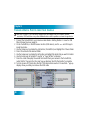
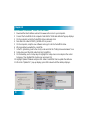
CONNECT A COMPUTER
When connected to an external device, the PocketDISH uses more energy than normal. Therefore
always connect the PocketDISH to power to prevent an unwanted shutdown.
The PocketDISH is compatible with Windows ME/2000/XP and Mac OS 10.2.4 or higher. Note that on
some Windows versions the PocketDISH may display in the Windows Explorer as a Removable Disk.
1 Connect the PocketDISH to power.
2 Turn the computer and the PocketDISH on.
3 On the computer:
a Close all programs.
b Locate the USB port and connect the USB cable.
4 On the PocketDISH:
a Locate the USB-B port and connect the USB cable.
b Now the "USB cable attached" pop-up displays.
c The PocketDISH keys are temporarily disabled.
WINDOWS PC
5 Open Windows Explorer and locate the PocketDISH
drive.
6 Double click the PocketDISH drive to get full access
to its hard drive as if you are working on your PC.
MAC
5 On the desktop, locate the PocketDISH icon.
6 Double click the PocketDISH icon to get full access to
its hard drive as if you are working on your Mac.

11
Getting Started
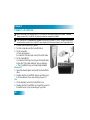
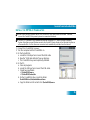
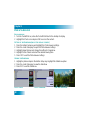
CONNECT A TV
When connected to an external device, the PocketDISH uses more energy than normal. Therefore
always connect the PocketDISH to power to prevent an unwanted shutdown.
1 Connect the PocketDISH to power.
2 Turn the PocketDISH on.
PLAYBACK
3 Install the analog AV-cable directly in the AV
connection (center jack) of the PocketDISH.
4 On your TV, locate the red (R), white (L) and
yellow (video) RCA connectors (In).
5 Connect the RCA connectors of the analog
AV-cable. Match the colors with the applicable
connectors on your TV.
6 Press the TV/LCD key for at least three seconds
to toggle between LCD and TV. When TV is
selected, the TV OUT indicator comes on.
RECORDING (VIDEOCORDER, SCHEDULER)
For detailed instructions, please refer to Getting
Started - Connect the Docking Station on page 13.
(Y):
YELLOW
CONNECTOR
TO
VIDEO
(R):
RED
CONNECTOR
TO
AUDIO
RIGHT
(W):
WHITE
CONNECTOR
TO
AUDIO
LEFT

12
Chapter 2
CONNECT AN AUDIO DEVICE
When connected to an external device, the PocketDISH uses more energy than normal. Therefore
always connect the PocketDISH to power to prevent an unwanted shutdown.
1 Connect the PocketDISH to power.
2 Turn the PocketDISH on.
PLAYBACK
3 Install the analog AV-cable directly in the AV
connection (center jack) of the PocketDISH.
4 On your audio device, locate the red (R) and
white (L) RCA connectors (In).
5 Connect the RCA connectors of the analog
AV cable. Match the colors with the applicable
connectors on your audio device.
6 Do not install the yellow (video) connector.
RECORDING (AUDIOCORDER, SCHEDULER)
For detailed instructions, please refer to Getting
Started - Connect the Docking Station on page 13.
(Y):
YELLOW
CONNECTOR
-
NOT
USED
(R):
RED
CONNECTOR
TO
AUDIO
RIGHT
(W):
WHITE
CONNECTOR
TO
AUDIO
LEFT

13
Getting Started
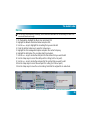
CONNECT THE DOCKING STATION
When connected to an external device, the PocketDISH uses more energy than normal. Therefore
always connect the PocketDISH to power to prevent an unwanted shutdown.
You can record in S-Video quality when using the S-Video connection. Note that the connection operates
as an S-Video In connection only. Do not forget to connect the analog AV-cable for the audio as well.
1 Connect the PocketDISH to the docking station.
3 Connect the analog AV-cable to the docking
station (AV in).
4 Connect the docking station (DC in) to power.
5 Turn the PocketDISH ON.
RECORDING (AUDIOCORDER)
6 On your audio device, locate the red (R) and
white (L) RCA connectors (Out).
7 Connect the RCA connectors of the analog
AV-cable. Match the colors with the applicable
connectors on your audio device.
8 Do not install the yellow (video) connector.
RECORDING (VIDEOCORDER, SCHEDULER)
6 On your video device, locate the red (R), white (L)
and yellow (video) RCA connectors (Out).
7 Connect the RCA connectors of the analog
AV-cable. Match the colors with the applicable
connectors on your
video device
.
(Y):
YELLOW
CONNECTOR
- F
OR
V
IDEO
(R):
RED
CONNECTOR
TO
AUDIO
RIGHT
(W):
WHITE
CONNECTOR
TO
AUDIO
LEFT

14
Chapter 2
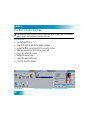
CONNECT A USB MASS STORAGE DEVICE
A USB mass storage device is a digital multimedia device that can communicate with another multimedia
device. For example, connecting to a computer without the need to install additional software.
Consult the user’s guide that came with your USB flash drive, MP3 player, digital photo or video camera
if it is compliant with the USB mass storage device protocol. If yes, the PocketDISH can get the files
from it.
1 Connect the PocketDISH to power.
2 Turn the PocketDISH and the USB device on.
3 Connect the USB adapter cable to the USB
cable.
4 On the USB device, locate the USB port and
connect the USB cable.
5 On the PocketDISH, locate the USB-A port
and connect the USB adapter cable.
6 Allow the two devices time to recognize each
other.
7 On the PocketDISH:
a The "USB device connected - Please wait ..."
pop-up displays.
b Wait until the browser screen displays.
c Now you can send files from the USB device
to the PocketDISH.
Page is loading ...
Page is loading ...
Page is loading ...
Page is loading ...
Page is loading ...
Page is loading ...
Page is loading ...
Page is loading ...
Page is loading ...
Page is loading ...
Page is loading ...
Page is loading ...
Page is loading ...
Page is loading ...
Page is loading ...
Page is loading ...
Page is loading ...
Page is loading ...
Page is loading ...
Page is loading ...
Page is loading ...
Page is loading ...
Page is loading ...
Page is loading ...
Page is loading ...
Page is loading ...
Page is loading ...
Page is loading ...
Page is loading ...
Page is loading ...
Page is loading ...
Page is loading ...
Page is loading ...
Page is loading ...
Page is loading ...
Page is loading ...
Page is loading ...
Page is loading ...
Page is loading ...
Page is loading ...
Page is loading ...
Page is loading ...
Page is loading ...
Page is loading ...
Page is loading ...
Page is loading ...
Page is loading ...
Page is loading ...
Page is loading ...
Page is loading ...
Page is loading ...
Page is loading ...
Page is loading ...
Page is loading ...
Page is loading ...
Page is loading ...
Page is loading ...
Page is loading ...
Page is loading ...
Page is loading ...
Page is loading ...
Page is loading ...
Page is loading ...
Page is loading ...
Page is loading ...
Page is loading ...
Page is loading ...
Page is loading ...
Page is loading ...
Page is loading ...
Page is loading ...
Page is loading ...
Page is loading ...
Page is loading ...
Page is loading ...
Page is loading ...
-
 1
1
-
 2
2
-
 3
3
-
 4
4
-
 5
5
-
 6
6
-
 7
7
-
 8
8
-
 9
9
-
 10
10
-
 11
11
-
 12
12
-
 13
13
-
 14
14
-
 15
15
-
 16
16
-
 17
17
-
 18
18
-
 19
19
-
 20
20
-
 21
21
-
 22
22
-
 23
23
-
 24
24
-
 25
25
-
 26
26
-
 27
27
-
 28
28
-
 29
29
-
 30
30
-
 31
31
-
 32
32
-
 33
33
-
 34
34
-
 35
35
-
 36
36
-
 37
37
-
 38
38
-
 39
39
-
 40
40
-
 41
41
-
 42
42
-
 43
43
-
 44
44
-
 45
45
-
 46
46
-
 47
47
-
 48
48
-
 49
49
-
 50
50
-
 51
51
-
 52
52
-
 53
53
-
 54
54
-
 55
55
-
 56
56
-
 57
57
-
 58
58
-
 59
59
-
 60
60
-
 61
61
-
 62
62
-
 63
63
-
 64
64
-
 65
65
-
 66
66
-
 67
67
-
 68
68
-
 69
69
-
 70
70
-
 71
71
-
 72
72
-
 73
73
-
 74
74
-
 75
75
-
 76
76
-
 77
77
-
 78
78
-
 79
79
-
 80
80
-
 81
81
-
 82
82
-
 83
83
-
 84
84
-
 85
85
-
 86
86
-
 87
87
-
 88
88
-
 89
89
-
 90
90
-
 91
91
-
 92
92
-
 93
93
-
 94
94
-
 95
95
-
 96
96


Dish Network PocketDISH User manual
- Category
- Digital Video Recorders (DVR)
- Type
- User manual
Ask a question and I''ll find the answer in the document
Finding information in a document is now easier with AI
Related papers
-
Dish Network 7000E User manual
-
-
-
-
-
-
-
-
-
Other documents
-
Archos Access 57 Hard reset manual
-
EchoStar PocketDISH User manual
-
-
-
-
RK 87 Wireless TKL Mechanical Keyboard User manual
-
-
Archos 104 User manual
-
-