
i
English............................................ 1
Français........................................ 16
Deutsch ........................................ 34
Italiano.......................................... 50
Español......................................... 66
Nederlands................................... 82
Português..................................... 97
Svenska ...................................... 113
Norsk.......................................... 129
Dansk ......................................... 145
Suomi ......................................... 161
Česky.......................................... 177
Polski.......................................... 193
Рyccкий ...................................... 209
CLE_Monet QS_Rev 2.book Page i Tuesday, August 30, 2005 10:53 AM

ii
CLE_Monet QS_Rev 2.book Page ii Tuesday, August 30, 2005 10:53 AM

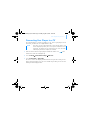
Congratulations! 1
English
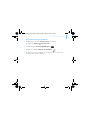
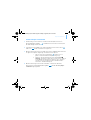
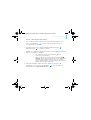
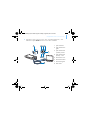
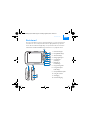
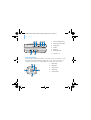
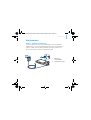
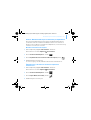
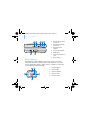
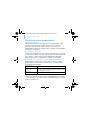
Congratulations!
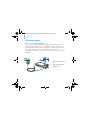
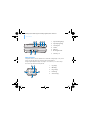
Thank you for purchasing Creative’s multiformat player, Creative Zen™
Vision. Read on to learn how to get started with your new player!
To get the most out of your player, also read the comprehensive User’s
Guide on your Installation and Applications CD.
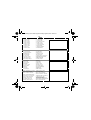
1
3
2
4
5
6
8
7
9
10
11
12
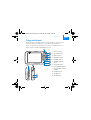
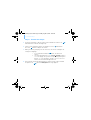
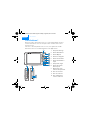
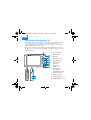
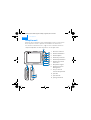
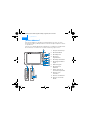
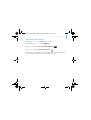
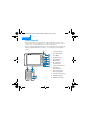
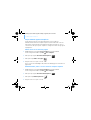
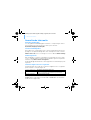
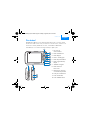
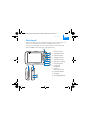
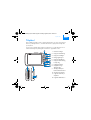
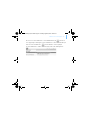
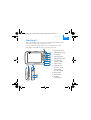
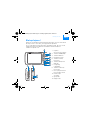
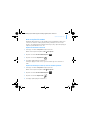
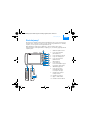
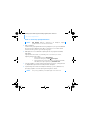
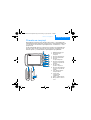
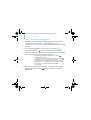
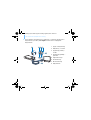
1. Infrared receiver
2. Menu/Back button
3. Options button
4. Navigation buttons
5. Play/Pause button
6. Next/Fast-Forward
button
7. Integrated speaker
8. Previous/Rewind button
9. Compact Flash memory
card slot
10. Headphone jack
11. A/V Out jack
12. DC IN 5V jack
CLE_Monet QS_Rev 2.book Page 1 Tuesday, August 30, 2005 10:53 AM

2 Congratulations!
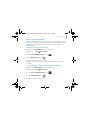
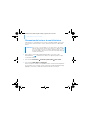
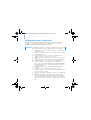
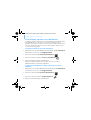
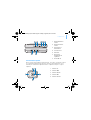
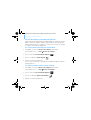
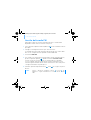
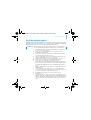
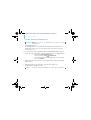
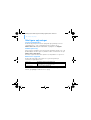
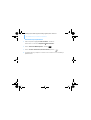
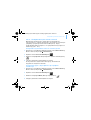
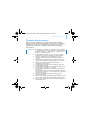
Selecting Options
In the following sections of this document, we use the term ‘Select’ to
indicate that you should use the Navigation buttons (Up, Down, Left or
Right) to highlight menu options, then press the OK button to select the
option.
1 2 3 4 5
7 6
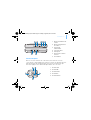
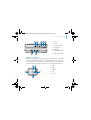
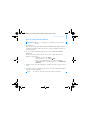
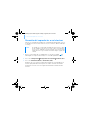
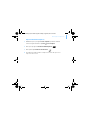
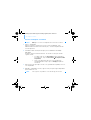
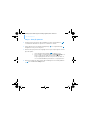
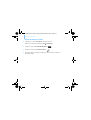
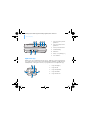
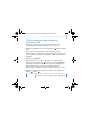
1. Volume Decrease button
2. Volume Increase button
3. Power switch
4. Lock icon
5. Microphone
6. Docking connector
7. USB 2.0 port
1. Up button
2. OK button
3. Right button
4. Down button
5. Left button
1
2
3
4
5
CLE_Monet QS_Rev 2.book Page 2 Tuesday, August 30, 2005 10:53 AM

Getting Started 3
Getting Started
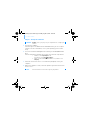
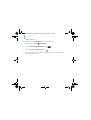
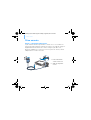
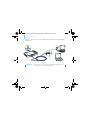
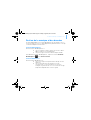
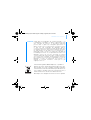
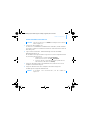
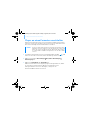
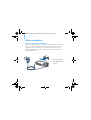
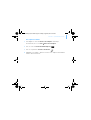
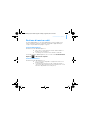
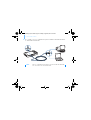
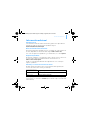
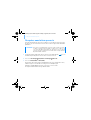
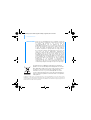
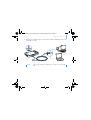
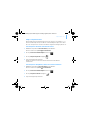
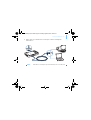
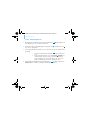
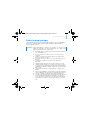
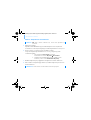
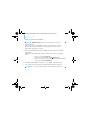
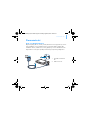
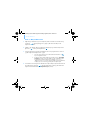
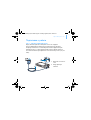
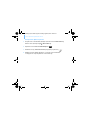
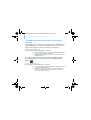
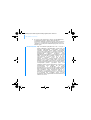
Step 1: Charge Your Player
The high performance lithium-ion battery supplied with your player needs
to be fully charged before you use it. The battery is fully charged in
approximately two hours. To charge your player's battery, connect the
power adapter to your player and wall outlet as shown in the diagram below.
1
2
1. DC IN 5V jack
2. Power adapter cable
CLE_Monet QS_Rev 2.book Page 3 Tuesday, August 30, 2005 10:53 AM

4 Set up the software
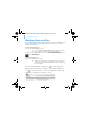
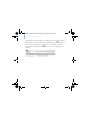
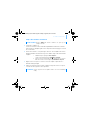
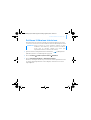
Step 2: Set up the software
1 Turn on your computer.
You must log in as an administrator in Windows before you can set up the
software. For more information, refer to your operating system’s online
Help.
2 Insert the Installation and Applications CD into your CD-ROM/DVD-ROM
drive.
Your CD should start automatically. If it does not, follow the steps below:
i. Double-click the My Computer icon.
Alternatively, click Start My Computer.
ii. Right-click the CD-ROM/DVD-ROM drive icon, and then click
Autoplay.
3 Follow the instructions on the screen and when prompted, restart your
computer.
4 When your computer restarts, follow the product registration instructions
on the screen.
WARNING DO NOT connect your player to your computer before setting up the
software.
NOTE You need an Internet connection to register your product.
CLE_Monet QS_Rev 2.book Page 4 Tuesday, August 30, 2005 10:53 AM

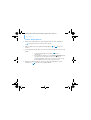
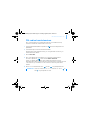
Set up the software 5
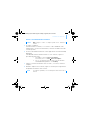
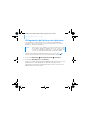
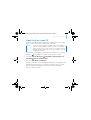
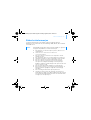
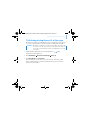
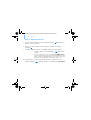
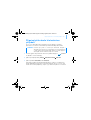
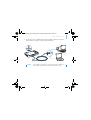
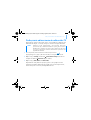
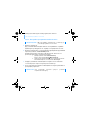
5 When prompted, connect your player to your computer’s USB port using the
supplied USB cable.
NOTE Connect to a computer USB port only; avoid connecting to a USB hub.
CLE_Monet QS_Rev 2.book Page 5 Tuesday, August 30, 2005 10:53 AM

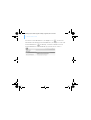
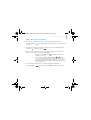
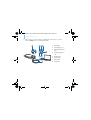
6 Turn On Your Player
Step 3: Turn On Your Player
1 To turn on your player, slide the Power switch towards the Power icon
and hold it there until the LCD lights up.
2 Connect your earphones and use the Volume Increase and Volume
Decrease buttons to adjust the volume.
3 When you turn on your player for the first time, the menu is in English. To
change the language:
i. Press and hold the Menu/Back button. The main menu
appears.
ii. Use the Navigation buttons to select System Language, and then
select the language that you want. For tips on using the Navigation
buttons, see “Selecting Options” on page 2, or refer to the User’s
Guide on the Installation and Applications CD.
4 After you have finished using your player, slide the Power switch towards
the power icon until the
Shutting Down message appears.
CLE_Monet QS_Rev 2.book Page 6 Tuesday, August 30, 2005 10:53 AM

Rip and Copy Music 7
Step 4: Rip and Copy Music
Rip music from your CD collection to your player, or copy audio files (such
as music you have purchased online) from your computer. Before ripping or
copying files, make sure your player is connected to your computer as
shown on page 5.
To rip music from your CD collection
1 Double-click the My Computer icon on your desktop.
Alternatively, click Start
My Computer.
2 Click the Zen Vision Media Explorer icon .
3 Click the Rip Audio CDs button .
4 Follow the instructions on the screen.
If you are connected to the Internet, album information is automatically
retrieved.
To copy audio files, videos or photos from your computer
1 Double-click the My Computer icon on your desktop.
Alternatively, click Start
My Computer.
2 Click the Zen Vision Media Explorer icon .
3 Click the Import Media button .
4 Follow the instructions on the screen.
CLE_Monet QS_Rev 2.book Page 7 Tuesday, August 30, 2005 10:53 AM

8 Rip and Copy Music
To copy data files
1 Double-click the My Computer icon on your desktop.
Alternatively, click Start
My Computer.
2 Click the Zen Vision Media Explorer icon .
3 Click the Transfer Documents button .
4 Locate your data files and copy them to your player or computer using the
drag-and-drop method.
CLE_Monet QS_Rev 2.book Page 8 Tuesday, August 30, 2005 10:53 AM

Connecting Your Player to a TV 9
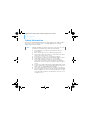
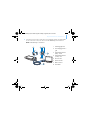
Connecting Your Player to a TV
To view your player’s content on a larger screen, connect your player to a TV.
To do this, you must use the supplied video cable.
1 Slide the Power switch on your player towards the Power icon and
hold it there until the LCD lights up.
2 Select Settings Photo/Video Settings Video Out.
3 Select Auto (NTSC) or Auto (PAL).
Be sure to choose the display format that matches your TV so that you can
better enjoy your videos. See the User’s Guide for your TV if you are not sure
about your TV’s display format.
NOTE Your player has been developed and tested to display photos and
videos of high quality. When you view these photos and videos from a
TV monitor, the display may vary in quality because of the TV model
and/or display format (for example, PAL or NTSC).
CLE_Monet QS_Rev 2.book Page 9 Tuesday, August 30, 2005 10:53 AM

10 Connecting Your Player to a TV
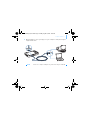
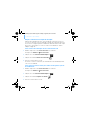
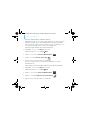
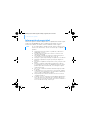
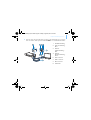
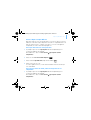
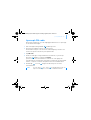
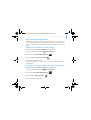
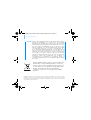
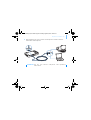
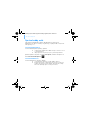
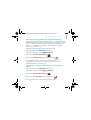
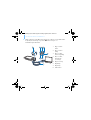
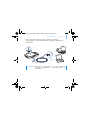
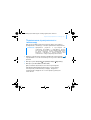
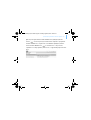
4 Connect your player to a TV with the supplied video cable, as shown below.
DO NOT use a standard video cable.
1 2
7
3 4
5
8
6
1. A/V Out jack
2. Video In jack - Yello
w
3. Audio In (Left) jack -
White
4. Audio In (Right) jack
-
Red
5. Red connector
6. White connector
7. Yellow connector
8. Video cable
CLE_Monet QS_Rev 2.book Page 10 Tuesday, August 30, 2005 10:53 AM

Listening to FM Radio 11
Listening to FM Radio
You can automatically scan for all available radio stations and save up to 32
radio presets.
1 Press and hold the Menu/Back button. The main menu appears.
2 Connect the earphone cable to your player’s Headphone jack.
The earphone cable acts as an antenna for radio reception and must be
connected to your player when using FM Radio.
3 Select FM Radio.
4 To automatically scan and save radio stations, press the Options button
and select Autoscan.
The player scans for all radio stations that can be received clearly. At the
end of the autoscan, Zen Vision automatically saves all stations as preset
channels and tunes in to the first preset.
5 Use the Up or Down navigation buttons to select a different preset.
NOTE Press the Left or Right navigation button to fine tune or manually
scan for a radio station.
CLE_Monet QS_Rev 2.book Page 11 Tuesday, August 30, 2005 10:53 AM

12 Managing Music and Data
Managing Music and Data
Creative Media Explorer and Creative MediaSource™ are included with your
player. Install and try out both applications to decide which one is more
suitable for your needs.
Creative Media Explorer
Use Creative Media Explorer if you:
■ are new to MP3 and WMA ripping and want to build up a library
■ prefer to manage Zen Vision as a removable disk drive
To start Creative Media Explorer, click the Zen Vision Media Explorer icon
under My Computer.
Creative MediaSource
Use Creative MediaSource if you:
■ frequently need to play back or organize music in your computer
■ require other features such as recording and audio conversion,
Smart Playlist, CD burning and MusicStore services (available only
in certain regions)
To start Creative MediaSource, double-click . For more information
about using Creative MediaSource, double-click the Creative MediaSource
icon on your desktop, refer to the Creative MediaSource online Help,
which offers a comprehensive “How do I” section.
CLE_Monet QS_Rev 2.book Page 12 Tuesday, August 30, 2005 10:53 AM

More Information 13
More Information
User’s Guide
Read the User's Guide found on your Installation and Application CD to
learn more about your player's many features. Go to
d:\manual\<language>\manual.pdf
Creative Knowledge Base
Resolve and troubleshoot technical queries at Creative's 24-hour self-help
Knowledge Base. Go to www.creative.com, select your region and then
select Support.
Product Registration
Registering your product ensures you receive the most appropriate service
and product support available. You can register your product during
installation or at www.creative.com/register.
Please note that your warranty rights are not dependent on registration.
Customer Support Services and Warranty
You can find Customer Support Services, Warranty and other information in
the Installation and Applications CD.
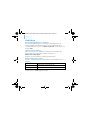
(replace d:\ with the drive letter of your CD-ROM/DVD-ROM drive, <region>
with the region that you are in, and <language> with the language that your
document is in)
Customer Support Services d:\support\<region>\<language>\support.chm
Warranty
d:\warranty\<region>\<language>\warranty.chm
Please keep your Proof of Purchase for the duration of the warranty
period.
User’s Guide d:\manual\<language>\manual.pdf
CLE_Monet QS_Rev 2.book Page 13 Tuesday, August 30, 2005 10:53 AM

14 Safety Information
Safety Information
Refer to the following information to use your player safely, and to reduce
the chance of electric shock, short-circuiting, damage, fire, hearing
impairment or other hazards.
■ Do not dismantle or attempt to repair your player, battery or
power adapter.
■ Refer all servicing to Creative or authorized repair agents.
■ Do not expose your player or battery to temperatures outside the
range of 0°C to 45°C (32°F to 113°F).
■ Do not pierce, crush or set fire to your player or battery.
■ Keep your player or battery away from strongly magnetic objects.
■ Do not subject your player to excessive force or impact.
■ Do not expose your player or battery to water or moisture.
If your player is moisture-resistant (see product packaging for
details), take care not to immerse your player in water or expose it
to rain.
■ Do not listen to audio at high volume for prolonged periods of time.
■ The battery must be recycled or disposed of properly. Contact local
agencies for recycling and disposal information.
■ Do not allow metal objects to touch the terminals of your battery.
■ If there is leakage, an offensive odor, discoloration or deformation
during charging or use, remove the battery and do not use it again.
Clean your hands well before touching food or sensitive areas, for
example, your eyes.
NOTE Improper handling may void the warranty for your player. For more
information, read the Warranty available with your product.
CLE_Monet QS_Rev 2.book Page 14 Tuesday, August 30, 2005 10:53 AM

Safety Information 15
WARNING As with any digital media-based storage device, data should be
backed up regularly. We strongly recommend that you observe the
usage precautions laid out in this booklet, and also back up the data
in your player regularly. In no event will Creative be liable for any
indirect, incidental, special or consequential damages to any persons
caused by Creative's negligence, or for any lost profits, lost savings,
loss of use, lost revenues or lost data arising from or relating to this
device, even if Creative has been advised of the possibility of such
damages. In no event will Creative’s liability or damages to you or any
other person ever exceed the amount paid by you for the device,
regardless of the form of the claim. Some countries/states do not
allow the limitation or exclusion of liability for incidental or
consequential damages, so the above limitation or exclusion may not
apply to you.
Copyright © 2005 Creative Technology Ltd. All rights reserved. The Creative logo, Creative MediaSource
and Zen are trademarks or registered trademarks of Creative Technology Ltd. in the United States and/
or other countries. Microsoft, Windows and the Windows logo are registered trademarks of Microsoft
Corporation.
The use of the WEEE Symbol indicates that this product may
not be treated as household waste. By ensuring this product
is disposed of correctly, you will help protect the
environment. For more detailed information about the
recycling of this product, please contact your local authority,
your household waste disposal service provider or the shop
where you purchased the product.
CLE_Monet QS_Rev 2.book Page 15 Tuesday, August 30, 2005 10:53 AM
Page is loading ...
Page is loading ...
Page is loading ...
Page is loading ...
Page is loading ...
Page is loading ...
Page is loading ...
Page is loading ...
Page is loading ...
Page is loading ...
Page is loading ...
Page is loading ...
Page is loading ...
Page is loading ...
Page is loading ...
Page is loading ...
Page is loading ...
Page is loading ...
Page is loading ...
Page is loading ...
Page is loading ...
Page is loading ...
Page is loading ...
Page is loading ...
Page is loading ...
Page is loading ...
Page is loading ...
Page is loading ...
Page is loading ...
Page is loading ...
Page is loading ...
Page is loading ...
Page is loading ...
Page is loading ...
Page is loading ...
Page is loading ...
Page is loading ...
Page is loading ...
Page is loading ...
Page is loading ...
Page is loading ...
Page is loading ...
Page is loading ...
Page is loading ...
Page is loading ...
Page is loading ...
Page is loading ...
Page is loading ...
Page is loading ...
Page is loading ...
Page is loading ...
Page is loading ...
Page is loading ...
Page is loading ...
Page is loading ...
Page is loading ...
Page is loading ...
Page is loading ...
Page is loading ...
Page is loading ...
Page is loading ...
Page is loading ...
Page is loading ...
Page is loading ...
Page is loading ...
Page is loading ...
Page is loading ...
Page is loading ...
Page is loading ...
Page is loading ...
Page is loading ...
Page is loading ...
Page is loading ...
Page is loading ...
Page is loading ...
Page is loading ...
Page is loading ...
Page is loading ...
Page is loading ...
Page is loading ...
Page is loading ...
Page is loading ...
Page is loading ...
Page is loading ...
Page is loading ...

Configurar o software 101
5 Quando lhe for pedido, ligue o leitor à porta USB do computador através do
cabo USB fornecido.
NOTA Ligue à porta USB de um computador; evite ligar a um concentrador
USB.
CLE_Monet QS_Rev 2.book Page 101 Tuesday, August 30, 2005 10:53 AM
Page is loading ...
Page is loading ...
Page is loading ...
Page is loading ...
Page is loading ...
Page is loading ...
Page is loading ...
Page is loading ...
Page is loading ...
Page is loading ...
Page is loading ...
Page is loading ...
Page is loading ...
Page is loading ...
Page is loading ...
Page is loading ...
Page is loading ...
Page is loading ...
Page is loading ...
Page is loading ...
Page is loading ...
Page is loading ...
Page is loading ...
Page is loading ...
Page is loading ...
Page is loading ...
Page is loading ...
Page is loading ...
Page is loading ...
Page is loading ...
Page is loading ...

Installere programvaren 133
5 Koble spilleren til datamaskinens USB-port med den medfølgende
USB-kabelen.
MERK Koble direkte til USB-porten på en datamaskin, ikke til en USB-hub.
CLE_Monet QS_Rev 2.book Page 133 Tuesday, August 30, 2005 10:53 AM
Page is loading ...
Page is loading ...
Page is loading ...
Page is loading ...

138 Koble spilleren til en TV
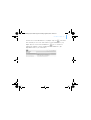
4 Koble spilleren til TVen med den medfølgende videokabelen, som vist
nedenfor. IKKE bruk en standard videokabel.
1 2
7
3 4
5
8
6
1. A/V-utgang
2. Videoinngang - gul
3. Lydinngang (venstre) -
hvit
4. Lydinngang (høyre) -
rød
5. Rød kontakt
6. Hvit kontakt
7. Gul kontakt
8. Videokabel
CLE_Monet QS_Rev 2.book Page 138 Tuesday, August 30, 2005 10:53 AM
Page is loading ...
Page is loading ...
Page is loading ...
Page is loading ...
Page is loading ...
Page is loading ...
Page is loading ...
Page is loading ...
Page is loading ...
Page is loading ...
Page is loading ...
Page is loading ...
Page is loading ...
Page is loading ...
Page is loading ...
Page is loading ...
Page is loading ...
Page is loading ...
Page is loading ...
Page is loading ...
Page is loading ...
Page is loading ...
Page is loading ...
Page is loading ...
Page is loading ...
Page is loading ...
Page is loading ...
Page is loading ...
Page is loading ...
Page is loading ...
Page is loading ...
Page is loading ...
Page is loading ...
Page is loading ...
Page is loading ...
Page is loading ...
Page is loading ...
Page is loading ...
Page is loading ...
Page is loading ...
Page is loading ...
Page is loading ...
Page is loading ...
Page is loading ...
Page is loading ...
Page is loading ...
Page is loading ...
Page is loading ...
Page is loading ...
Page is loading ...
Page is loading ...
Page is loading ...
Page is loading ...
Page is loading ...
Page is loading ...
Page is loading ...
Page is loading ...
Page is loading ...
Page is loading ...
Page is loading ...
Page is loading ...
Page is loading ...
Page is loading ...
Page is loading ...
Page is loading ...
Page is loading ...
Page is loading ...
Page is loading ...
Page is loading ...
Page is loading ...
Page is loading ...
Page is loading ...
Page is loading ...
Page is loading ...
Page is loading ...
Page is loading ...
Page is loading ...
Page is loading ...
Page is loading ...
Page is loading ...
Page is loading ...
Page is loading ...
Page is loading ...
Page is loading ...
Page is loading ...
Page is loading ...
Page is loading ...
Page is loading ...
Page is loading ...
Page is loading ...
Page is loading ...
Page is loading ...
-
 1
1
-
 2
2
-
 3
3
-
 4
4
-
 5
5
-
 6
6
-
 7
7
-
 8
8
-
 9
9
-
 10
10
-
 11
11
-
 12
12
-
 13
13
-
 14
14
-
 15
15
-
 16
16
-
 17
17
-
 18
18
-
 19
19
-
 20
20
-
 21
21
-
 22
22
-
 23
23
-
 24
24
-
 25
25
-
 26
26
-
 27
27
-
 28
28
-
 29
29
-
 30
30
-
 31
31
-
 32
32
-
 33
33
-
 34
34
-
 35
35
-
 36
36
-
 37
37
-
 38
38
-
 39
39
-
 40
40
-
 41
41
-
 42
42
-
 43
43
-
 44
44
-
 45
45
-
 46
46
-
 47
47
-
 48
48
-
 49
49
-
 50
50
-
 51
51
-
 52
52
-
 53
53
-
 54
54
-
 55
55
-
 56
56
-
 57
57
-
 58
58
-
 59
59
-
 60
60
-
 61
61
-
 62
62
-
 63
63
-
 64
64
-
 65
65
-
 66
66
-
 67
67
-
 68
68
-
 69
69
-
 70
70
-
 71
71
-
 72
72
-
 73
73
-
 74
74
-
 75
75
-
 76
76
-
 77
77
-
 78
78
-
 79
79
-
 80
80
-
 81
81
-
 82
82
-
 83
83
-
 84
84
-
 85
85
-
 86
86
-
 87
87
-
 88
88
-
 89
89
-
 90
90
-
 91
91
-
 92
92
-
 93
93
-
 94
94
-
 95
95
-
 96
96
-
 97
97
-
 98
98
-
 99
99
-
 100
100
-
 101
101
-
 102
102
-
 103
103
-
 104
104
-
 105
105
-
 106
106
-
 107
107
-
 108
108
-
 109
109
-
 110
110
-
 111
111
-
 112
112
-
 113
113
-
 114
114
-
 115
115
-
 116
116
-
 117
117
-
 118
118
-
 119
119
-
 120
120
-
 121
121
-
 122
122
-
 123
123
-
 124
124
-
 125
125
-
 126
126
-
 127
127
-
 128
128
-
 129
129
-
 130
130
-
 131
131
-
 132
132
-
 133
133
-
 134
134
-
 135
135
-
 136
136
-
 137
137
-
 138
138
-
 139
139
-
 140
140
-
 141
141
-
 142
142
-
 143
143
-
 144
144
-
 145
145
-
 146
146
-
 147
147
-
 148
148
-
 149
149
-
 150
150
-
 151
151
-
 152
152
-
 153
153
-
 154
154
-
 155
155
-
 156
156
-
 157
157
-
 158
158
-
 159
159
-
 160
160
-
 161
161
-
 162
162
-
 163
163
-
 164
164
-
 165
165
-
 166
166
-
 167
167
-
 168
168
-
 169
169
-
 170
170
-
 171
171
-
 172
172
-
 173
173
-
 174
174
-
 175
175
-
 176
176
-
 177
177
-
 178
178
-
 179
179
-
 180
180
-
 181
181
-
 182
182
-
 183
183
-
 184
184
-
 185
185
-
 186
186
-
 187
187
-
 188
188
-
 189
189
-
 190
190
-
 191
191
-
 192
192
-
 193
193
-
 194
194
-
 195
195
-
 196
196
-
 197
197
-
 198
198
-
 199
199
-
 200
200
-
 201
201
-
 202
202
-
 203
203
-
 204
204
-
 205
205
-
 206
206
-
 207
207
-
 208
208
-
 209
209
-
 210
210
-
 211
211
-
 212
212
-
 213
213
-
 214
214
-
 215
215
-
 216
216
-
 217
217
-
 218
218
-
 219
219
-
 220
220
-
 221
221
-
 222
222
-
 223
223
-
 224
224
-
 225
225
-
 226
226
-
 227
227
-
 228
228
-
 229
229
-
 230
230
-
 231
231
-
 232
232


Creative ZEN Vision Quick start guide
- Type
- Quick start guide
- This manual is also suitable for
Ask a question and I''ll find the answer in the document
Finding information in a document is now easier with AI
in other languages
- italiano: Creative ZEN Vision Guida Rapida
- français: Creative ZEN Vision Guide de démarrage rapide
- español: Creative ZEN Vision Guía de inicio rápido
- Deutsch: Creative ZEN Vision Schnellstartanleitung
- русский: Creative ZEN Vision Инструкция по началу работы
- Nederlands: Creative ZEN Vision Snelstartgids
- português: Creative ZEN Vision Guia rápido
- dansk: Creative ZEN Vision Hurtig start guide
- polski: Creative ZEN Vision Skrócona instrukcja obsługi
- čeština: Creative ZEN Vision Rychlý návod
- svenska: Creative ZEN Vision Snabbstartsguide
- suomi: Creative ZEN Vision Pikaopas
Related papers
-
Creative Zen Vision Cell Phone Quick start guide
-
Creative Zen Nano Plus User manual
-
Creative Zen V Owner's manual
-
Creative Zen V, V Plus Quick start guide
-
-
-
-
-
-
Other documents
-
Denver MPS-201 User manual
-
Fujitsu Fujitsu Lifebook T730 User manual
-
AIPTEK POCKETCINEMA V50 Quick start guide
-
Panasonic KX-TGA915EX Operating instructions
-
-
EUROCOM P150HM Racer User manual
-
Gateway GT4015h User manual
-
eMachines H5082 User manual
-
Gateway GT5453H User manual
-
eMachines H5270 User manual