Whirlpool ADG 8533 IX WP Installation guide
- Type
- Installation guide

Montageanweisung - Einbaugerät
Technische Änderungen vorbehalten
Assembly instructions - Built-in model
We reserve the right to make technical modifications
Instructions de montage - Appareil encastrable
Sous réserve de modifications techniques
Montage-instructies - Inbouwmodel
Technische wijzigingen voorbehouden
Instrucciones para el montaje - Modelo encastrable
Reservado el derecho de introducir modificaciones técnicas
Instruções para a montagem - Modelo de embutir
Com reserva de eventuais alterações técnicas
Istruzioni per il montaggio - Modello da incasso
Con riserva di modifiche tecniche
δηγς για τ µντρισµα - Εντιιµν µντλ
Μ την πιλαη για τνικς αλλαγς
Monteringsanvisning - Modell för inbyggnad
Vi förbehåller oss rätten att göra tekniska ändringar
Monteringsanvisning - Innbyggingsmodell
Vi forbeholder oss retten til å foreta tekniske endringer
Monteringsvejledning - Indbygningsmodel
Vi forbeholder os retten til at foretage tekniske ændringer
Asennusohjeet - Kalusteeseen asennettava malli
Oikeus teknisiin muutoksiin pidätetään
Instrukcja montażu - Model do zabudowy
Z zastrzeżeniem zmian technicznych
Pokyny k montáži - Vestavný model
S výhradou technických změn
Montážne pokyny - Vstavaný model
Technické úpravy vyhradené
Szerelési utasítások - Beépíthető típus
A műszaki módosítások jogának fenntartásával
Укaзaния пo мoнтaжу - Встрaивaeмaя мoдeль
Фирмa oстaвляeт зa сoбoй прaвo внoсить в прибoр тeхничeскиe измeнeния
Инструкции зa мoнтaж - Мoдeл зa вгрaждaнe
Cъс зaпaзeнo прaвo зa тeхничeски мoдификaции
Instruc∑iuni de montare - Model inclus ¶n mobil™
Cu rezerva de a putea aduce modific™ri de natur™ tehnic™
Kurulum Talimatları - Ankastre model
Teknik de¤ifliklik yapma hakkımız saklıdır
00190 10-01-2006 14:59 Pagina 1
Page is loading ...

z Montageanweisung 2
u Assembly instructions 2
i Instructions de montage 3
o Montage-instructies 3
f Instrucciones para el montaje 4
g Instruções para a montagem 4
h Istruzioni per il montaggio 5
m δηγς για τ µντρισµα 5
Monteringsanvisning 6
a Monteringsanvisning 6
s Monteringsvejledning 7
Asennusohjeet 7
k Instrukcja montażu 8
Pokyny k montáži 8
Montážne pokyny 9
j Szerelési utasítások 9
Укaзaния пo мoнтaжу 10
Инструкции зa мoнтaж 10
Instruc∑iuni de montare 11
Kurulum Talimatları 11
12
12
13
RO
TR
BG
RUS
SK
CZ
FIN
KO
00190 10-01-2006 14:59 Pagina 1

2
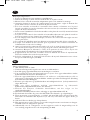
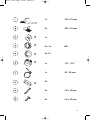
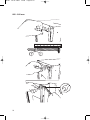
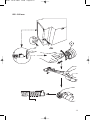
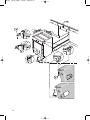
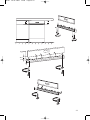
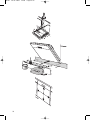
Wichtige Hinweise:
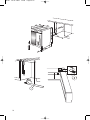
1. Alle Maßangaben in Millimeter
2. Während der Montage muss der Netzstecker gezogen sein.
3. Geschirrspüler nur im eingebauten Zustand betreiben.
4. Achtung bei unebenen Aufstellflächen: Geschirrspüler mit weit
herausgedrehten Füssen vorsichtig unter Arbeitsplatte schieben.
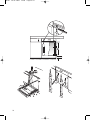
5. Wenn das Gerät am Ende einer Küchenzeile steht und damit eine
Seitenwand zugänglich ist, muss der Scharnierbereich seitlich verkleidet sein
(Abdeckung beim Service erhältlich).
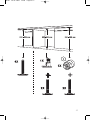
6. Schnittkanten an Möbelteilen und Arbeitsplatten müssen gegen Feuchtigkeit
isoliert werden (Isoliermaterial nicht im Lieferumfang enthalten).
7. Zwischenräume zu Nachbarmöbel und Arbeitsplatte dürfen nicht versiegelt werden
(z.B. mit Silicon)
8. Beim Einsatz von Elektroschraubern ist eine niedrige Drehzahl einzustellen.
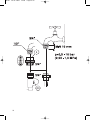
9. Der Inhalt des Beipacks kann je nach Geräteausführung unterschiedlich sein. ★
10. Bei der ersten Inbetriebnahme den Wasserzulauf und Wasserablauf auf Dichtheit
prüfen.
11. Nach der Dekorplatten- und Sockelmontage ist vor dem Öffnen der Tür zu prüfen
ob bzw. wie weit der Sockel auszuschneiden ist (siehe Seite 26) um Beschädigungen
zu vermeiden.
12.Vorsicht ! Verletzungsgefahr durch scharfe Kanten.
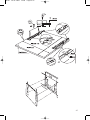
13. Das Gerät mit neuen Schläuchen an die Wasserversorgung anschließen. Keine alten
Schläuche wiederverwenden.
14. Je nach Geräteausführung wird das Magnetventil des Zulaufschlauches durch die
Netzspannung ausgelöst (siehe ★★).
D
GB
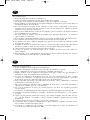
Important notes:
1. All sizes are given in millimetres.
2. During assembly, unplug the appliance from the mains.
3. Do not use the dishwasher until it has been fully assembled.
4. Be careful about irregular surfaces: regulate the foot height, push the dishwasher
under the worktop!
5. When installing the dishwasher at the end of a fitted kitchen and the side of the
machine is left exposed, cover the hinge area (available from the After-Sales
Service).
6. Protect the edges of units and worktops from humidity (insulating material not
supplied).
7. Do not seal the gaps between the dishwasher and adjacent units/worktop (for
example. with silicone).
8. Set any electrical screwdrivers to a low rev count.
9. Depending on the model, your dishwasher may differ slightly from the illustration.
★
10. The first time you use the dishwasher, check the water inlet hose and drain hose for
leaks.
11. Once the decor panels and plinth have been fitted, before opening the dishwasher
door, evaluate whether the plinth needs to be trimmed, and if so by how much, (see
page 26), in order to avoid damaging it.
12. Caution! Beware of sharp corners.
13. The Appliance is to be connected to the water supply using new hose-sets. Old
hose-sets should not be reused.
14. Depending on Appliance configuration the magnet valve of inlet will be driven by
line voltage (see ★★).
00190 10-01-2006 14:59 Pagina 2
Page is loading ...
Page is loading ...
Page is loading ...
Page is loading ...
Page is loading ...
Page is loading ...
Page is loading ...
Page is loading ...
Page is loading ...
Page is loading ...
Page is loading ...
Page is loading ...
Page is loading ...
Page is loading ...
Page is loading ...
Page is loading ...
Page is loading ...
Page is loading ...
Page is loading ...
Page is loading ...
Page is loading ...
Page is loading ...
Page is loading ...
Page is loading ...
Page is loading ...
Page is loading ...
Page is loading ...

Printed in Italy 11/05
5019 102 00190
i67 dhgc
RUS
BG
TR
FIN
KO
23490qw
S
00190 10-01-2006 15:00 Pagina 30
-
 1
1
-
 2
2
-
 3
3
-
 4
4
-
 5
5
-
 6
6
-
 7
7
-
 8
8
-
 9
9
-
 10
10
-
 11
11
-
 12
12
-
 13
13
-
 14
14
-
 15
15
-
 16
16
-
 17
17
-
 18
18
-
 19
19
-
 20
20
-
 21
21
-
 22
22
-
 23
23
-
 24
24
-
 25
25
-
 26
26
-
 27
27
-
 28
28
-
 29
29
-
 30
30
-
 31
31
-
 32
32


Whirlpool ADG 8533 IX WP Installation guide
- Type
- Installation guide
Ask a question and I''ll find the answer in the document
Finding information in a document is now easier with AI
in other languages
- italiano: Whirlpool ADG 8533 IX WP Guida d'installazione
- français: Whirlpool ADG 8533 IX WP Guide d'installation
- español: Whirlpool ADG 8533 IX WP Guía de instalación
- Deutsch: Whirlpool ADG 8533 IX WP Installationsanleitung
- русский: Whirlpool ADG 8533 IX WP Инструкция по установке
- português: Whirlpool ADG 8533 IX WP Guia de instalação
- slovenčina: Whirlpool ADG 8533 IX WP Návod na inštaláciu
- dansk: Whirlpool ADG 8533 IX WP Installationsvejledning
- polski: Whirlpool ADG 8533 IX WP Instrukcja instalacji
- čeština: Whirlpool ADG 8533 IX WP instalační příručka
- Türkçe: Whirlpool ADG 8533 IX WP Yükleme Rehberi
- svenska: Whirlpool ADG 8533 IX WP Installationsguide
- suomi: Whirlpool ADG 8533 IX WP Asennusohje
- română: Whirlpool ADG 8533 IX WP Ghid de instalare
Related papers
-
Whirlpool ADG 7680 WP Installation guide
-
Whirlpool ADG 9927 Installation guide
-
Whirlpool ADG 699 IX WP Installation guide
-
Whirlpool ADG 7430 Installation guide
-
Whirlpool ADG 6370 WH Installation guide
-
Whirlpool GSX 5521 BK Owner's manual
-
Whirlpool GSU 80 POWER IN Installation guide
-
KitchenAid KDFX 6020 Installation guide
-
-
LADEN ADP 81 AS SL Installation guide
Other documents
-
IKEA OV 9M1 W Installation guide
-
-
-
IKEA HB 630 S Installation guide
-
-
Panasonic MCE6003MCE6003K Operating instructions
-
-
-
-
Sandstrom SID60W12N User manual