
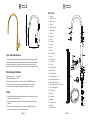
Tap Installation
www.abey.com.au

KTA014 KTA014
6
9
15
7
8
11
14
33
31
21
10
17
16
20
19
18
32
12
13
1
2
3
4
5
22
23
24
25
26
28
27
30
29
Parts List
7 O-ring
5 Guide washer
6 Guide sleeve
4 Spout
8 Guide nut
9 Screw
10 Tap body
18 O-ring
19 Locking Screw
20 Steel washer
14 Handle cap
11 Pin lever
17 Cartridge
16 Locking Nut
15 Cover
13 Cover
12 Screw
2 Pull out spray
3
1 Aerator
26 Pull-out hose guide
28 O-ring
31 Flexible hose
32 Weight
33 Pull out hose
30 Washer
29 Connector
27 Check-valve
230mm
240mm
421mm
Care and Maintenance
operate the handle and pull-out hand shower during use. When installing
Notes
1.
cleaned.
2.
and tap to remove grit. Then re-insert the screen.
3.
Working Specifica�ons
Working pressure: 20-100 psi
Working temperature: 1-60°C
This tap must be installed in accordance with the AS/NZS 3500 series
standard. All Abey taps are stongly recommended to be installed by

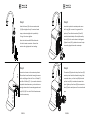
Insert the tap into the countertop and ensure
the O-ring (18) is secure in the groove of the
tap body. Then slide the washers (20 and 21)
onto the threaded body of the tap followed by
the nut (22) in the order shown in the diagram.
Tighten the nut (22) by hand and ensure the tap
is correctly aligned above the countertop.
Step 3
Locate a hole centre in the countertop at least
50mm from the wall and with enough clearance
into the countertop .
Step 2
KTA014 KTA014
SINK WALL
WALL
WALL
SINK WALL
Step 1
water to the rigid pipe with red marking.
SINK WALL
WALL
A
B
must be placed inside the female housing of the
pull out hose (33) is inserted and screwed into
tape.
Step 4

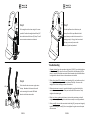
KTA014 KTA014
SINK WALL
WALL
Flush the wall valves to ensure no grit enters
Step 6
HOT
WALL
SINK WALL
Fit the weight onto the hose using the 2 screws
ensure maximum extension and retract.
Step 5
spray/stream you should also ensure this is
working properly. If any grit etc has entered
the tap you can easily remove the
Step 7
Troubleshoo�ng
3. If the water stream is uneven it is possible that debris or grit has blocked the
will not rotate.
weight/hose are not catching on items in the cabinet.
-
 1
1
-
 2
2
-
 3
3
-
 4
4


Abey LUA190T14 Installation guide
- Type
- Installation guide
Ask a question and I''ll find the answer in the document
Finding information in a document is now easier with AI