Page is loading ...

STEALTH LED SERIES
INSTALLATION INSTRUCTIONS
10070175 Rev 1 - 03/17 1
SAVE THESE INSTRUCTIONS!
READ CAREFULLY AND FOLLOW ALL INSTRUCTIONS FOR YOUR OWN SAFETY
• DISCONNECT AC POWER SUPPLY BEFORE SERVICING.
• Installation and servicing of this equipment should be performed by qualified service personnel only.
• Ensure the electrical connections conform to the National Electrical Code and local regulations if applicable.
• Do not mount near gas or electrical heaters.
• Equipment should be mounted in locations and at heights where it will not readily be subjected to tampering by
unauthorized personnel.
• The use of accessory equipment not recommended by the manufacturer may cause an unsafe condition. Any
modification or use of non-original components will void the warranty and product liability.
• Do not use this equipment for other than intended use.
800.533.3948 • www.barronltg.com
1. Trace then cut a 6" x 9" rectangular hole in the ceiling or wall.
2. Knock out the appropriate mounting holes and secure flexible conduit, to backbox.
3. Electrical connections should be made in wireway box. Cap unused wire to prevent shorting.
120V AC 277V AC
White - Common White - Common
Black - 120V Orange - 277V
Green - Ground Green - Ground
4. Secure in place using cables, chain or mounting against the wall. Use appropriate hardware for application such as
wood or concrete screws.
5. Connect lamp leads from the controll board (located inside backbox) to lamp enclosure assembly.
6. Place supplied nylon spacers on threaded
studs located inside of backbox.
7. Insert lamp enclosure assembly into wall
cutout and secure in place using lamp
enclosure nuts.
8. Energize un-switched AC power to unit.
verify indicator light is illuminated.
9. Press test button and verify hinged doors
open and the lamps turn on.
Note: If lamps do not illuminate, allow unit
to charge for 30 mins.
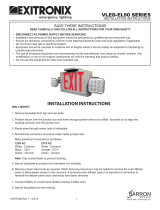
INSTALLATION INSTRUCTIONS
(2) Lamp Enclosure Nuts
Backbox
Control
Board
(2) Nylon Spacers
Lamp Leads Doors
Adjustable
Thru 90°
(2) MR16
Lamps
Hinged
Refletive
Door Assembly
Flexible
Door Links
Lamp Enclosure
Assby
Battery
Panel Cutout
9” x 6”
/