01
About the User Manual
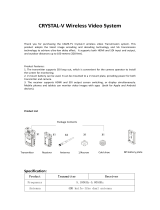
Overview
Packing List
Specifications
Structure & Interface
Mounting
Troubleshooting
Precautions
Transmitter: CC8980
Monitor: 3104
Monitor: 3104
Features
01
01
02
03
04
04
06
08
08
11
OLED Display Description 13
14
26
28
30
PRO VUE is a more reliable, professional and portable wireless monitor kit.
Paired with Movcam follow focus system, the critical follow focus information
will be displayed as overlays directly on the monitor.allowing camera assistants
to pull focus and keep eyes on the image. The bright (1500 nits) and light
weight (405g) monitor brings to you the most vivid productions.
About the User Manual
- Please read this manual carefully before you use this product and retain it
properly for future reference.
- If there is any question or difficulty about the operation of product,
please feel free to contact us or the dealer.
- The company reserves the authority to modify the instruction manuals.
Overview
PRO VUE is composed of a wireless transmitter and a daylight viewable 5.5”
monitor with a built-in wireless receiver. The highest supported resolution is
1080P/60Hz, with zero latency and no compression. The transmission distance
can be up to 200 meters. Transmitter supports HDMI/SDI input and SDI Loop
output.A wide variety of advanced features is included, such as 3D Lut Import,
Waveform, Vectorscope, Brightness Histogram, Audio Meters, Focus Assist,
False Color, Zebra, Single Color, Freeze, Zoom, Anamorphic, etc.
Contents
Transmitter: CC8980
Monitor Menu Operation