Baxi Fires Division 834 Installer And Owner Manual

Category
Fireplaces
Type
Installer And Owner Manual

Baxi Fires Division 834 is a stylish and efficient electric heater designed to provide warmth and comfort to your home. It features a range of advanced functions for optimal heating performance, including adjustable thermostatic control for precise temperature regulation, a choice of heat settings to suit your needs, and a built-in safety cut-out for peace of mind.

Baxi Fires Division 834 is a stylish and efficient electric heater designed to provide warmth and comfort to your home. It features a range of advanced functions for optimal heating performance, including adjustable thermostatic control for precise temperature regulation, a choice of heat settings to suit your needs, and a built-in safety cut-out for peace of mind.

5119016/02
INSTALLER AND OWNER GUIDE
© Baxi Heating U.K. Limited 2006.
Model 834
Electric Heater
fitted with one of the following fascia
Hanging Deco, Distinction,
Panacheor Washington.
(GC No. EF-032-24)
This guide is intended to help you
install and care for your Baxi Fires
Division electric heater. Please read
carefully before installing and using
your heater. However, if further
information is required, our
Baxi Fires Division Technical
Helpline
will be pleased to help.
Telephone 08706 061 065
(National call rates apply in the United
Kingdom)
In the Republic of Ireland
Telephone 0044 8706 061 065
Important: Please keep your guide in a safe place for future reference.
© Baxi Heating U.K. Limited 2006.
All rights reserved. No part of this publication may be reproduced in any material form
(including photocopying), stored in any medium by electronic means (including in any
retrieval system or database) or transmitted, in any form or by any means, whether
electronic, mechanical, recording or otherwise, without the prior written permission of
the copyright owner.
Applications for the copyright owner's permission to reproduce any part of this
publication should be made, giving details of the proposed use, to the following address:
Road, Derby, DE21 4XA.
Warning: Any person who does any unauthorised act in relation to a copyright work
may be liable to criminal prosecution and civil claims for damages.
Baxi Fires Division, Erdington, Birmingham B24 9QP
www.firesandstoves.co.uk
Because our policy is one of constant development and improvement, details may vary slightly from those
given in this publication
Page 2
INSTALLER AND OWNER GUIDE
© Baxi Heating U.K. Limited 2006.
Safety First.
Baxi Fires Division heaters are CE Approved and designed to meet the appropriate
British Standards and Safety Marks.
Quality and Excellence.
All Baxi Fires Division heaters are manufactured to the highest standards of quality and
excellence and are manufactured under a BS EN ISO 9001 quality system accepted by
the British Standards Institute.
CUSTOMER CARE
Thank you for choosing Baxi Fires Division
All Baxi Fires Division heaters are designed to meet the most stringent quality,
performance and safety requirements to provide our customers with many years of
trouble free service. This guide aims to improve your understanding and appreciation of
your new heater, by providing simple and informative instructions to enable you to
install it and to ensure that you benefit from the excellent performance and features it
has to offer.
If you require further assistance, the Baxi Fires Division Technical Helpline
will be
pleased to help.
Please telephone 08706 061 065 (local rates apply in the United Kingdom).
In the Republic of Ireland telephone 0044 8706 061 065.
FOR OTHER USEFUL TELEPHONE NUMBERS SEE PAGE 12 OF THIS GUIDE
Page 3
INSTALLER AND OWNER GUIDE
© Baxi Heating U.K. Limited 2006.
HANDLING AND UNPACKING
The ‘Distinction’ model is supplied with the fascia fitted to the heater. We recommend
that this is removed before continuing with the installation. To do this, remove the two
thumbscrews at the base of the heater, pull the bottom of the fascia forward and lift the
fascia clear of the heater.
Fascia parts may be covered in protective film. Ensure that this has been removed
before using the heater.
Before continuing any further with the installation of this heater please read the
following:
Important safety instructions.
! The lifting weights of the heater parts are listed below: -
Heater Heat engine (kg) Fascia (kg)
Surround and Fascia (kg)
Hanging Deco 8.15 6.72 N/A
Distinction 8.15 8.5 N/A
Panache 8.15 N/A 19.0
Washington 8.15 N/A 19.0
! One person should be sufficient to lift Hanging Deco and Distinction heater. We
recommend a minimum of two people lift the Panache and Washington
models. If for any reason this weight is considered too heavy then obtain
assistance.
! When lifting always keep your back straight. Bend your legs and not your back.
! Avoid twisting at the waist. It is better to reposition your feet.
!
Avoid upper body/top heavy bending. Always bend from the knees rather than the
waist. Do not lean forward or sideways whilst handling the heater.
!
Always grip with the palm of the hand. Do not use the tips of fingers for support.
! Always keep the heater as close to the body as possible. This will minimise the
cantilever action.
! Use gloves to provide additional grip.
! Always use assistance if required.
Always
! Always install the heater in accordance with this guide. If in doubt obtain
expert advice.
! Always
make sure the electrical socket is accessible and located adjacent to, but not
above the heater.
! Always disconnect the heater from the electrical supply before carrying out
Page 4
INSTALLER AND OWNER GUIDE
© Baxi Heating U.K. Limited 2006.
cleaning, maintenance or replacing the light bulbs.
! Always
use a fireguard when young children, infirm persons and pet animals can
come into contact with the heater.
! Always use genuine Baxi Fires Division spare parts.
Never
! Never leave children unsupervised in a room where the heater is ON and
unguarded.
! Never obstruct or cover the fan outlet or force items into heater openings.
! Never
obstruct the openings at the base of the heater, this could cause overheating
and consequent risk of fire.
! Never install or use the heater anywhere where water is in use, i.e.
Bathrooms, Kitchens, Shower Rooms, Swimming Pools etc.
! Never use aerosols or steam cleaners on or around the heater.
! Never route the electric supply cable under carpet etc.
! Never install the heater close to curtains or combustible materials.
! Never use the heater to dry clothes etc.
! Never sit or stand on the heater or surround.
HEATER DIMENSIONS
Page 5
INSTALLER AND OWNER GUIDE
© Baxi Heating U.K. Limited 2006.
Figure 1. Heater dimensions (Fascia may differ from that shown)
Model Dimension A Dimension B Dimension C
Hanging Deco 950 700 150
Distinction 800 675 165
Panache 1200* 1030 280*
Washington 1200* 1030 280*
*On the Panache and
Washington models
Dimensions A and C
include the Plinth.
FITTING THE HEATER
The installation of this heater requires a reasonable level of DIY skills.
Please read this guide thoroughly before commencing installation and if in doubt,
seek help from a competent person.
Do I need any tools?
Hanging Deco and Distinction models.
! A Pozidrive / Phillips / cross head. This should have a number 2 size tip. This is
required for screwing the lower support bracket and the hanging/retainer brackets to the
Hanging Deco fascia.
!
A flat ended screwdriver will be required for securing the wall mounting bracket
and lower support bracket.
! If drilling into brick work you will need a power drill (preferably with hammer
action) and appropriate size drill bit for the wall plugs supplied.
Panache and Washington model.
! A Pozidrive / Phillips / cross head. This should have a number 2 size tip. This is
required for screwing the surround to the plinth.
Where can I fit the heater?
Hanging Deco and Distinction models.
The Hanging Deco and Distinction models are designed to be wall mounted on a flat
wall. There should be at least 50mm (2 inches) clearance between the top of the fascia
and anything such as a shelf, fireplace surround or mantel etc. This will allow the fascia
to be lifted off or removed during servicing. To check this gently place the fascia against
the surface to which it is to be fixed. Measure the distance from the top of the fascia.
Panache and Washington model.
The model is designed to be floor mounted on a level flat floor.
Important electrical safety.
The heater must not
be located in front of or under an electrical socket, the socket must
always be accessible in order to disconnect the heater from the electrical supply for
maintenance and cleaning. On the Panache and Washington models the electrical socket
must not be covered by the surround or plinth.
Page 6
INSTALLER AND OWNER GUIDE
© Baxi Heating U.K. Limited 2006.
Important! This heater must be earthed.
!
The heater is supplied with a 3 pin 13 Amp fused re-wireable plug with 1mm² 3 core
cable.
! The wires in the cable are coloured in accordance with the following code: -
Live =Brown
Neutral = Blue
Earth = Green / Yellow
! The electric cable must be safely routed from the heater to an electrical socket.
If the electric cable is damaged, to avoid a hazard it must be replaced by a Baxi Fires
Division authorised service agent, or similarly qualified person (See page 12 of this
guide for useful telephone numbers).
All external wiring between the heater and the electrical supply shall comply with
current IEE regulations.
Heater fixing.
All fixings supplied with the heaters have been identified in figure 2.
Additional fixings may be required if fitting the heater to a
plasterboard wall that has a
wooden frame behind it. In such cases we recommend the use of heavy duty cavity
fixings.
Page 7
INSTALLER AND OWNER GUIDE
© Baxi Heating U.K. Limited 2006.
Figure 2. Loose parts identification (Items are not to scale)
Fitting the heater.
Hanging Deco and Distinction models.
1. There is a Lower Support
bracket supplied with the
heater. Secure this to the rear
base of the heater with the
two screws supplied (See
figure 3).
2. Decide the location of the
heater.
3. ‘Hanging Decofascia
only - If the heater is to be
fixed with the bottom of the
fascia level with the hearth or
finished floor then the wall
mounted support bracket
needs to be secured as in figure 4. (The dimension shown in figure 4 is a minimum
dimension for installations with an ‘Hanging Decofascia. This dimension can be
increased).
3. ‘Distinctionfascia -
The fascia is secured at the base with two thumbscrews and
therefore cannot be fitted level with the hearth or finished floor level as the ‘Hanging
Deco’ above.
4. If fitting to a conventional
brick wall then use the outer
slotted holes in the bracket. If
fitting to a plasterboard wall
that has a wooden frame
behind it then use all four
fixing holes in the bracket.
This is required to spread the
load. Mark the positions of the
hanging bracket holes on the
wall.
5. Drill the marked positions
using a suitable sized drill bit
for the chosen fixings.
6. Insert the wall plugs /
fixings and secure the bracket
to the wall using suitable
screws.
7. Hang the heater body on the wall hanging bracket.
Page 8
INSTALLER AND OWNER GUIDE
© Baxi Heating U.K. Limited 2006.
Figure 4. Wall hanging bracket height from
finished floor / hearth
Figure 3.
8. Underneath the heater,
mark on the wall the position
of the slot in the lower
support bracket.
9. Lift the heater off the wall.
10. Drill the marked positions
using a suitable sized drill bit
for the chosen fixings.
11. Insert the wall plugs /
fixings.
12. Hang the heater body on
the wall hanging bracket.
Secure the bottom of the
heater using a suitable screw.
Panache and Washington
models.
1. The surround has six holes
in its base. The top surface of the plinth has six pilot holes. Place the surround onto the
plinth ensuring that the six holes are in line. Secure the surround to the plinth using six
screws supplied (See figure 5).
2.
Place the surround and plinth assembly against the wall ensuring that the electrical
cable is on the required side of the surround.
Fitting the Hanging Deco Fascia.
1. On the underside of the fascia top are
two sets of pilot holes. Align the holes in
the fascia hanging brackets with the pilot
holes and secure using the screws
supplied (See figure 6).
2. On the lower rear of the fascia are two
sets of pilot holes. Align the holes in the
fascia retaining brackets with the pilot
holes and secure using the screws
supplied (See figure 6).
3. Locate the fascia hanging brackets into
those on top of the heater.
4. Swing the bottom of the fascia in to
place.
Page 9
INSTALLER AND OWNER GUIDE
© Baxi Heating U.K. Limited 2006.
Figure 5.
Figure 6.
Fitting the Distinction Fascia.
1. Fit the fascia and secure using the thumbscrews
removed previously.
Fitting the Fuel support (All models).
1. Locate the fuel support as in figure 7.
2. Place the coals on top of the fuel support. It is not
necessary to use all the coals supplied.
Important notes.
! The coal pieces supplied are a natural material.
Occasionally it will be necessary to reduce the size of
the coal pieces. To do this place them inside a plastic
bag, place on a suitable hard surface and tap gently
with a small hammer or similar tool.
! The coals are for decorative purposes only.
There is a choke risk to young children. Make sure they cannot gain access to
them.
USING THE HEATER
Important Safety
Never cover the heater or obstruct the openings at the base of the heater, this could
cause overheating and consequent risk of fire.
What are the three switches for?
The heater is operated by three switches located below the hood on the left hand side of
the heater.
Switch 1 = O Main On - Off
In the On position only the fuel effect operates
Switch 2 = I 1kW fan heat setting and fuel effect
Switch 3 = II 2kW fan heat setting and fuel effect
The switches are connected on the inside, so when switch 1 is turned off, all switches
turn off.
Page 10
INSTALLER AND OWNER GUIDE
© Baxi Heating U.K. Limited 2006.
Figure 7. Fuel support locations
(Fascia may differ from that
shown)
CLEANING AND MAINTAINING THE HEATER
How do I clean my heater?
The heater fascia and plastic parts need only to be wiped clean with a dry soft cloth, do
not use polishes or abrasive materials. The ‘Distinction’ fascia is NOT glass fronted and
will be damaged by the use of polishes or abrasive materials.
I have a problem with my heater!
Important Safety
Before undertaking maintenance or replacing the light bulb(s) always disconnect
the heater from the electricity supply by removing the 3 pin plug and allowing the
heater to cool completely.
1. My heater is on but there is no light or the light appears brighter on one
side of the heater.
This is possibly a light bulb failure. Remove the light bulb(s) as follows and check it /
them in a table lamp that is known to work. If it / they do not work in the table lamp
then replace as below.
The light bulbs fitted to this heater are standard clear 40 Watt (maximum) candle,
Edison screw, SES E14 lamps, but due to the indeterminate life span and ease of
replacement, they are specifically excluded from the guarantee.
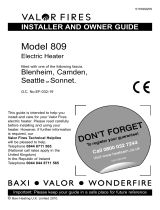
To replace the light bulb(s).
1. To gain access to the light bulb,
remove the loose coals from the fuel
support and place them onto an old
newspaper or plastic bag. This will
prevent them from marking the surface.
2. Remove the fuel support by lifting
clear.
3. Unscrew and replace the light bulb(s)
with a clear 40 Watt (maximum) candle,
Edison screw, SES E14.
4. Refit the fuel support and coals.
2. My heater is on but there is no
light or heat.
The first thing to do is check the wall socket. To do this plug in a known working
appliance. If the appliance you have plugged in works then there is a good chance that
the problem lies with the 13Amp fuse in the heater plug. If either fuse or socket is
suspected, have them checked by an electrician.
Page 11
INSTALLER AND OWNER GUIDE
© Baxi Heating U.K. Limited 2006.
Figure 8. Bulb replacement
3. My heater is on but there is no heat.
A cut out device is fitted to the heater to prevent damage due to over heating. If it
operates due to an obstruction in the airflow, the heater must be turned off and allowed
to cool for 15 minutes and the obstruction removed before restarting.
4. I Have a problem that is different to those in the previous examples 1- 3.
Following is a list of useful telephone numbers
For general advice about your heater:
BAXI FIRES DIVISION TECHNICAL HELPLINE 08706 061 065.
To report faults or arrange for your heater to be serviced:
BAXI FIRES DIVISION SERVICE 08706 090 081.
For sales or product information:
BAXI FIRES DIVISION SALES 08706 061 067.
CALLERS IN THE REPUBLIC OF IRELAND
Call 0044 8706 061 065
For spares inquiries
Spare parts are available nationwide via the ‘interpart stockist network’. For your
local stockist consult Yellow pages under ‘Central Heating’.
When ordering spare parts please have the
below information available. This will help
us to deal with your call quicker and avoid
you having to make a second call.
! Your Post Code
! Type of Heater (Electric or gas)
! The fault, problem or request.
! Model, Name and serial number (This
information can be found on a small
label attached to the inside lower right of
the heater. To see this you will have to
remove the coals and fuel support. The
label is located on the right of the fan
unit. See figure 9).
Page 12
INSTALLER AND OWNER GUIDE
© Baxi Heating U.K. Limited 2006.
Figure 9. Fuel support locations
What should I do when I’m ready to dispose of my heater?
The plug should be removed from the mains supply cable and the mains supply cable
cut from the heater.
Environmental Protection.
Waste electrical products should not be disposed of with household waste.
Please recycle where facilities exist. Check with your local authority or retailer
for recycling advice.
Page 13
INSTALLER AND OWNER GUIDE
© Baxi Heating U.K. Limited 2006.
  • Page 1 1
  • Page 2 2
  • Page 3 3
  • Page 4 4
  • Page 5 5
  • Page 6 6
  • Page 7 7
  • Page 8 8
  • Page 9 9
  • Page 10 10
  • Page 11 11
  • Page 12 12
  • Page 13 13

Baxi Fires Division 834 Installer And Owner Manual

Category
Fireplaces
Type
Installer And Owner Manual

Baxi Fires Division 834 is a stylish and efficient electric heater designed to provide warmth and comfort to your home. It features a range of advanced functions for optimal heating performance, including adjustable thermostatic control for precise temperature regulation, a choice of heat settings to suit your needs, and a built-in safety cut-out for peace of mind.

Ask a question and I''ll find the answer in the document

Finding information in a document is now easier with AI