Page is loading ...

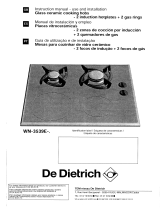
EN GUIDE FOR INSTALLATION AND USE
COOKING HOB
COOKING GAS HOB
- DPG7388B -

DEAR
CUSTOMER
EN
Discovering a De Dietrich product means experiencing
the range of unique emotions.
The attraction is immediate, from the moment you set eyes on the product.
The sheer quality of the design shines through, thanks to the timeless style
and outstanding fi nishes which make each component an elegant and
refi ned masterpiece in its own right, each one in perfect harmony with the
others. Next, comes the irresistible urge to touch it.
De Dietrich design makes extensive use of robust and prestigious
materials, where the accent is place fi rmly upon authenticity. By combining
state-of-the-art technology with top quality materials, De Dietrich produces
beautifully crafted products to help you get the most from the culinary arts,
a passion shared by all lovers of cooking and fi ne food. We hope that you
enjoy using this new appliance.
Thank you for choosing a De Dietrich product.

3
TABLE OF CONTENTS
SAFETY INSTRUCTIONS ....................................................................3
1 / DESCRIPTION OF YOUR APPLIANCE .........................................8
2 / INSTALLING YOUR APPLIANCE
• Choice of location ..........................................................................9
• Fitting ...........................................................................................9
• Fitting tips ...................................................................................10
• Case of fl ush fi tting above a drawer, of a cabinet with a door
or drawer ....................................................................................10
• Electric connection .....................................................................11
• Gas connection ..........................................................................12
Town gas connection ................................................................12
Markings on the injectors .........................................................13
Gas rating .................................................................................13
• Changing the type of gas ............................................................14
Switching from town gas to LPG gas .......................................14
Markings on the injectors .........................................................16
Gas rating .................................................................................16
3 / USING YOUR APPLIANCE
• Description of the worktop. ..........................................................17
• Switiching on the gas burners .....................................................17
• Cookware to be used with gas burners .......................................19
4 / DAILY CARE OF YOUR APPLIANCE
• Maintaining your appliance ..........................................................20
5 / SPECIAL MESSAGES, INCIDENTS .............................................21
6 / SOME TIPS ...................................................................................22
7 /
ENVIRONMENT
.............................................................................. 23
8 / AFTER SALES SERVICE .............................................................24
In the manual :
Display safety instruction
Display tips and hints
YOUR HOB IS DELIVERED PRE SET FOR USE WITH TOWN GAS 10 mbar

4
SAFETY INSTRUCTIONS
IMPORTANT SAFETY INSTRUCTIONS – READ CAREFULLY
AND RETAIN FOR FUTURE USE.
This guide can be downloaded from the brand web site.
• WARNING : this appliance may be used by children aged 8
years and older, and by persons with impaired physical sensorial
or mental capacities, or without experience or knowledge, if
they are supervised or have received prior instructions on how
to use the appliance safely and have understood the risks
involved.
• Children must not be allowed to play with the appliance.
• Cleaning and maintenance operations must not be carried out
by children without supervision.
• Children must be supervised to ensure that they do not play
with the appliance.
• It must be possible to disconnect the appliance from the
power supply, either using a plug or by fi tting a switch on the
fi xed wiring system in accordance with installation rules. The
protective wire (green-yellow) must be connected to the plug’s
earth terminal or the installation’s earth terminal.
• Do not use steam cleaning appliances.
• The electrical plug must remain accessible after installation.
• The appliance is not designed to be switched on using an
external timer or a separate remote control system.
• WARNING : leaving a hob unattended when cooking with fat
or oil can be dangerous and could cause a fi re.
• Never try to extinguish a fi re with water but switch off the
appliance, then cover the fl ame with a lid or a fi re blanket.
• WARNING : fi re risk: do not store any items on the cooking
surfaces.

5
SAFETY INSTRUCTIONS
• Prior to installation, ensure that the local distribution conditions
(type of gas and gas pressure) and the appliance’s settings are
compatible.
• The conditions for setting this appliance are described on the
rating plate or on label stuck on the appliance.
• This appliance is not connected to a system for evacuating
combustion products. It must be installed and connected in
compliance with current regulations. Particular attention should
be given to applicable ventilation requirements.
• The use of a gas hob produces both heat and humidity
in a room. Ensure that the kitchen is well ventilated: keep
mechanical ventilators open. Prolonged, intensive use of the
hob may require additional ventilation, by opening a window, for
example, or ventilating the room more effi ciently by increasing
the setting on mechanical ventilation, where installed.
• Do not use cookware that overhangs the edge of the hob.
• WARNING: the cooking process must be monitored. A short
cooking process must be continuously monitored.
• Use only hob guards designed by the manufactrer of the
cooking appliance or indicated by the manufactrer of the
appliance in the instructions for use as suitable or hob guards
incorporated in the appliance. The use of inappropriate guards
can cause accidents.
• WARNING We do not recommend using any hob protection
mechanism.
• If the power cable is damaged, it should be replaced by
the manufacturer, its after-sales service department or by a
similarly qualifi ed person in order to avoid danger.
• WARNING : In case of hotplate glass breakage :

6
- shut immediately off all burners and any electrical heating
element and isolate the appliance from the power supply.
- do not touch the appliance surface,
- do not use the appliance.
•WARNING: If a crack appears in the surface of the glass,
disconnect your appliance from the power supply to avoid
electric shock.
• This hob has been designed for use by private persons in their
homes.
• These hobs are designed exclusively for cooking drinks and
foodstuffs and do not contain any asbestos-based component
parts.
• Never leave any CLEANING or FLAMMABLE products in
the cupboard beneath your hob (aerosols or other pressurized
cans, papers, recipe books, etc.).
• If you have a drawer underneath the hob, we recommend
avoiding placing objects in it that are temperature sensitive
(plastics, paper, aerosols, etc.).
• Disconnect your hob from both electrical and gas supplies
before carrying out any maintenance operations.
• When connecting electrical appliances to a nearby socket,
ensure that the power supply cable is not in contact with any
hot surface on the appliance.
• For safety reasons, after use, do not forget to close the main
gas valve for mains gas lines or the valve on the top of your
butane/propane gas cylinder.
• The conformity CE mark is applied to this hob.
SAFETY INSTRUCTIONS

7
SAFETY INSTRUCTIONS
• This appliance should be installed by a qualifi ed technician /
installer.
• If a knob is diffi cult to turn, call your installer immediately.
• This hob complies with standard EN 60335-2-6, as it applies
to heat build-up in class 3 appliances and the implications for
their installation (in compliance with standard EN 30-1-1).
• Never use aluminium foil for cooking. Never place products
wrapped in aluminium foil or in aluminium trays on your hob. The
aluminium will melt and permanently damage your appliance.

8
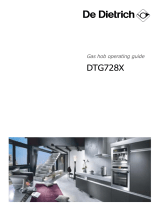
•DESCRIPTION OF YOUR HOB
A
Burner cover
B
Burner head
C
Injector
D
Spark igniter
E
Thermocouple
F
Knob
G
Gasket
H
Tap
Tip
This Guide to Installation and Use is valid for several models. There may be
minor differences in details or fi ttings between your appliance and the descriptions
provided.
Pan support
Model:
High power hob with knobs
• 1 DESCRIPTION OF YOUR APPLIANCE
A
B
C
F
G
H
D
E

49 cm
3 cm mini
10 cm mini
10 cm mini
27 cm
7,5 cm mini
70 cm mini
•CHOICE OF LOCATION
Your appliance should be fl ush mounted
in the surface of a support cabinet that
is a minimum of 3 cm thick, made of
a material that resists heat or that is
covered with such a material.
So as not to inhibit the movement of
cooking utensils, there should not be to
any obstacle within 30 cm of the hob to
the right or left or back.
If a horizontal divider wall is positioned
under the hob, it should be placed
between 10 cm and 15 cm away from
the top of the work surface. Never store
aerosol cans or pressurised containers in
any compartment that may exist under the
hob (see chapter “Safety instructions”).
•FITTING
Before installation of your appliance and
to ensure leaktightness between the
drawer unit and the work surface, make
sure that you glue the seal provided in the
plastic bag (Fig. 02).
— Remove the pan supports, the burner
covers and burner heads; noting their
positions.
— Turn the hob over and carefully place it
on top of the opening in the cabinet so as
not to damage the knobs and spark plugs.
— Glue the foam seal, supplied with the
appliance, to the outside edge of the
frame. This seal ensures leaktightness
between the glass and the work surface.
Fig. 01
Fig. 02
Seal
•
2 INSTALLING YOUR APPLIANCE
APPLIANCE
Width Depth Thickness
Standard
cabinet cut-out
27 cm
49 cm
depending
on cabinet
Total dimension
above the work
surface
30 cm 51,5 cm
5 cm
Total dimension
below the work
surface
26,3 cm 48 cm
5,1 cm
— Place your hob in the opening of the
support unit, carefully centering it in the
cut-out.
— Reposition the pan supports, burner
covers and burner heads.
— Connect the hob’s power cable to your
kitchen’s electricity supply (see section
“Electricity connection”).
— Connect your appliance to the gas supply
(see section “Gas connection”).
Housing
9

10
Mini 4mm
Mini 40 cm
2
Fig. 01
Fig. 02
Underside view of the housing
• FITTING TIPS
A
Mounting holes
Gas hob
Front of
cabinet
Services
space
80 mm
mini
100 mm
mini
Worktop
Fig. 03
•
2 INSTALLING YOUR APPLIANCE
— If you wish, you can immobilise the
hobusing the four mounting brackets
delivered with their screws, fi xed to the
four corners of the casing. You must
use the holes provided for this purpose,
according to the diagram above (Fig. 01).
— Stop screwing when the mounting
bracket starts to become deformed.
Do not use a screwdriver.
A
A
A
• CASE OF FLUSH FITTING
ABOVE A DRAWER, OF A
CABINET WITH A DOOR OR
DRAWER
• Above an empty cabinet or a drawer
(Fig. 02).
Fitting your hob above an oven requires the
oven to be fi tted low. It is recommended
that the hob not be installed above an oven
if the oven’s ventilation is not frontwards.
Create an air vent in the partition to the
right or left of the oven, of 40 cm
2
.
Brackets
Screw
Worktop

11
•ELECTRIC CONNECTION
Your hob is supplied with a power cable
(type H05VVF cross-section 1 mm2)
with 3 conductors (including 1 ground:
green/yellow). These conductors must be
connected to the grid via a standardised
CEI 60083 live + ground + neutral electrical
outlet or or an all-pole cut-off device with
a minimum distance between contact
openings of 3.5 mm.
The plug of the electrical outlet must be
accessible after installation.
Warning:
If the power cable is damaged, it
must be replaced by a cable or a special
kit available from the manufacturer or
its After-Sales Service Department.
•
2 INSTALLING YOUR APPLIANCE
Neutral
(N)
Live
(L)
Earth
Blue wire
Cable type:
H05V2V2F
Black, brown or
red wire
Green and
yellow wire
Cross-section of cable to be used
220-240 V
˜
- 50 HZ
H05V2V2F cable - T90
3 conductors including
1 ground
Cross-section of
conductors in mm
2
1
Fuse 10 A

12
•
2 INSTALLING YOUR APPLIANCE
•GAS CONNECTION
PRELIMINARY REMARKS
Warning
Your appliance is sold pre-set for TOWNGAS.
If the hob is installed above an oven or if the proximity of other heat generating elements
threatens to cause the connection to heat up, it is vital that the connection be made
using a rigid pipe and the appliance should be properly mounted. If a hose or soft pipe
is used, it must not come into contact with any of the unit’s moving parts or enter an
area that is likely to be obstructed.
The gas supply must be connected in line with current regulations in the country of
installation.
TOWN GAS CONNECTION :
WARNING: for a correct functioning of your appliance, the pressure of the town gas
must imperatively be adjusted at 10 mbar.
You must consequently use the external gas governor Elitre model EL- 125 delive-
red with the appliance and to be installed as follows :

13
•
2 INSTALLING YOUR APPLIANCE
Markings on the injectors
The table below shows where the
injectors are positioned on your appliance
according to the type of gas used.
Each number is marked on the injector.
Gas rating
Appliance designed for installation in SINGAPORE
Towngas
Hourly input - see below at 15°C at 1013 mbar
G110
10 mbar
EXTERNAL RING
Indicator marked on injector 205B
Nominal heat rating (kW) 3.25
Low heat rating (kW)
1.600
Hourly output (g/h)
CENTRAL BURNER
Indicator marked on injector 115B
Nominal heat rating (kW) 0.85
Low heat rating (kW) 0.800
Hourly output (g/h)
TOTAL FOR HIGH-POWER HOB
Total nominal heat rating (kW) 4.10
Maximum output (g/h)
Town Gas
205B
205B
115B
205B
205B
Example :
injector reference 205B

14
•
2 INSTALLING YOUR APPLIANCE
•
CHANGING THE TYPE OF GAS
SWITCHING FROM TOWN GAS TO
LPG GAS
Connecting the gas supply LPG
connection - gas supplied by tank
or cylinder.
Warning
Your appliance is sold pre-set for
TOWNGAS. The injectors required for
adapting it to LPG can be found in the
plastic bag containing this guide.
For your safety, you must choose this
connection :
Connection with a reinforced rubber hose
with screw-on mechanical connectors.
In an existing system, a soft pipe fi tted
with clamps whose service life is fi ve years
may be used. It is necessary in this case
to use an adapter without forgetting to fi t
a sealing washer between the adapter and
the hob’s elbow.
Tip
You can obtain the adaptor and the
sealing washer from your After-sales
Service Department.
A
C
B
A
Seal (not provided)
B
Adaptor (not provided)
C
Clamp (not provided)
•For Singapore : LPG Connection
The gasket depicted in the diagram on
the right is to prevent gas leakage. After
installation, turn on the gas supply and use
soap solution (never use naked fl ame) to
check for gas leakage.
ring
nozzle
elbow joint
rubber hose
gasket
To change the type of gas, you should
successively :
Change the injectors
Adjust the retarder on the taps

Fig. 01
B
15
•
2 INSTALLING YOUR APPLIANCE
Change the injectors, proceeding as
follows:
— Remove the an support, the burner
cover, and the burner head.
— Using a No.10 spanner, unscrew the
central injector located at the base of
the burner unit (see
A
) and using a
No. 7 spanner, unscrew the 3 injectors
located around the central injector (see
B
) Fig. 01.
— Replace the corresponding gas injectors,
in accordance with the positioning of the
injectors and the gas characteristics table
shown at the end of this section. To do
this :
First screw them in manually until the
injector locks into place.
Apply the spanner to the injector.
Turn the spanner clockwise.
Warning
Screw on the adaptor with a torque
not exceeding 4 N.m.
Exceeding this limit may damage the
product.
A
B

•
2 INSTALLING YOUR APPLIANCE
• Markings on the injectors
The table below shows where the
injectors are positioned on your appliance
according to the type of gas used.
Each number is marked on the injector.
LPG Gas
•Gas rating
Appliance designed for installation in SINGAPORE
LPG
Hourly input - see below at 15°C at 1013 mbar
G30
28 mbar
EXTERNAL RING
Indicator marked on injector 62B
Nominal heat rating (kW) 3.50
Low heat rating (kW)
1.900
Hourly output (g/h) 254
CENTRAL BURNER
Indicator marked on injector 49B
Nominal heat rating (kW) 1.00
Low heat rating (kW) 0.620
Hourly output (g/h) 73
TOTAL FOR HIGH-POWER HOB
Total nominal heat rating (kW) 4.50
Maximum output (g/h) 327
62B
49B
62B 62B
62B
Example :
injector reference 62B
16
Adjust the retarder on the taps
— Using a small fl at-head screwdriver,
screw in the brass burner-power screws
(yellow) all the way, (fi g. 1) screwing them
in a clockwise direction.
— Replace the gaskets and the knobs,
paying careful attention to their direction
and ensuring that the knobs are pushed
in all the way.
— Put the burner heads, burner cover and
pan support back in position.
Tap axis
Burner power
adjustment screw
Fig. 01

17
•
DESCRIPTION OF THE WORKTOP
A
High-power burner 4.1kW (*)
(*) Power obtained with Town gas
Model 1 burner with control knobs
DPG7388B
•
3 USING YOUR APPLIANCE
A

18
• SWITCHING ON THE GAS
BURNERS
Each burner is supplied by a tap which
can be opened by pressing it and turning
it in in a counterclockwise motion.
The point “O” corresponds to a closed
tap.
— Choose the desired burner by using the
symbols located near the knobs (e.g. :
central burner
or external ring ).
You can use the central burner and the
external ring together.
Your hob is fi tted with a burner-ignition
system built into the knobs.
— To light a burner, press on the knob and
turn it in a counterclockwise direction
to the maximum setting .
— Continue to press on the knob to
produce a series of sparks until the
burner lights.
The setting for more moderate fl ame
intensities is between the symbol
and
the symbol
.
Tip
When a knob becomes diffi cult to
turn, do not force it. Call the installer for
emergency repairs.
If the fl ame goes out accidentally,
reignite normally following the lighting
instructions.
Fig. 01
•
3 USING YOUR APPLIANCE

19
CORRECT
INCORRECT
CONCAVE
CONVEX
Fig. 01
Fig. 02
Fig. 03
Fig. 04
• COOKWARE TO BE USED WITH GAS BURNERS
• Which burner should you use depending on your cookware?
— Adjust the ring of fl ames so that they
do not extend beyond the edges of the
cookware (Fig. 01).
— Do not use cookware with a concave
or convex bottom (Fig. 02).
— Do not leave a gas burner operating
with empty cookware.
— Do not use cookware that partially
covers the knobs.
— Do not use cookware that goes over
the edges of the cooking hob.
— Do not use heat distributors, toasters
(Fig. 03), steel meat broilers or stewpots
that have feet resting on or touching the
glass top
— Only cooking hobs with the “high
power” burner are equipped with a
special “wok”-type grid.
This wok type grid allows you to use
concave cookware. Supplied only
for “high power” burners, it provides
better fl ame distribution under large
receptacles such as woks (Fig. 04).
— Keep natural ventilation orifi ces
in your home open or install a
mechanical ventilation device
(mechanical ventilation hood).
— Intensive, prolonged use of the
appliance may require additional
ventilation; you can, for example, open
a window or provide more effective
ventilation or increase power to the
mechanical ventilation, if such a
system is installed (a minimum air fl ow
of 2 m
3
/ hr per kW of gas power is
required).
•
3 USING YOUR APPLIANCE
Burner high-power fl ame External ring Central burner
20 to 30 cm 20 to 30 cm
8 to 14 cm
Wok Frying, Boiling Gentle simmer

20
Warning
- Never clean your appliance while it is in operation. Set all the electric and gas
controls to zero.
- If a crack appears in the surface of the glass disconnect your appliance immediately
to prevent a risk of electric shock. Contact the After-Sales Service Department.
Tips
- It is better to clean the parts of the hob by hand rather than in the dishwasher.
- Do not use an abrasive sponge to clean your hob.
- Do not use steam cleaning.
•MAINTAINING YOUR APPLIANCE
MAINTENANCE WHAT TO DO
PRODUCTS/ACCESSORIES
TO BE USED
Of the spark plugs
and injectors
En cas d’encrassement des bougies
In the event that the spark plugs
become soiled, clean them using
a small, hard-bristled brush (non-
metallic).
The gas injector is located in the
centre of the burner in the form of
a crucible. Be careful not to clog it
during cleaning, as this will reduce
the performance of your hob. If it is
obstructed, use a safety pin to unclog
the injector..
- Small, hard-bristled brush.
- Safety pin
Of the pan sup-
ports and gas
burners
For tough stains, use a non-abrasive
cream, then rinse with clean water.
Carefully wipe each part of the burner
before using your hob again.
- Gentle scrubbing cream.
- Cleaning sponge.
Of the glass work-
top
- Clean with warm water and then
wipe. For tough stains, use products
designed for vitroceramic glass.
- Cleaning sponge.
- Special vitroceramic glass
products.
•
4 DAILY CARE OF YOUR APPLIANCE
/