Page is loading ...


THIS PAGE
INTENTIONALLY BLANK

Build 30 v30.7.0
MARCH 10, 2011 © 2007-2011 RED.COM INC.
1
TABLE OF CONTENTS
DISCLAIMER ................................... 3
Copyright Notice .......................... 3
Trademark Disclaimer .................. 3
COMPLIANCE ................................. 3
Industrial Canada Emission
Compliance Statements .............. 3
Federal Communications
Commission (FCC) Statement ..... 3
Australia and New Zealand
Statement .................................... 4
Japan Statements ........................ 4
European Union Compliance
Statements .................................. 4
BEFORE YOU START ..................... 5
Important Safety Instructions ...... 5
CAMERA CONTROLS,
CONNECTORS AND
DISPLAYS ........................................ 8
Camera Controls .......................... 8
Left Front of Camera ............... 8
Rear of Camera ....................... 9
Joystick Operation ................ 11
Power On / Off switch ........... 12
Camera Connectors................... 13
Right Side of Camera ............ 13
Rear of Camera ..................... 14
Camera Displays ........................ 15
Camera LCD Status
Display .................................. 15
RED EVF................................ 16
BOMB EVF™ ........................ 17
RED LCD ............................... 18
External HD-SDI or HDMI
Monitors ................................ 19
RED LCD / RED EVF /
BOMB EVF / HD-SDI /
HDMI Display Elements......... 20
THEORY OF OPERATION ............. 22
MYSTERIUM® Sensor............... 22
MYSTERIUM X® Sensor ........... 22
Image Processing ...................... 23
Audio Recording ........................ 23
Line Level Inputs ........................ 23
Microphone Level Inputs ........... 23
Video Monitoring Outputs .......... 24
RED LCD, RED EVF and
BOMB EVF ............................ 25
Record Indicator ........................ 26
Recording Errors ................... 26
Digital Magazines ...................... 28
Metadata ............................... 28
Clip Naming Conventions ..... 28
SMPTE Timecode ................. 29
Power Consumption .................. 29
BASIC OPERATION ...................... 30
Power Up / Down ...................... 30
Operating Camera using RED
Charger ...................................... 31
Recharging Batteries using
RED Charger .............................. 31
First Time Use - Setting Up
Your RED ONE .......................... 32
Connecting Media ..................... 32
Project Setup ............................. 33
Resolution ............................. 34
Time Base ............................. 34
Quality ................................... 35
Recording .................................. 35
Playback .................................... 36
Back Focus Adjustment ............ 36
SENSOR MENU CONTROLS ........ 38
Sensitivity .................................. 38
ISO Rating ............................. 38
Color Temp ................................ 39
Auto WB ................................ 39
Tungsten ............................... 39
Daylight ................................. 39
Manual WB............................ 39
Tint ........................................ 39
Shutter Menu ............................. 40
Genlock ................................. 40
Mode ..................................... 40
Speed .................................... 41
Syncro ................................... 42
Phase .................................... 42
Varispeed ................................... 43
Varispeed .............................. 43
Ramp .................................... 43
Frame Rate ........................... 44
Time ...................................... 45
End Rate ............................... 46
Time-Lapse ................................ 46
Enable ................................... 46
Speed .................................... 47
Step Print .............................. 47
Interval .................................. 47
Burst Type ............................. 47
AUDIO / VIDEO MENU
CONTROLS ................................... 49
View ........................................... 49
RAW ...................................... 49
REDcolor ............................... 49
Video.......................................... 49
Look ...................................... 50
Color ..................................... 51
Gain ....................................... 52
Tone ...................................... 53
Flut ........................................ 54
Viewfinder Menu ........................ 54
False Color (Previously
Color) .................................... 54
Meter ..................................... 57
Assists ................................... 61
Zebras ................................... 62
Dark Detail ............................ 63
Open Gate ............................. 64
Audio ......................................... 64
Line Level Inputs ................... 65
Microphone Level Inputs....... 65
Headphone ................................ 65
Volume (Master) .................... 66
Volume Left ........................... 66
Volume Right ......................... 66
Mix ........................................ 66
SYSTEM MENU CONTROLS ........ 67
Sound Menu .............................. 67
REC Enable ........................... 67
Output Level.......................... 67
48V MIC ................................ 68
Media Menu ............................... 68
Pre-Record............................ 68
Unmount ............................... 70
Format ................................... 70
Change.................................. 70
Reset ..................................... 71
Project Menu ............................. 71
Status .................................... 72
Slate ...................................... 73
Configure .............................. 74
Timecode .............................. 78
QT Proxies ............................ 80
Monitor ...................................... 80
Frame Guide ......................... 81
Preview ................................. 85
Test Signal ............................ 85
PVW Refresh (Formerly
HD-SDI) ................................. 87
EVF Refresh .......................... 87
Setup ......................................... 88
Preferences ........................... 88
Maintenance ......................... 97
Setting System Clock ......... 104
Remote ............................... 106
Program .............................. 107
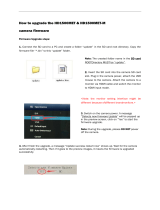
APPENDIX A: UPGRADING
CAMERA FIRMWARE ................. 111
Verify Current Camera
Firmware .................................. 112
Upgrade Procedure ................. 112
APPENDIX B: MANAGING
DIGITAL MEDIA .......................... 115
Media types ............................. 115
Formatting Media .................... 115
Re-formatting Media ................ 118

Build 30 v30.7.0
© 2007-2011 RED.COM INC. MARCH 10, 2011
2 2
Media Capacity Remaining
Status ...................................... 119
Remove Media from Camera
(Unmount) ................................ 119
Procedure A ........................ 120
Procedure B ........................ 120
Procedure C ........................ 121
Copying Media ........................ 121
Erasing Media Using
Macintosh OS X ....................... 121
Erasing Media Using
Windows .................................. 122
SD Memory Card / USB
Memory Devices ...................... 122
SD Memory Card ................ 122
USB Memory Device ........... 122
Media Errors ............................ 123
APPENDIX C: SAVING LOOK /
USER PROFILE ........................... 124
Look ......................................... 124
Export Look ......................... 124
Import Look ......................... 125
User Profile .............................. 125
Export User Profile .............. 125
Import User Profile .............. 126
Data Not Saved During
Export ...................................... 126
APPENDIX D: INPUT /
OUTPUT CONNECTORS ............ 127
Right Side of Camera .............. 127
Time Code Input / Output ... 127
Aux / RS232 Port ................ 128
Viewfinder (RED EVF)
Interface .............................. 129
Monitor (RED LCD)
Interface .............................. 129
Line Level / Microphone
Level Audio Inputs .............. 129
Line Audio Output ............... 131
Headphone Audio Output ... 131
USB-2 Master ..................... 132
USB-2 Slave ........................ 132
Genlock Input ...................... 133
Program (Dual-link) HD-
SDI ...................................... 133
Preview HD-SDI .................. 134
HDMI ................................... 134
Rear of Camera ....................... 135
DC Power Input ................... 136
Drive Interface ..................... 136
Auxiliary Power Outputs...... 137
APPENDIX E: EXPOSURE TIPS
– USING FALSE COLOR AND
ISO ............................................... 138
Underexposure (~ 2 stops) ...... 138
Overexposure (~ 2 stops) ........ 140
Appropriate Exposure .............. 142
Adjusting the ISO Rating ......... 144
APPENDIX F: POST
PRODUCTION ............................. 146
Software Tools......................... 146
RED QuickTime Codec ....... 147
REDCINE-X ......................... 148
APPENDIX G: POSSIBLE
ERRORS, ISSUES AND
SOLUTIONS................................. 149
APPENDIX H: ACCESSORY
OPTIONS ..................................... 151
APPENDIX I: MENU MAPS ......... 152
RED ONE® Operation Guide
Camera Build 30 Version 30.7.0
March 10, 2011

Build 30 v30.7.0
MARCH 10, 2011 © 2007-2011 RED.COM INC.
3
DISCLAIMER
RED® has made every effort to provide clear and accurate information in this Operation Guide, which is
provided solely for the user’s information. While thought to be accurate, the information in this document
is provided strictly “as is” and RED will not be held responsible for issues arising from typographical errors
or user’s interpretation of the language used herein that is different from that intended by RED. All safety
and general information is subject to change as a result of changes in local, federal or other applicable
laws.
RED reserves the right to revise this Operation Guide and make changes from time to time in the content
hereof without obligation to notify any person of such revisions or changes. In no event shall RED, its em-
ployees or authorized agents be liable to you for any damages or losses, direct or indirect, arising from the
use of any technical or operational information contained in this document.
COPYRIGHT NOTICE
© 2011 Red.com, Inc.
All trademarks, trade names, logos, icons, images, written material, code, and product names used in as-
sociation with the accompanying product are the copyrights, trademarks or other intellectual property
owned and controlled exclusively by Red.com, Inc.
TRADEMARK DISCLAIMER
All other company, brand and product names are trademarks or registered trademarks of their respective
holders. RED has no affiliation to, is not associated or sponsored with, and has no express rights in third-
party trademarks. MAC® and QuickTime® are registered trademarks of Apple, Inc. Intel® is the registered
trademark of Intel Corporation. Windows®, Microsoft Windows® and Windows Vista® are the registered
trademarks of Microsoft Corporation. AVID® is a registered trademark of Avid Technology, Inc.
COMPLIANCE
INDUSTRIAL CANADA EMISSION COMPLIANCE STATEMENTS
This Class A digital apparatus complies with Canadian ICES-003.
Cet appareil numérique de la classe A est conforme à la norme NMB-003 du Canada.
FEDERAL COMMUNICATIONS COMMISSION (FCC) STATEMENT
This equipment has been tested and found to comply with the limits for a Class A digital
device, pursuant to part 15 of the FCC Rules. These limits are designed to provide rea-
sonable protection against harmful interference when the equipment is operated in a
commercial environment. This equipment generates, uses, and can radiate radio frequen-
cy energy and, if not installed and used in accordance with the instruction manual, may
cause harmful interference to radio communications. Operation of this equipment in a residential area is
likely to cause harmful interference in which case the user will be required to correct the interference at his
own expense.
CAUTION: If the device is changed or modified without permission from Red, the user may void his
or her authority to operate the equipment.

Build 30 v30.7.0
© 2007-2011 RED.COM INC. MARCH 10, 2011
4 4
AUSTRALIA AND NEW ZEALAND STATEMENT
Attention: This is a Class A product. In a domestic environment this product may cause radio interference
in which case the user may be required to take adequate measures.
JAPAN STATEMENTS
EUROPEAN UNION COMPLIANCE STATEMENTS
Red declares that the equipment described in this document has been tested and is
in conformance with the requirements of the European Council EMC Directive
2004/108/EC, Low Voltage Directive 2006/95/EC, RoHS Directive 2002/95/EC and
WEEE Directive 2002/96/EC.
This declaration is based upon compliance of the product to the following standards:
• EN 55022, Information Technology Equipment - Radio Disturbance Characteristics
• EN 55024, Information Technology Equipment - Immunity Characteristics
• EN 61000-3-2, Limits for harmonic current emissions
• EN 61000-3-3, Limits for harmonic current emissions
• EN 60065, Audio, video and similar electronic apparatus, Safety requirements
The Waste Electrical and Electronic Equipment (WEEE) mark applies only to countries
within the European Union (EU) and Norway. This symbol on the product and accompany-
ing documents means that used electrical and electronic products should not be mixed
with general household waste. For proper treatment, recovery and recycling, please take
this product to designated collection points where it will be accepted free of charge. Alter-
natively, in some countries you may be able to return your products to your local retailer
upon purchase of an equivalent new product.
Disposing of this product correctly will help save valuable resources and prevent any potential negative
effects on human health and the environment, which could otherwise arise from inappropriate waste han-
dling. Please contact your local authority for further details of your nearest designated collection point.
Penalties may be applicable for incorrect disposal of this waste, in accordance with you national legisla-
tion.
For business users in the European Union, If you wish to discard electrical and electronic equipment,
please contact your dealer or supplier for further information.
Responsible party:
Red Digital Cinema.
20291 Valencia Circle
Lake Forest, CA 92630 USA

Build 30 v30.7.0
MARCH 10, 2011 © 2007-2011 RED.COM INC.
5
BEFORE YOU START
Congratulations on your purchase of a RED ONE camera. This operation guide covers cameras equipped
with MYSTERIUM® and MYSTERIUM X® sensors. Please read the safety instructions, then carefully un-
pack the camera body any accessories. If there is any physical damage or missing components for your
camera body and any accessories, please file a support ticket at www.RED.com/support.
RED ONE Camera
IMPORTANT SAFETY INSTRUCTIONS
READ BEFORE USING YOUR CAMERA
• Heed all cautions and warnings in these instructions.
• Read these instructions before operating the camera and accessories.
• Follow these instructions while operating the camera and accessories.
• Keep these instructions with the camera and accessories at all times.
• DO NOT attempt to modify, dismantle or open your camera, lens or other accessory as doing so may
expose you to electric shock and serious injury. There are no user-serviceable parts inside. Alteration
or repairs made to the camera, lens or other accessory, except by a RED authorized service facility,
will void the Limited Warranty. Users are not permitted to make design changes or otherwise modify
the operation of the camera, lenses or other accessories, without the express written approval of RED
DIGITAL CINEMA®.
• Only use attachments/accessories specified by RED.
• Install camera and accessories in accordance with the manufacturer’s instructions.

Build 30 v30.7.0
© 2007-2011 RED.COM INC. MARCH 10, 2011
6 6
• Avoid imaging of laser beams as they may cause damage to the sensor.
• DO NOT use the camera or accessories near water. Avoid exposing your camera to moisture. The unit
is not waterproof, so contact with water could cause permanent damage to the unit as well as electric
shock and serious injury to the user. DO NOT the camera in the rain or under other conditions with
high moisture and immediately remove the power source if exposed to moisture.
WARNING: To reduce the risk of fire or electric shock, do not expose the camera or accessories to
rain or moisture.
• DO NOT expose your camera to excessive vibration or impact (shock). Be careful not to drop your
camera. Internal mechanisms may be damaged by severe shock. Mechanical alignment of optical
elements may be affected by excessive vibration.
• ELECTROMAGNETIC INTERFERENCE: The use of devices using radio or other communication
waves may result in the malfunction or interference with the unit and/or with audio and video signals.
• Clean only using a dry cloth. When cleaning your camera, remember that it is not waterproof and
moisture can damage electronic circuitry. DO NOT rinse or immerse any element of the camera, lens
or other accessory, keep them dry at all times. DO NOT use soaps, detergents, ammonia, alkaline
cleaners, and abrasive cleaning compounds or solvents. These substances may damage lens coatings
and electronic circuitry.
• Maintain sufficient ventilation - DO NOT block any ventilation openings or obstruct cooling fan airflow.
CAUTION: The RED ONE camera ventilation openings require a minimum .40” (1cm) clearance be-
tween the camera and any objects. Ventilation should not be impeded by any objects blocking or
partially covering the ventilation openings. If this caution is not followed, overheating and possible
damage to the camera may occur.
- DO NOT operate or store near any heat sources such as radiators, heat registers, stoves, or any other
apparatus that produce heat. Store in a protected, level and ventilated place. Avoid exposure to tem-
perature extremes, damp, severe vibration, strong magnetic fields, direct sunlight or local heat sources
during storage. Remove any batteries from the camera before storage. The recommended storage
and usage temperatures for your camera, lenses and other accessories are:
o Operating range: 0°C to +40°C (32°F to 104°F)
o Storage range: -20°C to +50°C (-4°F to 122°F)
If there are any performance issues with your camera or accessories within this operating range,
please file a support ticket on www.RED.com/support.
• Do not bypass the third prong of the grounding-type plug on the power cord for the AC Power Adap-
ter or the RED Charger. A grounding-type plug has two blades and a third “grounding” prong. The
third prong is provided for your safety. A grounding-type plug shall be connected to an outlet with a
protective earthen connection. If the grounding-type plug does not fit into your outlet, consult an elec-
trician for replacement of the obsolete outlet.
• Protect the AC Power Adapter or the RED Charger power cord from being pinched, walked on or dri-
ven on to prevent the plug from being pulled out of the socket.
• Unplug the camera and accessories from power during lightning storms or when unused for long pe-
riods of time.

Build 30 v30.7.0
MARCH 10, 2011 © 2007-2011 RED.COM INC.
7
CAUTION: The power cord plug for the AC Power Adapter is used as the power disconnect. To dis-
connect all power from the AC Power Adapter, unplug the power cord plug from the wall outlet.
During use, the power cord plug should remain easily accessible at all times.
• Lithium Ion batteries may be subject to special handling requirements pursuant to federal and local
laws. Please refer to specific shipping instructions included with your battery regarding proper trans-
port of your battery. Do not handle your battery if it is damaged or leaking. Disposal of batteries must
be in accordance with local environmental regulations. For example, California law requires that all re-
chargeable batteries must be recycled by an authorized recycle center. Storing batteries fully charged
or in high temperature conditions may permanently reduce the life of the battery. Available battery ca-
pacity may also be temporarily lessened after storage in low temperature conditions.
WARNING: Do not expose the battery to excessive heat.
WARNING: Danger of explosion if an incorrect battery is charged in the RED charger or used to
power the camera and accessories. Replace only with the same or equivalent type battery.
CAUTION: Refer all service and repair to qualified RED service personnel. To reduce the risk of
electric shock, DO NOT perform any servicing other than that contained in the operating instruc-
tions.

Build 30 v30.7.0
© 2007-2011 RED.COM INC. MARCH 10, 2011
8 8
CAMERA CONTROLS, CONNECTORS AND DISPLAYS
This section describes the physical controls, connectors and displays on the RED ONE camera body.
CAMERA CONTROLS
LEFT FRONT OF CAMERA
This section describes the physical controls on the RED ONE camera body.
A
PL Lens Mount Cover
B
Record Button
C
User Keys 1 and 2
D
SD Memory Card
Figure 1 – Left Front Camera Controls
A PL Lens mount is provided as standard with the RED ONE camera. The mount is compatible with the
majority of S35mm, 35mm and S16mm cinematography lenses. In addition, broadcast B4 mount lenses
may be used if the camera is equipped with the optional B4 to PL mount optical converter.
The PL Lens mount (A) includes a 4-pin S4/i data interface. This allows the camera to gather lens metada-
ta from lenses supplied by RED and Cooke Optics, Ltd. using S4/i protocol.
On the left side of the camera body is a RECORD key (B) and two User Keys (C). User Key 1 is pre-
assigned to AUTO WB and User Key 2 is pre-assigned to 1:1 FOCUS CHECK. Focus check zooms in the
image to allow for precise focus adjustment. These assignments can be changed in the KEYMAP prefe-
rences menu. Refer to KEY-MAP under PREFERENCES in SET UP under SYSTEM MENU CONTROLS.
NOTE: If User Key 2 assignment is changed, FOCUS CHECK is still available through the EVF but-
tons. Refer to RED EVF DISPLAY under CAMERA DISPLAYS for additional information.
A
B
C
D

Build 30 v30.7.0
MARCH 10, 2011 © 2007-2011 RED.COM INC.
9
An SD Memory Card slot (D) is located below User Key 2, which supports most SD Cards of up to 1GB
capacity. It is not possible to store video or audio data to the card SD card, however it may be used for
camera firmware upgrades and to store USER PROFILE and LOOK files.
REAR OF CAMERA
A
Clip Start / Previous Clip
C
Clip Play / Pause
E
Clip End / Next Clip
B
Play Reverse
D
Fast Forward
Figure 2 – Rear Upper Playback Camera Controls
A. Cues the Clip to its Start Frame. If already at the Start Frame, pushing this key again will cue to the
Start Frame of the previous clip recorded on the digital media, if one exists.
B. FRW – Plays the clip back in reverse. Each push of this key cycles clip playback between – 1 x, - 2 x
and - 8 x speed playback.
C. PLAY/PAUSE - Used to enter PLAYBACK mode and to initiate playback of the last recorded clip. Push
once to enter Playback mode, a second time to start playback. Once in clip playback, this key acts as
a Play/Pause toggle.
D. FFW - Plays the clip at higher speeds. Each push of this key cycles clip playback between 1 x, 2 x, 8 x
and 32 x speed playback.
E. Cues the Clip to its End Frame. If already at the End Frame, pushing this key again will cue to the Start
Frame of the next clip recorded on the digital media, if one exists.
Rotating the joystick allows cycling through available clips while in playback mode. Refer to JOYSTICK
OPERATION.
NOTE: It is not necessary to exit Playback mode prior to the next recording. To exit playback mode,
either push the RECORD key, or push the EXIT key to the left of the joystick.
When in playback, all cursors will be disabled, and the camera provides a clean feed of the recorded vid-
eo signal at 1280 x 720 resolution on the Preview HD-SDI and HDMI outputs.
Depending on the capture frame rate, pull down will be added to create a standard 1280 x 720 progres-
sive scan 59.94Hz or 50.00 Hz high definition video signal. SMPTE timecode is embedded on the Preview
HD-SDI output, and both Preview HD-SDI and HDMI outputs provide up to 4 independent channels of 24-
bit 48KHz audio.
NOTE: If PLAYBACK MODE preference is set to 1080p, HD Preview HD-SDI and HDMI outputs will
switch to 1920 x 1080p progressive scan 10-bit 4:2:2 at 23.98, 24.00, 25.00 or 29.97 fps.
NOTE: If PLAYBACK LOOK preference is set to CLIP, the color adjust metadata will be read from
the recorded clip. If set to CAMERA, the metadata used are the current camera settings.
A B C D
E

Build 30 v30.7.0
© 2007-2011 RED.COM INC. MARCH 10, 2011
10 10
A
User Menus Select
F
UNDO / Alternate Action
B
Sensor Menu
G
System Menu
C
Audio / Video Menu
H
Record Start / Stop
D
EXIT Menu I Record/Ready (OK) LED
E
Joystick J
LCD Display
Figure 3 – Rear Center Camera Controls
On the rear of the camera, several buttons surround a daylight readable LCD status display (J).
To the left of the status display are three (3) User Menu buttons (A), which by default provide direct access
to the following menus:
• A: SENSITIVITY menu.
• B: SHUTTER menu
• C: COLOR TEMPERATURE menu.
The specific function of these buttons may be re-programmed by the user, to provide quick access to
other functions. To program of the User Menu Buttons, perform the following:
1. Navigate to the desired menu you wish to program the A, B or C key to.
2. Press and hold the desired key until external monitors display “User button A/B/C has been assigned
to this menu.
The selected key will now be programmed to the new menu destination. To reset keys to default settings,
go to RESTORE. A reboot of the camera may be necessary to restore defaults.
A
B
C
D
E
F
G
H
I
J

Build 30 v30.7.0
MARCH 10, 2011 © 2007-2011 RED.COM INC.
11
Below the LCD status display are the Joystick (E), Exit (D), Undo / Alternate Action (F) and RECORD (H)
buttons, plus the SENSOR (B), AUDIO / VIDEO (C) and SYSTEM (G) menu buttons. The camera control
menus are logically grouped under these last three buttons to provide streamlined camera operations.
The status display reports key camera status values, and is complimented by two LED’s (I): the REC LED
provides record status (illuminates Red when recording), while the OK LED indicates the camera is ready
for operation (illuminates Green when ready).
UNDO / EXIT BUTTONS
- EXIT will exit the menus.
SHORTCUTS
- Press and hold UNDO and SYSTEM menu buttons at the same time to navigate to the last displayed
menu before exiting.
- Press and hold UNDO and EXIT buttons at the same time to unmount media from the camera. Refer
to REMOVE MEDIA FROM CAMERA (UNMOUNT) under APPENDIX B: MANAGING DIGITAL MEDIA.
- Press and hold UNDO and press in on JOYSTICK to display the current camera build version on the
camera LCD display.
- Press and hold UNDO and press CLIP START/PREVIOUS CLIP button to cycle the HD-SDI and
HDMI output between VIDEO [720p] and MENUS [DVI]. Refer to SYSTEM MENU CONTROLS > MON-
ITOR > PREVIEW.
JOYSTICK OPERATION
- Left/Right to navigate menu selections.
- Up to go previous screen (will exit menu when at top level).
- Down to go to next menu (similar to Push to select a menu item).
- Rotate (turn/twist like a knob) changes value in highlighted box.
- Push (like a button) to enter a selection.

Build 30 v30.7.0
© 2007-2011 RED.COM INC. MARCH 10, 2011
12 12
POWER ON / OFF SWITCH
Power on/off switch (A) is located on the lower rear of the camera. Press once to power up/power down
the camera.
A
Power ON / Off Switch
Figure 4 – Rear Lower Camera Controls
A

Build 30 v30.7.0
MARCH 10, 2011 © 2007-2011 RED.COM INC.
13
CAMERA CONNECTORS
RIGHT SIDE OF CAMERA
This section describes the physical connectors on the RED ONE camera body. For detailed description
and operation refer to APPENDIX D: INPUT/OUTPUT CONNECTORS.
A
Headphone
H
USB Slave
B
Program HD-SDI (A)
I
Audio Out
C
Program HD-SDI (B)
J
Timecode
D
Preview HD-SDI
K
Audio In Ch 1 – 4 (1-2 Upper
Left - Right, 3-4 Lower Left -
Right)
E
Video Genlock
L
Viewfinder for RED EVF
F
HDMI Out
M
Monitor for RED LCD
G
USB Master
N
Aux / RS232
Figure 5 – Right Side Camera Connections
The right side of the camera contains all the video, audio and time code inputs and outputs.
From top left to bottom right, these comprise a 3.5mm stereo headphone jack (A), and four DIN 1.0/2.3
video connectors that support Program HD-SDI (B, C), Preview HD-SDI (D) and Video Genlock (E).
Next is an HDMI output (F), a USB-2 “master” port (G) to connect the camera to another camera or to
connect a USB memory device to update camera firmware, a USB-2 “slave” port (H) to connect the cam-
era to another camera or computer based controller, a 5-pin mini-XLR audio output (I), a 5-pin timecode
input/output (J) and four (4) 3-pin mini-XLR audio inputs (K). Finally there are two 16-pin push lock LEMO
connectors (L, M) that provide video, communications and power for a RED EVF (L) and RED LCD (M),
and a 10-pin push lock LEMO connector (N) supporting the Aux/RS232 port that can interface to a variety
of B4 lenses and lens motor control devices.
One 6-inch length DIN 1.0 / 2.3 to BNC video adaptor cable and one 9-inch length 3-pin mini-XLR to mini-
XLR cable plus a mini-XLR to full size XLR adaptor are provided with the camera.
Additional video and audio adaptor cables may be ordered online at www.RED.com/store.
A
B
C
D E
F
G
H
I
J
K
L
M
N

Build 30 v30.7.0
© 2007-2011 RED.COM INC. MARCH 10, 2011
14 14
NOTE: Cameras shipped prior to Sept 15th 2008, may have an earlier revision of the audio board
and no S4/i pins installed in the P/L mount. Contact RED customer service about appropriate audio
cables to use with these systems, and hardware upgrade options.
REAR OF CAMERA
A Aux Power / GPIO A C Camera Power 11.5 – 17V DC Input
B
Aux Power / GPIO B
D
e-SATA Interface (to RED-DRIVE or
RED-RAM digital magazine)
Figure 6 – Lower Rear Camera Connectors
On the rear of the camera are the two 4-pin Auxiliary Power / GPIO outputs (A, B), 6-pin camera system
POWER input (C) and a 16-pin DRIVE interface (E).
Each Auxiliary Power / GPIO connector can supply 1.75 amps of unregulated 11.5 – 17V DC to accesso-
ries such as range finders or low power lens motors. The upper connector provides a GPI trigger (user
programmable but defaulted to Record Start / Stop) and a Record Tally output. The lower connector pro-
vides a GPI trigger (user programmable but defaulted to Record Start / Stop – for Time-lapse set to TIM-
LAPSE in GPIO preferences) and a Frame Recorded Tally output.
The DRIVE interface supplies power and data over e-SATA protocols to record REDCODE (TM) RAW
compressed video data, metadata and audio to RED-DRIVE or RED-RAM digital media.
A
B
C
D

Build 30 v30.7.0
MARCH 10, 2011 © 2007-2011 RED.COM INC.
15
CAMERA DISPLAYS
The LCD status display mounted at the rear of the RED ONE camera provides a snapshot of the camera
setup.
RED LCD, RED EVF and BOMB EVF monitors are factory preset digital displays. There are no saturation,
peaking or contrast adjustments as found on analog monitors to correct color reproduction.
Monitor outputs on the RED ONE camera are set up for REDcolor gamma and color space.
Image intensity can be adjusted to compensate for ambient lighting conditions. For the RED LCD, use the
Up / Down keys on top of the display. For the RED EVF use the rotary encoder.
To assist with exposure, all monitor outputs can display a dual Zebra pattern and a False Color exposure
meter overlaid on the video. In addition the RED EVF and RED LCD outputs can display a RGB histogram,
and RAW sensor data exposure meter with individual R, G, B channel clip "stop lights".
CAMERA LCD STATUS DISPLAY
Figure 7 – Camera LCD Display
The LCD status display elements include:
• Timecode / Status: Displays current timecode
value, clip name or system messages
• ISO Rating: Displays current exposure rating
• Project Frame Rate: Displays the project frame
rate, 23.98 fps in this example
• Timecode: Displays timecode lock status
• White Balance: Displays current color temp
• Media: Displays remaining media capacity in %
• Power: Displays remaining battery capacity in
% (as shown) or connection to DC power
• Shutter Speed: Displays current exposure time
• Format: Displays video recording format, 4K
RAW in this example
NOTE: The timecode value reported is Edge Code or Time Code, as selected by the user in the
TIMECODE menu. During recording, the Clip Name is reported in this display field.
TIMECODE / STATUS
ISO RATING
WHITE BALANCE
SHUTTER SPEED
TIMECODE
FORMAT
PROJECT FRAME RATE
MEDIA POWER

Build 30 v30.7.0
© 2007-2011 RED.COM INC. MARCH 10, 2011
16 16
RED EVF
Figure 9 – RED EVF
The RED EVF comprises the following components:
A. High-resolution color display: Provides a 1280 pixel x 848-pixel resolution progressive scan color im-
age equivalent to viewing a 17” reference color monitor from a distance of approximately 4 ft.
B. Focus ring: May be adjusted for optimal subject focus for your eye. Available diopter range is +1.5 to -
2.0.
C. Rotary encoder/switch: Used to adjust a variety of parameters. These include the EVF Intensity, but
also camera parameters such as Ch1 Audio Level or Ch 2 Audio Level, and Shutter speed, Varispeed
frame rate and ISO setting. For detailed information on enabling and using this feature, go to EVF
MENU under DISPLAY in PREFERENCES under SETUP in SYSTEM MENU CONTROLS.
D. Two (2) programmable USER KEY 3 and 4 buttons. When looking from the side of the RED EVF, US-
ER KEY 3 is on the top and USER KEY 4 is on the bottom.
• Default setting of USER KEY 3 is COLOR (turns FALSE COLOR - EXPOSURE On/Off).
• Default setting of USER KEY 4 is VIEW RAW (toggles the VIEW between REDColor and RAW).
• USER KEY 3 and 4 can be programmed. Refer to SYSTEM MENU CONTROLS > PREFERENCES
> KEY-MAP.
E. One (1) fixed function button.
• The fixed function button (located closest to the focus ring) selects 1:1 FOCUS CHECK (Image
Zoom) mode. When selected this shows the central region of the MYSTERIUM sensor in native 4K
resolution.
NOTE: This function is not available during RECORD.
F. Tally Light: Illuminates during recording. Can be turned off through SETUP > PROGRAM > FEED >
TALLY.
D
C
B
E
A
F

Build 30 v30.7.0
MARCH 10, 2011 © 2007-2011 RED.COM INC.
17
BOMB EVF™
Figure 10 – BOMB EVF
The BOMB EVF comprises the following components:
A. High-resolution color display: Provides a 1280 pixel x 784-pixel resolution progressive scan color im-
age equivalent to viewing a 17” reference color monitor from a distance of approximately 3’ 3” (1 m).
NOTE: The BOMB EVF can display either the upper 784 lines or lower 784 rows of the 1280 x 848
pixel viewfinder output. To toggle between these two options, simultaneously press both User Key
3 and User Key 4.
Upper 784 Lines Lower 784 Lines
B. Focus ring: May be adjusted for optimal subject focus for your eye. Available diopter range is +2.0 to -
5.0.
NOTE: The White ring at the end of the focus ring allows you to use a wax pencil or similar to
mark individual focus positions to expedite set-up operations when multiple camera operators
are using the same camera or BOMB EVF.
C. Two (2) programmable USER KEY 3 and 4 buttons. When looking from the front of the BOMB EVF,
USER KEY 3 is on the right and USER KEY 4 is on the left.
A
B
C
D

Build 30 v30.7.0
© 2007-2011 RED.COM INC. MARCH 10, 2011
18 18
• Default setting of USER KEY 3 is COLOR (turns FALSE COLOR - EXPOSURE On/Off).
• Default setting of USER KEY 4 is VIEW RAW (toggles the VIEW between REDColor and RAW).
• USER KEY 3 and 4 can be programmed. Refer to SYSTEM MENU CONTROLS > PREFERENCES
> KEY-MAP.
D. Tally Light: Illuminates during recording. Can be turned off through SETUP > PROGRAM > FEED >
TALLY.
NOTE: DARK DETAIL control is not functional with BOMB EVF.
NOTE: INTENSITY control is currently unavailable for BOMB EVF.
NOTE: BOMB EVF will display Color Bar test pattern for 1 frame when exiting OPEN GATE mode.
IMPORTANT: For optimal performance, the BOMB EVF should be operated after an approximate 15
minute warm-up time.
RED LCD
Figure 8 –RED LCD
Two (2) round and two (2) triangular buttons are located on top of the RED LCD.
• The two triangular buttons (A) in the center are used to increase or decrease backlight intensity.
• Right button (B) switches display between Video plus Frame Guides and Menus, to Video plus Frame
Guides only.
• Left button (C) is User Key 5 and can be programmed. Refer to KEY-MAP under PREFERENCES in
SET UP under SYSTEM MENU CONTROLS.
B
A
C
/
