Samsung CS-29K30PQ User manual

Category
CRT TVs
Type
User manual
English - 1
AA68-03627A-01
The actual configuration of your TV may be different,
depending on your model.
Connection Panel
(depending on the model)
cable television network
Rear Panel
Whenever you connect an audio or video system to your
television, ensure that all elements are switched off.
Please be sure to match the color coded input terminals
and cable jacks.
Connecting to an Aerial or Cable Television Network
Connect the aerial or network input cable to the Π(75
coaxial socket).
To view television channels correctly, a signal must be
received by the set from one of the sources: an outdoor
aerial, cable television network, or satellite network.
If you are using an indoor aerial, you may need to adjust it
when tuning your television until you obtain a picture that is
both sharp and clear.
Connecting to the SCART Input/Output
The SCART´ and SCARTˇ connectors are used for
equipment, such as a VCR, DVD, decoder, satellite receiver,
video game device, or video disc player.
The SCART´ is also used for equipment with an RGB
output, such as a video game device or video disc player.
continued...
or
ΠAudio input
´ Video input
ˇ S-Video input
¨ Headphone jack
Front (or Side) Panel
Please be sure to match the color coded input terminals
and cable jacks.
Connecting to the RCA Input
The Œ (AUDIO-L/R) and ´ (VIDEO) connectors are used
for equipment, such as a camcorder, video disc player, or
video game device.
Connecting to the S-VIDEO Input
The ˇ (S-VIDEO) and Œ (AUDIO-L/R) connectors are used
for equipment with an S-Video output, such as a camcorder
or VCR.
Connecting Headphones
The ¨ (headphone) jack is used for watching a television
programme without disturbing the other people in the room.
Prolonged use of headphones at a high volume may damage
your hearing.
When both the front (or side) AV and rear connectors
are connected to external equipment, the front (or
side) AV receives priority.
Connecting to the RCA Input
The RCA¨ and RCAˆ connectors are used for equipment,
such as a VCR, DVD, decoder, satellite receiver, video game
device, or video disc player. (When using the mono
equipment, connect to the AUDIO-L input connector.)
The RCAconnectors are used for equipment such as a
DVD with component output (480i only).
Connecting to the RCA Output
The RCAØ connectors are used for equipment, such as a
recording VCR or audio system.
The actual configuration of your TV may be different,
depending on your model.
Control Panel
(depending on the model)
You can use the ¨ buttons to switch the TV on when it is
in standby mode depending on the model.
The ˇ and ¨ buttons also have the same function as the
œ///buttons on the remote control.
If the remote control no longer works or you have
misplaced it, you can use the controls on the panel of the
television.
Front (or Side) Panel
ΠInput source selection
´ On-screen menu display
ˇ Volume adjustment
¨ Channel selection
ˆ Standby indicator
Ø Remote control sensor
Power on/off
COLOR TELEVISION
CS21A11/CS21E20/CS21E21/CS21E22/
CS21M7/CS21M21/CS21S8/CS21T10/
CS21T20/
CS25A6/CS25A11/CS25E20/CS25K10/
CS25M6/CS25M20/
CS29A7/CS29A11/CS29K3/CS29K5/
CS29K10/CS29M6/CS29M16/CS29M20
Owner’s Instructions
Before operating, please read this manual thoroughly,
and retain it for future reference.
Register your product at
www.samsung.com/global/register
AA68-03627A-01Eng_mind_pip 11/21/05 9:34 AM Page 1
English - 2
/
Used to increase or
decrease the volume.
TV
Used to return to the TV
mode when it is in
external input mode.
MENU
Used to display the on-
screen menu or return to
the previous menu.
˝˝
/
/
œœ
/
Used to control the
cursor in the menu.
ÔÔ
TURBO
Used to select the turbo
sound option.
S.MENU
Used to display the
sound menu.
ÒÒ
SLEEP
Used to select a preset
time interval for
automatic shut off.
ÚÚ
PRE-CH
Used to switch
repeatedly between the
last two channels
displayed.
ÆÆ
VIDEO
Used to display all of the
available video sources.
ıı
P/
Used to display the next
or previous stored
channel.
˜˜
INFO
Used to view the
channel information and
setting status you
selected. (Depending on
the model, the signal
strength symbol ( )
can be displayed.)
¯¯
EXIT
Used to exit from any
display or return to
normal viewing.
˘˘
ENTER
While using the on-
screen menus, press the
ENTER button to
activate (or change) a
particular item.
¿¿
P.MODE
Used to select the
picture effect.
¸¸
S.MODE
Used to select the
sound effect.
ŒŒ
POWER
Used to switch the TV
on and off.
´´
DUAL I-II
Used to select the
sound mode.
ˇˇ
P.SIZE
Used to change the
screen size.
¨¨
Numeric buttons
Used to select channels
directly.
ˆˆ
-/--
Used to select a channel
numbered ten or over.
Press this button, then
--
” symbol is
displayed. Enter the
two-digit channel
number.
ØØ
MUTE
Used to switch the
sound off temporarily. To
turn the sound back on,
press the MUTE, , or
button.
Operation of remote control may be affected by bright
artificial light near to the TV.
Remote Control
(depending on the model)
Installing Batteries
Remove the cover. Install two AAA
size batteries, then replace the cover.
When the remote control does not
operate normally, check that the “+” and “
-
” ends of the
batteries are inserted correctly or the batteries are drained.
Do not mix battery types, i.e. alkaline and manganese.
The mains lead is attached to the rear of the television.
1 Plug the mains lead into an appropriate socket.
The main voltage is indicated on the rear of the
television and the frequency is 50 or 60Hz.
2 Press the button (On/Off) on the front (or side) of the
television.
3 Press the POWER button on the remote control to
switch the television on. The programme that you were
watching last is re-selected automatically. If you have
not yet stored any channels, no clear picture appears.
Refer to “Channel - Auto Store” or “Channel - Manual
Store” on page 4.
If the television is initially powered on, several basic
customer settings proceed automatically. Refer to
“Setup - Plug & Play” on page 3.
4 To switch the television off, press the button (On/Off)
on the front (or side) of the television.
Switching the Television On and Off
The television can be placed in standby mode, in order to
reduce power consumption and wear of the cathode ray
tube. Standby mode can be useful when you wish to
interrupt viewing temporarily (during a meal, for example).
1 Press the POWER button on the remote control while
viewing.
The television is in standby mode.
2 To switch the television back on, simply press it again.
Do not leave the television in standby mode for long
periods of time (when you are away on holiday, for
example). Turn the television off by pressing the
button (On/Off) on the front (or side) of the television. It
is best to unplug the set from the mains and aerial.
Placing the Television in Standby Mode
AA68-03627A-01Eng_mind_pip 11/21/05 9:34 AM Page 2
English - 3
he
e
sic
o
ff)
.
It
e
Source List
You can switch between
viewing signal from
connected equipment, such
as a VCR, DVD, set-top box,
and the TV source
(broadcast or cable).
You can change the required external source simply
by pressing the VIDEO button on the remote
control. It might take a short period of time for
pictures to be switched. To return to the TV mode,
press the TV button on the remote control.
Edit Name
You can give a name to the
external source.
Input -
Source List / Edit Name
Move Enter Return
TV
AV1 - - --
AV2 - - --
S-Video - - --
Component - - --
Source List
TV
Move Enter Return
AV1 : Belgie
AV2 :
S-Video :
Component :
Edit Name
TV
----
VCR
DVD
Cable STB
Sat. STB
AV Recv.
DVD Recv.
Game
Camcorder
DVD Combo
2 Select the appropriated
language by pressing the
or button. Press the
ENTER button.
The Check antenna input. is displayed.
If any language is not selected, the language menu
will disappear about 30 seconds later.
3 Make sure that the antenna
is connected to the
television (refer to page 1).
Press the ENTER button.
The Auto Store menu is
displayed with Area
selected.
4 Press the ENTER button again.
5 Press the or button to select your area. Press the
ENTER button.
6 To search the channels,
select Search by pressing
the or button. Press
the ENTER button.
7 Press the ENTER button
again to start search
channels. To stop the
search, press the ENTER
button.
When the channel
searching has finished, the
Time menu is displayed
with Clock selected.
8 Press the œ or button to
move to the hour or minute.
Set the hour or minute by pressing the or button.
continued...
Check antenna input.
Enter Exit
Move Enter Return
Area : Belgie
Search
Auto Store
TV
ASIA W/EUROPE
CIS E/EUROPE
CHINA
HONGKONG U/K
AUSTRALIA
NZ/INDONESIA
SOUTH AFRICA
AMERICA
Search
Enter Return
Start
9 When you have finished,
press the MENU button.
The Enjoy your watching is displayed, and then the
channel which has been stored will be activated.
Re-setting the Plug & Play
Method: MENU /
(Setup) ENTER /
(Plug & Play) ENTER
Move Enter Return
Plug & Play
Language : English
Time
Child Lock
Blue Screen : Off
Melody : On
Demonstration
Setup
TV
Search
Enter Return
Stop
P 1 C-- ----- 102MHz
7 %
Enjoy your watching
Viewing the Menus
1 Press the MENU button.
The main menu is displayed on the screen. Its left side
has five icons: Input, Picture, Sound, Channel, and
Setup.
2 Press the or button to select one of the icons.
Press the ENTER button to access the icon’s sub-menu.
3 Press the or button to move to items in the menu.
Press the ENTER button to enter items in the menu.
4 Press the //œ/button to change the selected
items. Press the MENU button to return to the previous
menu.
5 Press the EXIT button to exit from the menu.
Setup - Plug & Play
When the television is initially powered on, several basic
customer settings proceed automatically and subsequently.
The following settings are available.
1 If the television is in standby
mode, press the POWER
button on the remote
control.
The Plug & Play is
displayed. It flickers for a
little while, and then
Language menu is
displayed.
continued...
Plug & Play
Move Enter Return
Clock
--:--
am
Sleep Timer : Off
On Timer
--:--
am Off
Off Timer
--:--
am Off
On Timer Volume : 10
Time
TV
Move Enter
Language
English
Français
Türkçe
AA68-03627A-01Eng_mind_pip 11/21/05 9:34 AM Page 3
English - 4
This function is very useful in the
situation that the TV is used in
weak signal. LNA amplifies the
TV signal in the weak signal
area, but not noise.
LNA (Low Noise Amplifier) setting is to be made for
each channel.
If the picture is noisy with the LNA set to On, select Off.
Depending on areas, factory mode of LNA will be set up
as On or Off.
Channel - LNA
Move Enter Return
Auto Store
Manual Store
Add/Delete
Sort
LNA :
Channel
TV
You can exclude channels you
have chosen from the channels
you scanned. When you scan
through the stored channels,
those you have chosen to skip
are not displayed. All of the
channels that you did not
specifically choose to skip are displayed during scanning.
Select Added or Deleted by pressing the ENTER button
repeatedly.
Channel - Add/Delete
This operation allows you to
change the programme numbers
of stored channels. This
operation may be necessary
after using auto store.
From: Channel number to
be changed.
To: New channel number to be identified.
Store: Confirmation the exchange of channel numbers.
Channel - Sort
Move Enter Return
P 1 : Added
P 2 : Added
P 3 : Added
P 4 : Added
P 5 : Added
Add/Delete
TV
Move Adjust Return
From : P 1
To : P--
Store : ?
Sort
TV
Channel - Manual Store
You can store channels,
including those received via
cable networks. When storing
channels manually, you can
choose:
-
Whether or not to store each
of the channels found
-
The programme number of each stored channel which
you wish to identify
Programme (Programme number to be assigned to a
channel)
Color System: AUTO/PAL/SECAM/NT4.43/NT3.58
Sound System: BG/DK/I/M
Search (When you do not know the channel numbers):
The tuner scans the frequency range until the first
channel or the channel that you selected is received on
the screen.
Channel (When you know the number of the channel to
be stored)
You can also select the channel number directly by
pressing the numeric buttons (0~9).
Store (When you store the channel and associated
programme number)
If there is no sound or abnormal sound, re-select the
sound standard required.
Channel mode
P (Programme mode): When completing tuning, the
broadcasting stations in your area have been
assigned to position numbers from P00 to P99. You
can select a channel by entering the position number
in this mode.
C (Real channel mode): You can select a channel by
entering the assigned number for each air
broadcasting station in this mode.
S (Cable channel mode): You can select a channel by
entering the assigned number for each cable channel
in this mode.
Move Adjust Return
Programme : P 3
Color System : AUTO
Sound System : BG
Search : 46MHz
Channel : C 1
Store : ?
Manual Store
TV
You can scan for the frequency ranges available to you (and
availability depends on your country). Automatically allocated
programme numbers may not correspond to actual or
desired programme numbers. However you can sort
numbers manually and clear any channels you do not wish
to watch.
Channels are sorted and stored
in the order which reflects their
position in the frequency range
(with lowest first and highest
last). The programme originally
selected is then displayed.
To stop the search before it
has finished, press the
MENU button.
When finished, the Sort menu
is displayed. To sort the stored
channels into the desired
numerical order, refer to “Channel - Sort”. To exit without
sorting, press the EXIT button.
Channel - Auto Store
Search
Enter Return
Stop
P 1 C-- ----- 102MHz
7 %
Move Enter Return
Area : Belgie
Search
Auto Store
TV
ASIA W/EUROPE
CIS E/EUROPE
CHINA
HONGKONG U/K
AUSTRALIA
NZ/INDONESIA
SOUTH AFRICA
AMERICA
Off
On
AA68-03627A-01Eng_mind_pip 11/21/05 2:48 PM Page 4
English - 5
for
f.
p
turn
el
turn
te
Language
It is variable depending on
the model. When you start
using the television for the
first time, you must select the
language which will be used
for displaying menus and
indications.
Blue Screen
If no signal is being received or the signal is very weak, a
blue screen automatically replaces the noisy picture
background. If you wish to continue viewing the poor
picture, you must set the Blue Screen to Off.
Melody
You can hear melody sound when the television is
powered on or off.
Demonstration
To become familiar with the various menus provided by
the television, you can view the in built demonstration.
Each of the menu options is displayed in turn. To exit
from the demonstration, press the EXIT button.
Setup -
Language / Blue Screen /
Melody / Demonstration
Move Enter Exit
Plug & Play
Language : English
Time
Child Lock
Blue Screen : Off
Melody : On
Demonstration
Setup
TV
Clock
You can set the television
clock so that the current time
is displayed when pressing
the INFO button on the
remote control. You must
also set the time if you wish
to use the automatic on or off timers.
When pressing the button (On/Off) on the front
(or side) of the television, the clock setting will be
reset.
Sleep Timer
You can select a time period of between 30 and 180
minutes after which the television automatically switches
to standby mode.
You can select these options simply by pressing the
SLEEP button on the remote control. If the sleep
timer is not yet set, Off is displayed. If it is already
set, the remaining time before which the television
switches to standby mode is displayed.
On Timer / Off Timer
You can set the On/Off timers so that the television will
switch on or off automatically at the time you select.
You must set the clock first.
On Timer Volume
The preferred volume can be set for when the timer
automatically turns on the television.
Auto Power Off
When you set the timer “On”, the television will
eventually turn off, if no controls are operated for 3
hours after the TV was turned on by timer. This function
is only available in timer “On” mode and prevents
overheating or leakages, which may occur if a TV is on
for too long (on holiday, for example).
Setup - Time
Move Enter Return
Clock
--:--
am
Sleep Timer : Off
On Timer
--:--
am Off
Off Timer
--:--
am Off
On Timer Volume : 10
Time
TV
This feature allows you to
prevent unauthorized users,
such as children, from watching
unsuitable programmes by
muting out video and audio.
Child Lock cannot be released
using front (or side) panel
buttons. Only remote control can release the Child Lock
setting, so keep the remote control away from children.
Child Lock: On/Off
If you want to unlock a channel, set to Off.
Programme: Channel number to be locked.
Lock: When press the ENTER button, the Locked is
displayed.
If any channel is locked, you can not enter the
Channel menu by using the control buttons on the
television, and the Not available is displayed. You
can access by using the remote control only.
Setup - Child Lock
Move Enter Return
Child Lock : On
Programme : P 1
Lock : ?
Child Lock
TV
AA68-03627A-01Eng_mind_pip 11/21/05 9:34 AM Page 5
English - 6
Swap
You can interchange the main picture and sub-picture. ˇ
Size: Small/Large
You can select a size of the sub-picture. ¨
Position: / / /
You can select a position of the sub-picture. ˆ
Programme
You can select a channel of the sub-picture only when
the Source is set to TV. Ø
Easy functions of the remote control
Picture - PIP
You can display a sub picture within the main picture of TV
programme or external A/V devices such as VCR or DVD. In
this way you can watch TV program or monitor the video
input from any connected devices while watching TV or other
video input.
PIP: On/Off
You can activate or deactivate the PIP funtion. Œ
Source
You can select a source of the sub-picture. ´
Depending on the models, the sub-picture can be
viewed only when a source different from the main
picture's is selected. If a TV programme is viewed
on the main picture, the sub-picture is not available
for TV programmes. If a TV source is selected, the
message Not available is displayed.
continued...
Move Enter Return
TV
PIP : On
Source : TV
Swap
Size : Large
Position :
Programme : P 1
Picture -
Mode / Custom /
Color Tone / Size /
Digital NR / DNIe Jr / Tilt
Mode: Dynamic/
Standard/Movie/Custom
You can select the type of
picture which best
corresponds to your viewing
requirements.
You can select these
options simply by pressing the P.MODE button on
the remote control.
Custom: Contrast/Brightness/Sharpness/
Color/Tint (NTSC only)
The television has several settings which allow you to
control the picture quality.
If you make any changes to these settings, the
picture mode is automatically switched to Custom.
Color Tone: Cool2/Cool1/Normal/Warm1/
Warm2
Size
You can select the picture size which best corresponds to
your viewing requirements. It is variable depending on
the model.
You can change the picture size simply by pressing
the P.SIZE button on the remote control.
Digital NR
If the signal received by the television is weak, you can
activate this feature to reduce any static and ghosting
that may appear on the screen.
continued...
Move Enter Exit
Mode : Dynamic
Custom
Color Tone : Normal
Size : Normal
Digital NR : Off
DNIe Jr : On
More
Picture
TV
Sound -
Mode / Equalizer /
Auto Volume / Dolby Virtual /
Pseudo Stereo / Turbo Plus
Mode: Standard/Music
/Movie/Speech/Custom
You can select the type of
special sound effect to be
used when watching a given
broadcast.
You can select these
options simply by pressing the S.MODE button on
the remote control.
continued...
Move Enter Exit
Mode : Custom
Equalizer
Auto Volume : Off
Dolby Virtual : Off
Pseudo Stereo : Off
Turbo Plus : Off
Sound
TV
DNIe Jr
(Digital Natural Image engine Junior)
(depending on the model)
This feature bring you more detailed image with detail
enhancement, contrast enhancement and white
enhancement. New image compensation algorithm gives
brighter, clearer, much detailed image to you. DNIe Jr
technology will fit every signals into your eyes.
Tilt (depending on the
model)
If you find that the picture
received is slightly tilted to
one side, you can adjust the
tilt setting (-7 to +7).
Move Enter Exit
More
Tilt : 0
PIP
Picture
TV
Move Enter Exit
More
Tilt : 0
PIP
Picture
TV
PIP
You can freeze the sub-picture.
AA68-03627A-01Eng_mind_pip 11/21/05 9:34 AM Page 6
Most television stations provide written information services
via teletext. The index page of the teletext service gives you
information on how to use the service. In addition, you can
select various options to suit your requirements by using the
remote control buttons.
For teletext information to be displayed correctly,
channel reception must be stable. Otherwise,
information may be missing or some pages may not be
displayed.
English - 7
ˇ
n
ed...
it
nd
Equalizer
The television has several settings which allow you to
control the sound quality.
If you make any changes to these settings, the
sound mode is automatically switched to Custom.
Auto Volume
Each broadcasting station has its own signal conditions,
and so it is not easy to adjust the volume every time the
channel is changed. This feature lets you automatically
adjust the volume of the desired channel by lowering the
sound output when the modulation signal is high or by
raising the sound output when the modulation signal is
low.
Dolby Virtual (depending on the model)
Pseudo Stereo
These features convert a monaural sound signal into two
identical left and right channels. Once the Dolby
Virtual or Pseudo Stereo is set to On or Off, these
settings apply to the sound effects such as Standard,
Music, Movie, and Speech.
Manufactured under license from Dolby
Laboratories. “Dolby” and the double-D
symbol are trademarks of Dolby
Laboratories.
Turbo Plus
This feature suitably emphasizes both higher and lower
bands of sound (and includes other effects). You can
enjoy more magnificent and dynamic sound when
watching music, movie, or other channels.
You can change the options simply by pressing the
TURBO button on the remote control.
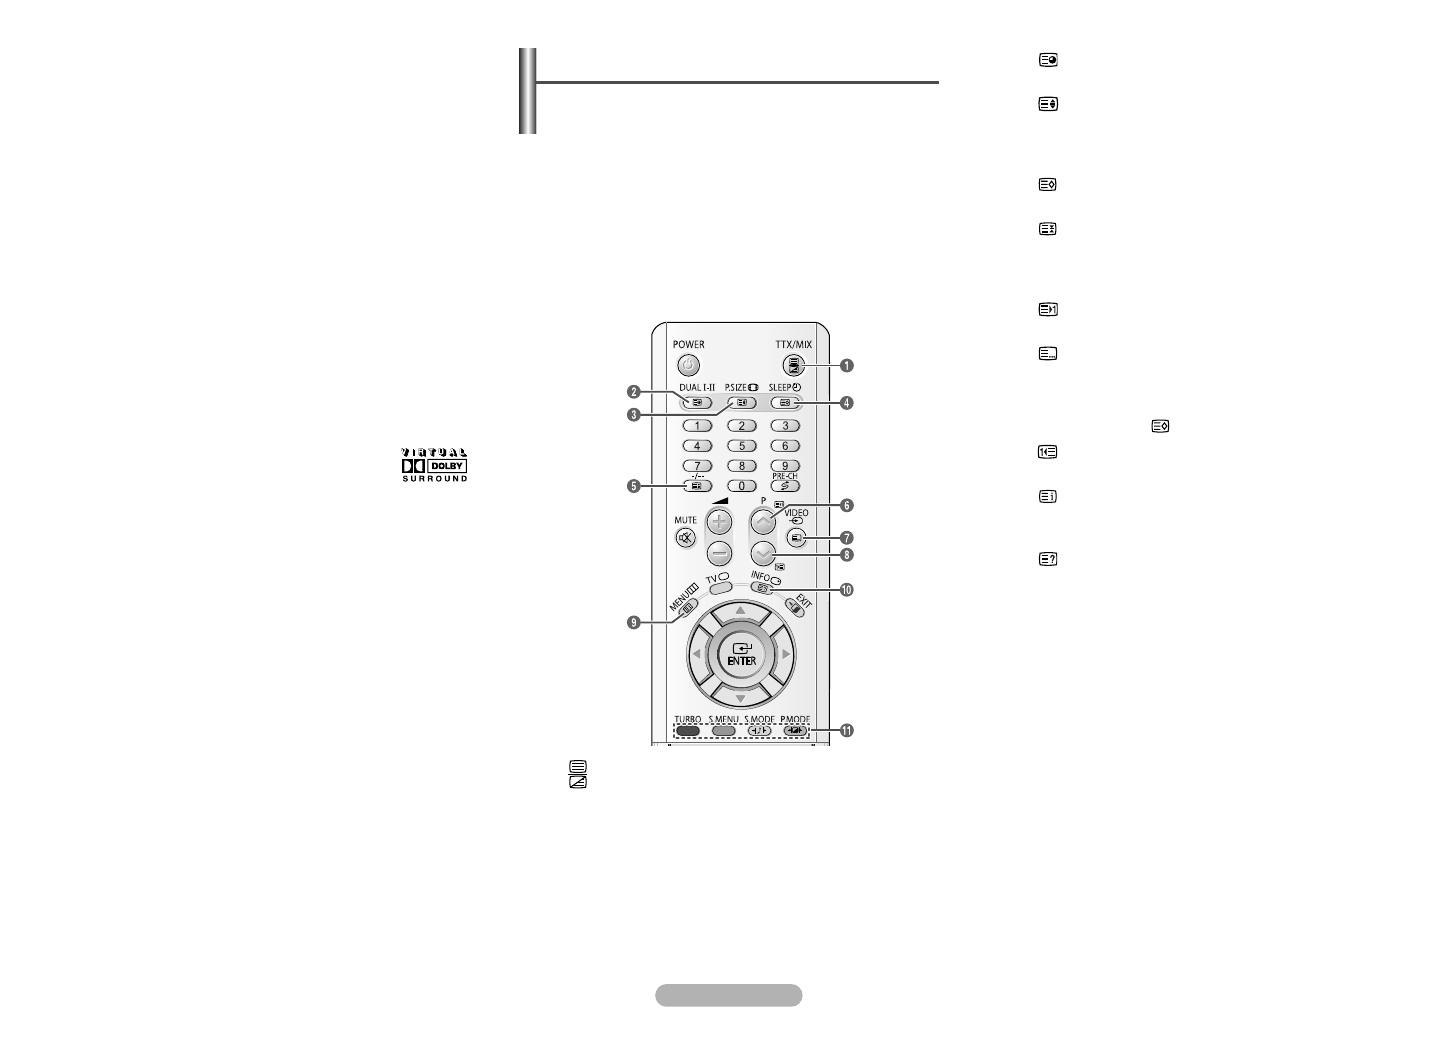
´´
(sub-page)
Used to display the available sub-page.
ˇˇ
(size)
Press to display the double-size letters in the upper half
of the screen. For lower half of the screen, press it again.
To display normal screen, press it once again.
¨¨
(store)
Used to store the teletext pages.
ˆˆ
(hold)
Used to hold the display on a given page if the selected
page is linked with several secondary pages which follow
on automatically. To resume, press it again.
ØØ
(page up)
Used to display the next teletext page.
(mode)
Press to select the teletext mode (LIST/FLOF). If you
press it in the LIST mode, it switches into the List save
mode. In the List save mode, you can save teletext page
into list using the (store) button.
(page down)
Used to display the previous teletext page.
(index)
Used to display the index (contents) page at any time
while you are viewing teletext.
˝˝
(reveal)
Used to display the hidden text (answers to quiz games,
for example). To display normal screen, press it again.
ÔÔ
Coloured buttons (red/green/yellow/blue)
If the FASTEXT system is used by a broadcasting
company, the different topics covered on a teletext page
are color-coded and can be selected by pressing the
coloured buttons. Press one of them corresponding to the
required. The page is displayed with other coloured
information that can be selected in the same way. To
display the previous or next page, press the
corresponding coloured button.
Teletext Feature
(depending on the model)
ŒŒ
(teletext on/mix)
Press to activate teletext mode after selecting the
channel providing the teletext service. Press it again to
overlap the teletext with the current broadcasting screen.
AA68-03627A-01Eng_mind_pip 11/22/05 10:04 AM Page 7
English - 8
OSD Map
: It is variable depending on the model.
Input
-
Source List
-
Edit Name
-
VCR / DVD / Cable STB / Sat. STB / AV Recv. / DVD Recv. / Game /
Camcorder / DVD Combo
Picture
-
Mode
-
Dynamic / Standard / Movie / Custom
-
Custom
-
Contrast / Brightness / Sharpness / Colour / Tint (NTSC only)
-
Colour Tone
-
Cool2 / Cool1 / Normal / Warm1 / Warm2
-
Size
-
Digital NR
-
Off / On
-
DNIe Jr
-
Off / On
-
Tilt
-
PIP
-
PIP
-
Off / On
-
Source
-
Swap
-
Size
-
Position
-
Programme
Sound
-
Mode
-
Standard / Music / Movie / Speech / Custom
-
Equalizer
-
Auto Volume
-
Off / On
-
Dolby Virtual
-
Off / On
-
Pseudo Stereo
-
Off / On
-
Turbo Plus
-
Off / On
Channel
-
Auto Store
-
Area
-
ASIA W/EUROPE / CIS E/EUROPE / CHINA /
HONGKONG U/K /AUSTRALIA / NZ/INDONESIA /
SOUTH AFRICA / AMERICA
-
Search
-
Manual Store
-
Programme
-
Color System
-
AUTO / PAL / SECAM / NT4.43 / NT3.58
-
Sound System
-
BG / DK / I / M
-
Search
-
Channel
-
Store
-
Add/Delete
-
Sort
-
LNA
-
Off / On
Setup
-
Plug & Play
-
Language
-
Time
-
Clock
-
Sleep Timer
-
On Timer
-
Off Timer
-
On Timer Volume
-
Child Lock
-
Off / On
-
Blue Screen
-
Off / On
-
Melody
-
Off / On
-
Demonstration
Before contacting the Samsung after-sales service, perform
the following simple checks. If you cannot solve the problem
using the instructions below, note the model and serial
number of the television and contact your local dealer.
No sound or picture
Check that the mains lead has been connected to a
wall socket.
Check that you have pressed the button (On/Off)
and the POWER button.
Check the picture contrast and brightness settings.
Check the volume.
Normal picture but no sound
Check the volume.
Check whether the volume MUTE button on the
remote control has been pressed.
No picture or black and white picture
Adjust the color settings.
Check that the broadcast system selected is correct.
Sound and picture interference
Try to identify the electrical appliance that is affecting
the television, then move it further away.
Plug the television into a different mains socket.
Blurred or snowy picture, distorted sound
Check the direction, location and connections of your
aerial.
This interference often occurs due to the use of an
indoor aerial.
Remote control malfunctions
Replace the remote control batteries.
Clean the upper edge of the remote control
(transmission window).
Check that the “+” and “
-
” ends of the batteries are
inserted correctly.
Check that the batteries are drained.
Troubleshooting
AA68-03627A-01Eng_mind_pip 11/21/05 9:34 AM Page 8
  • Page 1 1
  • Page 2 2
  • Page 3 3
  • Page 4 4
  • Page 5 5
  • Page 6 6
  • Page 7 7
  • Page 8 8

Samsung CS-29K30PQ User manual

Category
CRT TVs
Type
User manual

Ask a question and I''ll find the answer in the document

Finding information in a document is now easier with AI