Page is loading ...

SM-CCR3030
CASSETTE RECEIVER
Instruction manual

2
Dear customer!
Thank you for purchasing our product. For safety, it is strongly recommended to read this manual carefully
before connecting, operating and/or adjusting the product and keep the manual for reference in the future.
Table of contents
Table of contents ....................................................................................................................................................................................2
Important safeguards ...........................................................................................................................................................................3
Installation/ Connections.....................................................................................................................................................................4
Panel controls ..........................................................................................................................................................................................7
Function of controls.............................................................................................................................................................................10
Cleaning...................................................................................................................................................................................................12
Troubleshooting guide.........................................................................................................................................................................13
Specification...........................................................................................................................................................................................14

3
Important safeguards
- Read carefully through this manual to familiarize yourself with this high-quality sound system.
- Use only in a 12-volt DC negative-ground electrical system.
- Disconnect the vehicle's negative battery terminal while mounting and connecting the unit.
- When replacing the fuse, be sure to use one with an identical amperage rating. Using a fuse with a higher
amperage rating may cause serious damage to the unit.
- DO NOT attempt to disassemble the unit.
- Make sure that pins or other foreign objects do not get inside the unit; they may cause malfunctions, or
create safety hazards such as electrical shock or laser beam exposure.
- If you have parked the car for a long time in hot or cold weather, wait until the temperature in the car
becomes normal before operating the unit.
- Keep the volume at a level at which you can hear outside warning sounds (horns sirens, etc.).
- DO NOT open covers and do not repair yourself. Consult the dealer or an experienced technician for help.
- Make sure you disconnect the power supply and aerial if you will not be using the system for a long period
or during a thunderstorm.
- Make sure you disconnect the power supply if the system appears to be working incorrectly, is making an
unusual sound, has a strange smell, has smoke emitting from it or liquids have got inside it. Have a
qualified technician check the system.
- Stop the car before performing any complicated operation.
- The unit is only designed for use with 4 speakers. Do not combine output for use with 2 speakers. Do not
ground negative speaker leads to the chassis ground.
- Do not install the unit in place where it is exposed to direct sunlight (including the faceplate), in order to
avoid high heat.
- The faceplate is a precision piece of equipment that contains sensitive electronic components. Do not
subject it to excessive shock.
- Be careful not to drop or shock the unit strongly, it may break or crack because it contain glass parts.
- When extending the ignition, memory backup or ground cable, use diameter of 0.75 mm (AWG18) or more
automotive grade cable to avoid wire deterioration or damage to the wire coating

4
Installation/ Connections
First complete the electrical connections, and then check them for correctness.
Installation way
It is an anti-theft installation way. The chassis wear a metal sliding housing. Please have the wiring connection
of the power supply, speakers and antenna as for the requirement of the manual, and then install the metal
sliding housing into the car according to the diagram.

5
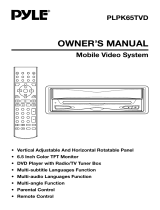
Detaching the front panel
1. Press the OPEN button on the front panel. The panel will go
down (pic. 1).
2. Push the panel to the right and then pull it towards you (pic.
2).
Attaching the control panel
1. Insert the right side of the control panel into the main unit (pic. 3).
Note: the control panel must be attached into the T-Joint.
2. Press the control panel on to the left side of middle of it until a click sound is
heard.
3. Close the panel.
Caution:
DO NOT insert the control panel from the left side. It can damage the control panel.
The control panel can easily be damaged by shocks. After removing it, place it in a protective case and be
careful not to drop it or subject it to strong shocks.
The rear connector that connects the main unit and the control panel is an extremely important part. Be
careful not to damage it by pressing on it with fingernails, pens, screwdrivers, etc.
Note:
If the control panel is dirty, wipe off the dirt with soft, dry cloth only. And use a cotton swab soaked in
isopropyl alcohol to clean the socket on the back of the control panel.
Pic. 1
Pic. 2
Pic. 3

6
Speaker connection
Notes:
- In spite of having any kinds of speaker system, must use 4 ohms impedance of speaker to reduce the
distortion during high volume level.
- Prohibit to make the conductors of auto antenna and ground touch with each other.
R (Red)
R (Red)
L (White)
L (White)

7
Panel controls
Front panel
1. OPEN BUTTON
Press it to flip down the front panel to insert or eject the cassette.
2. VOL knob/ SEL button
Rotate VOL knob clockwise to increase the volume level; rotate anticlockwise to decrease the volume level.
Press the VOL/SEL button shortly to show the time on display. Press it and hold for 3 seconds to set the
time: press the >>/+ button to adjust the hour. Press the <</- button to adjust the hour.
Press the VOL/SEL button again to return to normal mode in 5 seconds.
3. LCD (LIQUID CRYSTAL DISPLAY)

8
4. POWER BUTTON
Press the POWER or any other button to turn the power on. Press the POWER button to turn
the power off.
5. << -/ >> + BUTTONS
Tune down/ up / Track down/ up buttons.
6. PRESET STATION [1-6] BUTTONS
7. BND/ MODE BUTTON
Press and hold for 2 seconds and then press it repeatedly to select the mode: Cassette => Radio => CD
changer (if it is connected).
In Radio mode press it repeatedly to select your desired radio band.
Back of the front panel
Press the OPEN button on the front panel to flip it down.
1. EJECT button
2. RESET button
3. Cassette slot
4. REWIND/ FAST FORWARD buttons.

9
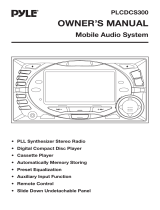
Remote control
1. Digit area
2. ST button
3. MODE button
4. MUTE button
5. SCAN button
6. CLOCK button
7. BAND LOUD button
8. POWER button
9. AS/PS button
10. LOCAL button
11. VOL SEL button
12. SEEK +/- buttons: use these buttons to enter the manual
tuning mode/ seek tuning mode.
Use this button to search for the beginning of the previous/
next track, for backward/ forward track scanning.
13. VOL +/- button
14. P.EQ button
Changing the battery
1. Press the catch and at the same time pull out the battery tray.
2. Insert the 1 x lithium battery, type CR 2025 3V battery with the
stamped (+) mark facing upward.
3. Insert the battery tray into the remote control.

10
Function of controls
General operations
Reset the unit
Operating the unit for the first time or after replacing the car battery, you must reset the unit.
Press OPEN button and remove the panel, then press the RESET button to restore the unit to the original
factory settings.
Power button
Press any button to turn the unit on.
Press the POWER button on the front panel or on the RC to switch the unit off.
Note: After the unit is off, the clock, volume level and radio current settings will be memorized, and when
you turn the unit on it will resume the stored status which you set.
Clock display and adjustment
To view the current time, press the VOL/SEL button on the front panel or CLOCK button on the RC shortly.
Press it and hold for 3 seconds to set the time: press the >>/+ button to adjust the hour. Press the <</-
button to adjust the hour.
Press the VOL/SEL or CLOCK button again to return to normal mode.
Mode select
Press the BND/ MODE button on the front panel or MODE button or RC repeatedly to select the mode:
Cassette => Radio => CDC (disc playback) (when the CD changer is connected).
Volume mode
Rotate VOL SEL knob clockwise to increase the volume level; rotate anticlockwise to decrease the volume
level.
Or press VOL +/- buttons on the RC
Press SEL button (VOL knob) on the front panel or on the RC shortly and repeatedly to select the mode: VOL
=> BAS => TRE => BAL => FAD =>. Rotate the VOL knob or use VOL +/- buttons to adjust each mode.
MUTE button
Press the MUT button on the RC to cancel the sound. Press again to resume.
ST selector
Press ST button on the RC to select MONO or STEREO mode.
Equalizer setting
Press P.EQ button to select EQ mode: POP, CLASSIC, ROCK, FLAT, Off.

11
Radio operations
Band select
Press the BND/ MODE button on the front panel or BAND LOUD button or RC repeatedly to select your
desired radio band during RADIO mode: FM1, FM2, FM3, AM1, AM2.
Auto/ Manual tuning
- Automatic tuning: Press the << -/ >> + buttons or SEEK buttons on the RC shortly, the automatic
search will start. It will play when finds the station.
- Manual tuning: press << or >> buttons or SEEK buttons on the RC and hold for 2 seconds to enter
manual tuning. MANUAL appears on display. Press the <</ >> buttons or SEEK buttons on the RC
repeatedly to select a station downward or upward step by step.
Programming tuner stations
You can store up to a total of 30 radio stations in the memory (18 FM, 12 MW), manually or automatically.
- To store a station:
- Select a band (if needed)
- Select a station by << -/ >> + buttons or SEEK buttons on the RC.
- Hold a Preset button (1-6) which you want store the station for at least 2 seconds.
- To recall a station:
- Select a band (if needed)
- Press a Preset button (1-6) briefly to recall the stored station
AS/PS (Auto Memory Store) function
· Preset scan: press AS/PS button on the RC to scan all preset stations in the memory of the current band
and stay on each memory stations for about 5 seconds. To stop preset scan, press this button again. To listen
to saved station press 1-6 buttons.
· Auto memory store: press AS/PS button on the RC for more than 2 seconds to enter auto store mode.
The radio will automatically store the 6 strongest available stations to the 6 preset memories of the current
band. To stop auto store, press this button again.
Local/Distance Control
In radio mode, press the LOC button on the RC to select local or distance reception.
Local and distance reception setting can facilitate the radio reception, depending on the location in which the
radio is being used.
Scanning the radio station
Press SCAN button on the RC to scanning the radio band.

12
Cassette operations
Loading a cassette
- Turn the power on.
- Press the OPEN button on the panel. Insert the cassette with the exposed tape side facing right into the
slot. The playback will start automatically.
Play direction reverse
Press both the REWIND and FAST FORWARD buttons on the back of the front panel at the same time to
reverse the play direction of the tape while it is still playing.
When the tape reaches to the end, it reverses automatically and the other side begins to play.
Rewind/ Fast forward
Press the REWIND or FAST FORWARD button on the back of the front panel to fast forward or
rewind the tape.
Stop playback
To stop the playback press the OPEN button to open the panel, then press the EJECT button.
The playback will be stopped, the cassette will be ejected.
Cleaning
Cleaning the cabinet
- Wipe with a soft cloth. If the cabinet is very dampen (not dropping wet) the cloth with a
weak solution of soapy water, and then wipe clean.
Cleaning the heads of tape recorder
- Periodic cleaning of the tape head, capstan and pinch rollers will ensure good reproduction
of music and trouble-free operation.
- Cleaning of the tape head should be done every 20 to 30 hours of operation or when the
high tones have become less clear.
- Clean the tape head, capstan and the pinch rollers with the cotton swab soaked in alcohol.
- Allow the tape head, capstan and pinch rollers to dry before operating.
- Do not touch the tape with your fingers. If it becomes lose wind it back by twisting six-sided
pencil in the cassette reel.

13
Troubleshooting guide
No power or no
sound
Car's engine switch is not on. Turn your car's key to ACC or ON.
Cable is not correctly connected. Check connection.
Fuse is burnt. Replace fuse. Check volume or mute on / off.
If above solutions cannot help, press the RESET button.
Sound skips due to
vibration
Mounting angle is over 30º. Adjust mounting angle to less than 30º.
Instable mounting. Mount the unit securely with the mounting parts.
Much noise in
broadcasts
Station is too far, or signals are too weak.
Select other stations of higher signal level.
Preset station is
reset
Battery cable is not correctly connected.
Connect the battery cable to the terminal that is always live.
No sound in one
channel
Dirty tape head (tape section only). Use a head cleaning cassette.
Damage speaker wire or speaker. Reverse left and right channel speaker leads.
If no sound from other side, check or replace speaker wires. If no sound from
same side, replace speaker.

14
Specification
Specifications are subject to change without notice. Mass and dimension are
approximate.
General. Power supply:
12 V DC (12 V - 15 V), negative ground
Maximum power output: 50 Wx4 channels
Fuse: 15 A
Suitable speaker impedance: 4 - 8 ohm
Output wiring: 4 speakers only
RCA line out: RCA low-level outputs 500 mV
Dimensions (W x H x D)/Weight: 192 x 178 x 50 mm/ 1.75 kg
FM. Frequency coverage: 87.5 108 MHz
Sensitivity (S/N = 60 dB): 50 dB
FM mono sensitivity: 50 dB
Stereo separation: 30 dB
AM. Frequency coverage/Sensitivity: 522 1620 KHz/ 20 uV
Cassette player. Tape speed: 4.75 cm/sec
Fast forward time: 180 sec (C-60 type)
Frequency response: 30 Hz 12 kHz
Channel separation/ Cross talk: > 40 dB/> 45 dB
Playback head: 4 tracks, 2 channels

15
!
.
,
, .
................................................................................................................................15
..............................................................................................................16
/ ..............................................................................................................17
.....................................................................................................................20
.......................................................................................................23
..............................................................................................................................26
.................................................................................27
.......................................................................................................28

16
- ,
.
- 12.
- .
- , .
,
.
- .
- , .
, .
- ,
, , .
- ,
(.).
- .
.
- , ,
.
- , , ,
, , .
.
- .
- 4 .
2 . .
- ,
, . ,
, , .
- ,
. .
- , ,
.

17
-
0,75 (AWG18), .
/
, .
. ,
, .
.

18
1. OPEN . (. 1).
2. (. 2).
1. , ,
(.3).
2. , (. 4).
3. .
:
. .
: , .
.
. ,
, .
:
, .
, .
. 1
. 2
. 3

19
:
- , , 4
.
- .
()
()
()
()

20
1. OPEN. ,
EJECT .
2. / SEL
, .
, .
VOL/SEL, .
3 , : << - , .
>> + , . VOL/SEL,
5 .
/