Page is loading ...

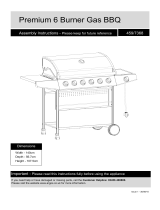
Model:
CP240
Buffalo 6 Burner
BBQ Griddle/Grill
Combination
Instruction manual

2
UK Telephone Helpline: 0845 146 2887
Safety tips
• Read all instructions before use and retain for future reference.
• Follow all warning notices on the appliance.
• Never allow children to operate this appliance.
• For outdoor use only.
• Position on a flat, stable surface.
• Warning: Accessible parts are very hot. Take great care,
especially when children, elderly people, and animals are
present.
• Always use oven gloves when cooking or carrying out any
adjustments to the barbecue.
• Use purpose designed barbecue tools with long, heat resistant
handles.
• Do not cover the appliance before it completely cools down.
• Do not move the appliance after lit, during use or immediately
after use before it completely cools down.
• Do not leave the appliance unattended during use.
• Turn off the gas supply at the gas cylinder or regulator after
each use, or before carrying out any adjustments.
• Do not modify the appliance in any way.
• Any modification of the appliance, misuse, or failure to follow
the instructions may be dangerous and will invalidate your
warranty.
• Never use accessories which are not recommended by the
manufacturer. Only use original parts and accessories.
• Do not use this appliance in enclosed areas, or near flammable
materials (Petroleum based products, thinners or any other
solid object that carries a flammable warning label).

3
UK
Telephone Helpline: 0845 146 2887
• The appliance must not have any overhead obstruction, e.g.
trees, shrubs, lean-to roofs. Ensure a clearance of at least 1m
around the appliance for ample ventilation.
• Do not store or use gasoline or Methylated Fuels or any other
flammable vapours and liquids in the vicinity of this or any
other appliance.
• Never light a gas grill with gasoline or combustible fluids!
• Do not store any other gas cylinder in the vicinity of this or
any other appliance.
• Keep a fire extinguisher (powder type) handy.
• Keep any electrical cords and fuel supply hose away from the
heat surfaces.
• Do not use to heat any sealed glass/container with food.
Pressure may build up and cause the container to burst,
possibly resulting in personal injury or damage to the grill.
• Do not attempt any unauthorized interference of the main
controls on this gas grill, i.e. gas taps, injectors, valves, etc.
• During use, do not attempt to disconnect any gas fitting part
on the gas grill or the gas regulator/cylinder.
• Clean the appliance after use. For cleaning surfaces in contact
with food, please refer to the "Cleaning and Maintenance"
section of this manual.
• Do not obstruct any ventilation openings in the appliance
body.
• Do not enlarge burner ports or orifice/nozzle openings when
cleaning the burner or valves.
• It is recommended this gas grill be serviced (at least annually)
by a professional. Do not service it yourself.

4
UK Telephone Helpline: 0845 146 2887
Gas, regulator and hose
• For use with LPG bottled gas only. A suitable regulator must
be used for butane, propane or mixes.
• LP gas cylinders should rest on a stable, flat surface.
• Do not place the gas bottle directly underneath the barbecue.
• LP gas cylinders should never be stored or laid on their side, in
the horizontal position. A leak would be very serious and liquid
could enter the gas line with serious result.
• Ensure to use gas hoses with heatproof temperature of higher
than 80°C.
• The hose should hang freely with no bends, twisting, tension,
folds, or kinks that could obstruct free flow of gas. Always
inspect the hose for cuts, cracks, perishing, or excessive wear
before use.
• Apart from the connection point, no part of the hose should
touch any hot barbecue parts. If the hose shows any sign of
damage, replace it immediately with one suitable for use with
LP gas which meets the national standards for the country of
use.
• Before use, ensure to check for gas leak ( Gas leak testing).
This is the only safe and sure way to detect any gas leaking
from joints and connections of the barbecue after assembly.
• Perform leak test annually, and whenever the gas cylinder is
disconnected or reconnected.
• Do not use an open flame for gas leak test at any time.
• In case of gas leak or gas odour:
- Stop using the appliance and turn off gas supply to it.
- Extinguish any open flame.
- Check for damages, poor connections, etc.
- If odour continues, contact your local dealer.

5
UK
Telephone Helpline: 0845 146 2887
Introduction
• Please take a few minutes to carefully read through this manual. Correct maintenance and operation
of this appliance will provide the best possible performance from your BUFFALO product.
• BUFFALO prides itself on quality and service, ensuring that at the time of unpacking the contents are
supplied fully functional and free of damage.
• Should you find any damage as a result of transit, please contact your BUFFALO dealer immediately.
Installation
Selecting a location
• This appliance is for outdoor use only and should be placed in a well-ventilated area.
• The sides of the barbecue should NEVER be closer than 1 metre from any combustible surface,
including trees and fences and make sure that there are no heat sources nearby (cigarettes, open
flames, spark etc.). Keep away from any flammable materials!
Choosing the suitable gas cylinder and regulator
This barbecue can use either propane or butane or propane/butane mixed LPG (liquid petroleum gas)
bottled gas. Propane bottles, will supply gas all year round, even on cold winter days. Butane bottles will
supply sufficient gas in summer, but it may affect the performance of the barbecue and restrict the heat
output available from the burners, particularly once the gas temperature starts to fall below +10°C.
• You will need LPG gas bottle and proper regulators under the gas pressure to operate this gas grill.
• Choose the proper regulator according to the appliance category and gas pressure, for example, use
37mbar regulator with appliance category I3+ for propane gas.
Country of Destination Appliance Category Gas and Supply Pressure
Main Burner
Injector Size Ø
BE, CH, CY, CZ, ES, FR,
GB, GR, IE, IT, LT, LU, LV,
PT, SK, SI
I3+(28-30/37) XButane (G30) 28-30 mbar 0.93mm
Propane (G31) 37 mbar 0.93mm
BE, CY, DK, EE, FI, HU, LT,
NL, NO, SE, SI, SK, RO,
HR, TR, BG, LU, MT
I3B/P(30) Butane/Propane 30 mbar 0.93mm
AT, CH, DE, SK I3B/P(50) Butane/Propane 50 mbar 0.82mm
PL I3B/P(37) Butane/Propane 37 mbar 0.86mm
Note: Marking on injector, for example, 0.82 indicates that the size
of the injector is 0.82mm. 845CR
Warning! Ensure to have the proper regulator and cylinder in order for the
barbecue to operate safely and efficiently. Use of an incorrect or faulty regulator
is dangerous and will invalidate any warranty. Consult your local gas dealer for
the most suitable gas cylinders and regulators.

6
UK Telephone Helpline: 0845 146 2887
Connecting the gas hose to the grill
and the regulator
Caution!
• Before connection, ensure all
the control switches of the
grill are at the OFF position.
• Ensure the hose to be used
is of 8-10mm diameter and
no more than 1.5m long.
• Change the hose every 2
years, or upon necessity.
• We suggest wearing gloves
when assembling the hose.
1. Plug the hose head to the connector (if you
have trouble to connect the hose, soak the
hose head into water for 5 minutes). Tighten
the clip by screwdriver (Fig. 1).
Hose
1
Connector
Metal
clip
2. Connect the hose from the grill to the regulator.
Secure the connection with the metal clip on
the hose.
Note:
• The date on the gas
hose (if supplied) is the
manufacturing date, not the
expiration date.
• When replacing with a
new hose, turn off the
gas cylinder first. Then
disconnect the hose from
the gas bottle and gas hose
inlet on the grill.
Connecting the regulator to the gas
cylinder
1. Position the gas cylinder at the right side of
your grill, away from heat and obstructions.
2. Turn the orange cap on the gas cylinder so that
the arrow is pointing to the gap in the shroud.
3. Remove the orange safety cap by pulling the
lanyard out. Do not use any tools. Leave the
cap hanging.
4. Ensure the black sealing washer is fitted inside
the cylinder valve.
5. Mount the regulator on the gas cylinder valve
and tighten firmly (Fig. 2).
2
6. Now the grill is done with all connections and
ready for use.
Gas leak testing
Always perform a leak test in a well-ventilated area.
1. Confirm all control knobs are at the OFF
position (Fig. 3).
3
2. Turn on the gas supply at the gas cylinder or
regulator. Turn on the gas grill as instructed
( Operation).
3. Check for leaks by brushing a solution of ½
water and ½ soap over all the gas system
joints, including all valve connections, hose
connections, and regulator connections.
4. If bubbles form over any of the joints, there is
a leak.
- Turn off the gas supply at the gas cylinder
- Re-tighten all joints
- Repeat test
- If bubbles form again, stop using the grill and
contact your local distributor for assistance.
5. Wipe the mixed solution from all joints and
connections after leak test.

7
UK
Telephone Helpline: 0845 146 2887
Disconnecting a gas cylinder
• Except for twin-cylinder installations with a
changeover valve, turn off the gas tap if fitted
to the appliance. Wait until the burner and pilot
light have gone out. For installations with a
changeover valve, it is only necessary to switch
off the empty cylinder.
• Replace the orange safety cap onto the empty
cylinder.
Operation
Seasoning the cooking surfaces
before first use
• Make sure the cooking surfaces are clean.
• Apply a generous amount of oil to the plates
and some oil to the cooking grids.
• Turn on all 6 knobs to the high position “ ”.
• Wait 5 minutes, switch off and carefully wipe
any excess oil from the plates and grids.
Preparation before cooking
• Wipe clean the cooking grid and griddle top.
Let dry thoroughly.
• To prevent foods from sticking to the cooking
surface, apply a light coat of cooking/vegetable
oil before each barbecuing session.
• Do not face directly over the gas grill when
lighting.
Note: When cooking for the first
time, cooking surfaces colour
may change slightly. This is
normal and does no indicate any
defect.
Lighting the gas grill
1. Ensure all control switches of the gas grill are
at OFF position.
2. Open the gas control valve on the gas cylinder
or regulator.
3. Press down one control switch (Fig. 4A) and
hold for 3-5 seconds to allow gas flow, then
turn anticlockwise to HI position (Fig. 4B).
4
4. You will hear a “snap” from the igniter and see
an orange flame coming from the burner lighting
tube at the left side of the burner (Fig. 4D).
5. Continue to hold the control switch for 2
seconds after the “snap”. This allows gas to
flow completely down the burner tube and
ensures ignition (Fig. 4E).
4
6. Ignite the remaining burners the same way.
Manual ignition
Should automatic ignition fails,
1. Remove the cooking grids and flame tamers.
2. Turn the switch anticlockwise to HI position
(Fig. 5).
5
3. Light with BBQ lighter at the distance of 5mm
to the burner fire hole.
4. Replace the cooking grids and flame tamers,
ensure to wear heat-resistant gloves.

8
UK Telephone Helpline: 0845 146 2887
Caution!
• If the lighting still fails, turn the control switch to OFF. Wait 2 minutes for
the unburnt gas to evaporate. Afterwards, re-light.
• For any difficulty with lighting, please consult your dealer.
Start cooking
1. After ignition, pre-heat the gas grill for 10-15 minutes with HI setting. This should be done before
each cooking session.
2. After pre-heating, turn the control switch to suit requirements.
3. At HI setting the burner flame is approximately 12-20mm long. Turn the control switch to LOW for
minimum setting.
4. Place your food on the desired cooking surface.
Cooking grid Griddle top
• The burners heat up the flame tamers underneath the grid/griddle top, which in turn pass heat
to the food.
• The natural food juices produced during
cooking fall onto the hot flame tamer and
vapourize.
• The subsequent rising smoke bastes the
food, as it travels upwards, imparting that
unique barbecued flavour.
• More suitable for frying steaks, sausages,
etc.
• More even cooking of food will be achieved
by using the griddle top.
5. End of cooking session: Turn the control switches to HI position and burn for 5 minutes. This
procedure will burn off cooking residue, thus making cleaning easier once lukewarm wipe with damp
cloth and dry.
6. Turning off the gas grill: After use, turn all the control switches to OFF position. Then switch off
the gas supply at the gas cylinder or regulator.
Energy saving tips:
• Turn the grill off as soon as cooking is completed.
• Do not preheat longer then recommended.
• Do not use a higher setting than required.
Flare-up control
• Flare-ups occur when meat is barbecued, and its fat and juices fall upon the hot flame tamer. Smoke
of course helps give food its barbecued flavour, but it is best to avoid excessive flare-up to prevent
food from being burned.
• To control flare-ups, it is ABSOLUTELY ESSENTIAL to trim away excess fat from meat and poultry
before grilling. Use cooking sauces and marinades sparingly and try to avoid very cheap cuts of meat
or meat products as these tend to have a high fat and water content. The burners should always be
set to low settings during cooking.
• When flare-ups do occur, they can usually be extinguished by applying baking soda or salt directly
onto the flame tamer. Always protect your hands when handling parts near the cooking surfaces.
Danger of scalding!

9
UK
Telephone Helpline: 0845 146 2887
Fat fires
• After each cooking session, empty and clean the oil cup of food debris. If the barbecue is to be used
for large gatherings, it will be necessary to turn off and cool the barbecue every 2 hours to remove
food debris from the grease cup and clean it out.
• Cleaning frequency may need to be increased if very fatty foods or cheap meat products are being
cooked. Failure to do this may result in a fat fire, and thus cause injury and seriously damage the
barbecue.
• In the event of a fat fire:
- Turn all control knobs to OFF position.
- Turn off the gas supply at the gas cylinder or regulator.
- Keep at a safe distance from the barbecue and wait until the fire has burnt out.
- Never douse a barbecue with water. If an extinguisher is used, it should be a powder type.
- Do not remove the oil cup.
- If the fire does not abates or even seems to worsen, contact your local Fire Brigade for assistance.
Cleaning, care & maintenance
Warning!
• Regularly clean your barbecue between uses, especially after extended
periods of storage.
• Ensure the barbecue and its components are sufficiently cool before cleaning
and storage. Never douse the barbecue surfaces with water while still hot.
• To extend the life and maintain the condition of your barbecue, we strongly recommend that the unit
be covered when left outside for any length of time, especially during the winter months. Heavy-duty
barbecue covers and other accessories are available from your local stockist.
• Inspect the barbecue on a regular basis as damp or condensation can form which may result in
damage to the appliance. It may be necessary to dry the barbecue internally. It is possible for mould
to grow on any fat-gathering parts. This should be cleaned off with hot soapy water.
• A chrome cleaner may be used on chrome parts if required. To prevent rusting, wipe chrome
parts with cooking oil after rinsing and drying.
• Any rust that does not come into contact with the food should be treated with a rust inhibitor and
painted with barbecue paint or a heat resistant paint. Any rust on cooking surface should burn off or
be rubbed off.
Grill Body
• Regularly remove excess grease or fat using a cloth dampened with hot soapy water. Dry thoroughly.
• Excess fat and food debris can be removed from inside the body using a soft plastic or wooden
scraper.
• Do not immerse the body or hose in water.
Burners
• Burning off any residue after cooking will keep the burners clean.
• Periodically check the burner to ensure it is free from insects and spiders which may clog the gas
system, deflecting gas flow.
• Ensure to clean pipes on burner very carefully and make sure that there are no obstructions. We
recommend the use of a pipe cleaner to clean the pipe area.

10
UK Telephone Helpline: 0845 146 2887
Cooking surfaces and all grease-collecting containers
• After cooling down, remove any fat or food particles with a plastic or wooden scraper. Do not use a
steel scraper or wire brush.
• Clean with hot soapy water. Rinse well and dry thoroughly.
• Do not use scouring pads or powders as they can permanently damage the finish. Due to the weight
of the parts, we do not recommend cleaning in a dishwasher.
• Failure to keep clean, and excessive buildup can result in a fat fire. This can be hazardous and
severely damage the barbecue. This is not a fault in the barbecue and is therefore not covered by the
warranty.
Storage
• Store in a cool dry place. If storing the gas grill outdoors, ensure to check that all areas under the
front panel are free from any obstructions (insects, for example). This area must be kept free as this
may affect the flow of combustion or ventilation air.
• If storing the gas grill indoors, the gas cylinder must be disconnected and left outside. The gas
cylinder should always be stored outside, in a dry, well-ventilated area, away from any sources of
heat or ignition. Do not let children tamper with the cylinder.
• When using the barbecue after extended periods of storage, ensure to check for gas leaks and any
obstructions in the burner. Also follow the cleaning procedures to ensure the gas grill is safe.
Troubleshooting
Fault Probable Cause Solution
Gas leaking from
cracked/cut/burned
hose
Damaged hose Turn off gas at LP bottle. If hose is cut or
cracked, replace hose. See LP bottle lead test and
connection regulator to the LP bottle
Gas leaking from LP
bottle
Mechanical failure due to
resting or mishandling
Turn off LP bottle valve
Gas leaking from LP
bottle valve
Failure or bottle valve from
mishandling or mechanical
failure
Turn off LP bottle valve. Return LP bottle to gas
supplier
Gas leaking
between LP bottle
and regulator
connection
Improper installation,
connection not tight, failure
of rubber seal
Turn off LP bottle valve, remove regulator from
cylinder and visually inspect rubber seal for
damage. See LP bottle test and connection
regulator to the LP bottle
Fire coming through
control panel
Fire in burner tube section
of burner due to partial
blockage
Turn off control knobs and LP bottle valve. After
fire is out and grill is cold, remove burner and
inspect for spider nests or rust. See natural hazard
and cleaning the burner assembly pages.
Grease fire
or continuous
excessive flames
above cooking
surface
Too much grease buildup in
burner area
Turn off LP Bottle. Allow flames to die down. After
cooling, clean food particles and excess grease
from inside firebox area, grease cup/pan/tray, and
other surfaces

11
UK
Telephone Helpline: 0845 146 2887
Fault Probable Cause Solution
Burner will not light
using ignitor
Gas issues
Trying to light wrong burner Lighting the gas grill
Burner not engaged with
control valve
Make sure valve are positioned inside of burner
tubes
Obstruction in burner Ensure burner tubes are not obstructed with
spider webs or other objects ( Cleaning, care
& maintenance)
No gas flow Make sure LP bottle is not empty. If not empty, see
“Sudden drop in gas flow”
Vapour lock at coupling nut
to LP bottle
Turn off knobs and disconnect coupling nut from
LP bottle. Reconnect and retry
Coupling nut ad LP bottle
valve not fully connected.
Turn the coupling nut approximately one-half to
three-quarters
Burner will not light
using ignitor
Electrical issues
Electrode cracked or broken;
“sparks at crack”
Replace electrode
Electrode tip not in proper
position
Tip of electrode should be pointing toward port
hole in burner. The distance should be 1/8” to
3/16”. Adjust if necessary
Wire and/or electrode
covered with cooking residue
Clean wire and or electrode with rubbing alcohol
and clean swab
Wires are loose or
disconnected
Reconnect wires or replace electrode/wire
assembly
Wires are short-circuited
(sparking) between ignitor
and electrode
Replace ignitor wire or ignitor
Push button sticks at bottom
sparking between ignitor and
electrode
Inspect wire insulation and proper connection.
Replace wires if insulation is broken
Sudden drop in gas
flow or low flame
Grease buildup Clean burners and inside of grill/ firebox
Excessive fat in meat Trim fat from meat before grilling
Excessive cooking
temperature
Set the control knob to a lower setting
Flames blow out High or gusting winds Move the grill to prevent it from facing wind
directly or increase flame height
Low on LP gas Refill LP bottle
Excess flow valve tripped Sudden drop in gas flow
Persistent grease
fire
Grease trapped by food
buildup around burner system
Turn all knobs to OFF. Turn gas off at LP bottle.
Let fire burn out. After grill cools, remove and
clean all parts
Flashback… (fire in
burner tube(s)
Burner and burner tubes are
blocked
Turn all knobs to OFF. Clean burner and/or burner
tubes ( Cleaning, care & maintenance)

12
UK Telephone Helpline: 0845 146 2887
Fault Probable Cause Solution
Flare-up Grease buildup Clean burners and inside of grill/ firebox
Excessive fat in meat Trim fat from meat before grilling
Excessive cooking
temperature
Set the control knob to a lower setting
Unable to fill LP
bottle
Some dealers have older fill
nozzles with worn threads
Turn worn nozzles don’t have enough “bite” to
engage the valve. Try a second LP gas dealer.
One burner does
not light from other
burner(s)
Grease buildup or food
particles at end of carryover
tube
Clean carry-over tube with wire brush
Technical specifications
Model: CP240
Country of Destination Appliance Category Gas and Supply Pressure
Burners (x6)
Injector Size Ø
BE, CH, CY, CZ, ES, FR,
GB, GR, IE, IT, LT, LU, LV,
PT, SK, SI
I3+(28-30/37) XButane (G30) 28-30 mbar 0.93mm
Propane (G31) 37 mbar 0.93mm
BE, CY, DK, EE, FI, HU, LT,
NL, NO, SE, SI, SK, RO,
HR, TR, BG, LU, MT
I3B/P(30) Butane/Propane 30 mbar 0.93mm
AT, CH, DE, SK I3B/P(50) Butane/Propane 50 mbar 0.82mm
PL I3B/P(37) Butane/Propane 37 mbar 0.86mm
Specifications subject to change without prior notice.
Compliance
The product must not be disposed of as household waste. To help prevent possible harm to human
health and/or the environment, the product must be disposed of in an approved and environmentally safe
recycling process. For further information on how to dispose of this product correctly, contact the product
supplier, or the local authority responsible for waste disposal in your area.
BUFFALO parts have undergone strict product testing in order to comply with
regulatory standards and specifications set by international, independent, and
federal authorities.
BUFFALO products have been approved to carry the following symbol:
845
All rights reserved. No part of these instructions may be produced or transmitted in any form or by any
means, electronic, mechanical, photocopying, recording or otherwise, without the prior written permission
of BUFFALO.
Every effort is made to ensure all details are correct at the time of going to press, however, BUFFALO
reserve the right to change specifications without notice.

13
UK
Telephone Helpline: 0845 146 2887
Assembly instructions

14
UK Telephone Helpline: 0845 146 2887
Assembly instructions
Assembling tools needed (not supplied)
Caution! Whilst every care is taken in the manufacture of this product, care must be taken
during assembly in case sharp edges are present.
Parts list
4
8
12
16
19
15
11
7
3
2
6
10
14
18
17
1
5
9
13
1. Legs (x 2) 11. Side shelf support (x 2)
2. Bottom shelf (x 1) 12. Side shelf (x 2)
3. Long fence rail (x 2) 13. Flame tamer (x 3)
4. Threaded caster (x 4) 14. Cooking grid (x 2)
5. Body (x 1) 15. Wind deflector (x 1)
6. Triangular bracket (R) (x 1) 16. Griddle top (x 1)
7. Triangular bracket (L) (x 1) 17. Drip tray (x 1)
8. Drip pan (x 1) 18. Handle (for the drip tray) (x 1)
9. Connecting slice (A) (x 4) 19. Oil cup (x 1)
10. Connecting slice (B) (x 4)

15
UK
Telephone Helpline: 0845 146 2887
Exploded view
4
8
3
6
14
18
13
7
9
10
11
12
1
15
5
16
19
17
2
Hardware List
A
E
B
D
F
A Bolt M6*50 (x 4)
B Bolt M6*12 (x 38)
D Pin roll 7*12 (x 8)
E Cotter pin (x 8)
F Spacer M6 (x 2)
Note: Specifications subject to change without prior notice.

16
UK Telephone Helpline: 0845 146 2887
Assembly steps
1
1
2
A
A
A x 4
Step 1:
Assemble the bottom shelf (2) to
the legs (1) using 4 bolts M6*50
(A).
B x 8
2
B
B
3
Step 2:
Assemble both of the long fence
rails (3) to the legs using 8 bolts
M6*12 (B).
3
4
Step 3:
Assemble the threaded casters (4)
to legs by twisting clockwise until
tight.
Turn over the bottom assembly
when completed.
Lock all casters to prevent from
moving.

17
UK
Telephone Helpline: 0845 146 2887
B x 12
Fx 2
5
B
4
F
FB
B
76
Step 4:
When installing
this part two
people are
recommended
Align and place the body (5) on
the legs.
Attach the left and right triangular
brackets (7, 6) to the rear of body
and legs. Secure with 10 bolts
M6*12 (B).
Fix the front of body to the legs
using 2 spacers (F) and 2 bolts
M6*12 (B).
5
8
Step 5:
Slide the drip pan (8) into the
body.
B x 16
6
9
B
10
Step 6:
Mount the connecting slices A
and B (9, 10) on the both sides of
body (5) and secure with 16 bolts
M6*12 (B).

18
UK Telephone Helpline: 0845 146 2887
D x 4
Ex 4
7
11
D
E
Step 7:
Attach the side shelf supports (11)
to the lower connecting slices.
Secure with 4 pin rolls (D) and 4
cotter pins (E).
D x 4
Ex 4
12
D
8
E
D
Step 8:
Attach the side shelves (12) to the
upper connecting slices.
Secure with 4 pin rolls (D) and 4
cotter pins (E).
Lift the side shelves (12) and shelf
supports (11) until the shelves
rest horizontally and stably on the
shelf supports.
9
13
Step 9:
Place the flame tamers (13) into
gas side of body.

19
UK
Telephone Helpline: 0845 146 2887
10 14 Step 10:
Place the cooking grids (14) into
body.
15
11 Step 11:
Place the wind deflector (15) on
the body.
Insert the 4 pins on the wind
deflector bottom into the top
holes on the body.
12 16
Step 12:
Place the griddle top (16) on the
body.
Insert the 4 pins on the griddle
bottom into the top holes on the
body.

20
UK Telephone Helpline: 0845 146 2887
17
13
B
18
B x 2
Step 13:
Mount the handle (18) on the drip
tray (17) using 2 bolts M6*12 (B).
Push the drip tray (17) into the
left side of the body.
14
19
17
Step 14:
Slide the oil cup (19) into the slot
underneath the drip tray (17).
15 Step 15:
Now the appliance is fully
assembled.
/