Lefroy Brooks BK 3202 Installation & Servicing Guide
- Category
- Sanitary ware
- Type
- Installation & Servicing Guide

TOWEL WARMER
INSTALLATION GUIDE


Inspection
Every eort has been made to ensure that your
product is delivered complete and without
damage. Please report any discrepancies
before installation. Your product is thoroughly
inspected before being packaged and
despatched to you. However, your product may
have been damaged during transit. The product
may have been damaged without damaging the
outer packaging. For this reason, upon delivery,
it is important that you inspect the product and
notify your supplier of any damage immediately.
Failure to do so may invalidate your guarantee.
Do not install a product that is received
damaged.
Guarantee expenses will not be considered for
the product or labour relating to the installation
of damaged product.
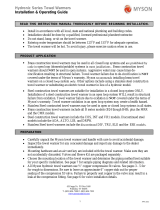
Professional installation
Hydronic & Dual Fuel
We recommend that our products are fitted
by a fully qualified professional plumber/
heating engineer. They should be installed
correctly and in accordance with all local water
regulations. Electrical installation on Dual Fuel
models should be conducted by a fully qualified
professional electrician in accordance with
current regulations.
Towel warmers with radiator inserts are
suitable for closed circuit heating systems only.
Sealed Electric
We recommend that our products are fitted
by a fully qualified professional electrician in
accordance with current regulations.
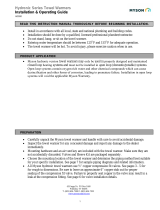
Location
When choosing a location for the towel warmer
ensure that there is sucient clearance to doors
and shower cubicles etc. Always ensure that
mounting surfaces are load bearing and are
suitable structures to accept the product weight
and fixings.
Safe operating temperature
Hydronic & Dual Fuel
To prevent the risk of burns we recommend
that the water temperature within the towel
warmer is between 49°C and 60°C. Exceeding
this will result in a burn hazard.
Sealed Electric
Depending on the model, the towel warmer will
operate at approximately 49°C to 55°C.
Guarantee
Your product is guaranteed against faulty
manufacture and materials for a period of 5
years from the original installation date, with
the exception of electrical elements on Dual
Fuel and Sealed Electric products that are
guaranteed for 12 months from the original
installation date. The guarantee is limited to the
product only and is not applicable to installation
and removal costs. The guarantee is subject
to correct installation. For Hydronic & Dual
Fuel towel warmers the guarantee is subject
to annual maintenance of the heating system.
This must be in accordance with local codes of
practice. In the United Kingdom we recommend
that maintenance of the heating system follows
the guidance given in the current edition of
BS 7593 – Code of practice for the preparation,
commissioning and maintenance of domestic
central heating and cooling water systems.
Brass towel warmer failure due to dezincification
is NOT covered under this guarantee.
IMPORTANT INFORMATION
3

Product care
To retain the appearance of your towel warmer
we recommend an occasional wipe with a
damp cloth, or alternatively, a cloth with a small
amount of mild soapy water. When clean and
dry, bu with a clean soft duster, avoid excessive
rubbing. Please refer to the cleaning instruction
sheet supplied with the product. If you have any
questions please telephone the helpline number
listed at the rear of this guide. DO NOT use
abrasive cleaning products which can damage
the surface finish.
Water quality – Hydronic & Dual Fuel
Your towel warmer is made using the finest
dezincification brass (DZR). However, we
recommend checking with the local water
authority to ensure that the water quality will
not cause dezincification of the brass material.
Brass towel warmer failure due to
dezincification is NOT covered under
this guarantee.
WARNING – When installing Sealed Electric
and Dual Fuel towel warmers the electric supply
to the fused spur must be o before working on
the towel warmer.
It is important to select suitable fixings for the
mounting surfaces. Before drilling the mounting
surfaces ensure that there are no hidden pipes
or wiring.
Safety notice
Towel warmers can be heavy, depending on
size. One person should be sucient to lift the
towel warmer. If for any reason the weight of
the towel warmer is considered too heavy then
obtain assistance.
• When lifting always keep your back straight.
Bend your legs and not your back.
• Avoid twisting at the waist. It is better to
reposition your feet.
• Avoid upper body/top heavy bending. Do not
lean forward or sideways whilst handling the
towel warmer.
• Always grip with the palm of the hand. Do not
use the tips of fingers for support.
• Always keep the towel warmer as close to
the body as possible. This will minimise the
cantilever action.
• Use gloves to provide additional grip.
4

INSTALLATION – HYDRONIC
1 Protect the towel warmer from damage
during installation.
2 Locate the towel warmer on to the
mounting surfaces.
3 Use a spirit level to ensure that the towel
warmer is level. On floor mounted models
ensure that the top and bottom are
equidistant from the wall.
4 Using a pencil or fine marker, mark the
location of the screw holes.
5 Remove the towel warmer and using a suitable
sized drill bit for the chosen fixings, drill the
mounting surfaces.
6 Secure the towel warmer using suitable fixings.
7 Introduce water into the towel warmer and
vent using the bleed valve located at the top of
the war mer.
8 Check all joints for water tightness. Check
again after 24 hours to ensure integrity.
USING YOUR TOWEL WARMER – HYDRONIC
Your towel warmer has been designed for
continuous use and can be used for towels and
some items of clothing. Although not intended
as a room heater, your towel warmer will
contribute a small amount of heat when used
in small bathrooms, toilets or cloak rooms with
low heat losses.
Towel warmers typically take 20 to 30 minutes
to reach full operating temperature.
MAINTENANCE – HYDRONIC
Occasional venting of air from the towel
warmer may be required depending upon how
the system is set up. If a cool zone occurs at the
top of the towel warmer then it is usually an
indication that air needs to be vented.
To prevent seizure, the valves should be turned
every 6 months.
5

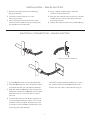
Remove excess from cable tie
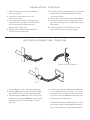
INSTALLATION – DUAL FUEL
1 Protect the towel warmer from damage
during installation.
2 Locate the towel warmer on to the
mounting surfaces.
3 Use a spirit level to ensure that the towel
warmer is level. On floor mounted models
ensure that the top and bottom are
equidistant from the wall.
4 Using a pencil or fine marker, mark the
location of the screw holes.
5 Remove the towel warmer and using a suitable
sized drill bit for the chosen fixings, drill the
mounting surfaces.
6 Secure the towel warmer using suitable fixings.
7 Introduce water into the towel warmer and
vent using the bleed valve located at the top of
the war mer.
8 Check all joints for water tightness. Check
again after 24 hours to ensure integrity.
1 Cut the flexible cover to the required length.
2 Feed the flexible cover over the electric cable
and screw the end onto the electric element.
3 Feed the cable and flexible cover through the
wall plate and secure the flexible cover in place
with the nylon tie. Cut the excess from the
nylon tie.
4 Connect the electrics and fit the wall plate to
a non switched fused spur outlet. The on/o
switched outlet should be located away from
any water source and fitted outside the room
containing the towel warmer.
DO NOT switch the electric element on until
the towel warmer has been filled with water.
Ensure that one valve is open before doing so.
ELECTRICAL CONNECTION – DUAL FUEL
6

USING YOUR TOWEL WARMER – DUAL FUEL
Your towel warmer has been designed for
continuous use and can be used for towels and
some items of clothing. Although not intended
as a room heater, your towel warmer will
contribute a small amount of heat when used
in small bathrooms, toilets or cloak rooms with
low heat losses.
Towel warmers typically take 20 to 30 minutes
to reach full operating temperature.
IMPORTANT – The electric heating element
is for use when the central heating system is
o. DO NOT use the electric element with the
central heating system on, or timed to come on
during the time that the electric element is on.
When using the electrical element it is critical
that one towel warmer valve is open and one
is closed. Failure to set the valves correctly will
cause irreparable damage to the towel warmer.
A programmer/timer can be used to control
the electric heating element. The electric
element is not fitted with an on/o switch
and is not adjustable.
MAINTENANCE – DUAL FUEL
Occasional venting of air from the warmer may
be required depending upon how the system
is set up. If a cool zone occurs at the top of the
warmer then it is usually an indication that air
needs to be vented from the towel warmer.
To prevent seizure, the valves should be turned
every 6 months.
7

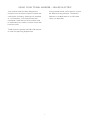
1 Protect the towel warmer from damage
during installation.
2 Locate the towel warmer on to the
mounting surfaces.
3 Use a spirit level to ensure that the towel
warmer is level and that the top and bottom
are equidistant from the wall.
4 Using a pencil or fine marker, mark the
location of the screw holes.
5 Remove the towel warmer and using a suitable
sized drill bit for the chosen fixings, drill the
mounting surfaces.
6 Secure the towel warmer using suitable fixings.
INSTALLATION – SEALED ELECTRIC
Remove excess from cable tie
1 Cut the flexible cover to the required length.
2 Feed the flexible cover over the electric cable
and screw the end onto the electric element.
3 Feed the cable and flexible cover through the
wall plate and secure the flexible cover in place
with the nylon tie. Cut the excess from the
nylon tie.
4 Connect the electrics and fit the wall plate to
a non switched fused spur outlet. The on/o
switched outlet should be located away from
any water source and fitted outside the room
containing the towel warmer.
DO NOT switch the electric element on until
the towel warmer has been filled with water.
Ensure that one valve is open before doing so.
ELECTRICAL CONNECTION – SEALED ELECTRIC
8

USING YOUR TOWEL WARMER – SEALED ELECTRIC
Your towel warmer has been designed for
continuous use and can be used for towels and
some items of clothing. Although not intended
as a room heater, your towel warmer will
contribute a small amount of heat when used
in small bathrooms, toilets or cloak rooms with
low heat losses.
Towel warmers typically take 20 to 30 minutes
to reach full operating temperature.
A programmer/timer can be used to control
the electric heating element. The electric
element is not fitted with an on/o switch
and is not adjustable.
9


Whilst every effort is made to ensure the accuracy of these, they are subject to change without
notice as part of the company’s product development process. The use of trademarks, product design
and artwork is subject to licence or agreement with LBIP Ltd. The design registrations, trademark registrations
and copyrights are protected by law and the use or reproduction outside the terms of an agreement is prohibited.
The right to modify designs and dimensions is reserved. LBIP Ltd is a member of ACID (Anti Copying in Design). E&OE
© LBIP Ltd 2023
CONTRACT ENQUIRIES
+44 (0)1992 708 316
info@lefroybrooks.co.uk
CUSTOMER SERVICE, SPARES & TECHNICAL ENQUIRIES
+44 (0)1902 390 894
technical@lefroybrooks.co.uk
LEFROYBROOKS.CO.UK
20 065 363A / MARCH 2023
-
 1
1
-
 2
2
-
 3
3
-
 4
4
-
 5
5
-
 6
6
-
 7
7
-
 8
8
-
 9
9
-
 10
10
-
 11
11
-
 12
12


Lefroy Brooks BK 3202 Installation & Servicing Guide
- Category
- Sanitary ware
- Type
- Installation & Servicing Guide
Ask a question and I''ll find the answer in the document
Finding information in a document is now easier with AI
Related papers
-
Lefroy Brooks FR 1762 Installation & Servicing Guide
-
-
-
-
-
-
-
-
-
Other documents
-
 Myson Hydronic TW User manual
-
 Myson Hydronic TW User manual
-
MrSteam Fifth Avenue Installation guide
-
Myson WRBY10M Installation guide
-
 Myson Gem Floor Installation guide
-
 Myson Electric TW Installation guide
-
-
Artos MC600H Installation guide
-
Mr. Steam W228C PC Installation guide
-


