Page is loading ...

SY-1029R/
SY-1029A
CLOCK RADIO
USER MANUAL
SCAN - SET MEMO SCAN +

WARNING
TO PREVENT FIRE OR SHOCK HAZARD DO NOT
EXPOSE THIS APPLIANCE TO RAIN OR
MOISTURE.
LIGHTNING FLASH WITH ARROW HEAD SYMBOL - within an equilateral triangle,
is intended to alert the user to the presence of uninsulated dangerous voltage
within the products enclosure that may be of sufficient magnitude to constude
a risk of electric shock to persons.
EXCLAMATION POINT - within an equilateral triangle, is used to indicate that a
specific component shall be replaced only by the component specified in that
documentaon for safety reason.
WARNING : SHOCK HAZARD-DO NOT OPEN
RISK OF ELECTRIC SHOCK
DO NOT OPEN
CAUTION

SAFETY INSTRUCTIONS
1. READ INSTRUCTIONS - All the safety and operang instrucons should be read before the appliance is
operated.
2. RETAIN INSTRUCTIONS - The safety and operang instrucon should be retained for future reference.
3. HEED WARNINGS - All warnings on the appliance and in the operang instrucons should be adhered
to.
4. FOLLOW INSTRUCTIONS - All operang instrucons should be followed.
5. WATER AND MOISTURE - The appliance should not be used near water, for example, near a bathtub,
washbowl, kitchen sink, laundry tub, swimming pool or in a wet basement.
6. VENTILATION - The appliance should be situated so that its locaon or posion does not interfere with
its proper venlaon. Do not place on bed, sofa, rug or similar surface that may block the venlaon
openings, in a built-in installaon, such as a bookcase or cabinet that may impede the flow of air through
the venlaon openings.
7. HEAT - The appliance should be situated away from heat sources such as radiators, stoves, or other
appliances (including amplifiers) that produce heat.
8. POWER SOURCE - The appliance should be connected to power supply only of the type described in
the operang instrucons or as marked on the appliance.
9. POWER CORD PROTECTION - Power supply cords should be routed so that they are not likely to be
walked on or pinched by items placed upon or against them.
10. POWER LINES - An outdoor antenna should be located away from power lines.
11. OBJECT and LIQUID ENTRY - Care should be taken so that objects do not fall and liquids are not
spilled into the enclosure through openings.
12. ESD WARNING - The display does not funcon properly or no reacon to operaon
of any the
control may due to the electrostac discharge. Switch off and unplug the set. Reconnect aer a few
seconds.
13. DAMAGE REQUIRING SERVICE - The appliance should be serviced by qualified service personnel when:
a. The power-supply cord or plug has been damaged.
b. Objects have fallen into, or liquid has been spilled into the appliance enclosure.
c. The appliance has been exposed to rain.
d. The appliance has been dropped, or the enclosure damaged.
e. The appliance does not appear to operate normally.
14. SERVICING - The user should not aempt to service the appliance beyond that described in the user
operang instrucons. All other servicing should be referred to qualified service personnel.
Notes:
If an error display or malfuncon occurs, disconnect the AC cord and remove all the baeries. Then turn
the power back on.

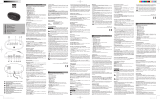
LOCATION OF CONTROL
DISPLAY
SCAN -
MODE
AL2
AL1
VOL-
VOL+
SLEEP
SET MEMO
SNOOZE/LIGHT
E-1
SCAN +

FEATURES
LCD display with backlight
Clock/Date/Weekday display
12/24 Hours display seng
Dual Alarm
Wake up by Radio/Buzzer
SNOOZE funcon
Sleep Funcon (Radio mode)
PLL FM Radio
10 Radio Preset Staon
Volume Control. Total 16 levels (defaulted at level 6 at the beginning)
Buon Cell baery backup
FUNCTION KEY
AL1: Press for checking Alarm1 status & Alarm1 seng
AL2: Press for checking Alarm1 status & Alarm1 seng
MODE: For Changing mode, Clock(standby) > Radio
SCAN-: (Radio) Press once Radio frequency down,
Press & hold for radio staon searching
SCAN+: (Radio) Press once for Radio frequency up,
Press & hold for radio staon searching
SET: (Clock) For clock seng
MEMO: (Radio) For seng the preset radio staon
SLEEP Press for sleep mer setup (90>60>30>15>0)
VOL +/- Volume level UP/DOWN
SNOOZE/LIGHT: - Snooze funcon when in alarm mode
(Each press for repeang alarm every 9 minutes, last for 1 hour)
- Light funcon when in normal situaon
(Press once for LCD backlight ON for 60 seconds)
(Press & hold for LCD backlight always ON, then press & hold again for return to
normal situaon)
E-2

CLOCK OPERATION
Time Seng
Press MODE unl you enter the Clock Display Mode (or it will be in Clock Display Mode when you
first connect with Electricity)
Press & hold the SET buon to enter Time Seng Mode
Press SCAN-/SCAN+ to set the desire me, press the SET buon to confirm and for next seng
Clock Seng sequence: Minutes>Hour>12/24 hr>Year>Month>Day
Alarm Time Seng
In Clock Display Mode
Press AL1/AL2 buon to enter the Alarm Time Seng Mode.
Press AL1/AL2 once again to select the alarm sound source.
The sequence: Off > Radio > Buzzer
Press the SET buon to enter the Alarm Time
The Seng sequence for wake up by Radio: Minutes > Hour > Preset radio staon number > Volume
(Radio preset staon must be set before using this funcon. Otherwise, alarm will only wake up to
the default staon at FM 87.5MHz)
The Seng sequence for wake up by Buzzer: Minutes > Hour
Press the MODE buon any me return to Clock Display Mode.
Alarm last for 1 hour
Alarm only available to stop by pressing the related alarm buon (AL1/AL2)
Alarm restart every 9 minutes aer each press of SNOOZE
RADIO OPERATION
Press MODE buon to enter Radio Mode
default at FM87.5 when first use
Last radio frequency memory
Press SCAN-/SCAN+ once for radio frequency selecon. Press & hold for auto radio staon
searching.
Once the radio staon been selected. Press & hold MEMO buon to enter the Preset Radio Staon
Mode. Then press SCAN-/SCAN+ to select the desire preset staon number. Then press MEMO
again to confirm.
Repeat the above procedures to store more radio staons (maximum 10 preset radio staons).
Listening to the radio by preset staon
In Radio Mode, press the MEMO buon to select the desired preset radio staon. Then press
MEMO buon again for the next preset staon
E-3

SNOOZE/LIGHT FUNCTION
During the wakeup me, press the SNOOZE/LIGHT buon once to temporarily turn off the alarm.
Aer approximately 9 minutes the alarm will sound again. The cycle will repeat when the SNOOZE /
LIGHT buon is pressed again. Alarm max last for 1 hour
Note:
When pressing the SNOOZE / LIGHT buon, the panel backlight will turn on, and will turn off
automacally aer 1 minute.
Press and hold SNOOZE/LIGHT for backlight always ON, then press and hold again for back to
normal
SLEEP FUNCTION
The sleep funcon is used for automac switch-off of the Radio
In Radio Mode, press the SLEEP buon to set the sleep me in minutes (90 > 60 > 30 > 15 > 0). The
radio will now play and switch off automacally when reach the sleep me.
SPECIFICATIONS
Radio Frequency : FM – 87.5 – 108MHz
Antenna : External Antenna Wire
Output : 500mW Max.
Speaker : 50mm, 8ohm x 1
Power Required : Input 230v 50Hz
Clock backup – DC3V, 1 x CR2032 baery (baery included)
While every effort has been made to ensure all informaon contained in this manual is correct, design
and specificaons are subject to change without noce.
E-4

SY-1029R/
SY-1029A
RADIO DESPERTADOR
MANUAL DE INSTRUCCIONES
SCAN - SET MEMO SCAN +
/