SportsArt E875-15 Owner's manual
- Category
- Bicycle accessories
- Type
- Owner's manual
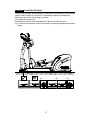
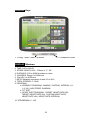
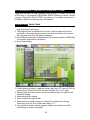
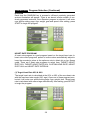
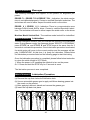
SportsArt E875-15 is a high-quality elliptical trainer designed for commercial use. It features a 15" TFT LCD touch screen display that provides users with a variety of workout options and entertainment choices. The E875-15 also has a built-in heart rate monitor, which allows users to track their heart rate during their workout. The included entertainment cap allows you to enjoy music or videos while you exercise, and the TV terminal and network connectivity let you connect to your favorite streaming services.
SportsArt E875-15 is a high-quality elliptical trainer designed for commercial use. It features a 15" TFT LCD touch screen display that provides users with a variety of workout options and entertainment choices. The E875-15 also has a built-in heart rate monitor, which allows users to track their heart rate during their workout. The included entertainment cap allows you to enjoy music or videos while you exercise, and the TV terminal and network connectivity let you connect to your favorite streaming services.


-
 1
1
-
 2
2
-
 3
3
-
 4
4
-
 5
5
-
 6
6
-
 7
7
-
 8
8
-
 9
9
-
 10
10
-
 11
11
-
 12
12
-
 13
13
-
 14
14
-
 15
15
-
 16
16
-
 17
17
-
 18
18
-
 19
19
-
 20
20
-
 21
21
-
 22
22
-
 23
23
-
 24
24
-
 25
25
-
 26
26
-
 27
27
-
 28
28
-
 29
29
-
 30
30
-
 31
31
-
 32
32
-
 33
33
-
 34
34
-
 35
35
-
 36
36
-
 37
37
-
 38
38
-
 39
39
-
 40
40
-
 41
41
-
 42
42
-
 43
43
-
 44
44
-
 45
45
-
 46
46
-
 47
47
-
 48
48


SportsArt E875-15 Owner's manual
- Category
- Bicycle accessories
- Type
- Owner's manual
SportsArt E875-15 is a high-quality elliptical trainer designed for commercial use. It features a 15" TFT LCD touch screen display that provides users with a variety of workout options and entertainment choices. The E875-15 also has a built-in heart rate monitor, which allows users to track their heart rate during their workout. The included entertainment cap allows you to enjoy music or videos while you exercise, and the TV terminal and network connectivity let you connect to your favorite streaming services.
Ask a question and I''ll find the answer in the document
Finding information in a document is now easier with AI
in other languages
Related papers
-
SportsArt E875-16 Owner's manual
-
SportsArt Fitness G876 Owner's manual
-
-
-
-
-
-
-
-
Other documents
-
Weslo EasyFit User manual
-
 Dyaco International 2AHVL-IEITB1DYACO User manual
-
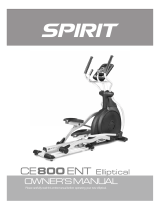
Spirit SPT0034- XE195 Owner's manual
-
-
-
NordicTrack NTEVEL99909.1 User manual
-
-
Life Fitness 91X User manual
-
 Enabling Devices 716 User manual
-
NordicTrack COMMERCIAL 7 NTEVEL15518.0 User manual

