Page is loading ...

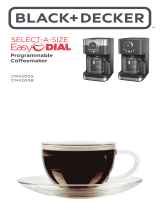
4-Cup ThermalCarafe
Coffeemaker
SAVE THIS USE AND CARE BOOK
QUESTIONS? Please call us TOLL FREE!
In U.S.A.: 1-800-231-9786
In Canada: 1-800-465-6070
?
MODEL DCM20WH

When using electrical appliances, in order to reduce the risk of fire, elec-
tric shock, and/or injury, basic safety precautions should always be fol-
lowed, including the following:
READ ALL INSTRUCTIONS.
■ Do not touch hot surfaces. Use handles or knobs.
■ To protect against fire, electric shock, or injury, do not place cord, plug,
or Coffeemaker base in water or other liquid.
■ Close supervision is necessary when any appliance is used by or near
children.
■ Unplug when Coffeemaker is not in use and before cleaning. Allow to
cool before putting on or taking off parts and before cleaning the
Coffeemaker.
■ Be sure there is water in the reservoir before brewing.
■ Do not operate if this appliance or the electrical cord or plug is dam-
aged or after the appliance malfunctions in any manner. Return the
Coffeemaker to the nearest Black & Decker, Household Appliance
Company-Owned or Authorized Service Center for examination, repair,
or adjustment.
■ To avoid an electrical overload, do not operate another high-wattage
appliance on the same circuit with this Coffeemaker.
■ The use of an accessory not approved for operation with this
Coffeemaker may result in fire, electric shock, or injury.
■ Do not use outdoors.
■ Do not let cord hang over the edge of table or counter, or come in con-
tact with hot surfaces.
■ Do not place carafe on or near a hot gas or electric burner or in a
heated oven.
■ Do not store anything directly on top of the appliance surface.
■ Keep the lid on the serving carafe when in use.
■ Do not remove carafe from the coffeemaker while liquid is dripping
from basket. Allow basket to cool before removing it from the
Coffeemaker.
■ Do not clean the carafe with cleansers, steel wool, or other abrasives.
2
IMPORTANT SAFEGUARDS

■ Do not use this Coffeemaker for anything other than its intended use.
■ Do not pour liquid other than water or the cleaning solution specified
in this manual into the water reservoir.
■ Remember to place the carafe on the unit base before brewing.
■ Do not operate any electric appliance in the presence of explosive
and/or flammable fumes.
■ This product is intended FOR HOUSEHOLD USE ONLY and not for com-
mercial or industrial use.
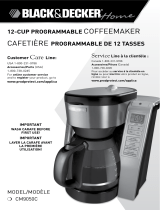
1. Flip Up Reservoir Cover with Tab 6. Carafe Serving Lid
2. Water Spreader 7. 4-Cup Thermal Carafe
3. Water Reservoir 8. Filter Basket
4. Power “On” Light 9. Permanent Filter
5. Start Lever
3
SAVE THESE INSTRUCTIONS
1
3
2
6
4
5
7
8
9

POLARIZED PLUG This appliance has a polarized plug—one blade
is wider than the other. To reduce the risk of
electric shock, this plug will fit into a polarized
outlet only one way. If the plug does not fit fully
into the outlet, reverse it. If it still does not fit,
contact a qualified electrician. Do not attempt to
defeat this safety feature by modifying the plug
in any way.
TAMPER-RESISTANT This appliance is equipped with a tamper-resis-
tant screw to prevent removal of the bottom
cover. To reduce the risk of fire or electric
shock, do not attempt to remove the bottom
cover. There are no user serviceable parts
inside. Repair should be done only by autho-
rized service personnel (see Insert Sheet for a
list of Black & Decker Company-Owned or
Authorized Service Centers).
1. Before the first use, remove all stickers,
packing material, and literature.
2. Clean the Carafe, Filter Basket, Permanent
Filter, and Carafe Lid by washing in hot, sudsy
water or in a dishwasher—top rack only. Rinse
thoroughly.
3. Brew 4 cups of fresh water through the sys-
tem as instructed in the BREWING COFFEE
instructions on the next page, but do not add
coffee grounds.
4
How To Use
PREPARATION
FOR USE

BREWING COFFEE
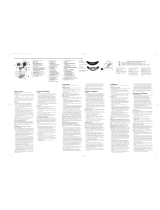
1. Place the Permanent Filter into the
Filter Basket. (Figure A) Add drip
grind coffee to the filter correspond-
ing to the amount of coffee to be
brewed (usually one rounded table-
spoon for each 5 oz./150 ml cup.
Adjust to suit your taste).
NOTE: If you prefer, you may place a
small cone-shaped paper filter (#2
size) into the Permanent Filter for easy
disposal after brewing.
2. Use the Carafe to fill the Water
Reservoir with cold water to the
desired level. Close the flip-up reser-
voir cover.
3. Place the empty Carafe on the cof-
feemaker base. Be sure the Carafe
Serving Lid is in place.
4. Push down on the Start Lever. The
power light will come on and coffee
will brew through the Lid into the
Carafe. (Figure B).
5. When brewing is done, the
Coffeemaker will automatically turn off
and the Power “On” light will go out.
6. Let all the brewed coffee drip from
the Basket and watch for any hot liq-
uid dripping from the Basket before
removing the carafe. Since the carafe
has a cool-touch exterior, you can
bring it straight from the coffeemaker
to table or desk.
7. DO NOT pour brewed coffee back
into the Water Reservoir to reheat it.
Remove the cover and place the
carafe into a microwave to reheat, or
pour coffee into a saucepan and heat
it on a range. If you are reheating in a
5
Figure A
Figure B

convection microwave oven, do not
use a metal rack. Be careful of scald-
ing from coffee reheated in a high-
powered microwave.
8. Your Coffeemaker can also be used
to brew hot water for other foods or
beverages such as tea, hot chocolate,
instant oatmeal, or soups. Be sure the
Permanent Filter and Filter Basket
have been washed in hot, sudsy
water and rinsed well before brewing
hot water. Replace the Filter and
Basket and repeat the brewing
process for hot water.
CAUTION: Be careful when lifting the
flip-up reservoir cover after brewing
as this area is hot. Use the Lift Tab
on the side of the Cover to open it.
Do not look into the Coffeemaker
after brewing as steam will be rising.
CLEANING YOUR COFFEEMAKER
1. To clean your Coffeemaker after
brewing coffee, be sure the unit is
OFF and has cooled. Discard the
grounds, and clean as follows:
Filter Basket, Permanent Filter
,
Carafe, and Serving Lid, are all top
rack dishwasher-safe; or they may be
hand washed in hot, sudsy water.
The Coffeemaker’
s exterior may be
cleaned with a soft damp cloth. Do
not use abrasive cleansers or scour-
ing pads. Never immerse the
Coffeemaker in water.
The W
ater Spreader area can be
cleaned by carefully unsnapping the
spreader from the inside of the Flip-
Up Reservoir Cover (Figure C).
6
Figure C
Lift
Tab

Wipe the surfaces with a damp cloth. When finished,
press the Water Spreader against the Cover to snap it
back into place.
MINERAL DEPOSITS AND CLOGGING
Mineral deposits left by hard water can clog your
Coffeemaker. It is necessary to regularly clean your
Coffeemaker to flush out these deposits. Excessive
steaming or a prolonged brewing cycle are signs that
a cleaning is needed.
Clean your Coffeemaker approximately every 1-3 months.
The frequency of cleaning required is affected by your
specific usage and water hardness. You may have to
clean the Coffeemaker more or less often.
During cleaning, more steaming may occur than when
brewing coffee.
1. Pour 1-1/2 cups (350 ml) of white vinegar into the
Water Reservoir and add cold water up to the TOP
FILL line.
2. Put the Filter Basket and Permanent Filter in place.
Set the empty Carafe securely onto the base of the
unit with its Lid in place.
3. Turn the Coffeemaker on.
4. Let half the cleaning solution brew into the Carafe,
then turn the Coffeemaker off to soak.
5. Allow the Coffeemaker to remain off for at least 15
minutes to soften the deposits.
6. Turn the Coffeemaker on again to brew the remaining
cleaning solution into the Carafe.
7. Turn the Coffeemaker off; discard the cleaning
solution.
8. Use the carafe to refill the Reservoir with cold water
to the TOP FILL line, replace the empty Basket, Filter,
Carafe, and Lid.
9. Turn on the Coffeemaker for a complete brew cycle
to flush out the remaining cleaning solution.
10. Wash the Filter Basket, Permanent Filter, Carafe, and
Lid as instructed in “Cleaning Your Coffeemaker.”
7

ELECTRICAL CORD The cord length of this Drip Coffeemaker was
selected to reduce safety hazards that may
occur with a longer cord. If more cord length is
needed, an extension cord with a polarized plug
may be used. It should be rated not less than 10
amperes, 120 Volts, and have Underwriters
Laboratories (in USA) or CSA (in Canada) listing.
When using a longer cord, be sure it does not
drape over a working area or dangle where it
could be pulled on or tripped over. Handle cord
carefully for longer life; avoid jerking or strain-
ing it at outlet and appliance connections.
SERVICE OR REPAIR Service, if necessary, must be performed by a
Black & Decker, Household Appliance
Company-Owned or Authorized Service Center
in the U.S. or Canada. The Service Center near-
est you can be found in the yellow pages of
your phone book under “Appliances—Small-
Repairing.” For your convenience, a listing of
our Company-Owned Service Centers can be
found on the insert included with this book.
If mailing or shipping your Coffeemaker, be sure
to empty water from the reservoir and carafe
before packing. Pack it carefully in a sturdy car-
ton with enough packing material to prevent
damage. You may use original packaging as
long as you include packing material suitable
for shipping. Include a note describing the
problem to our Service Center and be sure to
give your return address. We also suggest that
you insure the package for your protection.
Consumer-replaceable parts and accessories
are available at Black & Decker Household
Appliance Company-Owned or Authorized
Service Centers in the U.S. or Canada.
8

Black & Decker warrants this product against
any defects that are due to faulty material or
workmanship for a two-year period after the
original date of consumer purchase or receipt
as a gift. This warranty does not include dam-
age to the product resulting from accident or
misuse.
If the product should become defective within
the warranty period, we will repair it or elect to
replace it free of charge. We will return your
product, transportation charges prepaid, provid-
ed it is delivered prepaid to any Black & Decker,
Household Appliance Company-Owned or
Authorized Service Center.
This warranty gives you specific legal rights
and you may also have other rights which vary
from state to state or province to province.
Answers to any questions regarding warranty
or service locations may be obtained by phone
or in writing:
In the U.S. A.
Consumer Assistance & Information
Black & Decker (U.S.) Inc.
626 Hanover Pike
Hampstead, MD 21074-0618
T
oll-Free Phone Number
1-800-231-9786
In Canada
Consumer Assistance & Information
Black & Decker Canada Inc.
100 Central Avenue
Brockville, Ontario K6V 5W6
T
oll-Free Phone Number
1-800-465-6070
9
FULL
TWO-YEAR
WARRANTY

Listed by Underwriters Laboratories, Inc. and
Canadian Standards Association
Copyright ©1995 Black & Decker
Pub No. 168638-17-RV00
Printed in People’s Republic of China
/