Page is loading ...

Owner’s
Manual

Owner’s Details
Model _________________________________________________________________
Vehicle Identification Number V.I.N. _______________________________________
Owner’s Name __________________________________________________________
Address ________________________________________________________________
_______________________________________________________________________
_______________________________________________________________________
_______________________________________________________________________
_______________________________________________________________________
Tel. No. _________________________________________________________________
Key Nos: All Doors _____________________________________________________
Water Filler Cap ________________________________________________
Retailer’s Name _________________________________________________________
Address ________________________________________________________________
_______________________________________________________________________
_______________________________________________________________________
_______________________________________________________________________
_______________________________________________________________________
Tel. No. _________________________________________________________________

Away from the rush of every day life and the busy tourist centres, you’ll find 200
Club Sites in areas of outstanding natural beauty across the country. Some
located in National Parks, on land owned by the National Trust or even in the
grounds of stately homes. And around 2,500 small, informal sites or CLs that are
ideal for a restful break. Wherever you stay, you’ll receive a friendly welcome.
You can also be sure of The Club’s
high standards both on our sites
and in our dealings with
members. We’re here to help you
enjoy your caravanning but you’re
free to choose what you want
from The Club.
Most members join us to use our
unrivalled network of sites but
there are many other Club benefits,
from technical and touring advice
to insurance and travel services.
Add a free Sites Directory and a
top-class monthly magazine, plus
the fact that you can ‘save’ your
whole year’s membership
subscription in reduced pitch fees
in just a week.
Why not request an enquiry pack
today and see for yourself.
The essential accessory
for your new caravan!
Enjoy all these benefits
of Club membership…
■
200 Club Sites at special rates
to members
■
Around 2,500 small 5-van sites
for members only
■
Free monthly Club magazine
■
Free UK Sites Directory &
Handbook
■
Free technical and legal
advice
■
Dedicated travel and
insurance services
…for just £36.00* a year
* price valid until 14 Dec 08. A joining
fee of £7.50 applies if you opt to pay by
a single payment method.
Or, if you prefer, send your name and address, quoting ref: BOB to: The Caravan Club,
Dept. MS, FREEPOST WD3000, East Grinstead, West Sussex RH19 1BR (no stamp
needed) and we’ll send you an Enquiry Pack including an application form.
To join or request an
Enquiry Pack, call free on
0800 328 6635
Quoting ref: BOB
or click onto
www.caravanclub.co.uk

Contents
Owner’s Details ............................................................ 1
1.1 INTRODUCTION ........................................... 1-1
1.2 WARRANTY .................................................. 1-2
1.3 WARRANTY COVER .................................... 1-2
1.3.1 6 Year Body Shell Integrity Guarantee .......... 1-2
1.3.2 3 Year Manufacturers Warranty ..................... 1-2
1.3.3 Terms and Conditions .................................... 1-3
1.4 CARAVAN REGISTRATION AND
IDENTIFICATION SCHEME (C.R.I.S)........... 1-4
1.5 SAFETY ........................................................ 1-5
2.1 INTRODUCTION ........................................... 2-1
2.2 Caravan and towing vehicle terms ............ 2-1
2.2.1 Measurement of nose weight ........................ 2-2
2.2.2 The caravan to towing vehicle weight ratio ... 2-2
2.2.3 Towing vehicle’s rear suspension .................. 2-2
2.2.4 Recommended tow ball height ...................... 2-3
2.2.5 Secondary braking cable (Break away
device) ........................................................... 2-3
2.2.6 Loading and distribution of weight in the
caravan and car ............................................. 2-4
2.2.7 Noseweight .................................................... 2-5
2.2.8 Hitching up .................................................... 2-5
2.2.9 Hitching the caravan to the tow vehicle ......... 2-6
2.3 Towing .......................................................... 2-8
2.3.1 Speed limits ................................................... 2-8
2.3.2 Pulling away .................................................. 2-8
2.3.3 Caravan handling .......................................... 2-8
2.3.4 Reversing ...................................................... 2-8
2.3.5 Motorway driving ........................................... 2-8
2.3.6 Mirrors ........................................................... 2-9
2.3.7 Passengers ................................................... 2-9
2.3.8 Snaking.......................................................... 2-9
2.3.9 Stabilisers .................................................... 2-10
2.3.10 Road lighting ............................................... 2-10
2.3.11 Types of tyres fitted ..................................... 2-10
2.3.12 Tyre Wear and Damage .............................. 2-10
2.3.13 Tyre pressures ............................................. 2-11
2.3.14 Wheels......................................................... 2-11
2.3.15 Spare Wheels .............................................. 2-12
2.3.16 Changing a Wheel ....................................... 2-12
2.3.17 Unhitching ................................................... 2-13
2.3.18 Levelling the caravan .................................. 2-14
2.3.19 Towing brackets ........................................... 2-14
2.3.20 Driving licences ........................................... 2-14
3.1 THE WATER SYSTEM .................................. 3-1
3.1.1 Water Supply ................................................. 3-1
3.1.2 The Submersible Pump
(Discovery & Ranger) .................................... 3-1
3.1.3 Whale Smartflo On Board Pump
(Pageant & Senator) ...................................... 3-2
3.1.4 Priming the System using the External
Water Container (Pageant & Senator) ........... 3-2
3.1.5 Troubleshooting (Pageant & Senator) ........... 3-4
3.1.6 Routine Maintenance .................................... 3-5
3.1.7 Cleaning Containers and the System ............ 3-5
3.1.8 Pressure switch (Discovery & Ranger) .......... 3-5
3.1.9 Adjusting Pressure Switch
(Discovery & Ranger) .................................... 3-5
3.1.10 Onboard water supply (Senator only) ............ 3-5
3.1.11 Aquasource Direct Mains Water Connection . 3-6
3.1.12 Draining and Winterisation of the Water
System........................................................... 3-6
3.1.13 Setting up the Water System ......................... 3-6
3.1.14 Shower tray ................................................... 3-6
3.1.15 Waste (Grey) Water System .......................... 3-7
3.2 THE GAS SYSTEM ....................................... 3-7
3.2.1 General information ....................................... 3-7
3.2.2 Types of gas .................................................. 3-8
3.2.3 Changing Gas Cylinders ............................... 3-9
3.2.5 Gas safety advice .......................................... 3-9
3.2.6 Awning Space LPG Appliance Exhaust ......... 3-9
3.2.7 Gas Leaks ..................................................... 3-9
3.2.8 Ventilation .................................................... 3-10
3.2.9 Gas BBQ point (Senator only) ..................... 3-10
3.3 THE ELECTRICAL SYSTEM – 230 VOLT . 3-11
3.3.1 On arrival at caravan site ............................ 3-11
3.3.2 On leaving caravan site ............................... 3-12
3.3.3 Generators................................................... 3-12
3.3.4 Overseas connections ................................. 3-12
3.3.5 Mains unit .................................................... 3-13
3.4 THE ELECTRICAL SYSTEM – 12 VOLT ... 3-14
3.4.1 12-volt Control Panel ................................... 3-15
3.4.2 Auxiliary Battery storage/mains inlet ........... 3-15
4.1 THE TRUMA ULTRASTORE WATER
HEATER ........................................................ 4-1
4.1.1 Filling the Truma Ultrastore with water .......... 4-1
4.1.2 Gas operating instructions ............................. 4-2
4.1.3 Switching off (gas operation) ......................... 4-2
4.1.4 Electrical operating instructions (230v) ......... 4-3
4.1.5 Draining the water heater .............................. 4-3
4.1.6 Maintenance .................................................. 4-3
4.1.7 Important Operating Notes: ........................... 4-4
4.1.8 General Safety Notes: ................................... 4-4
4.1.9 Technical Data ............................................... 4-5
4.2 THE TRUMA S 3002 EL SPACE HEATER ... 4-6
4.2.1 Gas Operation ............................................... 4-6
4.2.2 Thermostat .................................................... 4-6
4.2.3 Important operating notes ............................. 4-6
4.2.4 General Safety Notes .................................... 4-7
4.2.5 Technical data ............................................... 4-8
4.2.6 230V Operation ............................................. 4-8
4.2.6 Operating notes ............................................. 4-8
4.2.7 Technical Data ............................................... 4-9
4.3 TRUMA 12V FAN OPERATION .................... 4-9
4.3.1 Trumavent TEB with automatic speed
control 12V .................................................... 4-9
4.3.2 Technical Data ............................................... 4-9
4.3.3 Warm air distribution ...................................... 4-9
4.4 THE COUNTRY LEISURE COOKING
APPLIANCES ............................................. 4-11
4.5 THE ARGENT HOB .................................... 4-11
4.5.1 Hotplate Burners ......................................... 4-11
4.6 THE MIDI OVEN & GRILL (Ranger,
Pageant & Senator) ................................... 4-12
4.6.1 Grill .............................................................. 4-12
4.6.2 Oven ............................................................ 4-13
4.6.3 The Duplex Oven & Grill (Discovery only) ... 4-13
4.6.4 Temperature Control .................................... 4-14
4.6.5 Cooking Guidelines ..................................... 4-14
4.6.6 Maintenance & Servicing ............................. 4-15
4.7 THE FIRE SENTRY SMOKE ALARM ......... 4-16
4.7.1 False Alarms ‘Hush’ Control ........................4-16
4.7.2 Testing ......................................................... 4-16
4.8 REFRIGERATORS ...................................... 4-17
4.9 DOMETIC REFRIGERATOR MODEL
RM 7390 (Discovery only) ......................... 4-17
4.9.1 Using the refrigerator ................................... 4-17
4.9.2 Controls ....................................................... 4-17

Contents
4.9.3 Energy Selection ......................................... 4-18
4.9.4 Temperature setting cooling compartment .. 4-20
4.9.5 Exchange of the igniter’s battery ................. 4-20
4.9.6 Storing food .................................................4-20
4.10 DOMETIC REFRIGERATOR MODEL
RM 8550L
(Pageant & Senator) ............................... 4-21
4.10.1 Cleaning ...................................................... 4-21
4.10.2 Operating modes and use of the
refrigerator ................................................... 4-21
4.10.3 Control elements of energy selections
(BATTERY IGNITER, MES and AES) ......... 4-21
4.10.4 Electrical operation ...................................... 4-22
4.10.5 Gas operation (liquid gas) ........................... 4-22
4.10.6 Door locking................................................. 4-23
4.10.7 Removable freezer compartment ................ 4-24
4.10.8 Positioning the storage racks ...................... 4-24
4.10.9 Exchange of the igniter’s battery ................. 4-25
4.10.10 Shutting off the refrigerator .......................... 4-25
4.10.11 Lighting ........................................................ 4-25
4.10.12 Troubleshooting ........................................... 4-26
14.10.13 Maintenance .............................................. 4-27
4.11 THETFORD REFRIGERATOR
MODEL N97 (Ranger) ................................ 4-28
4.11.1 Switching on the refrigerator ....................... 4-28
4.11.2 Igniting and starting your refrigerator .......... 4-28
4.11.3 Electrical operation ...................................... 4-28
4.11.4 Power with gas ............................................ 4-29
4.11.5 Switching off the refrigerator........................ 4-29
4.11.6 Securing products for driving ....................... 4-29
4.11.7 Door locking mechanism ............................. 4-30
4.12 THE THETFORD CASSETTE C-200
CW / CWE (Discovery & Ranger).............. 4-31
4.12.1 Preparing for use ......................................... 4-31
4.12.2 Operation ..................................................... 4-33
4.12.3 Emptying the holding tank ........................... 4-33
4.12.4 Cleaning and Maintenance .......................... 4-33
4.12.5 Winterising / Storage ................................... 4-34
4.12.6 Cold weather use ........................................ 4-34
4.12.7 High altitude and hot weather use ............... 4-34
4.13 THE THETFORD CASSETTE C-250
(Pageant & Senator) .................................. 4-35
4.13.1 Introduction .................................................. 4-35
4.13.2 Preparing for use (standard) ....................... 4-37
4.13.3 Preparing for use with Optional Features .... 4-37
4.13.4 Using the toilet (standard) ........................... 4-37
4.13.5 Using the toilet with Optional Features ........ 4-38
4.13.6 Emptying...................................................... 4-38
4.13.7 Emptying with Optional Features ................ 4-38
4.13.8 Cleaning and Maintenance .......................... 4-39
4.13.9 Waste Holding Tank ..................................... 4-39
4.13.10 Cleaning and Maintenance for Optional
Features ...................................................... 4-40
4.13.11 Winter operation .......................................... 4-40
4.13.12 Storage ........................................................ 4-40
4.14 AL-KO SECURE ......................................... 4-41
4.15 AL-KO ATC TRAILER CONTROL
SYSTEM ...................................................... 4-42
4.15.1 System requirements .................................. 4-42
4.15.2 Operating instructions ................................. 4-42
4.16 OMNIVENT ROOFLIGHT MOUNTED
EXTRACTION FAN
(Pageant & Senator only) .......................... 4-43
4.16.1 Use Ventilator (only for OMNIVENT 12V).... 4-43
4.17 THE ALKO CARAVAN CHASSIS ............... 4-44
4.17.1 Chassis members ........................................ 4-44
4.17.2 Drilling or welding of parts or accessories ... 4-44
4.17.3 Independent suspension ............................. 4-44
4.17.4 Coupling head ............................................. 4-44
4.17.5 Operation : Type AK 160 & AK 300
Coupling Head ............................................. 4-45
4.17.6 Secondary braking (Breakaway cable) ........ 4-45
4.17.7 Uncoupling .................................................. 4-45
4.17.8 Brake drum/hub assembly ........................... 4-45
4.17.9 Operating instructions ................................. 4-45
4.17.10 Coupling ...................................................... 4-45
4.17.11 Stabiliser Unit: ............................................. 4-46
4.17.12 Uncoupling .................................................. 4-46
4.17.13 Checking the efficiency of the left/right
friction pads: ................................................ 4-46
4.17.14 Manoeuvring operation ................................ 4-46
4.17.15 Noises whilst driving .................................... 4-47
4.17.16 Remedial Action .......................................... 4-47
4.17.17 Storing ......................................................... 4-47
4.17.18 Towing ball ................................................... 4-47
4.17.19 Overrunning device ..................................... 4-47
4.17.20 Jockey wheel ............................................... 4-48
4.17.21 Brake linkage ............................................... 4-48
4.17.22 Corner steadies ...........................................4-48
4.17.23 Braking system adjustment ......................... 4-48
4.17.24 Chassis Lubrication Points .......................... 4-50
4.18 REMI CARE DOOR FLYSCREEN
(Pageant) .................................................... 4-50
4.18.1 To close REMIcare ...................................... 4-50
4.18.2 To open REMIcare ....................................... 4-50
4.18.3 Cleaning ...................................................... 4-50
4.19 HEKI 2 ROOFLIGHT ................................... 4-51
4.19.1 To open in the tilted position ........................ 4-51
4.19.2 To open in the intermediate position ............ 4-51
4.19.3 To open in the ventilation position ............... 4-51
4.19.4 Closing the blinds ........................................ 4-51
4.19.5 Opening the blinds ...................................... 4-52
4.19.6 Care Instructions ......................................... 4-52
4.20 SENATOR CASSETTE COMBINATION
WINDOW BLINDS ...................................... 4-52
4.20.1 Tensioning ................................................... 4-52
4.21 DISCOVERY, RANGER & PAGEANT
COMBINATION WINDOW BLINDS ............ 4-53
4.21.1 Retensioning ............................................... 4-53
4.21.2 Cleaning ...................................................... 4-53
4.22 TRACKER MONITOR ................................. 4-54
4.22.1 To arm.......................................................... 4-54
4.22.2 To disarm ..................................................... 4-54
4.22.3 Winter storage ............................................. 4-54
4.23 STATUS 315 OMNI-DIRECTIONAL
TELEVISION & FM RADIO ANTENNA
(Ranger only) ............................................. 4-55
4.23.1 Travelling ..................................................... 4-55
4.23.2 Operating the System .................................. 4-55
4.23.3 Removing the Antenna ................................ 4-55
4.23.4 Removing the Pinnacle ............................... 4-55
4.23.5 Fault Finding ................................................ 4-56
4.24 STATUS 530 DIRECTIONAL
TELEVISION & FM RADIO ANTENNA
(Pageant & Senator) .................................. 4-57
4.24.1 Travelling ..................................................... 4-57
4.24.2 Operating the System .................................. 4-57
4.24.3 VHF Television Reception (Overseas Only) 4-57

Contents
4.24.4 Fault Finding ................................................ 4-58
4.25 DAEWOO MICROWAVE OVEN ................. 4-59
4.25.1 Precautions to avoid possible exposure to
excessive microwave energy ...................... 4-59
4.25.2 Operational Procedure ................................ 4-59
4.25.3 Microwave Cooking Utensils ....................... 4-60
4.25.4 Cooking Techniques .................................... 4-61
4.25.5 Cooking Utensils ......................................... 4-61
4.25.6 Care and Cleaning ...................................... 4-62
4.25.7 Before You Call For Service ........................ 4-62
4.25.8 Questions and Answers ............................... 4-62
4.25.9 Specifications .............................................. 4-63
5.1 GENERAL MAINTENANCE ......................... 5-1
5.1.1 Exterior .......................................................... 5-1
5.1.2 Acrylic Windows ............................................ 5-1
5.1.3 Window Catches and Stays .......................... 5-2
5.1.3 Interior ........................................................... 5-2
5.1.4 Mattresses ..................................................... 5-2
5.1.5 Care of your upholstery ................................. 5-2
5.1.6 Curtains ......................................................... 5-2
5.1.7 Hinges and Catches ...................................... 5-3
5.1.8 Free Standing Table ...................................... 5-3
5.1.9 Kitchen Chopping Board ............................... 5-3
5.1.10 Shower/Vanity Units ...................................... 5-3
5.1.11 Guidance on Cleaning Portable Water
Tanks and the Water System and in Touring
Caravans ....................................................... 5-3
5.1.12 For Containers ............................................... 5-4
5.1.13 For Systems .................................................. 5-4
5.1.14 Caravan Keys (Senator only) ........................ 5-4
5.2 FIRE AND SAFETY PRECAUTIONS ........... 5-5
5.2.1 Children ......................................................... 5-5
5.2.2 Fire Extinguishers .......................................... 5-5
5.2.3 In Case of Fire ............................................... 5-5
5.2.4 Ventilation ...................................................... 5-5
5.2.5 Petrol/Diesel Fumes ...................................... 5-5
5.2.6 Original Equipment Appliances ..................... 5-6
5.2.7 Portable Appliances ....................................... 5-6
5.2.8 Modifications.................................................. 5-6
5.3 ASSEMBLING THE BUNKS......................... 5-7
5.3.1 Lift up Bunk ................................................... 5-8
5.3.2 Slatted Bed (Fig. 1) ....................................... 5-8
5.3.3 Side Dinette Bed (Fig. 2) ............................... 5-8
5.3.4 Drop Down Table Bed .................................... 5-8
5.4 WATER SYSTEM - FAULT FINDING ............ 5-9
5.4.1 FAULT - Water not flowing from any tap
when operated but pump runs ....................... 5-9
5.4.2 FAULT - Pump does not run ..........................5-9
5.4.3 FAULT - Water flows from cold tap but has
reduced flow from hot .................................... 5-9
5.4.4 FAULT - Water flows from hot tap but has
reduced flow from cold ................................ 5-10
5.4.5 FAULT - Reduced flow from both hot and
cold taps ...................................................... 5-10
5.4.6 FAULT - Reduced flow from either taps ....... 5-10
5.4.7 FAULT - Water Heater pressure relief
valve venting water ...................................... 5-10
5.4.8 FAULT - Water heater difficult to drain ......... 5-11
5.5 ROOM HEATER - FAULT FINDING ........... 5-12
5.5.1 FAULT - Heater will not light ........................5-12
5.5.2 FAULT - Heater lights .................................. 5-12
5.5.3 FAULT - Blown Air ....................................... 5-12
5.6 BRAKE FAULT FINDING CHART - AL-KO 5-13
5.6.1 FAULT - Braking is one-sided ......................5-13
5.6.2 FAULT - The trailer brakes during mild
decelerations ............................................... 5-13
5.6.3 FAULT - The trailer brakes snatch when
braking ......................................................... 5-13
5.6.4 FAULT - Brake judder .................................. 5-13
5.6.5 FAULT - Trailer brakes lock up when
reversing ...................................................... 5-13
5.6.6 FAULT - Trailer brakes inoperative ..............5-14
5.6.7 FAULT - Hot brakes ..................................... 5-14
5.6.8 FAULT - Handbrake will not hold trailer
on slope ....................................................... 5-14
5.7 REFRIGERATOR - FAULT FINDING ..........5-14
5.7.1 FAULT - No 230V fridge operation .............. 5-14
5.8 TRACKER - FAULT FINDING ..................... 5-14
5.8.1 GENERAL QUESTIONS .............................5-14

Congratulations on the purchase
of a fine touring caravan!
The Caravan Handbook. From Haynes “Glove
Box” series, this caravanning handbook offers
advice on topics like tow cars and towing, storing
your caravan, choosing and using an awning,
accessories worth considering, using your
caravan’s appliances, laying-up a caravan for the
winter and dozens of other subjects. The Caravan
Handbook by John Wickersham has over 300
pages, hundreds of colour photographs, and an
address list of around 145 manufacturers/service
providers.
Price: £12.99.
The Caravan Manual. Now in its 3rd edition, this
full colour manual is the ultimate guide to repairs
and maintenance. Using the guidance and step-
by-step illustrations, many jobs can be carried out
by a competent owner. On the other hand this book
is used by caravanners who want to find out how
things work and to learn about tasks carried out by
servicing specialists. Trevor Watson, Director
General of The Caravan Club wrote: “This
remarkable book covers just about all you will need
to know to get the most from your caravan.”
Price £14.99.
To ensure you enjoy your caravanning to the full, may we commend the
following books from Haynes Publishing? They have been written by John
Wickersham whose caravanning articles appear every month in several
magazines, including the Members’ Magazine of The Caravan Club.
These notable books are available from all good bookshops.
Or you can order direct from:
Haynes Publishing on 01963-442030
Or visit: www.haynes.co.uk

1-1
Introduction
1
1.1 INTRODUCTION
Bailey of Bristol welcome you to the ranks of Bailey Owners.
This Handbook has been designed to enable you to derive the maximum benefits and enjoyment from
your caravan, its information will be of benefit to both experienced and new caravanners alike.
Several sections are ‘common to all models’ in the range, the specific sections relative to a particular
model are clearly indicated.
All enquiries regarding your caravan must be addressed in the first instance to the dealer from whom
the caravan was first purchased.
Your caravan is designed to give many years of use, regular maintenance is however necessary to
ensure trouble free service. Your Bailey Retailer is equipped to offer service facilities, repair work and
any spare parts you may require.
Always consult your Bailey Retailer before additional equipment is fitted to ensure appropriate fixing
support is available.
▲ In any correspondence the caravan V.I.N. should always be quoted, this can be found on
the offside chassis member and is etched into all major windows.
Manufactured by:
BAILEY CARAVANS LIMITED,
South Liberty Lane, Bristol BS3 2SS, England.

1-2
1
Introduction
1.2 WARRANTY
Any claims under warranty must be made through the Retailer from whom the caravan was purchased.
It is with the retailer that the purchaser’s Contract of Sale exists and consequently Bailey Caravans
cannot enter into any discussions with the purchaser.
Bailey retailers sell our products of their own choice and not as agents. They are, therefore, unable to
bind Bailey Caravans Ltd or make any representation or undertaking whatsoever on behalf of Bailey
Caravans Ltd.
All Bailey products are classified as “portable”. All work under warranty requires that the caravan be
delivered to and collected from the Bailey retailer.
▲ Whilst every effort is made within this Handbook to accurately reflect and describe our
home market caravans (those purchased and stored on the mainland) our policy of
continued improvements and change in market and supply conditions mean that we reserve
the right to alter specifications without further notice. Some materials used in the production
of our caravans can result in variations to the figures quoted in respect of measurements
and weights.
© Copyright 2008 Bailey Caravans Limited.
1.3 WARRANTY COVER
Total customer satisfaction is top priority at Bailey and the quality ethos extends to the aftersales
service and manufacturer’s warranty that comes with every new Bailey touring caravan. In this way we
not only ensure long-term peace of mind but also enhance the resale value of your investment. This
cover is available at no extra cost to the customer.
1.3.1 6 Year Body Shell Integrity Guarantee
All Bailey products are covered by a six year Body Shell Integrity Guarantee. Cover extends to the
following items
Body Leaks & Delamination; water ingress through any permanently sealed seam and joints or
delamination of panels and floor, being part of the original manufacturer’s construction.
1.3.2 3 Year Manufacturers Warranty
For a period of 12 months from the date of purchase Bailey of Bristol offer a comprehensive warranty
on all parts and components as well as full coverage for any manufacturing faults.
The 2nd & 3rd year of cover extends to these items:
Chassis; all chassis members including outriggers.
Suspension; springs, hangers, shackle pins, bushes, shock absorbers and mountings.
Running Gear; axles, hubs, hub bearings, hub oil seals, road wheels (excluding tyres and tubes).
Braking Systems; all mechanical linkage, backing plates, actuators, drums and shoes, (Exclusions:
this warranty does not cover damage to brake drums, shoes or any faults caused through misuse of the
braking system or normal wear and tear).
Towing Mechanism; all mechanical components fitted to tourers (excluding electrics).
Cooker; the cooker unit including burners, grill, oven and flame failure device and igniter.

1-3
Introduction
1
Fridge; door seal, condenser, gas control valve, gas igniter, flame failure device, 12 and 230v heater
elements, gas thermostat, 230v thermostat, 230v temperature control switch.
Water System; water heater (gas or electric), fresh water tank, water pump, water gauges, taps and
shower head.
Auxiliary Electrics; mains hook-up input connector, ELCB, battery charger and distributor unit, interior
lighting units (excluding bulbs).
Cassette Toilet; the cassette toilet is covered (excluding seals, valves and glands).
Heating System; thermostat, motor, switches, control unit, gas heater, flame failure device, igniter
(excluding ducting and fittings).
An additional 4th, 5th and 6th year component warranty package is also available, please ask your
Bailey retailer for more information.
In the unusual event of something going wrong then your first contact should always be your supplying
retailer. Approved Bailey agents enjoy a first class after sales support service from the manufacturer
and they should be able to offer all the help you need to rectify any problems that may exist.
1.3.3 Terms and Conditions
The above offer is subject to the following conditions. The warranty agreement does not affect the
purchaser’s statutory rights.
The Bailey Warranty Cover is offered subject to the following simple conditions: 1. The duration of the Body Shell
Integrity Guarantee is 72 months from the date of purchase and the duration of the Manufacturers Warranty is 36
months from the date of purchase. 2. That an authorised Bailey Service Centre has carried out a full service,
including moisture survey, annually from the date of purchase as new (or within 6 weeks of each anniversary of
purchase). 3. This agreement is personal to the purchaser of the tourer as new from an authorised Bailey retailer
or authorised representative and is not transferable by way of assignment, novation or otherwise. 4. That the
seams and panels requiring repair are part of the original construction of the tourer and have not been tampered
with or repaired otherwise than by Bailey Caravans Limited or an authorised Bailey Service Centre. 5. That
original VAT invoices be retained as proof those annual inspections have been carried out. 6. That in the event of
any repairs being identified as being necessary during the course of an annual inspection the tourer is made
available to an authorised Bailey Service Centre or Bailey Caravans Limited within 6 weeks for the purpose of
carrying out the repair work. 7. No repairs, including the fitting of any replacement unit, may be undertaken or
commenced under the terms of the agreement unless authorisation is obtained by an authorised Bailey Service
Centre from Bailey Caravans Limited. No liability will exist with regard to any claims not authorised in this way. 8.
Bailey Caravans Limited reserve the right to examine the tourer before any repairs commence or any replacement
part fitted. 9. No liability will be accepted for damage caused by neglect, corrosion, intrusion of foreign or deleterious
matter, lack of servicing, over-heating, freezing or abuse or the continued use of the tourer after a fault has
become evident or for the consequential loss or damage to parts not covered by this agreement. 10. That tourers
covered by this agreement shall not be put out to hire, reward or any other commercial use in any timed competition
race. 11. That the tourer shall be used only for its ordinary and intended purpose and shall not be subjected to any
treatment or conditions which could reasonably be foreseen to cause or result in damage to the tourer or excessive
wear and tear. 12. That the tourer registration card shall have been sent to Bailey Caravans Limited within 6
weeks of its purchase as new. 13. That private cars, or 4x4 type vehicles substituting as private cars, shall have
only towed the tourer. 14. Bailey Caravans Limited’s liability under this agreement shall be limited to supplying
labour and materials of a value not exceeding £2,500 including VAT in respect of each claim or series of claims.
No liability arises out of this agreement for consequential costs or damage or for repair costs (other than labour
materials). 15. No liability will be accepted for any accidental or fire damage or any losses incurred by accident or
fire. 16. No liability will be accepted for transport costs to and from point of repair or consequential cost relating to
transportation. 17. No liability of any kind exists in respect of third parties or bodily injury.

1-4
1
Introduction
1.4 CARAVAN REGISTRATION AND IDENTIFICATION SCHEME (C.R.I.S)
This caravan has been security marked and recorded under the Caravan Registration and Identification
Scheme that is organised by the Caravan Industry.
Shortly after purchasing this caravan you should receive your Touring Caravan Registration Document.
It will be sent by post to your home address.
Your Touring Caravan Registration Document will include a 17 character V.I.N. (Vehicle Identification
Number), shown in the top right hand corner. This 17 character V.I.N. will be die stamped into the
caravan drawbar and chemically etched on up to a maximum of 10 eye level windows.
To protect yourself and your touring caravan, never leave the Registration Document in the caravan.
For security reasons keep it in a safe place.
If you sell the caravan please follow the instructions on the Touring Caravan Registration Document.
If you do not receive a Touring Caravan Registration Document, lose it, or any of the details recorded
are incorrect, please contact:
CRIS
Dolphin House
New Street
Salisbury
Wiltshire SP1 2TB
Tel: 01722 411430

1-5
Introduction
1
1.5 SAFETY
This handbook contains the information that you will require for safe enjoyment of your tourer. All of the
information contained herein is important. However to draw your attention to specific items we have
prefixed them with the following symbols to indicate a warning, caution or note respectively:
Warnings
are items that if ignored can cause the user(s) physical harm.
Cautions are items that if ignored can result in the caravan becoming damaged.
Notes
are reminders that should be understood.
▲ To ensure all the occupants of your caravan enjoy a safe and relaxed environment please
observe the following
▲ Ensure all occupants are aware of their escape routes in the event of a fire.
▲ Always keep escape routes and exit points clear from obstruction and debris.
▲ Provide one dry powder fire extinguisher of an approved type or complying with ISO
7165 of at least 1kg capacity by the main door, and a fire blanket next to the cooker.
Familiarise yourself on your fire extinguisher and the local fire precaution arrangements.
▲ Ensure the caravan is serviced and maintained in accordance with this manual and the
appliance manufacturer’s recommendations. Also, that any replacement parts for an
appliance conform to the appliance manufacturer’s specifications and should be fitted by
them or an authorised agent.
▲ Your tourer is a compact living environment, and appliances should be treated in the
same way as those in the home to prevent any accidental burning scalding - keep young
children away from hot surfaces.
▲ Your tourer is supplied with a EN1645 approved caravan step. Always take care when
entering or exiting your tourer, ensuring that the step is securely located and safe before
use. Do not use a broken or damaged step.
▲ The torque setting of the caravan’s wheel bolts should be checked after the first 30 miles
after collection of the caravan from the retailer. Thereafter, the wheel bolts should be
checked before every journey. The torque settings and tightening sequence are detailed
on page 2-10 of this handbook.
▲ Never attempt to lift the tow hitch with your hands when hitching the caravan to the tow
vehicle or at any other time. Always raise or lower the tow hitch by winding the handle on
the jockey wheel.
▲ Always ensure that the green button located on the leading edge of the coupling head is
raised before towing.

1-6
1
Introduction

2-1
Caravan & Tow Vehicle
2
2.1 INTRODUCTION
Choosing the right car and caravan combination for safe and stable towing is both an art and a science.
It may seem complicated to the newcomer, but a few minutes spent understanding the basic principles,
common terms and definitions in use will be worthwhile in ensuring your enjoyment of our product.
2.2 CARAVAN AND TOWING VEHICLE TERMS
Maximum technically permissible laden mass: As stated by the vehicle manufacturer. This mass
takes into account specific operating conditions including factors such as the strength of materials,
loading capacity of the tyres etc. It is the maximum that the caravan can weigh on the road.
▲ Under no circumstances should the maximum technically permissible laden mass of this
caravan be exceeded.
Mass in running order: Mass of the caravan equipped to the manufacturer’s standard specification.
User payload: The difference between the maximum technically permissible laden mass and the mass
in running order.
User Payload includes:-
Essential habitation equipment:
Those items and fluids required for the safe and proper functioning of
the equipment for habitation as defined by the manufacturer of the caravan.
Personal effects:
Those items which a user can choose to carry in a caravan and which are not included
as essential habitation equipment or operational equipment.
Optional equipment:
Items made available by the manufacturer over and above the standard specification
for the caravan.
The masses relevant to your model of caravan can be found in the service handbook, page 6-8 to 6-11.
▲ Please take care to ensure that you have allowed for the masses of all items you intend to
carry in the caravan. E.g. optional equipment, essential habitation equipment and personal
effects such as clothing, food, bicycles, sailboard, sports equipment etc. The actual laden
mass of the caravan as towed should thus not exceed the maximum technically permissible
laden mass. The actual laden mass can be measured on a public weighbridge.
N.B. Beware weighbridges although regularly checked can give varying (inaccurate) results.
Nose Weight: That part of the weight of the caravan supported by the rear of the towing vehicle. This
is sometimes defined as the “static load at the coupling head”. The maximum nose weight for a caravan
will be limited by either the towing vehicle tow hitch limits or the maximum load to which the caravan
hitch is specified.
▲ The towing vehicle and towing hitch handbooks/manufacturers must be consulted for their
specification prior to towing.
▲ The maximum static nose weight for all Bailey caravans is 100Kg. This should never be
exceeded regardless of whether the towing vehicle’s upper limit is greater.
It is recommended that the nose weight should be varied to find the optimum for towing dependent
upon the actual laden weight of the caravan. Experience has shown that the nose weight should be
approximately 7% of the actual laden weight (i.e. between 50 and 100 kg).

2-2
2
Caravan & Tow Vehicle
MAYBE
NO
YES
85%
2.2.1 Measurement of nose weight
Nose weight may be measured using a proprietary brand of nose weight indicator. Such equipment is
obtainable from your Bailey Dealer.
Another simple method is to use bathroom scales and a suitable piece of strong timber as a platform to
rest the tow hitch on. The timber can be placed vertically between the caravan tow hitch and the
bathroom scales. The timber should be of such length that when the caravan tow hitch is lowered onto
it, using the jockey wheel, the caravan floor is horizontal. The weight can then be measured. When
taking the measurement the jockey wheel should be raised and the corner steadies lowered until they
are just clear of the ground.
Kerb Weight: The weight of the towing vehicle as defined by the vehicle manufacturer.
This is normally: With a full tank of fuel
With an adequate supply of other liquids incidental to the vehicles propulsion
Without drivers or passengers
Without any load except loose tools and equipment with which the vehicle is normally
provided
Without any towing bracket
2.2.2 The caravan to towing vehicle weight ratio
This can be determined by calculation and is equal to:
actual laden mass of caravan
x 100%
kerb weight of towing vehicle
As a general guide.
i. Conventional petrol engines with a capacity
up to approximately 1600cc petrol or 1800cc
diesel should be adequate for towing a
caravan weighing around 85% of the kerb
weight of the towing vehicle.
ii. Above 1600cc petrol or 1800cc diesel such
engines should manage a caravan weighing
up to 100% of the kerb weight of the towing
vehicle and still give adequate performance.
The towing vehicle manufacturer’s towing limit is,
in some cases, less than the kerb weight.
Vehicles with automatic transmission may need an
oil cooler fitted or the SAE rating of the gearbox
fluid increased when towing. The advice of the
vehicle manufacturer should be sought.
The law requires that caravans & their towing vehicles & the loads they carry must be in such a condition
that no danger or nuisance is caused. (Regulation 100 of the Road Vehicles [Construction and Use]
Regulations 1986).
2.2.3 Towing vehicle’s rear suspension
It is important that the towing vehicle’s rear suspension is not deflected excessively by the noseweight
on the tow ball. If it is excessive the steering and stability will be affected and at night the headlight
beam is likely to dazzle other drivers which is illegal.
EQUAL

2-3
Caravan & Tow Vehicle
2
The greater the towing vehicle’s tail overhang (the distance between the rear axle and the tow ball) the
greater the effect the noseweight will have on the towing vehicle’s rear suspension.
After trying out the caravan it may be found that stiffening of the rear suspension is necessary - but note
that this may give the towing vehicle a firmer ride when not towing.
There are a number of suspension aids available and advice should be sought on which to use and
how to fit.
It is important to ensure that the caravan is towed either level or slightly nose down. If it is not, then the
car’s towbar may be at the wrong height.
▲
Always consult your tow vehicle manufacturer for advice on towing and the loads that the
vehicle is capable of towing.
2.2.4 Recommended tow ball height
The recommended tow ball height for Bailey Caravans is 415 +/- 35mm (i.e. between 380mm and
450mm).
2.2.5 Secondary braking cable (Break away device)
Purpose
- To apply a trailer’s brakes if it becomes separated from its towing vehicle. Having done this,
the cable assembly is designed to part, allowing the trailer to come to a halt away from the towing
vehicle.
Construction
- A thin steel cable, coated in red plastic, and fitted with a means of attachment for
connection to the towing vehicle.
Operation
- In the event of the main coupling of the trailer separating from the towing vehicle, the cable
should be able to pull tight, without any hindrance, engaging the trailer’s brakes.
▲
The breakaway cable should never become taut during normal use.
Correct procedure for use:
● Regularly check the cable and clip for damage. If in doubt, contact your trailer or towbar supplier or
your service agent.
● Make sure the cable runs as straight as possible and goes through a cable guide underneath the
trailer coupling.
● Determine whether or not the towbar has a designated attachment point (i.e. a part specifically
designated by its manufacturer for a breakaway cable).
Where a designated attachment point is provided on the
towbar:
Pass the cable through the attachment point and clip it back on itself
(Fig a).
Fig a

2-4
2
Caravan & Tow Vehicle
Where no designated
attachment point has been
provided on the towbar:
Fixed ball
- Loop the cable around
the neck of the towball. If you fit the
cable like this, use a single loop only.
See Figs. b and c.
Detachable ball
- You must seek
guidance on procedure from the
towbar manufacturer or supplier.
Other means of attachment:
In some instances it may be possible to attach the cable assembly:
Either:
a) to a permanent part of the towbar structure, as long as this meets the approval of the towbar
manufacturer/supplier,
Or:
b) to an accessory sold for the specific purpose of breakaway cable attachment.
When the breakaway cable is attached, check to ensure:
a) that the cable cannot snag in use on the trailer coupling head, jockey wheel, or any accessory, e.g.
a stabiliser, bumper shield, cycle carrier, etc.
b) that there is sufficient slack in the cable to allow the towing vehicle and trailer to articulate fully
without the cable ever becoming taut and applying the brakes.
▲
For peace of mind you might wish to check the state of the cable by positioning the trailer
and towing vehicle at extreme angles before setting off.
c) that it is not so slack that it can drag on the ground. If left loose, the cable may scrape along the
ground and be weakened so that it subsequently fails to do its job. The cable may also be caught on
an obstacle when in motion thus engaging the trailer brakes prematurely.
Having followed this advice, should you feel that a satisfactory coupling arrangement cannot be achieved,
consult your trailer or towbar supplier or service agent.
▲
It is a legal requirement that the secondary break away cable is used when towing.
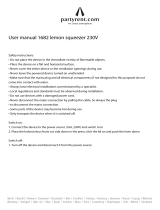
2.2.6 Loading and distribution of weight in the caravan and car
Equipment and personal effects should be loaded in the caravan so that any heavy items are low down
near the floor and mainly over the axle(s).
The remainder should be distributed to give a suitable noseweight at the towing coupling (see illustration).
It should be noted that with certain layouts or models it may be necessary to load heavy items, such as
awnings in the middle of the floor to achieve an acceptable and safe nose weight. It may not be possible
to achieve the desired nose weight with all items stored ‘out of sight’ in lockers and bed boxes (bunks).
Fig b
Fig c

2-5
Caravan & Tow Vehicle
2
▲ Always load the caravan in such a way that maximises towing safety.
Incorrect caravan loading and/or overloading of the
towing vehicles rear suspension will also result in
poor towing stability.
The weight should be distributed so that each side
of the caravan carries, approximately, the same
load.
▲ Please take care that you have
allowed for the weight of all items you
intend to load into the caravan.
2.2.7 Noseweight
It is recommended that the noseweight should be
varied to find the optimum for towing dependent
upon the actual laden weight of the caravan.
Experience has shown that the noseweight should
be approximately 7% of the actual laden weight
(i.e. between 50 and 100kg). However, this may
be limited by the towing vehicle or caravan
manufacturer’s limit noseweight. Check with the
car and caravan handbook, or consult your retailer.
The upper limit for the caravan coupling head is
100kg.
2.2.8 Hitching up
Before hitching up always check the following:
1. All wheel bolts are tightened to the correct
torque. For alloy wheels the wheel bolts
should be tightened to a torque of 110Nm
(Newton Metres), for steel wheels the wheel
bolts should be tightened to a torque of
88Nm.
2. Inspect all wheels and tyres for signs of
deterioration or damage.
3. Tyre pressures are correct according to the
service handbook (remember to check the
spare as well)
4. Ensure all loose articles are stowed securely
▲ Do not store heavy items in roof
lockers. Televisions and other heavy
items must always be secured at floor
level when towing.
INCORRECT
INCORRECT
CORRECT
HEAVY
ITEMS
MEDIUM
ITEMS
LIGHT
ITEMS

2-6
2
Caravan & Tow Vehicle
5. All lockers and cupboard doors are closed and
secured
6. All bunks are secure
7. All rooflights, extractor fans and sunroofs are
closed and secured
8. Tables are securely stored in their transit
positions
9. Fridge is on 12v operation and door lock is set
(if required)
10. All windows are fully closed and latched. Never
tow with windows on night setting. Leave all
curtains and blinds open to aid rear visibility
11. Gas cylinders are correctly positioned, secured
and turned off, the gas box is shut and locked
▲ Ensure no loose items are stored in the
gas box and it is not ‘overstuffed’ with
equipment, as this may cause impact
damage to the inside of the front panel.
12. Battery strap is connected and the battery is
secure
13. All external doors, flaps and ventilation ducts
are closed and secure with their relevant covers
in place.
▲ Before commencing any journey always ensure that the REMItop rooflight is closed and
both handles are securely fastened.
▲ All gas appliances and the gas bottles must be turned off whilst towing
▲ It is recommended that a minimum of 2 people work together when hitching up the caravan
to the tow vehicle.
2.2.9 Hitching the caravan to the tow vehicle
Ensure that the caravan is in a suitable position, and secure with the handbrake fully on.
Fully raise all four corner steadies.
Shut and lock the caravan exterior.
Gauge the height of the car’s tow ball then raise or lower the height of the caravan’s towing hitch to
ensure that it is high enough to pass over it cleanly and not hit the tow ball. Rotating the caravans
jockey wheel handle can do this. Clockwise to lower, Anti-clockwise to raise.
The assistant should position themselves by the front near side of the caravan so that they can extend
an arm horizontally to indicate the position of the caravan’s towing hitch.
Remove car’s tow ball cover and keep it in a secure place in the car.
Slowly reverse the towing vehicle towards the caravan.
▲ When reversing the towing vehicle towards the caravan always ensure that any
pedestrians and your assistant are visible at all times.
When reversing aim the tow ball of the car directly at the caravan towing hitch.
When the car’s tow ball is as close to the caravan’s towing hitch as possible fully apply the car’s
handbrake, turn off the engine and leave the car in first gear (Park or ‘P’ Position for Automatics).

2-7
Caravan & Tow Vehicle
2
The final positioning should be carried out by manoeuvring the caravan by hand.
Carefully release the caravan handbrake.
Manoeuvre the caravan by hand to position the caravan’s tow hitch directly over the car’s tow ball.
▲ Always manoeuvre the caravan by pushing /pulling on the grab handles only. Not the
body panels. When the caravan is in the correct position fully apply the handbrake.
Raise the handle on the caravan tow hitch until it clicks and remains at an angle.
Rotate the jockey wheel handle
clockwise to lower the caravan
hitch onto the car’s tow ball. When
the tow hitch clicks and the handle
drops to the horizontal position it is
engaged. The hitch head is fitted
with a visual indicator on the front
radius to show whether or not it is
properly connected to the tow ball.
A green band will show immediately
below the red indicator button on
the hitch head when a proper connection has been made.
Connect secondary braking cable as per the instructions in the
previous section.
Test that the hitch is now fully engaged by slightly raising caravan
hitch from car tow ball by winding the jockey wheel handle anti-
clockwise. The hitch should not release from the car tow ball.
Only raise the rear of the car enough to check the hitch is fully
engaged.
Turn jockey wheel winding handle to lower caravan. When the wheel is fully retracted, release the
clamp and raise the jockey wheel to its travel position.
Once the jockey wheel is at its
travel position and the wheel is
located in the recess in the hitch
cover tighten clamp again.
Depending on the age of your
caravan it will be fitted with either
dual 7 pin connection leads (one
grey and one black) or a single 13
pin connector. If the receiving
sockets on the car do not match the
lead on the caravan then an
adaptor will be required.
In both cases connect the relevant
leads ensuring there is enough
loose cable for cornering, but not
too much which can drag on the
ground.
Check all car and caravan road
lights are working and the operation of the brake lights.
AK300 Hitch
AK160 Hitch
Single 13 pin connectionDual 7 pin connection
/