6238-I2 Wi-Fi Router with VoIP
User’s Guide
February 2007
Document Part Number: 6238-A2-ZB20-20

2 6238 Wi-Fi Router with VOIP User’s Guide 6238-A2-ZB20-10
Zhone Technologies
@Zhone Way
7001 Oakport Street
Oakland, CA 94621
USA
510.777.7000
www.zhone.com
info@zhone.com
COPYRIGHT 2007 Zhone Technologies, Inc. All rights reserved.
This publication is protected by copyright law. No part of this publication may be copied, distributed,
displayed, modified, transmitted, stored in a retrieval system, or translated without express written
permission from Zhone Technologies, Inc.
Acculink, ADSL/R, Bitstorm, Comsphere, DSL the Easy Way, ETC, Etherloop, FrameSaver,
GranDSLAM, GrandVIEW, Hotwire, the Hotwire logo, iMarc, Jetstream, MVL, NextEDGE, Net to Net
Technologies, OpenLane, Paradyne, the Paradyne logo, Performance Wizard, ReachDSL, StormPort,
TruePut are registered trademarks of Zhone Technologies, Inc.
BAN, Connect to Success, GigMux, Hotwire Connected, JetFusion, JetVision, MALC, MicroBurst,
PacketSurfer, Quick Channel, Raptor, Reverse Gateway, SLMS, Spectrum Manager, StormTracker, Z-
Edge, Zhone, ZMS, and the Zhone logo are trademarks of Zhone Technologies, Inc.
All other products names or service marks mentioned herein are the trademarks, trade names and service
names of their respective owners.
Zhone Technologies makes no representation or warranties with respect to the contents hereof and
specifically disclaims any implied warranties of merchantability, noninfringement, or fitness for a
particular purpose. Further, Zhone Technologies reserves the right to revise this publication and to make
changes from time to time in the contents hereof without obligation of Zhone Technologies to notify any
person of such revision or changes.

6238-A2-ZB20-10 6238 Wi-Fi Router with VOIP User’s Guide 3
Table of Contents
General Information...............................................................................................5
Package Contents .................................................................................................. 5
Safety Instructions—Please Read ......................................................................... 5
Front Panel View ..................................................................................................6
Indication .............................................................................................................. 6
Back Panel View...................................................................................................8
Installing the Router...............................................................................................9
Connect the ADSL Line to a POTS Splitter (Optional)........................................ 9
Connect the ADSL Line to the Router.................................................................. 9
Connect the PC to the Router................................................................................ 9
Connect a Printer or Server to the Router ........................................................... 10
Connect the Telephone to the Router.................................................................. 10
Connect the Router to a Phone Jack.................................................................... 10
Connect the Power Adapter ................................................................................ 10
Installation Diagram.............................................................................................11
Mounting the Router ........................................................................................... 12
USB Driver Installation........................................................................................13
Configuring Your Computer ...............................................................................16
Windows 2000 .................................................................................................... 16
Windows XP ....................................................................................................... 17
Log in to the Router..............................................................................................18
Device Info.............................................................................................................19
Summary............................................................................................................. 19
WAN................................................................................................................... 20
Statistics .............................................................................................................. 20
Route................................................................................................................... 23
ARP..................................................................................................................... 23
DHCP.................................................................................................................. 25
Quick Setup...........................................................................................................25
Advanced Setup.....................................................................................................30
WAN................................................................................................................... 30
Local Area Network (LAN) Setup...................................................................... 34
Ethernet Mode..................................................................................................... 35
NAT .................................................................................................................... 35
Firewall ............................................................................................................... 38
Quality of Service ............................................................................................... 43
Routing................................................................................................................ 47
DNS .................................................................................................................... 49
ADSL .................................................................................................................. 50
Port Mapping ...................................................................................................... 52
Wireless..................................................................................................................53
Basic.................................................................................................................... 53
Security ............................................................................................................... 54
MAC Filter.......................................................................................................... 55
Wireless Bridge................................................................................................... 56

4 6238 Wi-Fi Router with VOIP User’s Guide 6238-A2-ZB20-10
Advanced ............................................................................................................ 56
Quality of Service ............................................................................................... 58
Station Info ......................................................................................................... 60
Voice.......................................................................................................................61
SIP Basic............................................................................................................. 61
SIP Advanced ..................................................................................................... 62
Dial Plan ............................................................................................................. 65
Phonebook .......................................................................................................... 66
SIP Provision ...................................................................................................... 67
Call Features ....................................................................................................... 68
Diagnostics.............................................................................................................69
Management..........................................................................................................70
Settings................................................................................................................ 70
System Log ......................................................................................................... 72
SNMP.................................................................................................................. 73
TR-069 Client ..................................................................................................... 74
Internet Time....................................................................................................... 74
Access Control .................................................................................................... 75
Update Software.................................................................................................. 78
Reboot Router ..................................................................................................... 79

6238-A2-ZB20-10 6238 Wi-Fi Router with VOIP User’s Guide 5
General Information
The 6238 Wi-Fi Router with VOIP is a 3-in-1 router having the functions of a
standard
ADSL router, plus voice capabilities and wireless accessibility, all in one box. These
three features add convenience and provide increased functions to one router.
Package Contents
Included in the package is one of each of the following:
• Wi-Fi Router
• AC power adapter
• USB cable
• RJ11 telephone cable
• RJ45 Ethernet cable
• Quick Installation Instructions
• CD containing USB drivers and user’s guide
• Place your router on a flat surface close to the cables in a location with
sufficient ventilation.
• To prevent overheating, do not obstruct the ventilation openings of this
equipment.
• Plug this equipment into a surge protector to reduce the risk of damage from
power surges and lightning strikes.
• Operate this equipment only from an electrical outlet with the correct power
source as indicated on the adapter.
• Unplug equipment first before cleaning. A damp cloth can be used to clean
the equipment. Do not use liquid / aerosol cleaners or magnetic / static
cleaning devices.
• Do not open the cover of this equipment. Opening the cover will void any
warranties on the equipment.
Safety Instructions—Please Read

6 6238 Wi-Fi Router with VOIP User’s Guide 6238-A2-ZB20-10
Front Panel View
LED Mode
Indication
Solid The router is on.
Power
No light
The router is not on.
Check if the AC power adapter is connected to the
router and plugged in.
Solid ADSL is connected.
No light ADSL is not connected. ALARM LED will be red.
ADSL / LINK
Blinking Router is connected to ADSL.
Solid ADSL is connected; no traffic.
ADSL / ACT
No light ADSL is not connected.
Blinking Presence of ADSL traffic.
Solid Router is connected to LAN.
No light
No connection to LAN. Check if LAN cable is
connected to router.
LAN 1-4
Blinking Presence of LAN traffic.
Solid Connection established using USB.
USB Device
Flashing The router is sending or receiving data using USB.
Solid Connection established using USB.
USB Host
Flashing The router is sending or receiving data using USB.
Solid Wireless is enabled.
Wi-Fi
No light Wireless is disabled.

6238-A2-ZB20-10 6238 Wi-Fi Router with VOIP User’s Guide 7
LED Mode
Indication
Blinking Presence of wireless traffic.
Solid Line2 is off-hook.
Phone2
No light Line2 is on-hook.
Solid Line1 is off-hook.
Phone1
No light Line1 is on-hook.
Solid Line is off-hook.
LINE
No light Line is on-hook.

8 6238 Wi-Fi Router with VOIP User’s Guide 6238-A2-ZB20-10
Back Panel View
Port Description
On / Off Press to turn the router on and off.
DC 15V 1.2A
Connects to the AC adapter.
LINE
Connects to the wall outlet using an RJ11 cable.
Phone1
Connects to a telephone using an RJ11 cable.
Phone2
Connects to a second telephone using another RJ11 cable.
Console
For use by service personnel only.
USB Host
Connects to a printer or server using the USB cable provided.
USB Device
Optional: Use only if not using any of the LAN lines.
Reset
Short reset (system reboot) — Push and hold the reset button
for 4 seconds.
Long reset (return to default settings) — Push the reset button
for more than 4 seconds and then release.
LAN 1–4
Connect to PCs using RJ45 cables.
ADSL
Connect to the ADSL line, or, optionally, to a POTS splitter
so that you can use a telephone on the same line.

6238-A2-ZB20-10 6238 Wi-Fi Router with VOIP User’s Guide 9
Installing the Router
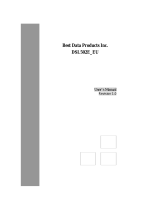
Connect the ADSL Line to a POTS Splitter (Optional)
Follow this procedure if you connect a telephone to the ADSL line using a POTS
splitter.
• Connect an RJ11 cable between the wall phone jack and the LINE port of the
splitter (see diagram below).
• Attach another RJ11 phone wire to the MODEM port of the splitter and the
ADSL port on the rear panel of the router.
• Attach the PHONE port of the splitter to the telephone using a third RJ11
phone wire.
Connect the ADSL Line to the Router
Follow this procedure if you will not connect a telephone to the ADSL line using a
POTS splitter.
• Connect an RJ11 cable between the wall phone jack and the ADSL port of the
router.
Connect the PC to the Router
By Ethernet—
To use the Ethernet connection, connect the Ethernet cable from the computer
directly to the router.
• Connect one end of the Ethernet cable to the port(s) labeled LAN 1-4 on the back
of the router and attach the other end to the Ethernet port of your computer. Do
not use the USB Device port of the router.
• If your LAN has more than one computer, you can attach one end of an Ethernet
cable to a hub or a switch and the other to the Ethernet port (labeled LAN) on the
router. Note that either a crossover or straight-through Ethernet cable can be used.
The router automatically recognizes the type of connection that is required.

10 6238 Wi-Fi Router with VOIP User’s Guide 6238-A2-ZB20-10
By USB—
Or, you can use the supplied USB cable to connect your computer directly to the
router.
• Connect one end of the USB cable to the USB port (labeled USB Device) on the
back of the router and connect the other end to a free USB port on your PC. Do
not use the LAN ports of the router.
• The Found New Hardware Wizard will open on your PC. See USB Driver
Installation below.
Connect a Printer or Server to the Router
If you have a printer or server that you wish to connect to the router, attach the printer
or server to the port labeled USB Host using the USB cable that comes with the
device.
Connect the Telephone to the Router
There are two ports on the back of your router labeled Phone 1 and Phone 2 for you
to connect up to two telephones to. Use RJ11 cables to connect the telephone(s) to the
router.
Connect the Router to a Phone Jack
• Before connecting the power adapter, connect the router directly to a phone jack
using an RJ11 cable.
• Connect one end of an RJ11 cable to the port labeled Line on the back of the
router and the other end to a wall phone jack.
Connect the Power Adapter
• Complete the process by connecting the AC power adapter to the POWER
connector on the back of the device and plug the adapter into a wall outlet or
power strip.
• Then turn on and boot up your PC and any LAN devices, such as hubs or
switches, and any computers connected to them.

6238-A2-ZB20-10 6238 Wi-Fi Router with VOIP User’s Guide 11
Installation Diagram

12 6238 Wi-Fi Router with VOIP User’s Guide 6238-A2-ZB20-10
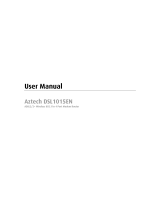
Mounting the Router
The router can be mounted on the wall with screws. Mounting can be done on wall
material including concrete, wood, or drywall. Select an appropriate location free
from obstructions or any possible interference. Make sure the cables can be easily
attached to
the router without strain. The illustration below shows how to mount the router
horizontally
on a wall.

6238-A2-ZB20-10 6238 Wi-Fi Router with VOIP User’s Guide 13
USB Driver Installation
The following instructions will guide you through the installation of the USB driver.
The procedure is not required if you use the LAN ports of the router instead of the
USB Device
port.
1. When you attach the USB cable to the router for the first time and turn on the
device, Windows will detect new hardware and the Found New Hardware
Wizard will appear.

14 6238 Wi-Fi Router with VOIP User’s Guide 6238-A2-ZB20-10
2. The Found New Hardware Wizard will appear shortly after, showing that a
USB driver is needed. Click on Next to continue with the installation.
3. The Digital Signature Not Found window appears. Click on Yes to continue
with the installation.
4. The Insert Disk window prompts you to insert the disk (or CD) containing
the USB driver. Click on OK after inserting the disk (or CD).

6238-A2-ZB20-10 6238 Wi-Fi Router with VOIP User’s Guide 15
5. After clicking OK at the previous window, you will be asked to browse for
the location of the disk (or CD) that the USB driver is on. Then click on OK
to continue to the next step.
6. When you select the location of the disk (or CD), the required file
USB8023K.SYS is displayed in the filename window of this screen. Click on
Open to continue with the installation process.

16 6238 Wi-Fi Router with VOIP User’s Guide 6238-A2-ZB20-10
7. The last window lets you know that the driver installation is complete. Click
on Finish to close the wizard.
Configuring Your Computer
Prior to accessing the router through the LAN or the USB port, your PC’s IP address
must be set to 192.168.1.x, where x is any number between 2 and 254. The Subnet
Mask must be set to 255.255.255.0.
The router’s default IP address is 192.168.1.1.
Below are the procedures for configuring your computer. Follow the instructions for
the operating system that you are using.
Windows 2000
1. In the Windows taskbar, click on the Start button and point to Settings,
Control Panel, and Network and Dial-up Connections (in that order).
2. Click on Local Area Connection. When you have the Local Area Connection
Status window open, click on Properties.
3. Listed in the window are the installed network components. If the list
includes Internet Protocol (TCP/IP), then the protocol has already been
enabled, and you can skip to Step 10.
4. If Internet Protocol (TCP/IP) does not appear as an installed component, then
click on Install.
5. In the Select Network Component Type window, click on protocol and then
the Add button.
6. Select Internet Protocol (TCP/IP) from the list and then click on OK.
7. If prompted to restart your computer with the new settings, click OK.
8. After your computer restarts, click on the Network and Dial-up Connections
icon again, and right click on the Local Area Connection icon and then select
Properties.
9. In the Local Area Connection Properties dialog box, select Internet Protocol
(TCP/IP) and then click on Properties.
10. In the Internet Protocol (TCP/IP) Properties dialog box, click in the radio
button labeled Use the following IP address and type 192.168.1.x (where x
is any number between 2 and 254) and 255.255.255.0 in the IP address field
and Subnet Mask field.

6238-A2-ZB20-10 6238 Wi-Fi Router with VOIP User’s Guide 17
11. Click on OK twice to save your changes and then close the Control Panel.
Windows XP
1. In the Windows taskbar, click on the Start button and point to Settings and
then click Network Connections.
2. In the Network Connections window, right click on the Local Area
Connection icon and click on properties.
3. Listed in the Local Area Connection window are the installed network
components. Make sure the box for Internet Protocol (TCP/IP) is checked and
then click on Properties.
4. In the Internet Protocol (TCP/IP) Properties dialog box, click in the radio
button labeled Use the following IP address and type 192.168.1.x (where x
is any number between 2 and 254) and 255.255.255.0 in the IP address field
and Subnet Mask field.
5. Click on OK twice to save your changes and then close the Control Panel.

18 6238 Wi-Fi Router with VOIP User’s Guide 6238-A2-ZB20-10
Log in to the Router
This section explains how to log in to your router.
1. Launch your web browser.
2. Enter the URL http://192.168.1.1 in the Address field of your browser
and press Enter.
A login screen like the one below appears.
3. Enter your user name and password, and then click on OK to display the
user interface.
NOTE: There are two default user name and password combinations. The
user / user name and password combination can display device status, but cannot
change or save configurations. The admin / admin combination can perform all
functions. Passwords can be changed at any time. Some procedures in this manual
require the admin login.
____________________________________________________

6238-A2-ZB20-10 6238 Wi-Fi Router with VOIP User’s Guide 19
This section describes the system information that can be accessed using the menu
items
under Device Info.
Summary
Access the general information of the router by clicking on Summary under Device
Info. The display shows details of the router such as software version, wireless driver
version, and LAN IP address. It also displays the current status of your DSL
connection.
Device Info

20 6238 Wi-Fi Router with VOIP User’s Guide 6238-A2-ZB20-10
WAN
Access the WAN status report from the router by clicking on “WAN” under
“Device Info”. The first time you do this, there is no information to view,
since a WAN connection has not been set up yet. After completing the
configurations for a WAN connection, you can return to this screen to view
the information on your WAN status.
Statistics
LAN Statistics
Access the LAN statistics from the router by clicking on the “LAN” item
under “Statistics”
WAN Statistics
Page is loading ...
Page is loading ...
Page is loading ...
Page is loading ...
Page is loading ...
Page is loading ...
Page is loading ...
Page is loading ...
Page is loading ...
Page is loading ...
Page is loading ...
Page is loading ...
Page is loading ...
Page is loading ...
Page is loading ...
Page is loading ...
Page is loading ...
Page is loading ...
Page is loading ...
Page is loading ...
Page is loading ...
Page is loading ...
Page is loading ...
Page is loading ...
Page is loading ...
Page is loading ...
Page is loading ...
Page is loading ...
Page is loading ...
Page is loading ...
Page is loading ...
Page is loading ...
Page is loading ...
Page is loading ...
Page is loading ...
Page is loading ...
Page is loading ...
Page is loading ...
Page is loading ...
Page is loading ...
Page is loading ...
Page is loading ...
Page is loading ...
Page is loading ...
Page is loading ...
Page is loading ...
Page is loading ...
Page is loading ...
Page is loading ...
Page is loading ...
Page is loading ...
Page is loading ...
Page is loading ...
Page is loading ...
Page is loading ...
Page is loading ...
Page is loading ...
Page is loading ...
Page is loading ...
/