Page is loading ...

USE& CARE
MANUAL
MODEL NO.
99721
KNOW YOUR UNIT
Read this booklet so you will
be able to enjoy all the
features in your Kenmore
Microwave Oven.
Record in space provided
below the Model No. and
the Serial No. found on the
label on the cabinet back.
Model No.
Senal No.
Retain this information for
future reference.
Kenmore
MICROWAVEOVEN
UseandCare
Sears, Roebuck and Co., Chicago, IL 60684 U.S.A.
P/N 400009

YOUR SAFETY FIRST
The Sears microwave oven, though simple to use, is not a toy. Respect it as an electric cooking appliance.
Become familiar with microwave energy, its uses and limitations.
PRECAUTIONS TO AVOID POSSIBLE EXPOSURE TO EXCESSIVE MICROWAVE ENERGY
(a) DO NOT ATTEMPT to operate this oven with the door open since open door operation can result in
harmful exposure to microwave energy. It is important not to defeat or tamper with the safety interlocks.
(b) DO NOT PLACE any object between the oven front face and the door or allow soil or cleaner residue
to accumulate on sealing surfaces.
(c) DO NOT OPERATE the oven if it is damaged. It is particularly important that the oven door closes
properly and that there is no damage to the:
(I) DOOR (bent)
(2) HINGES AND LATCHES (broken or loosened)
(3) DOOR SEALS AND SEALING SURFACES
(d) THE OVEN SHOULD NOT BE ADJUSTED OR REPAIRED BY ANYONE EXCEPT PROPERLY
QUALIFIED SERVICE PERSONNEL.
Oven must be level.
Glass tray must be in oven during cooking.
Remove metal rack from oven when rack is not used for cooking.
If this oven is dropped or damaged,do not use it until it is thoroughly checked by a trained service technician.
Electrical power cord must be kept dry and must not be pinched or crushed in any way.
The MICROWAVE OVEN has several hidden safety switches to make sure the power remains off when the
door is open. Do not try to defeat them.
DON'T
Do not try to use this microwave oven with the door open.
Do not run the oven empty without the foods.
Do not run the oven empty with the Metal Rack in it.
Do not use browning dishes on Metal Rack.
Do not run the oven empty with the Temperature Probe plugged in.
Do not let the Temperature Probe Sensor touch the sides, bottom and door of oven when in use.
Do not use the Temperature Probe in a regular oven.
Do not store burnable material, such as food, in a Microwave Oven.
Do not use this microwave oven for commercial purposes.
This Microwave Oven is made for household use only.
.SAFETY CERTIFICATION
The Kenmore Microwave Oven is designed and thoroughly tested to meet exacting safety standards.
It meets UL and FCC requirements and complies with safety performance standards of the U.S.
Department of Health and Human Services.

TABLE OF CONTENTS
Installation .......................................................................... 6
Names of Oven Parts and Oven Control Panel ............................................ 7-8
Use Instructions ................................................................... 9 26
• Easy Use Chart .................................................................... 10
III Recall and Change of Settings ........................................................ 1!
• Pause bet_,een Stages .............................................................. ] ]
[] Regular Timer ..................................................................... 11
Detailed Directions ................................................................ 12--26
• HI Power Cooking ................................................................. 12
• Cooking Guide for Multi-Power Settings ................................................ 13
• MultiPower Cooking ............................................................... 14
• Temperature Control Cooking ........................................................ 15--17
• Temperature Controlled HI Power Cooking
and Automatic Hold Warm .......................................................... 18
• Temperature Controlled Multi-Power Cooking
and Automatic Hold Warm ......................................................... 19
• Two-Stage Cooking ................................................................. 20-21
[] Delay Sta_ Cooking ................................................................ 21
• Whole Meal Cooking ............................................................... 21
• Programmed Defrost ............................................................... 22-26
Utensils ............................................................................. 27
Care and Cleaning ................................................................... 2S
Questions and Answers ................................................................ 29-30
Sears Se_'k:e ....................................................................... 31
SearsWarranty ..................................................................... 32

Sears
USE AND CARE MANUAL
MICROWAVE OVEN
USE INSTRUCTIONS
Enjoy a new cooking exp_Hence from Sears. Please read this booklet. It takes
• just a few minutes-- time well spent to learn how to use all of the features.
Advice on the use and care of Sears appliances is always available at your
nearest Sears store. When seeking information, be sure to get the complete
model number located on the plastic label. See below for its location.
MODEL NUMBER
Any request for service, replacement of parts, or information needs the complete model number
(Nomenclature Number) of your microwave oven. The number is on the left side of the con_ol panel.
The model number is also located on the back ol the cabinet.
The number will look like this: 564.9000000.
J
Model (Nomenclature)
Number Label
0

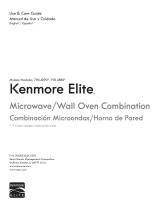
IMPORTANT- Electrical
Grounding Instructions
This microwave oven has a three.prong (grounding) plug.
Where a two prong wall outlet is available, it is the
responsibility of the customer to contact a quail[led
electrician and have it replaced with a properly grounded
three-prong wa{l outlet in accordance with the national
e{ectrical code (see il{ustration below).
Do not cut or remove round grounding prong from this
plug,
This oven is made to use on a properly grounded outlet.
This oven has a short power supply cord. Extension cords may be used if you are careful in their use,
If an extension cord is used. it must be a tplae S, with 3 number 16 wires and have a 3-prong grounded
plug. Tile extension cord should not drape over the countertop where it can be pulled on or tripped over
accidentally.
Electrical power cord must be kept dry and must not be pinched or crushed in any way.
PROPERLY POLARIZED AND
GROUNDED OUTLET
Plug With Ground Prong

INSTALLATION
Install your oven by following these four simple steps:
Step 1: Remove all packing material and accessories.
Step 2: Place the oven in the level location of your choice, but make sure there is at least one inch of
space on the top and at the rear to make sure of proper ventilation.
Top of the oven should be kept clear and the plastic feet must be kept on oven so there is air flow
for ventilation. An exhaust outlet is at the rear of the oven and blocking the outlet can damage
the oven.
Step 3: Plug your oven into a standard 120 volt household outlet. Be sure the electrical circuit is at least
15 amperes and that your microwave oven is the only appliance on the circuit.
Step 4: To set Time of Day, touch CLEAR; then touch TIME OF DAY; touch numbers [or correct time:
then touch TIME OF DAY.
Note: If you want to "build-in" this microwave oven, either by itself or over Sears Kenmore electric
built-in oven models 42209, 4228X, 4238X, 42489, and 4258X, (X may be 2.4, 6. 8 or 9),
Sears Kenmore Built-in Trim Kit Model 22-40191 is available. Contact your nearest Sears store
or the catalog.
Height 15-3/4"
Width 24"
Depth 19-3/4"
Weight 68 lbs.
1 o,,op,os,0oo on.

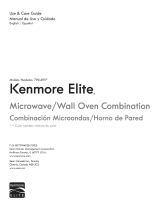
NAMES OF OVEN PARTS
See-through
door
Easy-clean
acrylic finish
___ S:/:tr_°ck system
!
Oven control pane_
Door release
//
Metal rack
Glass tray
Temperature probe
Remove your Oven and all material from the shipping carton. Your Oven will come with the following material:
Glass Tray ................................. 1 each
Metal Rack ................................ 1 each
Temperature Probe ......................... 1 each
Cookbook ................................ 1 each
Use and Care Manual ....................... 1 each
Easy Use Char[ Card ........................ 1 each
Do not use this Microwave Oven for commercial purposes. This Microwave Oven is made for household use only.

OVEN CONTROL PANEL
Stage Lights-When
cooking stages are set, Lights
will go on indicating which
Stage your Oven is cooking in.
Indicator Lights- Time,
Cook, Temp and Programmed
Defrost lights indicate which
cooking operation is being
used.
Programmed Defrost-
Used in setting Programmed
DefrosL
Time of Day-Used in
setting Time of Day.
Time-Used in settir
Cooking Time.
Numbers- Used to enter the
Time of Day, Cooking Times,
Cooking Powers and Cooking
Temperatures.
Cook Control-Used to
select Cooking Power Levels.
Clear- Cle
except Time of Day. Once
cooking has begun, however,
Clear will function only after
Stop has been touched.
Cook Guide-Lists the
Types of Cooking that most
often occur at these Cooking
Power Levels.
COOK
10 Warm
20 Low
30 Oefrost
40 Br aisa 1407 Fish SteBks & I
Well Done Beef
50 Simmer 15G _ Soups, Casseroles
60 Bake 155 = Veal
70 Roast 160=Well Done Pork
_. Reheat 165o Well Done Lamb
Saut_ 170 ° _ultry P_rts _,
HI Max Power 180 = Whole Poultry
Display Window - Shows
Time of Day, Cooking Time,
Cooking Power Level, Cooking
Temperature and Hold. Acts
as Countdown Timer or
Temperature Indicator when
Cooking.
Probe Light--Flashes to
warn that Temperature Probe
is not plugged into the socket
inside the Oven for Tempera-
ture Control Cooking.
Pause Light--Shows Oven
has been set to pause between
the first and second Cooking
Stages.
Pause- Used to stop Oven
between Cooking Stages.
setting Cooking Time, Power
Level and Temperature for
Two-Stage Cooking. Also used
to recall each memory stage in
a two-stage program
emp Control-Used in
setting the desired Cooking
Temperature. Temperature
Control Cooking can be done
only wher_ the Temperature
Probe is plugged into the
socket inside the Oven.
Stop- Stops Oven.
Start--Starts Oven.
Temp Guide-- Lists examples
of food that are best cooked to
these Temperatures.
Door Release-Opens Oven
Door.
Note: A Beep Tone sounds when a Pad on the Control
Panel is touched, so you can tell that a Setting
has been entered.

USE INSTRUCTIONS
"HI'POWER COOKING
"HI" gives highest power and is a recommended setting for
cooking foods with high moisture content or for foods that
need fast cooking to keep natural flavor and texture, Your
Kenmore Microwave Cookbook willtell you which foods are
cooked best using highest microwave power or "HI". For
detailed directions on "HI" (max power) cooking, see page
12.
MULTI-POWER COOKING
Many foods need slower cooking at less than full power in
order to give you the best results. In addition to "HI", there
are ninety-nine multFpower settings. Detailed directions for
multi-power cooking are on pages 13 and 14.
TEMPERATURE CONTROLLED
HI POWER COOKING
"HI" power with Temperature Control lets you cook food to
a preset temperature using maximum speed. Follow the
directions on page 18 and you will be able to preset the
temperature you desire with the aid of the Temperature
Control Cooking Guide.
TEMPERATURE CONTROLLED
MULTI-POWER COOKING
Multi-power with Temperature Control allows you to cook
more sensitive foods to a preset temperature using slower
microwave speeds. See page 19 for detailed directions.
TWO-STAGE COOKING
Some recipes need more than one cooking stage. Many
foods will cook better when done fora period of time at one
power setting and then cook for another period at a different
power setting. With a cake, for example, the Cookbook rnay
recommend cooking at the 60 (BAKE) setting followed by a
period of cooking at the _'HI" setting, BAKE allows the cake
to rise gently and then _'HI" finishes the cooking. You can set
both stages at the beginning, start the oven, and the oven will
change into the second stage at the preset time.
Two-Stage cooking with both Time and Temperature control
can also be set. For detailed directions on Two-Stage
Cooking, see pages 20 and 21.
WHOLE MEAL COOKING
The Metal Rack increases the oven cooking space. To cook
two or more different foods at one time, choose their proper
places inside the oven by following the Cookbook directions.
See page 21.
PROGRAMMED DEFROST
Power level will automatically change for proper thawing of
dense food items. See pages 22 thin 26 for detailed
directions.
AUTOMATIC HOLD WARM
After reaching the set temperature the Oven switches into
Hold Warm to keep the food at the chosen temperature.
"Hold" will show in the Display Window and continue for up
to 60 minutes or until the Door is opened or STOP is
touched. See pages !8 and 19.

EASY USE CHART
Your new Solid State Control allows you to use your microwave oven in many ways.
TIME OF DAY
To Set
i. Touch CLEAR
2, Touch TIME OF DAY
-3, Touch Numbers for Correct Time
4. Touch TIME OF DAY
TEMPERATURE CONTROLLED
HI POWER COOKING
ToSet
I, Plug in Temperature Probe
2. Touch CLEAR
3. Touch TEMP CONTROL
4. Touch Numbers for Cooking
Temperature
5. Touch START
(See page 18 for more instructions,)
DELAY START COOKING
To Set
1, Touch CLEAR
2. Touch TIME
3, Touch numbers for Delay Time
4. Touch COOK CONTROL
5. Touch "0"
6. Touch MEMORY!RECALL
7. Touch TIME or TEMP CONTROL
8. Touch Numbers for Cooking Time
or Temperature
9. Touch COOK CONTROL
10. Touch Numbers for Cooking
Power level
11. Touch START
(See page 21 for more instructions.)
HI POWER COOKING
To Set
1. Touch CLEAR
2. Touch TIME
3 Touch Numbers for Cooking Tidle
4. Touch START
(See page 12 for more instructions.)
TEMPERATURE CONTROLLED
MULTI-POWER COOKING
To Set
I. Plug in Temperature Probe
2. Touch CLEAR
3. Touch TEMP CONTROl_.
4. Touch Numbers for Cooking
Temperature
5. Touch COOK CONTROL
6, Touch Numbers for Cooking Power
level
7. Touch START
(See page 19 for more instructions.)
PROGRAMMED DEFROST
To Set
1. Touch CLEAR
2. Touch PROGRAMMED DEFROST
3. Touch Numbers for Defrost Time
4. Touch START
(See page 22 for more instructions.)
MULTI-POWER COOKING
To Set
I. Touch CLEAR
2. Touch TIME
3. Touch Numbers for Cooking Time
4, Touch COOK CONTROL
5, Touch Numbers for Cooking Power
level
6. Touch START
(See page 14 for more instructions,)
TWO-STAGE COOKING
To Set
1, Touch CLEAR
2. Touch TIME or TEMP CONTROL
3. Touch Numbers for Cooking Time
or Temperature
4. Touch COOK CONTROL
5, Touch Numbers for Cooking Power
level
6. Touch MEMORY/RECALL or PAUSE
7. Touch TIME or TEMP CONTROL
8. Touch Numbers for cooking Time or
Temperature
9. Touch COOK CONTROL
I0. Touch numbers for Cooking Power
level
1I, Touch START
(See pages 20 and 21 for more
instructions,)
I0

RECALL AND CHANGE OF SETTINGS
To Recall a Setting
To check the Setting for a given stage,touch MEMORY/RECALL once or more until the
correct Stage l,ight and Indicator Light turn on. The set Time or Temperature for that stage
_,ilI show in the Display Window. To check the Cooking Power level, touch COOK CONTROL.
To check Settings while the Oven is running, touch desired pad to recall setting for operating
stage. To recall a future stage, touch STOP, follow directions above, and touch START to
continue cooking. To recall Time of Day during cooking, touch TIME OF DAY, and it will
show in the Display Window.
To Change a Setting
Recall the Setting to be changed by following directions above and make the change as follows:
TIME ......................... Touch "0" until only one "0" shows in the Display Window.
Set Cooking Time
TEMPERATURE CONTROL ..... Set Cooking Temperature,
COOK CONTROL ............. Set Cooking Power level. To reset to "HI", set "99"
PAUSE BETWEEN STAGES
Some recipes need stimng, turning, adding or removing of foods between stages, To set the Oven to stop
between stages, touch PAUSE rather than MEMORY/RECALL when setting the Oven. After the pause,
to restart the Oven, touch START.
REGULAR TIMER
Your Oven also has a timer that can be used for non-cooking
functions. When used as a regular timer, the Oven is not
running, the timer is simply counting down. For detailed
instructions on using this timer, see below,
To use the Regular Timer feature:
1. Touch CLEAR.
2. Touch TIME.
3. Touch numbers for the time.
4. Touch COOK CONTROL.
5. Touch "0'" (0% of cooking power).
6. Touch START. The Timer wellbegin counting down in the
Display Window with no cooking or heating in the oven,
A tone will sound when the time is over.
Ii

HI POWER COOKING
I. Touch CLEAR, and a beep tone will be heard.
The CLEAR erases all previous settings.
2. Touch TIME. The Lights above TIME and below
STAGE 1 will go on. ("0" will show in the Display
Window.)
3. Touch Numbers for Cooking Time.
Set the cook time by touching the suitable numbers on
the Control Panel. For example, to set 30 seconds, you
would touch "3" and then "0". For 3 minutes, touch "3"
and then touch "0" twice. For 3_,_minutes, touch "'3".
"3" and "0". (Note: Remember, the timer is a digital
clock that is divided into 60 seconds. So i,/_minute is
equal to 30 seconds. Touch-30 not 50 as with a
calculator.) The time set will show in the Display Window
at the top of the Control Panel.
Note: It is not necessary to touch COOK CONTROL
when cooking with highest power ("HI"). However. if
COOK CONTROL is touched, the Light above COOK
will go on and the word "HI" will show in the Display
Window. This is to tell you that the oven will be running
on "HI'" power unless a different power setting is chosen,
4. Touch START. The oven will begin cooking, and the
Display Window will show the time counting down by
seconds. A tone sounds for two seconds when the
time is up, and the oven shuts itself off,
Note: To stir food during cooking, open oven door, stir
or turn food. close oven door and touch START. Oven
will count down the amount of time left on the timer.
Example: Fresh fish can be quick-cooked on "HI" (max
power) for 6 minutes. Here is the procedure:
I. Touch CLEAR.
2, Touch TIME,
F
3. Set 6 minutes by touching "6",
then '0" twce. "600" will show in
the Display Window.
1"7 /'1
i..i t......
r
4. Touch START. The oven begins
cooking and the time shows
counting down in the Display
Window. A tone sounds for two
seconds when the 6 minutes are
up, and the oven shuts itself off.
{ gg
! S_a_e

COOKING GUIDE
FOR MULTI-POWER SETTINGS
The Multi-Power feature lets you cook at the best power level for the food beincA cooked. Cooking
directions can be found in the Cookbook.
POWER
POWER SETTINGS EXAMPLES
10% WARM Softening cream cheese; keeping casseroles and main dishes warm.
20% LOW Softening chocolate; heating breads, rolls, pancakes, tacos, tortillas, and French
toast', clarifying butter, taking chill out of fruit; heating small amounts of food.
30% DEFROST Thawing meat, poultry and seafood; finish cooking casseroles, stews, and some
sauces; cooking small quantities of most food.
40% BRAISE Cooking less tender cuts of meat in liquid and slow cooking dishes; finish cooking
less tender roasts.
50% SIMMER Cooking stews and soups after bringing to a boil; cooking baked custards and pasta.
60% BAKE Cooking scrambled eggs; cakes.
70% ROAST Cooking rump roast, ham, veal, and lamb; cooking cheese dishes; cooking eggs,
and milk; cooking quick breads and cereal products.
80% REHEAT Quickly reheating precooked or prepared food: heating sandwiches.
90% SAUTE Quickly cooking onions, celery, and green peppers; reheating meat slices quickly.
100%
(HI) MAX POWER Cooking tender cuts of meat; cooking poultry, fish, vegetables, and most casseroles;
preheating the browning dish; boiling water, thickening some sauces,
As you get to know your microwave oven, you may find
that a par'dcular setting is too low or too high for the
results you desire.
Multiple Power Con_ol gives you the means to obtain
greater precision in setting power levels. For instance, if
you want a power level between ROAST and REHEAT
you would set the time as usual, touch COOK
CONTROL, and then touch "7" and "5/' The Display
Window will show "75," indicating that your oven is set
to run at a 75% power leveFhalfway between ROAST
and REHEAT.
13

MULTI-POWER COOKING
The Cookbook tells you which power setting is
recommended for the food being cooked.
To Cook with Multi-Power
I. Touch CLEAR.
2. Touch TIME. The Lights above TIME and below STAGE I
will go on. ("0" will show in the Display Window.)
3. Touch Numbers for Cooking Time.
Set the cook time by touching the suitable numbers, The
time set will show in the Display Window.
4. Touch COOK CONTROL. The Light above COOK willgo
on. Also the word "HI" will show in the Display Window
until a lower power setting is entered. This tells that the
Oven will always run at highest power unless a lower
power is set.
5. Touch Numbers for Cooking Power level.
Choose the cook control setting desired and touch
numbers corresponding to it. For example, if the recipe
calls for cooking at the 20 (LOW) setting, you would
touch "2" then "0" (the number that is next to LOW on
the Cook Guide). When you touch "20", the Display
Window will read "20". This means that in the LOW
setting, the Oven is at a 20% power level.
6. Touch START. The Oven begins cooking, and the
Display Window will show the time counting down.
A tone will sound for two seconds when time is up and
the Oven shuts itself off.
Example: To Warm 6 doughnuts you would microwave on
80 (REHEAT) for 1½ minutes.
Follow the steps below:
I. Touch CLEAR.
2. Touch TIME,
3. Set i_ minutes by touching
"I" then "3", and then "0",
"130" will show in the
Display Window.
..... )
4. Touch COOK CONTROL.
"HI" will show in the Display
Window.
5. Choose the 80 (REHEAT)
setting by touching the
number "8" then "0" (the
number next to REHEAT on
the Cook Guide). The Display
Window will read "80",
meaning the Oven is at an
80% power level.
6. Touch START.
The Oven begins cooking and
the time shows counting down
in the Display Window, A tone
sounds for two seconds when
the I minute, 30 seconds are
up and the Oven shuts itself
off,
¸
s_at_
rC- _
J
I -onl t
ov:: ,;,,::v--_,
t ii
i
14

TEMPERATURE CONTROL COOKING
The Temperature Probe is used to judge doneness when
cooking or reheating food. Set the desired food temperature
with the TEMP CONTROL and power level with COOK
CONTROL When the food reaches that temperature, the
Oven willhold the food at that temperature for up to one
hour.
TEMPERATURE SE_ING & DISPLAY TEMPERATURE
Temperatures from ll5°F to 185°F can be chosen and set
in the oven. Temperature should be set in five_degree incre-
ments, and the Display will show the rise in food temperature
in five-degree increments. For example, when a temperature
of 125°F is set. the Display Window will show the temperature
rise from 115°F to 120°F and to 125°F,
Plug
Temperature
Probe Slide
Grommet
Sensitive
Area
Temperature
Probe
Sensor
DEFINITIONS
TEMPERATURE PROBE SENSOR: The pointed metal
portion of the probe which is placed into food.
SENSITIVE AREA OF SENSOR: First inch, or tip, of
Temperature Probe Sensor.
PLUG: End of Temperature Probe that is plugged into oven
socket.
SOCKET: Outlet on oven side wall.
CAUTION'. Do not plug the Pointed End of the Temperature
Probe into the socket.
SLIDE GROMMET: Adjust the length of Temperature
Probe by sliding the Grommet, so that the Sensitive Area
of the Probe can always be placed in the center of meat.
DISPLAY WINDOW: Shows the Cooking Temperature
rising as the food is cooking. Chosen temperature may be
seen during cooking by touching TEMP CONTROL. When
chosen temperature is reached the Display will show "Hold"
for 60 minutes or until Door is opened or STOP is touched.
meats
[] Choose only fresh completely thawed meat.
[] Place meat, fat side down, on microwave roasting rack
in glass baking dish.
II Microwave on first multi-power setting for half of the total
cooking time. (See Cooking Guide on page 16.)
[] Turn meat, fat side up, and
I, Place Temperature Probe Sensor in meat with the first
inch of Sensor in center of meat. Sensor should not touch
bone or fat pocket. Sensor should be put in from side or
front: Sensor should not be put in from top of meat.
2. Plug Temperature Probe into socket on side of oven
wall.
3. Choose doneness temperature from chart on page 16:
set temperature with the TEMP CONTROL.
4. Microwave meat on second multi-power setting, The
microwave oven will turn itself off when preset temperature
is reached. Take out the food from the oven as soon as
Display Window reads "Hold,"
5. Remove Temperature Probe Sensor. Let meat stand,
covered with foil, about 10 minutes before serving.
Temperature will rise about 15 ° during standing time.
Note: It is normal for meats to become slightly over-cooked
in a small circular area in the immediate vicinity of the hole
made by the meat probe.
15

TEMPERATURE CONTROL DO'S AND DON'TS
DO
[] Place Temperature Probe Sensor in thickest pa_:of meat or
in center of food to reheat. Avoid touching bone or fat.
[] Check that the first inch of Sensor is in the denser part of
food to cook.
[] Remove Temperature Probe from oven after use.
DON'T
M Do not run the oven empty with the Temperature Probe
plugged in.
[] Do not let the Temperature Probe Sensor touch the sides,
bottom and door of oven when in use.
[] Do not use the Temperature Probe in a regular oven.
16
TEMPERATURE CONTROL MEAT COOKING GUIDE
Refer to meats section on page 13.
BEEF
Meat Loaf
2 Ibs.
MEAT
Rib Roast. Boneless
Rib Roast. Bone in
LAMB
Lamb Leg or
Shoulder Roast,
Bone in
Lamb Roast, Boneless
VEAL
Shoulder or Rump Roast,
Boneless
FIRST SETTING
AND TIME
- HI (Max. Power)
12 - 14 rain.
HI (Max. Power)
rare 4-5 min. per lb.
medium-rare 5 min, per lb.
medium 5- 6 rain. per lb.
medium-well 6 min. per Ib.
well done 6- 7 min. per lb.
HI (Max. Power)
rare 3 - 4 min. per lb.
medium-rare 4 min. per lb.
medium 4-5 min. per Ib,
medium-well 5 min. per lb.
well done 5-6 rain. per lb.
SECOND SETFING
AND TIME
4
70 (Roast)
medium 4-5 min. per lb.
well done 5-6 rain. per lb.
70 (Roast)
5--6 rain. per lb.
70 (Roast)
9 rain. per lb.
t
70 (Roast)
rare 3-4 rain per lb.
medium-rare 4 min. per lb.
medium 5-6 rain. per lb.
medium-well 6 rain. per lb.
well done 6-7 min. per Ib,
70 (Roast)
rare 3-4 rain. per Ib.
medium-rare 3 rain. per lb.
medium 3-5 rain. per lb.
medium-well 4 min. per lb.
we!l done 5- 6 rain. per lb.
70 (Roast)
medium 4-5 rain. per Ib,
well done 5 -6 rain. per lb.
70 (Roast)
5-6 rain. per l&
70 (Roast)
9-10 min. per lb.
TEMPERATURE
PROBE AND COOK
CONTROL SETTING
4
t
HI (Max. Power)
160°F
70 (Roast)
120°F
I 125°F
130°F
, 135°F
140°F
70 (Roast)
rare 120°F
F medium-rare 125°F
medium 130°F
i medium-well 135°F
well done 140°F
70 (Roast)
medium 145°F
well done 165°F
70 (Roast)
150° F
70 (Roast)
155°F
2-5 Ibs.
PORK
Pork LoinRoast, Boneless
3--5 Ibs.
Pork Loin. Center Cut
4- 5 Ibs.
Ham, Boneless, Precooked
Center Cut Ham Slice
1- 19_lbs.
Smoked Ham Shank
Canned Ham
3 Ibs.
5 Ibs.
HI (Max. Power)
6 rain. per lb.
HI (Max. Power)
5-6 rain. per lb.
70 (Roast)
5-7 rain. per lb.
70 (Roast)
5 rain, per Ib,
70 (Roast)
4-5 min. per lb.
70 (Roast)
5-6 min. per lb.
70 (Roast)
4-5 rain. per Ib
70 (Roast)
5--6 rain. per lb.
70 (Roast)
4-5 min.per lb.
70 (Roast)
5 7 min. per lb.
70 (Roast)
5-6 rain. per lb.
70 (Roast)
4-5 min. per lb.
70 (Roast)
5-6 min. per lb.
70 (Roast)
4-5 rain, per lb.
70 (Roast)
155°F
70 (Roast)
155°F
70 (Roast)
120°F
70 (Roast)
120°F
70 (Roast)
120°F
70(Roast)
120°F
70(Roast)
120°F
[] Turn meat between first and second,settings,
[] See Cookbook for other information,
STANDING
TIME
}
5-10 rain.
10 rain,
10 min.
10 min,
10 min.
10 min.
I0 min.
I0 min.
I0 min.
I0 rain.
I0 min,
5 min,
10 min.
10 min.
10 min.
10 min.
10 min.
10 rain.
10 min.
10 rain,
I
r 10 min.
I,
10 min

reheating foods
il Place Temperature Probe Sensor in food to be reheated
with the first inch of sensor in the center of the food.
[] Plug Temperature Probe into socket on side of oven
wall,
[] Cover food if desired.
[] Set temperature of desired aloneness. (See chart below.)
[] Select multi-power setting as shown below.
[] Microwave oven will stop cooking when set
temperature is reached and hold warm.
[] Remove Temperature Probe from Oven after use.
TEMPERATURE CONTROL REHEATING GUIDE
FOOD SETTING DONENESS SPECIAL HELP
i
Beverages HI (MAXPOWER) 150°F Place Temperature Probe Sensor in center of beverage glass.
Soups g0 {REHEAT) 150°F Place the Temperature Probe Sensor in the center of the soup.
Cover with casserole lid,waxed paper, or plasticwrap.
Precooked 80 (REHEAT) 150°F Place Temperature Probe Sensor in center of food.
Casseroles Cover with casserole lid,waxed paper, or plasticwrap
Meat Sandwiches 80 (REHEAT) 120°F Place the Temperature Probe Sensor in the thickest part of the
(thickl sandwich to be warmed. The sensitive area of the Sensor
should be located in the sandwich filling.
Leftovers Place Temperature Probe Sensor in the most dense or largest
amount of food.
Canned
Vegetables
Baked Goods
Syrup
S0 IREEIEAT)
80 (REHEAT)
80 (REHEAT)
70 (ROAST)
150°F
150°F
120OF
i 150°F
Place Temperature Probe Sensor in center of food to be
reheated. Sensitive area of Sensor should rest in middle of food.
Place Temperature Probe Sensor in center of the container.
Caution
At times the same kinds of foods may vary in shape, form
and density, and, therefore will not produce the same results
each time. For this reason, we do not recommend using the
Temperature Control for thin food items and foods that
require tenderizing by simmering.
In some cases the microwave oven may shut off prematurely.
This means either that the Temperature Probe is not placed
properly or that it should not be used with this type of food,
17

TEMPERATURE CONTROLLED HI POWER COOKING
AND AUTOMATIC HOLD WARM
The Temperature Control Meat Cooking Guide and
Reheating Guide on pages 16 and 17 will tell you which
multi-power setting and doneness Temperature are
recommended for the food you re cooking.
When cooking with Temperature control, the Timer is
not used.
I. Place Temperature Probe in
food, with the first inch of Sensor
in center of food. Adjust the
length of Temperature Probe by
sliding the Grommet, so that the
Sensitive Area of the Probe can
always be placed in the center of
meat. Probe should be in a level
direction or on an angle as
shown,
2. P)ug Temperature Probe into
socket on side of oven,
Caution: Do not plug the
Pointed End of the Temperature
Probe into the socket.
Note: You do not need to touch COOK CONTROL
when you are cooking with HI (max power). However,
you may touch COOK CONTROL. The Light above
COOK _,_llgo on and the word "FI[" will show in the
Display Window. This is to tell you that the Oven will
work at HI (highest microwave power) unless a
different power setting is chosen.
6. Touch START. The Oven
begins cooking, and you will be
able to see the temperature of
the food rising in the Display
Window. A Tone will sound for
one second when the tempera-
ture is reached.
The Oven will switch into Hold
Waml to keep the food at the set
temperature. The Cook Control
Setting changes to 10 (WARM).
To be sure the correct
temperature is being held, touch
TEMP CONTROL, The "holding"
temperature will show in the
Display Window. The Hold Warm
will continue for 60 minutes after
the food reaches the chosen
temperature, or until the Door is
opened or STOP is touched.
,-
3. Touch CLEAR.
4. Touch TEMP CONTROL,
The Lights above TEMP and
below STAGE 1 will go on, and
"F" will show in the Display
Window.
5. Choose the food temperature
and touch the corresponding
Numbers, For example, ifthe
recipe calls for doneness at
120°F, you would touch numbers
"I", "2" and "0" (the temperature
next to Rare Beef on the Tempe-
rature Guide). When you touch
"120", the Display Window will
read "I20F". Ifthe Temperature
Probe is not plugged into the
socket, the Probe Light will flash
and the Oven w_llnot work.
If Door is opened, the Hold
Warm will stop.
To reset, simply touch TEMP
CONTROL and corresponding
Numbers,
Note: The highest temperature
that can be set is 185°F.
18

TEMPERATURE CONTROLLED MULTI-POWER COOKING
AND AUTOMATIC HOLD WARM
Temperature Control Meat Cooking Guide and Reheating
Guide on pages 16 and 17 will tell you which multi-power
setting and temperature setting are recommended for the
food you're cooking.
I. Place Tem'perature Probe in food.
with the first inch of Sensor in center of food. Adjust the
length of.Temperature Probe by sliding the Grommet,
so that the Sensitive Area of the Probe can always be
placed in the center of meat. Probe should be in a level
direction or on an angle as shown.
2. Plug Temperature Probe into
socket on side of oven.
Caution: Do not plug the
Pointed End of the Temperature
Probe into the socket.
3. Touch CLEAR.
4. Touch TEMP CONTROL,
The Lights above TEMP and
below STAGE I will go on, and
"F" will show in the Display
Window.
5. Choose the food
temperature and touch the
corresponding Numbers, For
example, if the recipe calls for
doneness at 155°F, you would
touch numbers "1", "5" and
"5- (the temperature next to
Veal Roast on the Temperature
Guide). When you touch -1",
"5'" and "5", the Display
Window will read "155F'" If
the Temperature Probe is not
plugged into the socket, the
Probe Light will flash and the
Oven will not work.
_ U;:i_':'=J
_ J
6. lbuch COOK CONTROL.
The Light above COOK will go
on. Also the word "HI" will show
in the Display Window until you
enter a lower power setting. This
is to remind you that the Oven
will always work at full power
unless you set a lower power.
7. Choose the cook control
setting you desire and touch the
corresponding Numbers. For
example, if the recipe calls for
cooking at the 70 (ROAST)
setting, you would touch numbers
"7" and "0" ('the number next to
ROAST on the Cook Guide).
When you touch "7" and "0'"
the Display Window will read
"70". This means that in the
ROAST setting, the Oven is at
a 70% power level.
8. Touch START The Oven
begins cooking, and you wellbe
able to see the temperature of
the food dsing in the Display
Window. A tone wilt sound for
one second when the tempera-
ture is reached. The Oven will
switch into Hold Warm to keep
the food at the set temperature.
The Cook Control Setting
changes to 10 (WARM). To be
sure the correct temperature is
being held, touch TEMP
CONTROL. The "holding"
temperature will show in the
Dispaly Window. The Hold
Warm will continue for 60 min-
utes after the food reaches the
chosen temperature, or until the
Door is opened or STOP is
touched.
If Door is opened, the Hold Wama
will stop. To reset, simply touch
TEMP CONTROL and corres-
ponding Numbers.
Note: The highest temperature
that can be set is 185°F.
__J
w_
i _:'
!;SSFi
19

TWO-STAGE COOKING
Two-stage cooking lets you cook in one stage at a certain
power level for a chosen time or temperature and then in a
second stage at a different power level for a chosen time or
temperature. To set both stages before starting the oven,
simply follow these steps:
I. Touch CLEAR.
2. Touch TIME or TEMP CONTROL.
Lights above TIME or TEMP and below STAGE 1 go
on. Display Window will read "0" or "F",
3. Touch Numbers for time or temperature of the first
cooking stage.
4. Touch COOK CONTROL Light above COOK goes on.
Display Window will read "HI".
5, Touch Numbers for the Cooking Power level of the first
cooking stage (if other than "HI").
6. Touch MEMORY/RECALL or PAUSE. Light below
STAGE 2 goes on. Display Window will read "0".
7. Touch TIME or TEMP CONTROL.
8. Touch Numbers for time or temperature of the second
cooking stage.
9. Touch COOK CONTROL. Display Window will read
"HI".
I0. Touch Numbers for the Cooking Power level in the
second cooking stage (if other than "HI").
I I. Touch START.
Example: In preparing a cake mix, the Cookbook calls for a
first stage of 7 minutes at the 50 (SIMMER) power level
followed by a second stage of 3 minutes at 'HI". Here's how
to set the oven:
4. Touch COOK CONTROL.
"HI" will show in the Display
Window to remind you that
the Oven will work at highest
power unless you enter a
lower power setting.
5. Touch numbers "5" then "0".
"50" will show in the
Display Window (telling
that you have set the oven to
run at a 50% power level).
The first stage has been set.
Second Stage (3 minutes; "HI")
6. Touch MEMORY/RECALL.
Light below STAGE 2 will go on.
Display Window will read "0".
........ J
SrBe8 ,,,_
First Stage (7 minutes', 50% SIMMER)
I. Touch CLEAR.
2. Touch TIME.
3. Set 7 minutes by
touching "7", then "0",
and then "0". "700"
will show in the
Display Window.
7. Touch TIME.
8. Set 3 minutes by
touching "3" then "0"
twice, and "300" will
show in the Display
Window. (Power is on "HI".)
2£)
/