
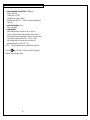
1
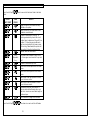
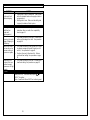
Section 1: Getting Started.............................................................3
Introduction and Safe Operation..................................................4-5
General Description........................................................................6-8
Battery Information.......................................................................9-11
Quick Start with the VIPER™ LS6...................................................12
Ribbon Loading & Selection......................................................13-14
Label Loading....................................................................................15
Keyboard......................................................................................16-20
Section 2: Working with the VIPER™ LS6................................21
Using the VIPER™ LS6...............................................................22-24
Creating Labels
Creating Text ..................................................................25-27
Creating Serializations ...................................................28-31
Creating Symbols............................................................32-33
Creating Lines .................................................................34-35
Creating Boxes......................................................................36
Creating Data Lists.........................................................37-38
Creating Bar Codes........................................................39-40
Creating Date/Time Stamps..........................................41-42
Using the Pages Function...................................................43
Setting up the VIPER™ LS6.......................................................44-47
Using File Manager ..........................................................................48
Interfacing with a Computer............................................................49
ViperLink™..................................................................................50-52
Using Remote Printer Utility..........................................53-54
Printer Cleaning Instructions...........................................................55
Printer Troubleshooting..............................................................56-59
Warranty Information …..................................................................60
General Specifications .....................................................................61
Replacement Parts and Accessories.............................................62

2

3
SECTION 1
GETTING STARTED

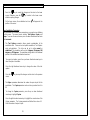
INTRODUCTION & SAFE OPERATION
4
The VIPER LS6 Thermal Transfer Portable Printer is the complete printing
solution for Electricians, Assemblers, Installers, Maintenance & Repair,
Construction, and Network Communications Personnel. This versatile on-site,
on-demand printer provides users with the ability to save, retrieve, and edit
custom or serialized labels for wire and cable marking, component labeling,
network labeling, safety identification, and general facilities identification.
This manual will guide you step by step through the set-up, operation, and
troubleshooting of the VIPER™ LS6 Printer. If you have problems not covered
herein, contact your local Panduit Sales Representative, call Panduit
Technical Support at 866-871-4571, or call Panduit Customer Service at 800-
777-3300. More information is available on the Internet at www.panduit.com.
SAFE OPERATION PRACTICES
The following general safety practices supplement the specific warnings and
cautions depicted elsewhere in this manual. They are recommended
precautions that must be understood and applied during the operation and
maintenance of this printer.
Do Not Operate In An Explosive Environment
Do not operate the printer in the presence of flammable gases or fumes.
Operation of this printer in such an environment constitutes a definite safety
hazard.
Do Not Operate In Wet Or Damp Areas
Do not operate this printer in wet or damp areas. Operation of the printer in
such an environment constitutes a definite safety hazard.
Do Not Substitute Parts Or Modify Equipment
Because of the danger of introducing additional hazards, do not install
substitute parts or perform an unauthorized modification to the printer or its
accessories. The proper components for service and repair may be obtained
from Panduit Corp.

INTRODUCTION & SAFE OPERATION
5
WARNING:
When the printer has been in use for an extended period of time, the
printer motor may become hot. DO NOT touch the printer motor with
bare hands.
Information to USA Users
NOTE: This printer has been tested and found to comply with the limits for a
Class A digital device, pursuant to Part 15 of FCC rules. These limits are
designed to provide reasonable protection against harmful interference when
the printer is operated in a commercial environment. This printer generates,
uses, and can radiate radio frequency energy and, if not used in accordance
with this instruction manual, may cause harmful interference to radio
communications. Operation of this printer in a residential area is likely to
cause interference in which case the user will be required to correct the
interference at his own expense.
Information to Canadian Users
This digital apparatus does not exceed Class A limits for radio noise
emissions for digital apparatus set out in the Radio Interference Regulations
of the Canadian Department of Communications.
Le present appareil numerique n’emet pas de bruits radioelectriques
depassant les limites applicables aux appareils numeriques de la class A
prescrites dans le Reglement sur le brouillage radioelectrique edicte par le
ministere des Communications du Canada.
It is possible that infrequent electrical phenomena (static discharge, power
line fluctuations) may cause printer function to be temporarily interrupted. In
this case, the printer will usually reset itself. In extreme cases, the user should
remove then re-apply power (battery pack and/or AC Adapter).
Printer Power Supply
The VIPER LS6 is supplied with a NiMH (Nickel-Metal Hydride) battery. This
battery is re-chargeable. The life expectancy of the NiMH battery is
approximately 500 charge/discharge cycles. After the NiMH has surpassed its
useful life, it must be disposed of properly. DO NOT PLACE THE SPENT
NiMH BATTERY IN AN UNAPPROVED TRASH RECEPTACLE. All NiMH
batteries should be disposed of according to local rules and regulations. It is
strongly recommended that the NiMH battery be recycled.

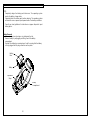
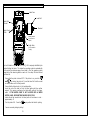
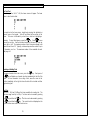
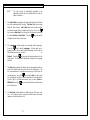
GENERAL DESCRIPTION
6
RS232 Serial
Port
Cutter Knob
LCD Display
AC Adapter Plug
Ribbon
Door
Label Door

GENERAL DESCRIPTION
7
The VIPER LS6 printer kit contains each of the following items:
1. VIPER LS6 thermal transfer portable printer
2. TPDEMO direct thermal labeling tape sample
3. LS6-RWBLK, black wax ribbon cartridge
4. LS6-ACS, 120 VAC adapter and battery charger
5. LS6-BP, NiMH rechargeable battery pack
6. LS6-CLN, package of 5 cleaning cards
7. LS6-MAN-A, operator’s manual in English*
8. Hardside carrying case
9. Product registration and warranty card
*Operator’s manuals are also available in other languages.
Optional accessories and replacement parts are listed on page 62 of this
operator’s manual.

GENERAL DESCRIPTION
8
Print Technology
The VIPER LS6 prints labels using thermal transfer printing technology. The
print head melts ink contained on a thin web of ribbon material allowing the
ink to transfer to the label material. The print head operates at a resolution of
203 dots per inch (dpi).
Smart Label Roll – See page 15
The VIPER LS6 label supplies are wound on a label cartridge that is plugged
into a socket in the printer. The label cartridge is read by the printer operating
system. The operating system AUTOMATICALLY selects the appropriate
printer settings. Also, the operating system will keep track of the number of
labels used from each roll and report the remaining labels to the user unless
labels are manually removed.
Ribbon Cartridge – See page 13
The ribbon material, which contains the thermal transfer ink, is housed in a
plastic housing to keep it clean, and to allow for easy installation and
replacement. Ribbons are available in wax, hybrid, and resin materials.
Battery Pack – See page 9
A 12 volt battery powers the VIPER LS6. The battery is a rechargeable NiMH
(Nickel-Metal Hydride) type which offers longer life than an equivalently sized
Ni-Cad (Nickel-Cadmium) battery. Also, NiMH batteries are more
environmentally friendly than Ni-Cad batteries, resulting in less stringent
recycling requirements.
AC Adapter / Battery Charger – See page 9
An AC Adapter is included for powering the VIPER LS6. The AC adapter is
compatible with international power systems (100 – 240 VAC). The VIPER
LS6 includes an internal overnight battery charging circuit. The AC Adapter is
used to power the charging circuit. This circuit is intended to charge a
completely discharged battery pack in less than 15 hours.
Label Cutter
A manually operated label cutter is included. The VIPER LS6 will
automatically place the printed label in the proper position for cutting.
Carrying Case
A custom carrying case to protect and transport the printer and accessories is
included.
PC-KIT – See page 47
An upgrade kit consisting of a serial cable for connection to a personal
computer (PC) and a CD of ViperLink software. The PC-KIT is used to
communicate between a PC and the VIPER LS6 printer.

BATTERY INFORMATION
9
A 12 volt NiMH (Nickel-Metal Hydride) battery comes with the VIPER LS6
printer. The battery is PARTIALLY CHARGED. Panduit recommends
charging the battery for 15 HOURS PRIOR TO USE. Charging of the
VIPER LS6 battery should be accomplished ONLY with Panduit Model LS6
AC Adapter/Battery Chargers (Part No. LS6-ACS, which is supplied with the
printer). The user MUST manually activate the battery charger with the LS6
powered on to start the charging process (see Charging the Battery below).
NOTE: The Battery (LS6-BP) should only be removed during its own
replacement or during the replacement of the Lithium Battery. Charging
of the NiMH battery pack will only occur while the battery (LS6-BP) is
installed INSIDE of the VIPER LS6 printer.
NOTE: The battery may lose capacity after extended periods of non-use,
and may require several charge/use cycles to recover to its full capacity.
Charging the Battery
1. Connect the AC Adapter to the printer at the AC Adapter Plug.
2. Plug the AC Adapter into an ordinary wall outlet.
3. Turn the Printer On.
4. Wait for the printer to cycle through its start up screens.
5. From the Home Screen press the key to enter the setup menu.
6. Next, use the arrow keys to scroll down to Utilities. Select Battery next
to Utilities and press the key.
7. The current charge level of the battery will appear on the screen briefly.
8. The printer will then prompt to Start charger now? 1-Yes 2-No
9. Press 1 first and then press any other key to begin charging or Press 2 to
exit the battery charging prompt screen and return to the setup menu.
10. Press to end charging. A fully charged battery will completely darken
the status bar vertically.

BATTERY INFORMATION
10
NOTE:
• Completely charge the battery pack before use. The operating system
reports the battery charge status.
• Completely drain the battery pack before charging. The operating system
will warn the user on power up and power down of low battery conditions.
• Consult your local guidelines for instructions on proper disposal of spent
battery packs.
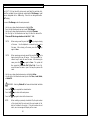
Battery Removal
1. Remove battery door by using a coin to depress the tab.
2. Remove battery by unplugging and lifting it out of the battery
compartment.
3. Re-install the battery by reversing steps 1 and 2 ensuring that the battery
is firmly plugged into the plug connection on the printer.
Battery
Door
Battery
Battery
Compartment
Adjustable
Strap

BATTERY INFORMATION
11
Lithium Battery
The VIPER
TM
LS6 uses a Lithium coin-cell battery to preserve the printer
settings and stored files when the main battery pack is removed and the AC
Adapter is not plugged in.
Do not leave the main battery pack out for extended
periods of time, as this will drain the Lithium cell.
Do not remove the Lithium cell as this may result in
a loss of all stored settings and files.
If the printer does not preserve the printer settings and files when both the
battery pack and the AC Adapter are disconnected, then the Lithium cell
should be replaced using the procedure below.
Replacing the Lithium Battery
1. Plug-in the AC Adapter to preserve the stored settings and files during the
battery replacement.
2. Remove the main battery pack to gain access to the lithium cell.
3. Peel away the lithium cell warning label to expose the lithium cell in a
plastic holder. Save the warning label.
4. With your finger, firmly push on the circular plastic tab holding the cell in
place to slightly eject the lithium cell from the holder.
5. Noting the polarity markings on the cell, remove the cell and replace it
with a Panasonic CR2032 or equivalent. The cell should snap in place
when properly installed. This common cell can be found at most office
and computer supply stores.
6. Replace Warning Label over Lithium Battery.
7. Replace the main battery pack.

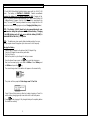
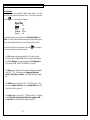
QUICK START WITH THE Viper™ LS6
12
1. Plug in the AC adapter.
2. Install a ribbon cartridge. (See section entitled “RIBBON LOADING &
NOTE: A ribbon is not required for TPDEMO, the thermal paper roll
supplied with the printer.
3. Install a label cartridge. (See section entitled “LABEL LOADING” on page
15.)
4. Turn ON the printer by pressing . If the low battery message
appears, select 2 to disregard and continue. (For detailed battery
charging instructions, see page 9.) The home screen will appear:
5. You may immediately begin typing text at the home screen or otherwise
press the key to enter the Tools menu. (See detail instructions for
creating tools beginning on page 23.)
6. From the home screen, press the key to print your label.

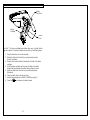
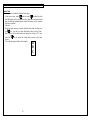
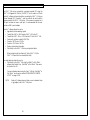
RIBBON LOADING & SELECTION
13
The VIPER™ LS6 uses a cartridge based ribbon (wax, resin, or hybrid) to form
legends on labels. The ribbon is loaded into the printer by the following steps:
1. Open the ribbon door on the side of printer.
2. Rotate the ribbon lock knob into the open (unlocked) position
[Counter clockwise].
3. Remove slack from the ribbon by winding the left roller of the ribbon
cartridge.
4. Insert the ribbon cartridge into the printer, the web of the ribbon
should slide freely between the rubber roller and the print head.
5. Rotate the ribbon lock knob into the closed (locked) position –
[Clockwise].
6. Close the ribbon door on the side of printer.
7. Install a label cartridge. (See LABEL LOADING on page 15.)
8. Press the key to advance the ribbon forward.
Ribbon
Lock Knob
Ribbon
Cartridge
Ribbon
Door

RIBBON LOADING & SELECTION
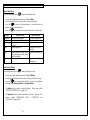
14
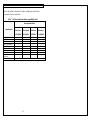
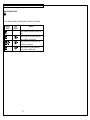
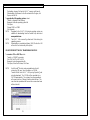
Use the chart below to determine the ribbon cartridge part number that is
recommended for your application.
VIPER™ LS6 label media and ribbon compatibility chart
Recommended Ribbon
Label Material
Black Wax
LS6-RWBLK
Black Hybrid
LS6-RHBLK
Black Resin
LS6-RRBLK
White Resin
LS6-RRWHT
Vinyl, Self-Laminating X X
Heat Shrink X X
Vinyl Cloth X X
Vinyl Tape, White X
Vinyl Tape, Colored X X
Polyester, White X
Polyester, Clear X X
Polyolefin X X
Non-Adhesive
Polyester
X X
Thermal Paper No ribbon required

LABEL LOADING
15
Each roll of labels or tape used in the VIPER LS6 is uniquely identified by the
mandrel holding the labels. This allows the operating system to automatically
set the printer for optimum usage of each label. Also, the operating system
keeps track of the remaining labels on each roll. Use steps 1-5 below to load
each label roll.
1. Ensure that the printer is turned OFF. If the printer is on, press the
and keys to turn the printer off. Insert the Label Roll into the socket
as shown above until it is firmly seated.
2. Ensure that the ribbon knob is in the locked position.
3. Insert the end of the label roll into the label guide path (see yellow
arrows). This requires positioning the label width guide to the proper
width. IF THE WIDTH GUIDE IS NOT LOCKED INTO A WIDTH
NOTCH, LABEL RECOGNITION FAILURE MAY OCCUR.
4. Labels should be inserted into the label path until resistance is met –
approximately ½”.
5. Turn the printer ON. Press the key to position the label for printing.
6. You are now ready to begin printing!
Label Roll
Socket
Label Roll
Width Guide
(Push Down to
Adjust)
Cutter Knob
(Pull Forward for
Cutting)
Label Door
Label Feed
Path
Mandrel

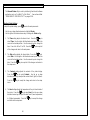
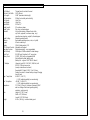
KEYBOARD
16
Print Key
Enter Key
Shift
Key
Power
On /
Off
Directional
Arrows
Space
Key
Label
or
Ribbon
Feed
Key
Tools
Key
Delete
Key
More Function Keys
Caps lock
Text size
Change page
Rotate label
Read label mandrel
Print multiple copies
Print selection of pages
Setup /
Escape Key

KEYBOARD
17
Basic Keyboard Functions
KEY / SYMBOL COMMON FUNCTIONS
POWER
Turn the printer ON, then turns
the printer OFF.
SETUP/
ESCAPE
Activate the Setup Menu from the home
screen or back out of internal menus.
DELETE
Delete characters or tools.
TOOLS
Used for creating serializations, symbols,
data lists, boxes, lines, bar codes, and
date/time stamps.
FEED
Advance labels and ribbon.
Pressing then reverse feeds
labels and ribbon.
UP
ARROW
Move cursor up one line.
DOWN
ARROW
Move cursor down one line.
RIGHT
ARROW
Move cursor one space to the right.
LEFT
ARROW
Move cursor one space to the left.
PRINTING
Print label.
Print multiple copies of the entire label.
Print a selection of pages from the label.
A print job can be terminated by pressing
any key.
SPACE
Insert a blank character.
ENTER
Complete a selection or move the cursor to
the next line.
SHIFT
Access alternate functions or characters.

KEYBOARD
18
Using the Shift Key
Press the shift key once to access the functions listed in the table below.
PRESS
SHIFT FIRST
THEN
PRESS
RESULT
Turn the printer OFF.
Delete all items on a label and return
formats to default values.
Delete all items on the current page only.
Does not delete current formats.
Left, center, or right justify the label items.
Reverse feed the label media.
Any
Alphabetic
or Numeric
Key
Enter secondary function from keypad
overlay onto text screen.
Enter the = symbol onto text screen
Increase the text size.
Decrease the text size.
Move forward one page in the current label.
Move backward one page in the current
label.
Rotate the label 90 degrees in the clockwise
or counterclockwise directions.
Print multiple copies of the entire label(s).

KEYBOARD
19
Press the shift key twice to access the functions listed in the table
below.
PRESS
SHIFT FIRST
THEN
PRESS
RESULT
Display the version of firmware currently
installed on the printer.
Delete all items on the entire label. Does
not delete current formats.
Activate or deactivate fit checking. Fit
checking automatically checks the size of
the label items to determine if they will fit on
the label. Fit checking occurs after each
new item is entered onto the home screen.
If fit checking if deactivated, the printer will
only perform fit checking before printing.
Reverse feeds the label media.
Any
Alphabetic
Key
Enter lower case character if caps lock is
on. Enter upper case character if caps lock
is off.
Activate or deactivate caps lock.
Move cursor to home position on the home
screen.
Move cursor to end position on the home
screen.
Move cursor to far right position of current
line on the home screen.
Move cursor to far left position of current
line on the home screen.
Automatically read the label mandrel in
order to restore default formats for a new
label roll or to enter an exact label length for
continuous tape.
Print a selection of pages from the label.
Press the shift key three times in a row to exit the shift mode.

KEYBOARD
20
Using the Delete Function
The four methods available for deleting labels are listed in the table below.
PRESS
FIRST
THEN
PRESS
RESULT
Delete individual characters or items on a
label.
Delete all items on the current page only.
Does not delete current formats.
Delete all items on the entire label. Does
not delete current formats.
Delete all items on the entire label and
return formats to default values.
Page is loading ...
Page is loading ...
Page is loading ...
Page is loading ...
Page is loading ...
Page is loading ...
Page is loading ...
Page is loading ...
Page is loading ...
Page is loading ...
Page is loading ...
Page is loading ...
Page is loading ...
Page is loading ...
Page is loading ...
Page is loading ...
Page is loading ...
Page is loading ...
Page is loading ...
Page is loading ...
Page is loading ...
Page is loading ...
Page is loading ...
Page is loading ...
Page is loading ...
Page is loading ...
Page is loading ...
Page is loading ...
Page is loading ...
Page is loading ...
Page is loading ...
Page is loading ...
Page is loading ...
Page is loading ...
Page is loading ...
Page is loading ...
Page is loading ...
Page is loading ...
Page is loading ...
Page is loading ...
Page is loading ...
Page is loading ...
-
 1
1
-
 2
2
-
 3
3
-
 4
4
-
 5
5
-
 6
6
-
 7
7
-
 8
8
-
 9
9
-
 10
10
-
 11
11
-
 12
12
-
 13
13
-
 14
14
-
 15
15
-
 16
16
-
 17
17
-
 18
18
-
 19
19
-
 20
20
-
 21
21
-
 22
22
-
 23
23
-
 24
24
-
 25
25
-
 26
26
-
 27
27
-
 28
28
-
 29
29
-
 30
30
-
 31
31
-
 32
32
-
 33
33
-
 34
34
-
 35
35
-
 36
36
-
 37
37
-
 38
38
-
 39
39
-
 40
40
-
 41
41
-
 42
42
-
 43
43
-
 44
44
-
 45
45
-
 46
46
-
 47
47
-
 48
48
-
 49
49
-
 50
50
-
 51
51
-
 52
52
-
 53
53
-
 54
54
-
 55
55
-
 56
56
-
 57
57
-
 58
58
-
 59
59
-
 60
60
-
 61
61
-
 62
62


Ask a question and I''ll find the answer in the document
Finding information in a document is now easier with AI
Other documents
-
CrewSafe VPB02101 Operating instructions
-
Casio KL-750E User manual
-
Casio KL 750B - 2 Line Label Printer User manual
-
Casio KL-60 - Label Printer User manual
-
-
-
Panduit LS8EQ-KIT Owner's manual
-
-
-
 MF DIGITAL P-55 User manual
