
Instruction Manual
15-MINUTE AUTO-OFF STEAM IRON
READ ALL INSTRUCTIONS BEFORE USING THIS APPLIANCE
Manuel d’Instructions
FER À VAPEUR AVEC SYSTÈME D’ARRÊT AUTOMATIQUE APRÈS 15 MINUTES
LIRE TOUTES LES INSTRUCTIONS AVANT D’UTILISER CET APPAREIL
Manual de Instrucciones
PLANCHA A VAPOR CON APAGADO AUTOMATICO DE 15 MINUTOS
LEA TODAS LAS INSTRUCCIONES ANTES DE USAR ESTE APARATO
Manual de Instruções
FERRO DE VAPOR COM DESLIGADO AUTOMÁTICO DE 15 MINUTOS
LEIA TODAS AS INSTRUÇÕES ANTES DE USAR ESTE APARELHO
©2002 Sunbeam Products, Inc. All rights reserved.
SUNBEAM
®
and SPRAY MIST
®
are registered trademarks of Sunbeam Products, Inc.
Distributed by Sunbeam Products, Inc., Boca Raton, Florida 33431.
©2002 Sunbeam Products, Inc. Tous droits réservés.
SUNBEAM
®
et SPRAY MIST
®
sont marques déposées de Sunbeam Products, Inc.
Distribué par Sunbeam Products, Inc., Boca Raton, Florida 33431.
©2002 Sunbeam Products, Inc. Todos los derechos reservados.
SUNBEAM
®
y SPRAY MIST
®
son marcas registradas de Sunbeam Products, Inc.
Distribuido por Sunbeam Products, Inc., Boca Raton, Florida 33431.
©2002 Sunbeam Products, Inc. Todos os direitos reservados.
SUNBEAM
®
e SPRAY MIST
®
som marcas registradas de Sunbeam Products, Inc.
Distribuído pela Sunbeam Products, Inc., Boca Raton, Florida 33431.
P.N. 103683
MODEL/MODÈLE
MODELO
3945
MODEL/MODÈLE
MODELO
3945

2
3
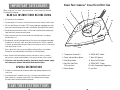
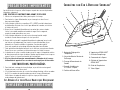
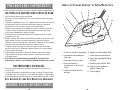
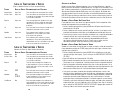
1. Temperature Control Dial
2. Power Indicator/Reset Button
3. Cord Wrap Groove
4. Non-Stick Sole Plate;
21 Steam Vents
5. Water Window
6. SPRAY MIST
®
Nozzle
7. Water Fill Opening
8. Steam On/Off Control
9. SPRAY MIST
®
Trigger
10. Fabric Temperature Suggestions
11. Heel Rest
K
NOW
Y
OUR
S
UNBEAM
® S
TEAM
/S
PRAY
/D
RY
I
RON
When using your iron, basic safety precautions should always be followed,
including the following:
READ ALL INSTRUCTIONS BEFORE USING
1. Use iron only for its intended use.
2.
To protect against risk of electric shock, do not immerse the iron in water or other liquids.
3. The iron should always be turned to “OFF” before plugging or unplugging from outlet.
Never yank cord to disconnect from outlet; instead, grasp plug and pull to disconnect.
4. Do not allow cord to touch hot surfaces. Let iron cool completely before putting away.
Loop cord loosely around iron when storing.
5. Always disconnect iron from electrical outlet when filling with water or emptying
and when not in use.
6. Do not operate iron with a damaged cord or if the iron has been dropped or damaged.
To avoid the risk of electric shock, do not disassemble the iron. Take it to a qualified
serviceman for examination and repair. Incorrect reassembly can cause a risk of electric
shock when the iron is used.
7. Close supervision is necessary for any appliance being used by or near children.
Do not leave iron unattended while connected or on an ironing board.
8. Burns can occur from touching hot metal parts, hot water or steam. Use caution
when you turn a steam iron upside down – there may be hot water in the reservoir.
9.
If the iron is not operating normally, disconnect from the power supply
and contact your nearest authorized Sunbeam distributor.
SPECIAL INSTRUCTIONS
1. To avoid a circuit overload, do not operate another high wattage appliance on the
same circuit.
2. If an extension cord is absolutely necessary, a 10-ampere cord should be used.
Cords rated for less amperage may overheat. Care should be taken to arrange
the cord so that it cannot be pulled or tripped over.
4
3
2
11
5
1
9
10
6
7
8
IMPORTANT SAFEGUARDS
SAVE THESE INSTRUCTIONS

4
5
F E AT U R E S
•
SPRAY MIST
®
– Provides a fine spray mist for spot dampening. Trigger control.
•
Temperature Dial
– Controls heat output of iron. Adjust dial according to ironing
needs. For low temperatures, turn the dial to the first dot. For medium temperatures,
turn the dial to second set of dots. For high temperatures, turn dial to third set of dots.
(Refer to Ironing Guide for recommended settings).
•
Swivel Cord
– Pivots up and down and is supported to prevent dragging on fabric.
Flexible grommet protects the cord from fraying.
•
Soleplate
– Has full-length button grooves for added convenience when ironing
shirts and blouses.
•
Non-Stick Finish
– The non-stick coating on the soleplate prevents sticking
of fabrics and starch residue.
•
Sliding Water Reservoir Cover
– Prevents dust and foreign matter from
entering the water tank; stops any water spillage during ironing.
•
Cord Wrap
– Provides quick, convenient cord storage.
•
Automatic Shut-Off
– Shuts off iron after 15 minutes of operation.
•
Power Reset Button
– Press to reset.
AUTO-OFF FEATURE
When the iron is plugged into a 120 V, AC electrical outlet, the steady red signal light
signals the iron is on. If the iron is left standing for 15 minutes, the iron will stop heating.
The signal light extinguishes to indicate auto shut-off and will stay out until the iron is
either reset or unplugged.
To restart iron:
To restart iron after it has shut itself off, please reset the red button.
CAUTION: DO NOT USE THE AUTO SHUT-OFF FEATURE AS A SUBSTITUTE
FOR TURNING OFF AND UNPLUGGING THE IRON WHEN NOT IN USE.
BEFORE FIRST USE
To ensure no stain is transferred to the fabric the first time you use the iron, it is advisable
to flush the soleplate steam vents to remove any residue from the manufacturing process.
To do this:
1. Set the steam adjustment control to steam (on).
2. Fill the iron’s water tank to its maximum fill line.
3. Set the temperature selector knob to its highest setting. Heat iron for 2 minutes.
4. Steam for 2 minutes while directing the steam vents away from the ironing surface.
5. Pass the iron on a damp cloth or a paper towel to clean.
SELECTING THE CORRECT FABRIC SETTING
When ironing, use the temperature and steam settings recommended for the type of fabric
being ironed. Garments requiring low temperatures and steam should be ironed first. This
will help avoid damaging garments with an iron that is too hot. If you are not sure of the
fabric content of the garment, start with a low heat and steam setting and test the iron on
an area of the garment where it will not show, such as a seam or facing. Gradually increase
the heat and steam settings until wrinkles are removed without damaging the fabric.
When changing the temperature from a high setting to a lower setting (Example: Moving
temperature selector from maximum to minimum), allow approximately 5 minutes for the
lower temperature to be reached. The following charts are designed to help you select the
best setting and method for the fabric you plan to iron. Check garment labels and follow
recommendations given by the fabric manufacturer. For blended fabrics use the setting for
the fabric in the blend requiring the lowest temperature. For example: 65% polyester, 35%
cotton fabric. Iron this fabric at the minimum setting.

7
6
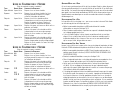
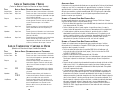
TEMPERATURE AND STEAM GUIDE
(All Models Except Variable Steam Models)
F
ABRIC STEAM GUIDE IRONING RECOMMENDATIONS
Acetate-Nylon Dry Steam Dry iron on wrong side while damp.
Acrylic-Silks Dry Steam Dry iron on wrong side while damp. Acrylic fabrics
may be steam ironed at steam settings if fabric
manufacturer directs.
Polyester Dry Steam Dry iron while fabric is damp or use spray as
you iron. Iron rayon fabrics on the wrong side.
Steam iron as fabric manufacturer directs.
Wools Dry Steam Steam iron on wrong side or use pressing cloth
on right side.
Cottons Dry Steam Steam iron while damp or use spray as you iron.
Iron dark fabrics on wrong side to avoid shine.
Linens Dry Steam Steam iron while damp or use spray as you iron.
Iron each section until entirely dry. Iron dark fabrics
on the wrong side and table linens on right side.
TEMPERATURE AND STEAM GUIDE
(All Models Except Variable Steam Models)
F
ABRIC STEAM GUIDE IRONING RECOMMENDATIONS
Acetate-Nylon MIN Dry iron on wrong side while damp.
Acrylic-Silks MIN Dry iron on wrong side while damp. Acrylic fabrics
may be steam ironed at steam settings if fabric
manufacturer directs.
Polyester
•
Steam iron while fabric is damp or use spray as
you iron. Iron rayon fabrics inside out. Steam iron
as manufacturer directs.
Wools
••
Steam iron inside out or use pressing cloth
on right side.
Cottons MAX Steam iron while damp or use spray as you iron.
•••
Iron dark fabrics inside out to avoid shine.
Linens MAX Steam iron while damp or use spray as you iron.
Iron each section until entirely dry. Iron dark fabrics
inside out and table linens on right side.
A WORD ON WATER
This iron is specially designed to use tap water. In areas of the country where the water is
very hard, distilled water is recommended for your iron. If you use distilled water in your
iron, you should periodically use a tank of tap water to keep your iron properly conditioned.
DO NOT use water passed through home water softening systems because such water
contains minerals that may be harmful to the iron.
USING AS A DRY IRON
The iron can be used on the dry setting with or without water in the tank. Avoid having the
tank too full of water while dry ironing.
• Slide the temperature control to MIN before plugging the cord into a 120 volt, AC
electrical outlet.
• Slide top button to the no-steam position and move the temperature control to the
appropriate fabric setting.
• If you are starting with a cool iron, let iron heat in the upright position on the heel rest.
If the iron is already hot, be sure to cool or heat the iron to a suitable temperature for
the fabric you are about to iron. Try it on an area of the garment where it will not show,
such as a seam or facing.
USING AS A STEAM IRON
When using as a steam iron, be sure the temperature setting is within the STEAM range
on the temperature selector to avoid water spotting the garment.
• Slide the temperature control to MIN. Slide top button to the steam position. Fill the
iron with water. (See TO FILL THE WATER TANK instructions).
• Plug the cord into a 120 volt, AC electrical outlet.
• Move the temperature control to the appropriate fabric setting. Allow 2 minutes for the
iron to reach the desired temperature.
• After iron has reached desired temperature, remove from the heel rest and use. If the
unit fails to steam after depressing the steam slide button, gently tap the soleplate on
the ironing surface. This will aid in starting the steaming action.
• When steam ironing, if the temperature control setting is accidentally lowered, water
may appear on the soleplate, indicating that iron temperature has dropped below
steaming level. If this should occur, reset temperature control to desired level. Rest the
iron on its heel rest for 1 minute to allow it to reach temperature. If your iron starts
losing its flow of steam and you wish to continue steam ironing, you may refill without
cooling the iron. Unplug the iron. Follow the TO FILL THE WATER TANK instructions.
Add water only to the maximum fill line to prevent overflow.

9
8
TO FILL THE WATER TANK
Always unplug the iron before filling. Set iron on its heel rest.
The water fill opening is located underneath the spill-proof cap. Hold the iron with the cap
open and fill to maximum fill line. Close the spill-proof cap on the iron. Be sure the cap
is fully sealed. Wipe the exterior of the unit to dry off any spillage.
TO EMPTY THE WATER TANK
Slide the temperature selector to the MIN position. Unplug the iron from the electrical
outlet. Open the spill-proof cap. Holding the iron over the sink, point the iron handle
down and hold in that position until water stops flowing out of the fill opening. Shake
the iron gently to loosen trapped water drops; the heat of the iron will dry the inside
of the iron. Let the iron cool on its heel rest.
IMPORTANT:
SUNBEAM DOES NOT RECOMMEND STORING THE IRON WITH
WATER IN THE TANK.
C
ARING FOR YOUR SUNBEAM IRON
•
Avoid ironing over snaps, zippers, rivets on jeans, etc., as they will scratch the soleplate.
• FOR MODELS WITH A NON-STICK SOLEPLATE, clean water marks, calcium deposits
and starch from the soleplate as follows: allow iron to cool and wipe with a soft cloth
using a mild vinegar solution (one tablespoon of vinegar in one cup of water).
DO NOT USE SCOURING PADS, ABRASIVES, OR CHEMICAL CLEANING SOLVENTS
as they may mar the finish.
NOTE:
Scratches in non-stick soleplates do not affect performance of iron.
M
AINTENANCE
Other than recommended care instructions contained in this pamphlet, no further user
maintenance should be necessary.
However, following is a list of frequently asked questions and their resolutions. If for any
reason your Sunbeam iron continues to exhibit one of these symptoms, or should require
repair for another reason, do not attempt to fix it yourself. Contact your authorized
Sunbeam Distributor.
QUESTIONS AND ANSWERS
SYMPTOM/POTENTIAL REASONS AND SOLUTIONS
Iron does not heat
• Iron should be plugged into a 120 volt, AC electrical outlet only.
• The slide control must be set at the desired temperature.
• The auto shut-off feature may have been activated. Press the power reset button
to start ironing.
Iron does not steam
• The water tank may be empty. Add water.
• Make sure the steam button is fully depressed. (On variable steam models,
the slide control must be in one of the three steam positions).
• Use only temperature settings at or above Polyester.
• Do not set to steam setting until selected temperature has been reached.
Make sure iron is pre-heated 1-1/2 – 2 minutes.
• Gently tap the soleplate on the ironing board once or twice to clear any blockage
of steam valve.
• Your iron may spit or leak water from the steam vents if you try to get steam when
the temperature setting is too low. Use only temperature settings in steam range
shown on the Temperature and Steam Guide.
Iron spits water or leaks water from steam vents
• Make sure iron has reached selected temperature before ironing. Pre-heat iron
1-1/2 – 2 minutes.
• If the iron leaks when turned OFF or while DRY ironing, make sure the steam control
is set to NO STEAM position.
• Iron may have been overfilled. Turn it off. Follow instructions for emptying the
water tank. Remove some of the water. Let iron cool, then dry it off. Replug iron
into electrical outlet and reheat. After 1-1/2 minutes, set to “steam”.
Follow USING AS A STEAM IRON instructions.
NOTE:
Always set steam control to NO STEAM position unless unit is ready
for steam ironing.

10
11
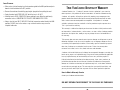
TWO
-YEAR LIMITED HOSPITALITY WARRANTY
Sunbeam Products, Inc. (“Sunbeam”) warrants that for a period of 2 years from the
date of purchase, this product will be free from defects in material and workmanship.
Sunbeam, at its option, will repair or replace this product or any component of the
product found to be defective during the warranty period. Replacement will be made
with a new or remanufactured product or component. If the product is no longer
available, replacement may be made with a similar product of equal or greater value.
This is your exclusive warranty.
This warranty is valid for the original purchaser from the date of initial purchase and is
not transferable.
Sunbeam dealers, service centers, or stores selling Sunbeam products
do not have the right to alter, modify or any way change the terms and conditions of
this warranty.
This warranty does not cover normal wear of parts or damage resulting from any of the
following: negligent use or misuse of the product, use on improper voltage or current,
use contrary to the operating instructions, disassembly, repair or alteration by anyone
other than Sunbeam or an authorized service center. Further, the warranty does
not cover Acts of God, such as fire, flood, hurricanes and tornadoes.
Sunbeam shall not be liable for any incidental or consequential damages caused by the
breach of any express or implied warranty. Except to the extent prohibited by applicable
law, any implied warranty of merchantability or fitness for a particular purpose is
limited in duration to the duration of the above warranty. Some states, provinces or
jurisdictions do not allow the exclusion or limitation of incidental
or consequential
damages or limitations on how long an implied warranty lasts, so the above limitations
or exclusion may not apply to you. This warranty gives you specific legal rights, and
you may also have other rights that vary from state to state or province to province.
How to Obtain Warranty Service
Contact your Sunbeam authorized dealer.
DO NOT RETURN THIS PRODUCT TO THE PLACE OF PURCHASE
IRON STORAGE
• When you’ve finished ironing, turn the temperature guide to the MIN position and push
down or slide the button to the OFF position.
• Remove the cord from the outlet by grasping the plug rather than pulling the cord.
• Empty the water tank AFTER EACH USE while the iron is still HOT.
• Allow the iron to COOL COMPLETELY before putting it away. Wrap the cord loosely
around the heel rest. WRAPPING TOO TIGHTLY CAN DAMAGE THE CORD.
• Always store the iron ON ITS HEEL REST with the temperature control knob in the MIN
position. DO NOT store in the carton, as any residue of moisture may cause the
soleplate to discolor.
Page is loading ...
Page is loading ...
Page is loading ...
Page is loading ...
Page is loading ...
Page is loading ...
Page is loading ...
Page is loading ...
Page is loading ...
Page is loading ...
Page is loading ...
Page is loading ...
Page is loading ...
Page is loading ...
Page is loading ...
Page is loading ...
-
 1
1
-
 2
2
-
 3
3
-
 4
4
-
 5
5
-
 6
6
-
 7
7
-
 8
8
-
 9
9
-
 10
10
-
 11
11
-
 12
12
-
 13
13
-
 14
14
-
 15
15
-
 16
16
-
 17
17
-
 18
18
-
 19
19
-
 20
20
-
 21
21
-
 22
22


Ask a question and I''ll find the answer in the document
Finding information in a document is now easier with AI
in other languages
- français: Sunbeam 3945 Manuel utilisateur
- español: Sunbeam 3945 Manual de usuario
- português: Sunbeam 3945 Manual do usuário
Related papers
Other documents
-
Palson Iris 30590 Operating Instructions Manual
-
-
BLACK DECKER PRO IR2250 User guide
-
Vetta VSI-1201BL User manual
-
Becken FERRO A VAPOR BSI3637 Owner's manual
-
Solac PV1610 Owner's manual
-
Shark IR420 Owner's manual
-
-
Palson 30437 Owner's manual
-
Westinghouse Iron WST5019MEX User manual