
GENERAL INFORMATION
Transport
Remove spark plug lead. Empty the petrol tank. Before public
trans port ing, engine oil and petrol must be removed.
ALGEMEINE ERLÄUTERUNGEN
Transport
Zienhen Sie das Zündkerzenkabel ab. Entleeren Sie den
Benzintank. Bei Transport mit öffentlichen Verkehrsmittein ist
der Benzin und Öltank zu entleeren.
RENSEIGNEMENTS GENERAUX
Transport
Débranchez la bougie. Videz le réservoir d'essence. En cas
de transport par un service public, il faut vider et l'essence et
l'huile.
INFORMACIONES GENERALES
Transporte
Desconexión del cable de bujía. Vacíese el depósito de gasolina
y, si se trata de transporte público, también el de aceite.
ALGEMENE NFORMATIE
Vervoer
De bougiekabel losmaken. Ledig de benzinetank. Bij openbaar
vervoer dienen zowel olie-als benzinetank geledigd te worden.
INFORMAZIONI GENERALI
Transporto
Staccare il cavo d'accensione dalla candela. Svuotare il ser-
batoio della benzina. In caso di transporto su mezzi pubblici, si
deve svuotare sia la benzina che l'olio.
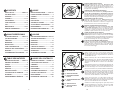
Cleaning of air fi lter. Remove the lid and remove the fi lter
cartridge.
Reinigung des Luftfi lters. Deckel abnehmen und Filtereinsatz
herausnehmen.
Nettoyage du fi ltre à air. Enlevez le capot et retirez la cartouche
fi ltrante.
Limpieza del fi ltro de aire. Quitar la tapa y extraer el elemento
fi ltrante.
Het schoonmaken van het luchfi lter. Verwijder de deksel en
haal het fi lter eruit.
Pulizia del fi ltro. Togliere il coperchio ed estrarre il fi ltro.
532 40 33-52 Rev. 1 Printed
06.19.06 BY in U.S.A.
www.fl ymo.com
Manuel d’instructions
Lisez très attentivement et soyez
certain de comprende ces in struc -
tions avant d’utiliser cette machine.
Manual de las
instrucciones
Por favor lea cuidadosamente y
comprenda estas intrucciones antes
de usar esta maquina.
Instruction manual
Please read these in struc tions care ful ly
and make sure you un der stand them
before using this ma chine.
Anleitungshandbuch
Bitte lesen Sie diese Anleitungen sorg-
fältig durch und vergewissern Sie sich,
daß Sie diese verstehen, bevor Sie die
Maschine in Betrieb nehmen.
Instructieboekje
Lees deze instructies aandachtig
en zorg dat u ze begrijpt voordat
u deze machine gebruikt.
Manuale di istruzioni
Prima di utilizzare la macchina
leggete queste istruzioni con at-
tenzione ed accertatevi di averle
comprese bene.
FL521D

2
INDICE
REGLAS DE SEGURIDAD..........SIVU 3-8
ESPECIFICACIONES TÉCNICAS........... 9
SUMARIO .............................................. 10
MONTAJE ......................................... 11-13
REGULACIÓN ....................................... 14
ARRANQUE Y PARADA .................. 15-16
APLICACIÓN DEL CORTACÉSPED ...... 17
MANTENIMIENTO ............................ 18-20
INFORMACIONES GENERALES ......... 20
INHOUD
VEILIGHEIDSMAATREGELEN ....PAG.3-8
TECHNISCHE GEGEVENS..................... 9
OVERZICHT........................................... 10
MONTEREN...................................... 11-13
INSTELLEN ........................................... 14
STARTEN EN STOPPEN.................. 15-16
GEBRUIK VAN DE MAAIER ................. 17
ONDERHOUD................................... 18-20
ALGEMENE INLICHTINGEN ................ 20
INDICE DEL CONTENUTO
NORME DE SICUREZZA........PAGINA 3-8
CARATTERISTICHE TECNICHE ............ 9
SOMMARIO ........................................... 10
MONTAGGIO .................................... 11-13
REGOLAZIONE..................................... 14
AVVIAMENTO ED ARRESTO .......... 15-16
USO DELLA FALCIATRICE .................. 17
MANUTENZIONE ............................. 18-20
INFORMAZIONI GENERICHE.............. 20
CONTENTS
SAFETY RULES........................ PAGE 3-8
TECHNICAL DATA .................................. 9
OVERVIEW............................................ 10
ASSEMBLY....................................... 11-13
ADJUSTMENTS .................................... 14
START AND STOP ........................... 15-16
USE........................................................ 17
MAINTENANCE................................ 18-20
GENERAL INFORMATION.................... 20
INHALTSVERZEICHNIS
SICHERHEITSREGELN ............SEITE 3-8
TECHNISCHE DATEN............................. 9
ÜBERSICHT .......................................... 10
MONTIEREN..................................... 11-13
EINSTELLUNG...................................... 14
START UND ABSTELLEN ............... 15-16
GEBRAUCH DES RASENMÄHERS....... 17
WARTUNG........................................ 18-20
ALLGEMEINE ERLÄUTERUNGEN ...... 20
TABLE DES MATIERES
MESURES DE SÉCURITÉ ........ PAGE 3-8
DONNÉES TECHNIQUES ....................... 9
APERÇU ................................................ 10
MONTAGE ........................................ 11-13
RÉGLAGE.............................................. 14
MARCHE ET ARRÊT........................ 15-16
UTILISATION DE LA TONDEUSE ........ 17
ENTRETIEN...................................... 18-20
RENSEIGNEMENTS GÉNÉRAUX ........ 20
19
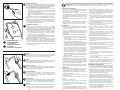
Annually (After end of season)
Grinding and balancing the cutter blade. Remove the spark
plug lead. Fitting and removing the blade require the use of
protective gloves. Unscrew the cutter blade and deliver it to a
service workshop for grinding and balancing. Tighten the screw
properly when re as sem bling.
Jährlich (nach Beendigung der Saison)
Schleifen und Auswuchten des Messers. (Achtung: Vor Demon-
tage des Messers Zündkabel von der Zündkerze entfernen).
Die Klinge nur mit Schutzhandschuhen einsetzen und entfernen.
Schrauben Sie das Messer ab und bringen dieses in eine Service-
Werkstatt. Bei der Montage die Schrauben richtig anziehen.
Annuellement (à fi n de la saison)
Aiguisage et équilibrage de la lame. Débrancher la bougie.
Mettre des gants de protection avant de mettre en place ou
d’enlever la lame. Démontez-la et donnez-la à aiguiser à un
professionnel. Bien resserer la vis après remontage.
Revisión anual (Al terminar la estación)
Afi lado y equilibrado de la cuchilla. Se desconecta el cable
del encendido de la bujía. El ajuste y la sustitución de la hoja
requiere el uso de guantes protectores. Se desmonta leugo la
cuchilla que es entrega a un taller mecánico para su afi lado y
equilibrado. Apriétese bien la tuerca al volver a montar.
Jarlijks (na einde van het seizoen)
Slijpen en balanceren van het maaimes. De bougiekabel los-
maken. Bij het afstellen en verwijderen van het mes moeten altijd
beschermende handschoenen worden gedragen. Schroef het mes
er af en breng het naar de werkplaats voor slijpen en balanceren.
Bij het weer aanbrengen de schroef goed vastdraaien.
Controllo annuale (All fi ne della stagione)
Rettifi ca e bilanciamento della lama. Rimuovere il cavo di ac-
censione. Inserire e rimuovere la lama solamente indossando
guanti di protezione. Smontare la lama e consegnarla ad una
offi cina di servizio per la rettifi ca ed il bilanciamento. Stringere
bene le viti nel rimontaggio.
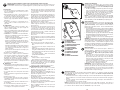
(1) OIL DRAIN PLUG
(1) ÖLABLAßSCHRAUBE
(1) BOUCHON DE VIDANGE
D'HUILE
(1) TAPON DE DRENAJE PARA
ACEITE
(1) AFTAPPLUG OLIE
(1) TAPPO DI SCARICO
DELL'OLIO
Change oil after each season or after 25 hours running time.
Run the engine warm, remove the spark plug lead. Remove
the drain plug from bottom of engine and drain oil. Fill with new
oil. SAE 30 can be used.
Ölwechsel einmal pro Jahr oder nach 25 Betriebsstunden. Den
Motor warm laufen lassen, abstellen und das Zündkerzenkabel
abziehen. Die Ölablaßschraube an der Unterseite des Motors
entfernen und das Öl ablassen. Danach neues Öl auffüllen
SAE 30.
Changez l'huile à chaque saison ou après 25 heures de marche. Al-
lumez le moteur, arrêtez-le et enlevez le câble d'allumage. Enlevez
le bouchon de vidange sous le moteur et vider l'huile. Puis rem-
plissez avec de l'huile neuve (les huiles SAE 30 sont utilisables).
Cambiar el aceite cada temporada, o después de 25 horas de
funcionamiento. Dejar funcionar el motor hasta que se caliente,
pararlo y quitar el cable de encendido. Quitar el tapón de drenaje
del lado inferior del motor y dejar salir el aceite. Poner después
aceite nuevo. Pueden utilizarse los aceites SAE 30.
Ververs de olie elk seizoen, of na 25 u rijden. Laat de motor
warmlopen, schakel de motor uit en demonteer de ontsteking-
skabel. Verwijder de aftapplug op de onderkant van de motor en
tap de olie af. Vul daarna met verse olie: SAE 30.
Sostituire l'olio al termine di ogni stagione, oppure dopo 25 ore di
esercizio. Scaldare il motore, spengerlo e staccare il cavo della
candela. Togliere il tappo di scarico sotto il motore e far uscire
tutto l'olio. Rifornire con olio nuovo SAE 30.
1

18
Periódicamente
Parar el motor para controlar el nivel de aceite del motor. Debe estar entre FULL y ADD. ATENCIÓN: la
tapa tiene que estar bien puesta para que la indicación del nivel de aceite de la varilla sea correcta. Evitar
relleno excesivo de aceite.
Regelmatig
Kontroleer het oliepeil bij voorkeur bij een koude motor. Het niveau moet tussen FULL en ADD staan. Nooit
beneden de ADD mar ook nooit boven FULL. N.B. De peilstok moet geheel ingedraaid worden voor dejuiste
meting. Niet teveel olie bijvullen.
Periodicamente
Arrestare il motore e controllare l'asta dell'olio. Ll livello deve trovarsi fra FULL e ADD. ATTENZIONE: l'asta
dell'olio deve essere avvitata fi no in fondo per vedere il livello correctto dell'olio. Evitare di versare troppo olio.
Regularly
Stop the engine and unscrew the dipstick. The level should be
between FULL and ADD. NOTE: the dipstick must be screwed
all the way down in order to indicate correct oil level. Avoid fi lling
with too much oil.
Regelmässig
Stellen Sie den Motor ab und schrauben Sie den Ölpeilstab heraus.
De Ölstand soll swischen FULL and ADD liegen. ACHTUNG:
der Ölpeilstab muss vollständig hineingeschraubt sein, damit
der richtige Ölstand angezeigt werden kann. Vermeiden Sie zu
viel Öl einzufüllen.
Régulièrement
Arrêter le moteur et vérifi er la jauge à julie. Le niveau doit être
situé entre FULL (plein) et ADD (ajoutez). ATTENTION: il faut
que la jauge soit vissé à fond pour obtenir un résultat correct.
Evitez de mettre trop d'huile.
Maintenance
Always remove the spark plug lead before repair, cleaning or
main te nance work. After 5 hours running time, tighten screws
and nuts. Check the oil. The spark plug must be at the highest
point on the mower when it is tilted up.
Wartung
Ziehen Sie immer das Zündkerzenkabel ab, bevor Sie mit
der Reparatur, Reinigung oder mit Wartungsarbeiten beginnen.
Nach den ersten 5 Betreibstunden alle Schrauben und Muttern
überprüfen. Ölstand kontrollieren. Wenn der Rasenmäher
gekippt wird, müssen sich die Zündkerze an der höchsten
Stelle befi nden.
Entretien
Toujours débrancher la bougie avant réparation, nettoyage ou
entretien. Après 5 heures d'utilisation, resserrer vis et écrous.
Vérifi er l'huile. Lorsque la tondeuse est inclinée sur le côté, il faut
que la bougie occupe la position la plus élevée.
Inspeccion
Desconéctese siempre el cable del encendido de la bujía antes
de hacer una reparación, limpieza o trabajo de mantenimiento.
Vovler a apretar tuercas y tornillos después de cinco horas de
trabajo. Contrólose el aceite. Si se coloca el cortacésped de
lado, el punto más alto debe ser la bujía.
Onderhoud
Voordag u begint met schoonmaken, reparaties of afstellen, altijd
eerst de bougiekabel losmaken. Bouten en moeren kontroleren
ma vijf draaiuren. Oliepeil kontroleren en zonodig bijvullen. Als
de maaier op de zijkant wordt gelegd, zorg dan dat de bougie
naar boven zign gericht.
Manutenzione
Manutenzione: Staccare sempre il cavo di accensione
prima di riparazioni, pulizie o lavori di menutenzione. Dopo
5 ore di funzionamento stringere viti e dadi. Controllare l'olio.
Piegando la falciatrice sul fi ancolare attenzione che la candela
sia il punto più alto.
3
I. Training
• Read the instructions carefully. Be fa mil iar with the
con trols and the proper use of the equipment.
• Never allow children or people un fa mil iar with the
ins truc tions to use the lawnmower. Local regulations
may restrict the age of the operator.
• Never mow while people, especially children, or pets
are nearby.
• Keep in mind that the operator or user is responsible
for accidents or hazards occurring to other people or
their property.
II. Preparation
• While mowing, always wear sub stan tial footwear and
long trousers. Do not operate the equipment when
barefoot or wearing open sandals.
• Thoroughly inspect the area where the equipment is to
be used and remove all objects which may be thrown
by the machine.
• WARNING - Petrol is highly fl ammable.
- Store fuel in containers specifi cally de signed for this
pur pose.
- Refuel outdoors only and do not smoke while re fu -
el ing.
- Add fuel before starting the engine. Never remove
the cap of the fuel tank or add petrol while the engine
is running or when the en gine is hot.
- If petrol is spilled, do not attempt to start the engine
but move the ma chine away from the area of spillage
and avoid cre at ing any source of ig ni tion until petrol
va pors have dis si pat ed.
- Replace all fuel tanks and container caps se-
cure ly.
• Replace faulty silencers.
• Before using, always visually inspect to see that the
blades, blade bolts and cutter assembly are not worn
or dam aged. Replace worn or damaged blades and
bolts in sets to pre serve balance.
• On multi-bladed machines, take care as rotating one
blade can cause other blades to rotate.
III. Operation
• Do not operate the engine in a confi ned space where
dan ger ous carbon mon ox ide fumes can collect.
• Mow only in daylight or in good artifi cial light.
• Avoid operating the equipment in wet grass, where
feasible.
• Always be sure of your footing on slopes.
• Walk, never run.
• For wheeled rotary machines, mow across the face of
slopes, never up and down.
• Exercise extreme caution when chang ing direction on
slopes.
• Do not mow excessively steep slopes.
• Use extreme caution when reversing or pulling the
lawnmower towards you.
• Stop the blade if the lawnmower has to be tilted for
trans por ta tion when cross ing surfaces other than grass,
and when transporting the lawnmower to and from the
area to be mowed.
• Never operate the lawnmower with defective guards, or
without safety de vic es, for example defl ectors and/or
grass catchers, in place.
• Do not change the engine governor settings or over-
speed the engine. Op er at ing the engine at excessive
speed may increase the hazard of personal injury.
• Disengage all blade and drive clutches before starting
the engine.
• Start the engine or switch on the motor carefully ac-
cording to instructions and with feet well away from
the blade.
• Do not tilt the lawnmower when starting the engine or
switch ing on the motor, except if the lawnmower has
to be tilted for starting. In this case, do not tilt more
than absolutely nec es sary and lift only the part which
is away from the op er a tor.
• Do not start the engine when standing in front of the
discharge chute.
• Do not put hands or feet near or under rotating parts.
Keep clear of the dis charge opening at all times.
• Never pick up or carry lawnmower while the engine is
running.
• Stop the engine and disconnect the spark plug wire:
- before cleaning blockages or un clog ging chute;
- before checking, cleaning or work ing on the lawn-
mower;
- after striking a foreign object. Inspect the lawnmower
for damage and make repairs before re start ing and
op er at ing the lawnmower;
- if the lawnmower starts to vibrate abnormally (check
im me di ate ly).
• Stop the engine:
- whenever you leave the lawnmower;
- before refuelling.
• Reduce the throttle setting during en gine shut down
and, if the engine is provided with a shut-off valve, turn
the fuel off at the conclusion of mowing.
• Go slow when using a trailing seat.
IV. Maintenance and Storage
• Keep all nuts, bolts and screws tight to be sure the
equip ment is in safe work ing condition.
• Never store the equipment with petrol in the tank inside
a building where fumes may reach an open fl ame or
spark.
• Allow the engine to cool before storing in any enclo-
sure.
• To reduce the fi re hazard, keep the engine, silencer,
battery compartment and petrol storage area free of
grass, leaves, or excessive grease.
• Check the grass catcher frequently for wear or de te -
ri o ra tion.
• Replace worn or damaged parts for safety.
• If the fuel tank has to be drained, this should be done
outdoors.
Safe Operation Prac tic es for Pe des tri an-Controlled Rotary Lawnmowers
IMPORTANT: This cutting machine is ca pa ble of am pu tat ing hands and feet and throwing objects.
Failure to observe the following safety instructions could result in serious injury or death.
Page is loading ...
Page is loading ...
Page is loading ...
Page is loading ...
Page is loading ...

12
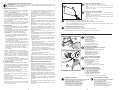
(1) CATCHER FRAME
( 2 ) V I N Y L B I N D I N G
(3) FRAME OPENING
(1) RAHMEN FÜR DEN.
GRASFANGBEUTEL
(2) KUNSTSTOFFKAPPEN
(3) RAHMENÖFFNUNG
(1) CADRE DU COLLECTEUR
(2) CRANS DE FIXATION
(3) OUVERTURE DU CADRE
(1) MARCO PARA EL
COLECTOR DE HIERBA
(2) GANCHOS DE PLASTICO
(3) ABERTURA DEL MARCO
(1) FRAME VOOR
GRASVERGAARBAK
(2) PLASTIC HAKEN
(3) FRAME-OPENING
(1) TELAIO DEL CESTELLO
(2) AGGANCI DI PLASTICA
(3) APERTURA DEL TELAIO
To Empty Grass Catcher
• To remove catcher, release en gine brake yoke to stop en-
gine.
• Lift up rear door and remove the grass catcher by the
handle.
• Do not drag bag when emptying, it will cause unnecessary
wear.
Leeren des Grasfangbeutels
• Durch Loslassen des Bedienungshebels den Motor abstellen.
• Die Klappe anheben und den Grasfangbeutel mit Hilfe des
Handgriffs entfernen.
• Den Beutel beim Leeren nicht über den Boden schleifen;
dadurch entsteht unnötiger Verschleiß.
To Assemble and Attach Grass Catcher
• Put grass catcher frame into grass bag with stiff part of bag
on the bottom.
• Slip vinyl bindings over frame.
• The grass catcher is secured to the lawn mower housing when
the rear door is low ered onto the grass catcher frame.
Zusammensetzung und Montage des Grasfang-
beutels
• Den Rahmen in den Grasfangbeutel einsetzen; der steife Teil
des Beutels nach unten.
• Die Kunststoffkappen auf den Rahmen aufsetzen.
• Der Grasfangbeutel wird durch den Druck der Klappe gegen
den Rahmen in der korrekten Stellung festgehalten.
Assemblage et montage du collecteur d'herbe
• Mettez en place le collecteur d'herbe avec sa partie dure vers
le bas.
• Passez les fi xations plastiques par dessus le cadre.
• Le collecteur se met en place en appuyant le volet au cadre
Armado y montaje del colector de hierba
• Montar el marco en el colector de hierba con la parte dura
de éste hacia abajo.
• Poner los ganchos de plástico alrededor del marco.
• El colector de hierba se mantiene en su sitio por la presión
de la tapa sobre el marco del colector.
Assembleren en monteren van de grasvergaarbak
• Zet het frame in de grasvergaarbak met het harde gedeelte
van de grasvergaarbak naar onderen.
• Trek de plastic haken over het frame.
• De grasvergaarbak wordt op zijn plaats gehouden door de druk
die het luik uitoefent op het frame van de grasvergaarbak.
Assemblaggio e montaggio del cestello di raccolta
• Porre il telaio nel cestello, con il lato rigido del cestello verso
il basso.
• Serrare gli agganci di plastica intorno al telaio.
• Il cestello di raccolta viene tenuto a posto dal portello.
2
1
3
(1) REAR DOOR
(2) GRASS CATCHER
FRAME
(1) HINTERE KLAPPE
(2) RAHMEN FÜR DEN
GRASFANGBEUTEL
1
2
(1) VOLET ARRIÈRE
(2) CADRE DU COLLECTEUR
(1) TAPA POSTERIOR
(2) MARCO PARA COLECTOR DE HIERBA
(1) ACHTERLUIK
(2) FRAME VOOR GRASVERGAARBAK
(1) PORTELLO DI SICUREZZA
(2) TELAIO DEL CESTELLO DI RACCOLTA
9
53
25 –
82
7,0 /
5,2
F521D
0 –
4,2
43,1
These symbols may appear on your machine or in the literature supplied with the product. Learn and under-
stand their meaning.
Diese Symbole fi nden Sie auf Ihrer Maschine oder in Unterlagen, die mit dem Produkt ausgehändigt wurden.
Bitte machen Sie sich mit deren Bedeutung vertraut.
Ces symboles peuvent se trouver sur votre machine ou dans les publications fournies avec le produit. Ap-
prenez à comprendre la signifi cation de ces symboles.
Estos símbolos pueden aparecer sobre su unidad o en la literatura proporcionada con el producto. Aprenda
y comprenda sus signifi cados.
Deze symbolen kunnen op uw machine of in de bij het produkt geleverde documentatie aanwezig zijn. Lees
en begrijp de betekenis.
Simboli utilizzati sull'apparato di taglio o nella documentazione fornita unitamente al prodotto. E' importante
conoscerne bene il signifi cato.

10
2
3
1
9
4
7
5
6
11
ASSEMBLING
Handle
Pull up the handle in direction of the arrow. With the handle in
up-turned position, tighten the wing-nuts.
MONTAGE
Griff
Griff in Pfeilrichtung hochklappen. Anschließend Flügelmuttern
anziehen.
MONTAGE
Manche
Déployez le manche dans la direction de la fl èche. Une fois le
manche déployé, serrez les écrous à oreilles.
MONTAJE
Empuñadura
Levantar le empuãdura en el sentido de la fl echa. Cuando la
empuãdura esté levantada, apretar las palomillas.
MONTAGE
Hendel
Klap de hendel om, in de richting van de pijl. Wanneer de hendel
omgeklapt is, worden de veugelmoeren aangedraaid.
MONTAGGIO
Impugnatura
Sollevare l'impugnatura nel senso dell afreccia. Quando
l'impugnatura è sollevato, stringere i galletti.
Install Rear Foot Guard
• Position guard as shown and secure with fasteners supplied.
NOTE: The foot guard must be installed for the safe operation
of this machine.
Hinteren fuss-schutz montieren
• Den Schutz der Abbildung entsprechend anbringen und
mit mitgelieferten Befestigungsteilen sichern. HINWEIS:
Die Montage des Fußschutzes ist für den sicheren Betrieb
dieser Maschine erforderlich.
Installez le protecteur de pieds arrière
• Placez le protecteur comme montré et assurez-le avec les
attaches fournies. REMARQUE: Vous devez installer le
protecteur de pieds arrière pour que l’usage de la machine
soit sûr.
Instalar la protección de pies trasera
• Ponga la protección como mostrado y asegúrela con las
amarras proporcionadas. NOTA: Para el funcionamiento en
seguridad de esta máquina hay que instalar la protección
para los pies.
Achterste voetbeschermer monteren
• Plaats beschermer zoals afgebeeld en zet hem met bi-
jgeleverde bevestigers vast. N.B.: De voetbeschermer
dient te worden geïnstalleerd voordat deze machine veilig
kan worden gebruikt.
Montaggio: Protezione posteriore piedi
• Posizionare la protezione come illustrato nella fi gura. Bloccare
in posizione con i dispositivi di fi ssaggio forniti con il prodotto.
NOTA: A garanzia di un funzionamento sicuro della macchina,
è basilare installare la protezione posteriore piedi.
-
 1
1
-
 2
2
-
 3
3
-
 4
4
-
 5
5
-
 6
6
-
 7
7
-
 8
8
-
 9
9
-
 10
10


Ask a question and I''ll find the answer in the document
Finding information in a document is now easier with AI
in other languages
- italiano: Flymo FL521D Manuale del proprietario
- français: Flymo FL521D Le manuel du propriétaire
- español: Flymo FL521D El manual del propietario
- Deutsch: Flymo FL521D Bedienungsanleitung
- Nederlands: Flymo FL521D de handleiding