Canon PIXMA MX420 User manual

Category
Dehumidifiers
Type
User manual

This manual is also suitable for

Canon PIXMA MX420 is a multifunction device that offers versatile printing, scanning, and copying capabilities. With built-in Wi-Fi, you can connect it to your wireless network and print or scan from virtually anywhere in your home or office. The MX420 also features a 2.5-inch LCD screen for easy navigation and setup. It can produce crisp and vibrant prints with a maximum resolution of 4800 x 1200 dpi.

Canon PIXMA MX420 is a multifunction device that offers versatile printing, scanning, and copying capabilities. With built-in Wi-Fi, you can connect it to your wireless network and print or scan from virtually anywhere in your home or office. The MX420 also features a 2.5-inch LCD screen for easy navigation and setup. It can produce crisp and vibrant prints with a maximum resolution of 4800 x 1200 dpi.

Installing Your Multifunction
to Your Network for the First Time
PIXMA MX420
Mac OS
1
Navigation Tips for Macintosh Users
2
To navigate this guide, please use the arrows on the MAC
keyboard or use the PAGE UP and Page DOWN keys.
Page UP
Page DOWN
LEFT
UP
DOWN
RIGHT
Installing Your Multifunction
to Your Network for the First Time
PIXMA MX420
Mac OS
Preparing to Connect My Multifunction to My Network 4
Network Requirements 4
Important Information You Need Before Adding Your Multifunction 5
Adding Your Multifunction to Your Network 6
Installing the Drivers & Software 10
Registering the Printer & Scanner 17
3
Network Requirements
Before connecting the machine to the network, make sure that configuration of the computer and access point or router is
complete, and that the computer is connected to the network.
Notes on Network Connection
The configuration, router functions, setup procedures and security settings of the network device vary depending on your
system environment. For details, refer to your device's instruction manual or contact its manufacturer.
The machine cannot be used over a wireless and wired connection at the same time.
Wireless Connection
Connect to your network environment over a wireless connection.
Preparing to Connect My Multifunction
To My Network
4
Preparing to Connect My Multifunction
To My Network
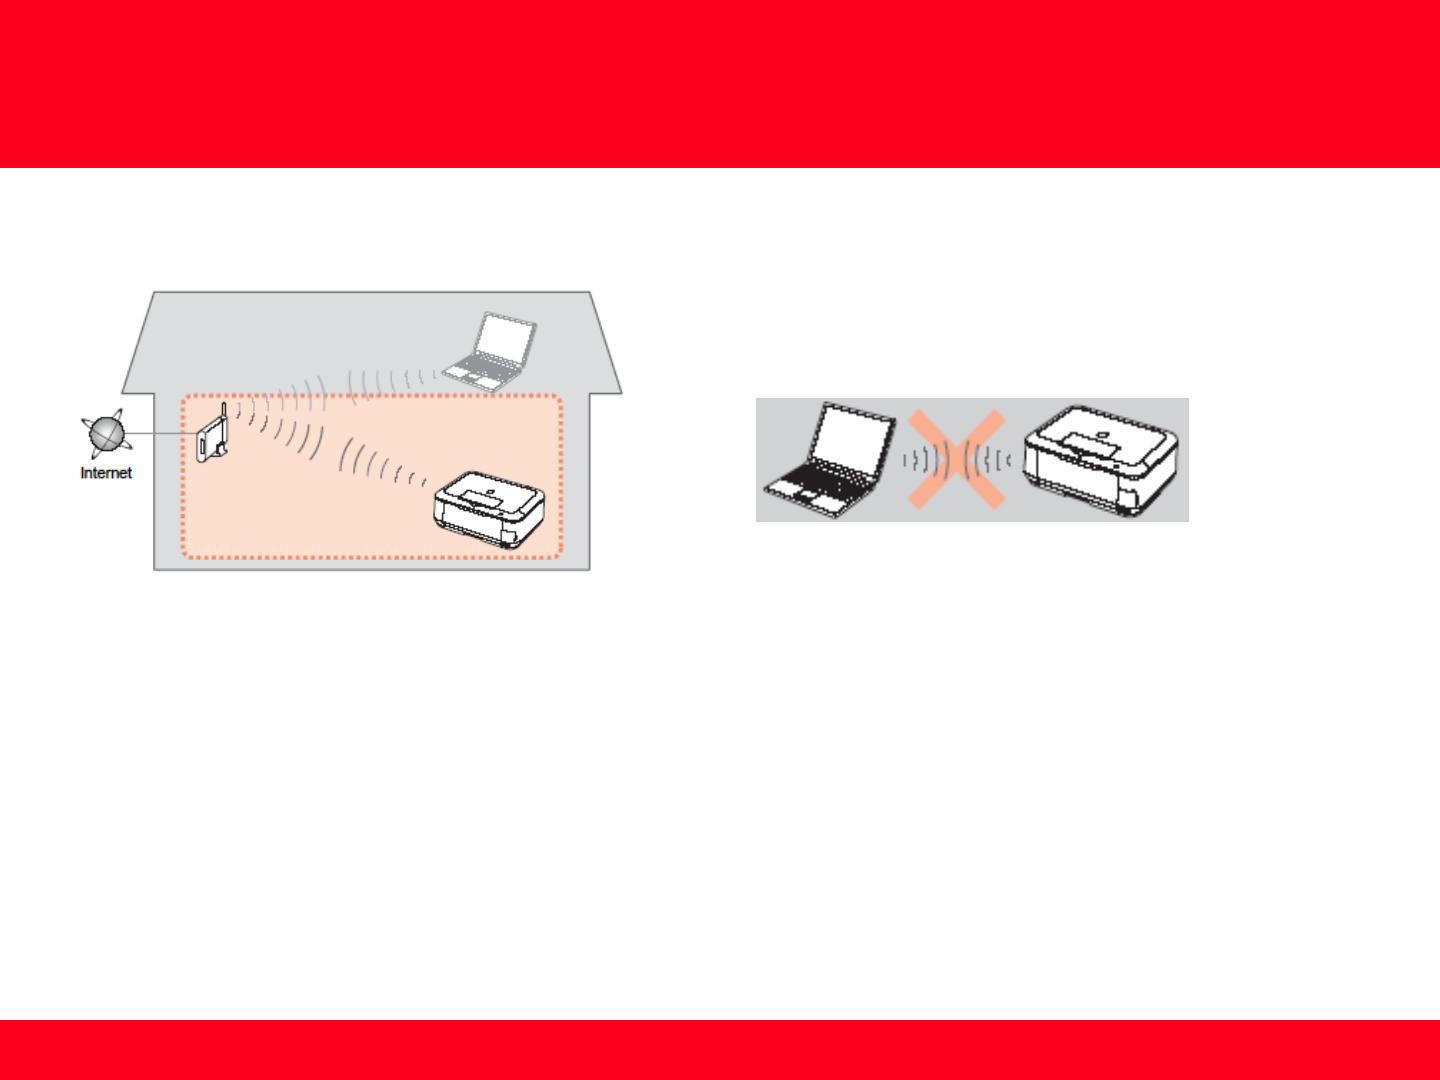
Be sure to prepare an access point.
Important Information You Need Before Adding Your Multifunction
The following information is required to connect to your access point or router.
Access Point Name/Network Name:
Also referred to as SSID. A name to identify the specific access point.
Network Key:
Also referred to as encryption key, WEP key or WPA/WPA2 passphrase, Pre-Shared key.
A password required to set to prevent unauthorized access to communication.
Check your access point or router for the following information, and then write it down.
NOTE: For details on how to check the following information, refer to the manual of your access point or router, or contact its manufacturer.
An "Ad-hoc connection," which establishes a direct
connection to the computer over a wireless connection
without using an access point, is not supported.
5
Adding Your Multifunction to Your Network
6
Step One
Press the Setup button (A)
Step Two
Select Wireless LAN setup, and then press the OK button.
Adding Your Multifunction to Your Network
7
Step Four
Select Easy setup, and then press the OK button.
Step Three
Select Yes, then press the OK button.
When wireless connection is enabled, the Wi-Fi lamp (D)
lights blue.
Step Five
Select the access point name, then press the OK button.
NOTE: If you are living in an apartment, nearby access
points in use may be detected.
Step Six
When one of the following screens is displayed, enter the network
key using the Numeric buttons (E), then press the OK button.
If the following screen is not displayed, go to step 8
Press the button to switch character entry modes.
Network key entry is case-sensitive.
Be sure to enter upper and lower case letters of the alphabet
correctly
Adding Your Multifunction to Your Network
8
Step Eight
When the connected to the access point screen appears, press the
OK button.
The Setup menu screen returns.
NOTE: If Failed to connect to the access point. appears, press the OK
button, make sure that the network key is correct, then enter it again. If a
connection still cannot be established, refer to the printed manual:
Network Setup Troubleshooting.
Adding Your Multifunction to Your Network
9
Step Seven
Make sure that the network key is correct, and then
press the OK button.
Installing the Drivers & Software
To use the machine by connecting it to a computer, software including the drivers needs to be copied (installed) to the computer's hard disk. The
installation process takes about 20 minutes. (The installation time varies depending on the computer environment or the number of applications
to be installed.)
Installing the Drivers & Software
10
Step One
Turn on the computer, then insert the Setup
CDROM into the CD-ROM drive
Step Two
Double-click the Setup icon of the CD-ROM folder to proceed to the
following screen.
If the CD-ROM folder does not open automatically, double-click the
CD-ROM icon on the desktop.
Step Four
Click Easy Install. Click Install.
The drivers, application software, and on-screen manuals are installed all together.
Step Three
Enter your administrator name and password. Click OK.
If you do not know your administrator name or password, click
Help , then follow the on-screen instructions.
11
Installing the Drivers & Software
Step Six
Select Use the printer with wireless LAN connection, then click
Next.
Follow any on-screen instructions to proceed with the software
installation.
Step Five
Click Install
*Applications may vary by model
12
Installing the Drivers & Software
Step Eight
When the Create an Alias on Desktop screen appears, select
Agree if you want an alias of the On-Screen manual to be placed on
the desktop , otherwise select Do not Agree, then click Next
Step Seven
Read the License Agreement screen carefully and click Yes.
13
Installing the Drivers & Software
14
Step Nine
Select Agree or Do not Agree on the Add Easy-WebPrint EX to
the Dock screen, then click Next
Step Ten
Click Skip or Next on the Download Easy-webPrint screen
Installing the Drivers & Software
Step Eleven
When the Printer Detection screen appears, click Next
Step Twelve
Make sure the machine is turned on, then click OK.
15
Installing the Drivers & Software
16
Installing the Drivers & Software
Step Thirteen
On the Canon IJ Network Tool screen, select MX420 series in Printers and click Next.
Step One
When the Register Printer and Scanner screen appears,
click Register Printer.
Registering the Printer & Scanner
This section describes how to register the machine on a Macintosh computer.
Registering the Printer & Scanner
17
Proceed to the section that relates to your operating
system for further installation instructions
Mac OS X v. 10.5.x / 10.6.x: Go to Step 2-A
Mac OS X v. 10.4.11: Go to Step 2-B
Step Two
2-A
1. Select Canon MXxxx series in the list of printers, then
click Add . *xxx refers to the model number. MX420 series
shown in example, below
2. Go to Step Three, page 20.
*The alphanumeric characters after Canon xxxx series is the machine's Bonjour
service name or MAC address
Step Two
2-B (OS X v. 10.4.11)
1. When the Printer List window appears, click Add.
18
Registering the Printer & Scanner
Step Two
2-B
3. Select Canon IJ Network in the pop-up menu, select Canon
MXxxx series in the list of printers, then click Add . *xxx refers
to the model number. MX410 series shown in example, below
Step Two
2-B
2. Click More Printers in the Printer Browser window.
19
Registering the Printer & Scanner
Step Three
When the Register Printer and Scanner screen appears, click
Register Scanner.
Step Two
2-B
4. Make sure that the Canon MXxxx series is added to the
list of printers.
*xxx refers to the model number. MX410 series shown in
above example.
20
Registering the Printer & Scanner
  • Page 1 1
  • Page 2 2
  • Page 3 3
  • Page 4 4
  • Page 5 5
  • Page 6 6
  • Page 7 7
  • Page 8 8
  • Page 9 9
  • Page 10 10
  • Page 11 11
  • Page 12 12
  • Page 13 13
  • Page 14 14
  • Page 15 15
  • Page 16 16
  • Page 17 17
  • Page 18 18
  • Page 19 19
  • Page 20 20
  • Page 21 21
  • Page 22 22
  • Page 23 23
  • Page 24 24

Canon PIXMA MX420 User manual

Category
Dehumidifiers
Type
User manual
This manual is also suitable for

Canon PIXMA MX420 is a multifunction device that offers versatile printing, scanning, and copying capabilities. With built-in Wi-Fi, you can connect it to your wireless network and print or scan from virtually anywhere in your home or office. The MX420 also features a 2.5-inch LCD screen for easy navigation and setup. It can produce crisp and vibrant prints with a maximum resolution of 4800 x 1200 dpi.

Ask a question and I''ll find the answer in the document

Finding information in a document is now easier with AI