Unbranded Gas Gun Motor Kit, M1 Series, CMF Series Installation guide
- Category
- Cookers
- Type
- Installation guide

Installation Instructions
For M1 and CMF Furnaces
Replacement Kit - Gas Gun Air Box
IMPORTANT: Read these Installation Instructions and
the furnace Installation Instructions carefully before be-
ginning the installation.
GENERAL:
These instructions are primarily intended to assist a
qualified individual who has good knowledge and experi-
ence in the installation of gas gun furnaces and in gas
gun maintenance. These instructions show you, step by
step, how to replace the old air box with newly designed
combustion air adjustment system. Some local codes
require licensed installation/service personnel for instal-
lation of this type of equipment.
CONTENTS OF KIT
1. 1-Installation Instructions
2. 1- Left-Half of Blower Housing
3. 1-Plastic Air Adjustment Device
4. 1-Flexible Hose, 2” x 40”
5. 1-Hose Clamp
6. 1-Adhesive tube
WARNING!
The gas gun air box must be replaced by a quali-
fied service technician in accordance with these
instructions and all codes having jurisdiction.
Failure to follow these instructions could result
in serious injury, property damage, or death. The
qualified service technician performing this work
assumes responsibility for this furnace air box
replacement.
WARNING!
The fuel supply and electric power shall be shut off
before proceeding with replacing the air box.
REMOVING EXISTING AIR BOX
1. Disconnect gas gun electric cord and gas supply line
from the furnace.
2. Disconnect flexible hose from the burner and fur-
nace
3. Remove three 5/16” nuts from the gas gun mounting
flange (9:00, 12:00 and 3:00 O’clock positions).
4. Turn the gun burner slightly to the left and gently pull
it out from the furnace.
5. Remove two 11/32” nuts from the left side of the
blower housing and remove air box.
6. Remove two 1/4” screws from top of the left blower
housing
7. Remove sealer from the joint of the blower housing
and disassemble the left side of the blower housing
by starting from the top.
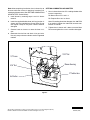
ASSEMBLING NEW AIR ADJUSTMENT DEVICE (see
Figure 1)
Note: The new combustion air adjustment device (air
shutter) does not have an air box. It consists of left-half
blower housing and a combustion air shutter. The flexible
hose is to be installed directly on the air shutter.
1. Clean sealer from the right blower housing. As-
semble left blower housing and secure it with two
1/4”screws
2. Seal blower joint with the supplied silicone.
3. Install plastic combustion air shutter.
4. Set combustion air shutter at wide open and tighten
the two nuts until it does not move. DO NOT OVER-
TIGHTEN.

Figure 1.
5/16" Nut
Air Shutter
1/4" Screw
Blower Housing
2" Flexible Hose
11/32" Nut
7085930 (NEW)
Note: After completing installation, the air shutter has to
be reset, while the furnace is operating, based on CO2
reading and flame pattern. (See “SETTING COMBUSTION
AIR SHUTTER” section below.)
5. Install burner by reversing steps 3 and 4 in burner
removal.
6. Install the supplied flexible hose (40” long) on the air
shutter with the supplied hose clamp. Note: Do not
over tighten clamp or the plastic shutter could be
damaged.
7. Connect hose to furnace or route the hose as it
was.
8. Reconnect the fuel line and check it for gas leaks.
Use only soap and water solution or other approved
method.
SETTING COMBUSTION AIR SHUTTER
1. Set air shutter based on CO
2 readings below while
furnace is operating:
For Natural Gas: 8.6 % to 9.2 %
For Propane Gas: 9.0% to 10.0%
Note: CO reading should not be more than 100 PPM.
If its reading is higher than 100 PPM, increase com-
bustion air amount.
2. Tighten the air shutter until it does not move. Note:
Do not over tighten the nut or it could be damaged.
Specifications & illustrations subject to change without notice or incurring obligations (05/15).
O’Fallon, MO, © Nortek Global HVAC LLC 2015. All Rights Reserved.
-
 1
1
-
 2
2


Unbranded Gas Gun Motor Kit, M1 Series, CMF Series Installation guide
- Category
- Cookers
- Type
- Installation guide
Ask a question and I''ll find the answer in the document
Finding information in a document is now easier with AI
Related papers
Other documents
-
Miller CMF2 80 PG Installation guide
-
-
Yukon LWG-168 Owner's manual
-
 Yukon Advanced Optics Oil Furnace User manual
-
Beckett Burner CG10 User manual
-
Beckett CG4 Gas Burner User manual
-
Beckett CG10.4S User manual
-
-
-
Nordyne M1SC 066 User manual
