Electrolux EW23SS65HS0 Owner's manual
- Category
- Side-by-side fridge-freezers
- Type
- Owner's manual

Use Et Care Guide
Side-By-Side Refrigerator
Guia de Uso y Cuidado
Refrigerador de dos puertas
Guide d'utilisation et d'entretien
Rdfrigdrateur _ compartime-r_ts juxtaposds
iiiliii!i!!!iiiiiiiili!ilii_!ililiil!iiiiiliiiilliiiiiiliiliii!ilili!iiii!iiiiiii!iiii!ililliiiiiiiiiili!!_iiii!_iiliilili!!iiiii!ililiil_ii!!iiiii!ililiii_ii!!iiiii!iliiiii_ii!!iiili!iiiliii_ii!!iiiii!iliiiil_ii!!iiiii!iliiiii_ii!!iiiii!iliiiii_ii!!iliii!iiiiiii_ii!!iiili!iiiliil_ii!!iiiii!iliiiii_ii!!iilii!iliiiii_ii!!iiili!iiiliii_ii!!iiili!iiiliil_ii!!iilii!iiiiiii_ii!!iiiii!iliiiii_ii!!iiili!iiiliii_ii!!iiiii!iliiiil_ii!!iiiii!iliiiii_ii!!iiiii!iliiiii_ii!!iliii!iiiiiii_ii!!iiili!iiiliil_ii!!iiiii!iliiiii_ii!!iilii!iliiiii_ii!!iiili!iiiliii_ii!!iiili!iiiliil_ii!!iilii!iiiiiii_ii!!iiiii!iliiiii_ii!!iiili!iiiliii_ii!!iiiii!iliiiil_ii!!iiiii!iliiiii_ii!!iiiii!iliiiii_ii!!iliii!iiiiiii_ii!!iiili!iiiliil_ii!!iiiii!iliiiii_ii!!iilii!iliiiii_ii!!iiili!iiiliii_ii!!iiili!iiiliil_ii!!iilii!iiiiiii_ii!!iiiii!iliiiii_ii!!iiili!iiiliii_iiiiii!_!iiill_ili!iiliiiliiiillilii!iili!iii!i_ii!_!ii_!i!!_ii_ill!iiiii!iii!:i_i!_!ili!iiii!!iiii!iiiiiiilliliililililiiiiiii_i!iiliii!ililiiiiiliiillii!ilill_i_ililiiiii!iliiiiiiilii_iiii!_iiii_iiliililili!ililiiiiilil_iiii!ililliiillii_ill!!iliiliiiilii_iiii!iiiiliiiliii_iili!ililiiiiilil_iiii!ililliiillii_ill!!iliiliiiilii_iiii!iiiiliiiliii_iili!ililiiiiilil_iiii!ililliiillii_ill!!iliiliiiilii_iiii!iiiiliiiliii_iili!ililiiiiilil_iiii!ililliiillii_ill!!iliiliiiilii_iiii!iiiiliiiliii_iili!ililiiiiilil_iiii!ililliiillii_ill!!iliiliiiilii_iiii!iiiiliiiliii_iili!ililiiiiilil_iiii!ililliiillii_ill!!iliiliiiilii_iiii!iiiiliiiliii_iili!ililiiiiilil_iiii!ililliiillii_ill!!iliiliiiilii_iiii!iiiiliiiliii_iili!ililiiiiilil_iiii!ililliiillii_ill!!iliiliiiilii_iiii!iiiiliiiliii_iili!ililiiiiilil_iiii!ililliiillii_ill!!iliiliiiilii_iiii!iiiiliiiliii_iili!ililiiiiilil_iiii!ililliiillii_ill!!iliiliiiilii_iiii!iiili!ilii!!il

ing Information
Please read and save this
Thank you for choosing Electrolux, our new
premium brand in home appliances. This Use &
Care Guide is part of our commitment to customer
satisfaction and product quality throughout the
service life of your new appliance.
Keep a record for quick
Purchase date
Electrolux model number
Electrolux serial number
Questions?
For toll-free telephone support in the U.S. and
Canada: 1-877-4ELECTROLUX (1-877-435-3287)
For online support and product information visit
http://www.electroluxappliances.com
Tabmeof contents
Findinginformation................................................. 2
Pleasereadand savethis guide..............................................2
Keepa record for quick reference...........................................2
Questions?..............................................................................2
Tableof contents.....................................................................2
Safety.................................................................. 3
importantsafetyinstructions..................................................3
Electricalinformation..............................................................3
Installation............................................................ 4
Location .................................................................................4
Installation ..............................................................................4
Installation clearances.......................................................4
Door opening..........................................................................4
Guidelinesfor final positioning of your refrigerator ................4
RemovingTheDoors................................................ 6
Getting through narrowspaces ..............................................6
Installing Doer Handles............................................. 8
Door HandleMounting Instructions ........................................8
Connecting The Water Supply ..................................... g
About your refrigerator's water supply....................................9
Feature Overview .................................................. 10
Understanding features and terms........................................10
Controls............................................................. 11
Wave-TouchTM (somemodels).............................................12
Wave-TouchTM/IQ-TouchTM "SabbathMode".........................13
IQ-TouchTM (somemodels)...................................................14
Storage Features................................................... 15
Shelf features........................................................................ 15
Drawers................................................................................ 15
Crispers................................................................................ 15
Crisper humidity control .......................................................16
Meat keeper..........................................................................16
Special items rack.................................................................16
Doors....................................................................................16
Storage bins ....................................................................16
Accessories ..........................................................................17
Tall bottle retainer ............................................................17
Can rack...........................................................................17
Extrashelf........................................................................17
Pizzarack.........................................................................17
Dairycompartment ..........................................................17
Automaticice&WaterMaker/Dispenser...................... 18
Primingthewatersupplysystem..........................................18
Toprimethewatersupplysystem...................................18
icemakeroperation& care...................................................18
Usingtheicemakerafterinstallation....................................18
Turningtheicemakeronandoff..........................................18
icemaker/dispensertips.......................................................19
Gleaningthe icemaker..........................................................19
ChangingTheFilter................................................ 20
Locatingthefilters................................................................20
Replacingtheairfilter...........................................................20
Replacingthewaterfilter......................................................20
Orderingreplacementfilters.................................................20
Moreaboutyouradvancedwaterfilter.................................21
NSFtests& certificationresults............................................21
ToreplaceyourPureAdvantage TM waterfilter..................21
Storing Food& Saving Energy................................... 22
Ideasfor storing foods .........................................................22
Ideasfor savingenergy.........................................................22
Normal Operating Sounds & Sights ............................. 23
Understanding the sounds you may hear.............................23
Care& Cleaning.................................................... 24
Protecting your investment...................................................24
Care& cleaningtips..............................................................25
Vacation & moving tips.........................................................25
Replacing light bulbs ............................................................26
Warranty ............................................................ 27
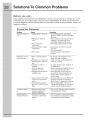
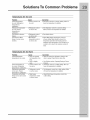
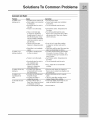
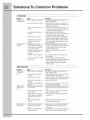
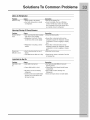
SolutionsToCommonProblems................................ 28

Safety
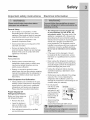
Important safety instructions Emectrica information
General Safety
. Do not store or use gasoline, or other
flammable liquids, near this or any other
appliance. Read product labels for warnings
regarding flammability and other hazards.
* Do not operate the refrigerator in the
presence of explosive fumes.
Avoid contact with any moving parts of the
automatic ice maker.
Remove all staples from the carton to
avoid cut injuries. Staples can also damage
finishes if they come in contact with other
appliances or furniture.
Child Safety
Packing Materials:
Packing cartons covered with rugs,
bedspreads, plastic sheets or stretch wrap
may become airtight chambers and can
quickly cause suffocation.
Destroy or recycle the product's carton,
plastic bags, and any other exterior wrapping
material immediately after the refrigerator is
unpacked. Children should never play with
these items.
Child Entrapment And Suffocation:
These problems are not limited to the past.
Whether junked, abandoned or temporarily
stored (even for a few hours), unattended
refrigerators and freezers are dangerous.
Please take the precautions listed below.
Proper Disposal Of
Refrigerators/Freezers
Before you throw away your
old refrigerator/freezer:
Remove the doors.
Leave the shelves in
place so children may
not easily climb inside.
Have refrigerant removed by a qualified
service technician.
* The refrigerator must be plugged into
its own dedicated 115 Volt, 60 Hz., AC-
only electric outlet. The power cord of the
appliance is equipped with a three-prong
grounding plug for your protection against
electrical shock hazards. It must be plugged
directly into a properly grounded three-
prong receptacle. The receptacle must be
installed in accordance with local codes and
ordinances. Consult a qualified electrician.
Do not use an extension cord or adapter
plug.
* If the power cord is damaged, it should
be replaced by the manufacturer, service
technician or a qualified person to prevent
any risk.
* Never unplug the refrigerator by pulling on
the power cord. Always grip the plug firmly,
and pull straight out from the receptacle to
prevent damaging the power cord.
* Unplug the refrigerator before cleaning
and before replacing a light bulb to avoid
electrical shock.
Performance may be affected if the voltage
varies by 10% or more. Operating the
refrigerator with insufficient power can
damage the compressor. Such damage is not
covered under your warranty.
Do not plug the
Grounding type
unit into an outlet _a, receptacle
controlled by a _ Donor,under
//, I J any circumstances
cut remove
wall switch or pull _i_)I_ o,_y.ssst.a
cordrefrigeratorto preventfromthe _i_
being turned off i
accidentally. Power c0rd With _,_
Avoid connecting 3:Pr0ng grounded plug
refrigerator to a
Ground Fault Interrupter (GFI) circuit.

Instal ion
This Use & Care Guide provides general operating
instructions for your model. Use the refrigerator
only as instructed in this Use & Care Guide. Before
starting the refrigerator, follow these important
first steps.
Location
• Choose a place that is near a grounded
electrical outlet. Do Not use an extension
cord or an adapter plug.
If possible, place the refrigerator out of
direct sunlight and away from the range,
dishwasher or other heat sources.
• The refrigerator must be installed on a floor
that is level and strong enough to support a
fully loaded refrigerator.
Consider water supply availability for models
equipped with an automatic ice maker.
installation
Installation clearances
Allow the following clearances for ease
of installation, proper air circulation, and
plumbing and electrical connections:
Sides & Top ¾ inch
Back 1 inch
Door opening
Your refrigerator should be positioned to allow easy
access to a counter when removing food. For best
use of drawers and freezer baskets, the refrigerator
should be in a position where both the refrigerator
and freezer doors can be fully opened.
Guidelines for final positioning of your
refrigerator:
All four corners of the cabinet must rest firmly
on the floor.
The cabinet should be level at the front and
rear.
The sides should tilt 1Ainch (6 mm) from front
to back (to ensure that doors close and seal
properly).
Doors should align with each other and be
level.
All of these conditions can be met by
raising or lowering the adjustable front
rollers.
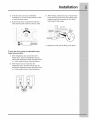
To level the cabinet using the front rollers:
1 Open both doors and remove the toe grille by
gently pulling forward (see illustration).

Instal ion
2 Close the doors and use a flat-blade
screwdriver or ¾ inch socket wrench to raise
or lower the front rollers.
3 Ensure both doors are bind-free with their
seals touching the cabinet on all four sides.
3
After leveling, verify door stop contacts lower
hinge and top of door does not contact upper
hinge through full movement of door (from
fully closed to fully open).
Raise
7/16"
Socket or
_Hinae Wrench
4 Replace the toe grille by fitting it into place.
To level the doors using the adjustable lower
hinge (some models):
1 If the refrigerator door is lower than the
freezer door, raise the refrigerator door by
turning the adjustment screw clockwise using
a 7/16inch socket wrench. (See illustration.)
2 If the freezer door is lower than the
refrigerator door, raise the freezer door by
turning the adjustment screw clockwise using
a 7/16inch socket wrench. (See illustration.)
RAISE
PAISE
DOOR

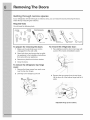
Removing The Doors
Getting through narrow spaces
if your refrigerator will not fit through an entrance area, you can reduce its size by removing the doors.
Check first by measuring the entrance.
Required Tools
You will need the following tools:
Top Hinge Top Hinge TOOLS NecessQry:
Cover Front Cover Rear
Screw _ _ Screw
Top Screw_ Phillips'" Head_ $H_we B_tt__
AND
3/8" Fixed
Wrench
To prepare for removing the doors:
1 Make sure the electrical power cord is
unplugged from the wall outlet.
2 Open both doors and remove the toe grille
(as explained in the Installation Instructions
that came with your appliance).
3 Remove any food from the door shelves,
4 Close the doors,
To remove the refrigerator top hinge
cover:
1 Remove the three screws from each cover
over the top door hinges.
2 Lift hinge cover straight up and off.
Rear Front
. Cover
e
i
i
i
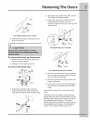
To remove the refrigerator door:
1 Trace lightly around the door's top hinge with
a pencil. This makes reinstallation easier.
Remove the two screws from the top hinge.
Lift the door off of the bottom hinge and set it
aside.
Adjustable Hinge (some models)

Removing The Doors
Non=Adjusting Hinge (some models)
3 Remove the two bottom hinge screws and
hinge if necessary.
To reinstall the refrigerator door, reverse the above
steps.
To remove the freezer top hinge cover:
2
3
Trace lightly around the hinge with a pencil.
This makes reinstallation easier.
Detach the water tube from the connector
located below the freezer door. The
connector releases when you press itsouter
sleeve inward.
Adjustable Hinge (some models)
1 Remove the two screws from each cover
over the top door hinges.
2 Lift hinge cover straight up and off.
To remove the freezer door:
Front
Rear
Screw
Screws
/
/
Cable I
Top Hinge
Detach the multi-wire cable connector
located above the top hinge. Grasp both
sides of the connector firmly and pull apart.
Door
Non=Adjusting Hinge (some models)
4 Remove the screws from the top hinge and
pull the multi-wire cable through it. Lift the
door off of the bottom hinge.
5 Remove the two bottom hinge screws and
hinge if necessary.
6 Lay the door on its side to avoid damage to
the water tube extending from the bottom
hinge.
To reinstall the freezer door, reverse the above
steps.
Once both doors are in place, ensure they are
aligned with each other and level (Please see "To
level the doors using the lower hinge" for models
with adjustable lower hinges or "To level the
cabinet using the front rollers" for models with the
non-adjustable lower hinges in the "Installation"
section.), then replace the top hinge cover.

Instal
ng Door
and[es
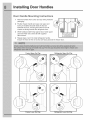
Door Handle Mounting Instructions
1 Remove handles from carton and any other protective
packaging.
2 Position freezer handle end caps over upper and
lower pre-installed shoulder bolts (A) that are
fastened into door, ensuring the holes for the set
screws are facing towards the refrigerator door,
3 While homing handle firmly against door, fasten upper
and lower Allen set screws (B) with supplied
Allen wrench.
4
I Ensure Handle Set Screws
are Facing Each Other
with Doors Closed,
Repeat steps 2 and 3 to install refrigerator handle.
Ensure the holes for the set screws are facing towards the freezer door.
Freezer Upper End Cap Refrigerator Upper End Cap
Freezer Lower End Cap Refrigerator Lower End Cap

Connecting The Water Supply
About your refrigerator's water supply
The automatic ice & water dispenser on your
refrigerator requires a permanent water supply
to function correctly. During installation, you
(or a service professional) establish this water
supply by connecting a copper tube from your
household water system to a valve at the rear of
the refrigerator.
You may have already followed the directions in
the Installation Instructions to connect the water
supply. This information is repeated here for future
reference if you need to relocate your refrigerator.
What you will need:
* Access to a cold water line with pressure of
30-1 O0 psi. (Systemsuppliedwithcoldwateronly.)
* Copper tubing with 1Ainch (6.4mm) Outside
Diameter (OD). Length for this tubing is the
distance from the rear of the refrigerator to
your household water supply line plus seven
feet (2.1 meters).
* A shut-off valve for the connection between
your household water line and the refrigerator
supply line.
Do not use a self-piercing shut-off valve.
. A compression nut and ferrule (sleeve) for
the water supply connection at the rear of
your refrigerator.
3
4
5
6
7
8
9
Unscrew the plastic cap from the water valve
inlet at the rear of your refrigerator. Discard
the cap.
Slide the brass compression nut, then the
ferrule (sleeve) onto copper tube.
Push the copper tube into water valve inlet as
far as it will go (1Ainch).
Slide the ferrule (sleeve) into valve and
finger-tighten the compression nut onto valve.
Tighten another half turn with a wrench. Do
not over-tighten.
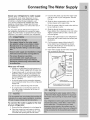
Secure the copper tube to your refrigerator's
rear panel with a steel clamp and screw (see
illustration).
Coil the excess copper tubing (about 2Y2
turns) behind your refrigerator as shown.
Arrange coiled tubing to avoid vibration or
wear against other surfaces.
Open water supply shut-off valve and tighten
any connections that leak.
_I_I _ _ Steel
Plastic Water Tubing _/_, Clamp
¢ ,,Compress,o°
j b_.=_ _ Ferru e
_!'] (sleeve)
_! ate lie
//j_ _ \ Water Valve
_ [_ N..._Bracket
_ _==-Valve Inlet
ater Valve
water line
hold water supply
f?include enough tubing in loop to allow
moving refrigerator out for cleaning.)
To connect the water supply to the rear
of your refrigerator:
1 Ensure that the refrigerator is not plugged in.
2 Flush the supply line until water is clear by
placing the end of the copper tube in a sink
or bucket and opening the shut-off valve.

Feature Overview
Understanding features and terms
Your Electrolux refrigerator is designed for optimal convenience and storage flexibility. Use the illustration
below to familiarize yourself with product features and terminology.
Door Light
ice Container-
Glass Shelf--
Small Basket
and Cover
Large
Glide Out
Basket
Tilt Out
Door Bin
Large Basket
Tilt Out
Door Bin
Water Fiker--\
Air Filt_
iiiil
/
/_ Door Light Switch
Dairy
Compartment
SpilIProof TM
Sliding Shelf
Door Bin
SpilIProof TM
Sliding Shelves
Tall Bottle
Retainer
Door Bin
Meat Keeper
and Cover
Door Bin
Crisper Pan
and Cover
Can Rack
Crisper Pan
and Cover
Fixed
Door Bin
Toe Grille

Controls
Wave-Touch TM
IQ-ToucW M

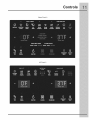
Controls
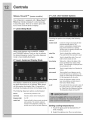
WaveoTouch TM(some models)
Your refrigerator is equipped with a Wave-Touch TM
Panel user interface display. It is only necessary
to touch the glass. There is no need to press with
force. There are three levels of display.
1st Level: Sleep Mode
Sleep mode displays only the WATER, CUBES
and CRUSHED options. Touch an icon to activate
the desired dispenser mode. The active dispenser
mode is more brightly illuminated.
2ndLevel: Awakened Display Mode
The display is awakened by touching anywhere on
the glass where there is an indicator. Black space
will not awaken the display. After 10 seconds of
inactivity, the display will return to the Sleep mode.
The following dispenser options are illuminated:
fast ice increases the production of ice
fast freeze Activatesafaster ratefor freezingfood
dispenserlight On/ Off
controllock Pressand hold for three secondsto activate
anddeactivate.This restricts undesired
changesto the refrigerators settings and
prevents use ofthe ice and water dispenser.
3rdLevel" User Variable Options
Touching the options icon displays the following
options:
vacationmode
Conservesenergy by increasingthe time
betweenautomatic defrost. This
feature is automatically activated during
long periods betweendoor openings.
Vacation mode ismanually activated when
the red indicator is lit.
water filter
Touchto display filter condition status.
Pressand hold for three secondsto reset.
air filter
Touchto display filter status. Pressand
hold for threeseconds to reset.
temp display When active, it allows the display ofthe
freezerand fridge temps during "Sleep
Mode". Thetemperature is displayedwhen
the red indicator is lit.
temp mode Touchtotoggledisplayfrom Fahrenheitto
Celsius.
mutesounds
factory default
onoff
Tonesemitted by each keypresscan be
turned off basedon user preference.The
sounds are muted when the red indicator is
lit. Warning signals will stay active.
Resetsall refrigerator settings such as
temp, temp display, and alarm tones to
their factory default settings.
Pressand hold for three secondsto turn off
the cooling system to cleanthe refrigera-
tor. It alsoturns off all dispenserfunctions.
Thetemperature display will read OFF.
Setting cooling temperatures
1 Touch the glass panel to illuminate the 2 nd
level of display.
2 Select the options icon. Plus (+) and minus

Controls
(-) indicators will appear on either side of the
displayed temperatures.
Press the + or - indicator to adjust the
temperature to the desired setting.
The temperature display will begin to blink
with the first touch. After five seconds of
inactivity, the display will beep to accept
the new temperature. After 10 seconds, the
display times out and returns to the basic
display.
Alarms
BoorAjar
HighTemp
PowerFail
If the door has beenleft open for an extend-
ed period oftime, analarm will
sound andthe door ajar indicator will
display in the middle. Thealarm is turned
off by closing the door. Thealarm off key
will illuminate to prompt the resetof any
pendingalarms. Pressthis keyto reset any
systemAlarms.
in the eventof a high temperature condi-
tion, the temperature displaywill display
"HI". After 20 minutes,the highletup alert
will be displayedand the alarm off icon
will illuminate until pressed,acknowledg-
ing the alarm, at which time the highest
temperature reachedwill be displayedand
the refrigerator will resume normal opera-
tion. All other modesareturned off until
the alarm isacknowledged.
in the eventof a powerfailure, the power
fail alert will bedisplayedand the alarm
off keywill beilluminated and you will hear
an audiblealarm until the alarm off icon is
pressed,acknowledging the alarm. Other
modes may beturned off until the alarm is
acknowledged.Whenthe powerfail alert is
turned off, the refrigerator will resume nor-
mal operation. The highletup alarm may
also be illuminated until a safe operating
range temperature hasbeen reached.
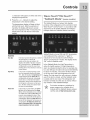
"Sabbath Mode" (somemode s)
The Sabbath Mode is a feature that disables
portions of the refrigerator and its controls for both
Wave-Touch TM and IQ-TouchT% in accordance with
observance of the weekly Sabbath and religious
holidays within the Orthodox Jewish community.
Sabbath Mode is turned ON and OFF by pressing
and holding both the outermost "J' and "+"
indicators for five seconds for both the Wave-
TouchTM and IQ-TouchTM modes. The display shows
"Sb" while in Sabbath mode.
In the Sabbath Mode, the High Temp alarm is
active for health reasons. If a high temperature
alarm is activated during this time, for example due
to a door left ajar, the alarm will sound intermittently
for about 10 minutes. The alarm will then silence
on its own and a red high temperature icon will
display. The high temp icon will continue to display,
even if the door is closed, until the Sabbath mode
is exited and the icon reset. The refrigerator will
function normally once the door is closed, without
any violation of the Sabbath/Holidays.
For further assistance, guidelines for
proper usage and a complete list of
models with the Sabbath feature, please
visit the web at http:\\www.star=k.org.

Controls
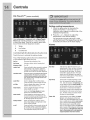
IQ°Touch TM(some models)
Your refrigerator is equipped with a Glass Touch
Panel user interface display, It is only necessary
to touch the glass. There is no need to press with
force, There are three dispenser modes:
1 Wate r
2 Ice Cubes
3 Crushed Ice
A red indicatorlightwillbe illuminatedabovetheactivemode.
Touch the icon to activate the options below.
fastice
fastfreeze
dispenserlight
controllock
Any of the following options that are activated have
a red indicator light above the icon.
Increasesthe production of ice
Activatesafaster ratefor freezingfood
On/ Off
vacationmode
waterfilter
air filter
tempdisplay
mutesounds
factory default
onoff
Pressand hold for three secondsto activate
anddeactivate.This restricts undesired
changesto the refrigerators settings and
prevents use ofthe ice and water dispenser.
Conservesenergybyincreasingthetimebetween
automaticdefrost.Thisfeatureisautomatically
activatedduringlongperiodsbetweendooropen-
ings.Vacationmodeismanuallyactivatedwhen
theredindicatorislit.
Touchto display filter condition status.
Pressand hold for three secondsto reset.
Touchto display filter status. Pressand
hold for threeseconds to reset.
Touchto toggle the freezerandfridge
temps display on andoff.
Touchand hold temp display to toggle
display from Fahrenheitto Celsius.
Tonesemitted by each keypresscan be
turned off basedon user preference.The
sounds are muted when the red indicator is
lit. Warning signals will stay active.
Resetsall refrigerator settings such as
temp, temp display andring tones to their
factory default settings.
Pressand hold for three secondsto turn off
the cooling system to cleanthe refrigera-
tor. It alsoturns off all dispenserfunctions.
Thetemperature display will read OFE
Setting cooling temperatures
1 Touch the glass panel to illuminate the
display to the Plus (+) and minus (-)
indicators which appear on either side of the
displayed temperatures.
2 Press the + or - indicator to adjust the
temperature to the desired setting.
The temperature display will begin to blink
with the first touch. The display times out after
5 seconds and returns to the basic display,
Alarms
DoorAjar
HighTemp
PowerFail
Ifthe door has beenleft openfor an ex-
tended period of time, an alarm will sound
andthe door ajar indicator will display on
the right side of the display.The alarm is
turned off byclosing the door. The mute
sounds key will illuminate to prompt the
resetof any pending alarms. Pressthis key
to resetany system alarms.
Inthe eventof a high temperature condi-
tion, the temperature display will display
"HI". After 20 minutes, the hightemp alert
will bedisplayed and the mute sounds icon
will illuminate until pressed,acknowledg-
ingthe alarm, at which time the highest
temperature reachedwill be displayedand
the refrigerator will resume normal opera-
tion. All other modes areturned off until
the alarm isacknowledged.
Inthe eventof a powerfailure, the power
fail alertwill be displayedand the mute
sounds icon will beilluminated andyou will
hearanaudiblealarm until the mute sounds
icon ispressed,acknowledgingthe alarm.
Other modes maybeturned off untilthe
alarm isacknowledged.Whenthe powerfail
alert isturned off the refrigeratorwill resume
normaloperation.Thehightemp alarm may
also heilluminateduntil asafe operating
range temperature hasbeenreached.

iiiil;iii:ii!ii;!i_i!i!i¸i_!i_i:i:!_i_i!i!_i!i_i;_!_:i_!_:i_!_:i_!_!ii_ii_iiii_i!i_i_i_!i!_!_!_ii_!!_i_i_i_i_i_i!_!_!i!_i_i!iii_:;_:;_i!_!_!;i:!_i_i;ii_i;ii_i;ii_i_i_;i!_i_;;i_i
Storage Features
i
You can easily adjust shelf positions in the freezer ;
and fresh food compartments to suit your needs.
The sheves have mount ng brackets wh ch ill If f t r
S e ea u es
attach to slotted supports at the rear of each TM
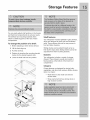
com artment Your refrigerator includes SpillSafe glass shelves
P " which are designed to catch and hold accidental
To change the position of a shelf" spills.These shelves slide out for easy access to
I Beforeadjustinga shelf,remove allfood. foodand fasterclean,ng.
2 Liftthefrontedge up. Slidingshelvescan be pulledforwardas faras
therbu t-n stopsa ow S d ng she yes cannot be
3 Pull the shelf out ....... " .....
separateo from inert moumlng bracKets.
4 Replace by inserting the mounting bracket
hooks into the desired support slots. Drawers
5 Lower the shelf and lock into position.
/
Tighten Spacers
Loosen Spacers
to Stabilize Shelf
Against Liner
Your refrigerator includes a variety of storage
drawers. These drawers usually are located in
fixed positions at the bottom of the fresh food
compartment.
Crispers
Crisper drawers are designed for storing fruits,
vegetables, and other fresh produce. Before storing
items in a crisper:
• Wash items in clear water and remove
excess water.
• Wrap any items that have strong odors or
high moisture content.
_i_i_ii_iliiiiiiiii_i_i_;¸;il;:_i_ii;iil;ii;iil;ii;iil;ii;iil;ii;iil;ii;iil;ii;iil;ii;ill

Storage Features
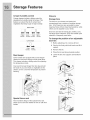
Crisper humidity control
Crisper drawers include a sliding control for
adjusting the humidity inside the crisper. This
feature can extend the life of certain fresh
vegetables that keep longer in high humidity.
Upper Crisper
D D
HJghe_ Lowe[: Lower Higher:
Humidity HumiditY Hum!d!ty Humjdi!y
Lower Crisper
D
Humidity Humidity
Meat keeper
Some models are equipped with a meat keeper
drawer for short-term storage of bulk meat items.
This drawer includes a sliding control for adjusting
the temperature inside.
Any meat to be kept longer than two days should
be frozen. If you store fruits or vegetables in this
drawer, set it to a warmer temperature to prevent
freezing.
_i_ii_i_II__II
ii _ii
iii
Special
_ltems
Rack
Special items rack
The innovative design of the special items rack
allows you to store four bottles of wine or soft drink
bottles.
Storage bins
The doors to your freezer and fresh food
compartments use a system of modular storage
bins. All of these bins are removable for easy
cleaning. Some of them have fixed positions, while
others can be adjusted to your needs.
Door bins are ideal for storing jars, bottles, cans,
and large drink containers. They also enable quick
selection of frequently used items.
To change the position of an adjustable
door bin:
1 Before adjusting a bin, remove all food.
2 Grip the bin firmly with both hands and lift it
upward.
3 Remove the bin.
4 Place the bin just above desired position.
5 Lower the bin onto supports until locked in
place.
Door Bin
Adj
Door Bins
Fixed
Door |
ilt Out

Storage Features
Tall bottle retainer
The tall bottle retainer
keeps tall containers
in the bin from
falling forward when
opening or closing
the refrigerator door.
To install, snap the
ends of the retainer
over the edge of
the retainer wall
as shown in the
illustration.
Can rack
The can rack
allows you to
efficiently and
securely store up
to six 12-ounce
cans of beverage
drink.
Extra shelf
The extra shelf
attaches to the
top of the ice
dispenser container.
It allows storage
of both round and
rectangular cartons
such as your favorite
ice cream.
Pizza rack (some models)
This rack is attached
to the freezer wall
beside the ice
dispenser container.
This convenient area
allows for storage
of pizza and other
tall items placed
vertically between
the ice dispenser
container and the
freezer wall.
Tall Bottle
Retainer
/
Dairy compartment
Use the dairy compartment, at the top of the fresh
food compartment door, for short term storage of
cheese, spreads, or butter. The dairy compartment,
which includes a lift-up cover that may be locked
and a dairy divider (some models), is designed
to be warmer than the open storage area to
accommodate these types of food.
Dairy Compartment (some models)

Automatic ice & Water
aker/Dispenser
Primimg the water supply
Your refrigerator's water supply system includes
several tubing lines, an advanced water filter,
a distribution valve bank, and a reserve tank to
ensure ample supply to the ice and water dispenser
at all times. This system needs to be completely
filled with water when first connected to an external
supply line.
To prime the water supply system:
3
Begin filling the tank by pressing and holding
a drinking glass against the water dispenser
paddle,
Keep the glass in this position until water
comes out of the dispenser, it may take
about 11/2minutes.
Continue dispensing water for about three
minutes to flush the system and plumbing
connections of any impurities (stopping to
empty the glass as necessary).
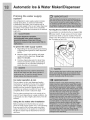
Turning the ice maker on and off
Ice production is controlled by the ice maker's On/
Off power switch. To gain access to the ice maker,
pull the extra shelf out (some models). Press the
switch to the "0" position to turn it Off and press to
the '1" position to turn it On.
Ice maker operation & care
The ice maker, ice bin, and dispenser feeding
mechanism are located in the top of the freezer
compartment. After the refrigerator is installed
properly and has cooled for several hours, the
ice maker can produce ice within 24 hours. It can
completely fill an ice bin in about two days.
The ice maker produces four to six pounds of ice
every 24 hours depending on usage conditions. Ice
is produced at a rate of eight cubes every 75 to 90
minutes,
Using the ice maker after installation
Before making ice for the first time, be sure to
prime the water supply system. Air in new plumbing
lines can result intwo or three empty ice maker
cycles. Furthermore, if the system is not flushed,
the first ice cubes may be discolored or have an
odd flavor.

Automatic ice & Water
aker/Dispenser
ice maker/dispenser tips
• Ice cubes stored too long may develop
an odd flavor. Empty the ice container as
explained below.
• Occasionally shake the ice container to keep
ice separated.
• If your refrigerator is not connected to a
water supply or the water supply is turned off,
turn off the ice maker by pressing the On/Off
switch.
• If you need a large quantity of ice at one
time, it is best to get cubes directly from the
ice container.
• The following sounds are normal when the
ice maker is operating:
Motor running
Ice dropping into ice container
Water valve opening or closing
Ice loosening from tray
Running water
• When dispensing ice, you will hear a
snapping or clicking sound when the ice
chute opens and closes.
• Turn off the ice maker when cleaning the
freezer and during vacations.
If you turn off the ice maker for a long
period of time, you should also turn off the
water supply valve.
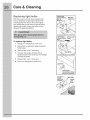
4 Allow the ice bin to dry completely before
replacing in the freezer.
5 Remove ice chips and clean the ice bin shelf
and the freezer door chute.
6 Replace the ice bin. Press the ice maker's
Off/On switch to resume ice production.
Remove and empty the ice storage bin
if:
• An extended power failure (one hour or
longer) causes ice cubes in the ice storage
bin to melt and freeze together, jamming the
dispenser mechanism.
• You do not use the ice dispenser frequently.
Ice cubes will freeze together in the bin,
jamming the dispenser mechanism.
Remove the ice storage bin and shake to loosen
the cubes or clean as explained above.
Cleaning the ice maker
Clean the ice maker and ice bin at regular intervals,
particularly before you take a vacation or move.
To clean the ice maker:
1 Turn off ice production by pressing the ice
maker's Off/On switch.
2
3
Remove the ice bin by lifting up and out.
Empty and carefully clean the ice bin with
mild detergent. Rinse with clear water. Do not
use harsh or abrasive cleaners.
Auge

Changing The
ilter
Locating the fimters
Your refrigerator is equipped with separate water
and air filtering systems. The water filter system
filters all dispensed drinking water, as well as
the water used to produce ice. The air filter
removes odors and impurities from the refrigerator
compartment.
Water filter
The water filter is located at the top right side of the
fresh food compartment.
Air filter
The air filter is located at the top of the fresh food
compartment next to the water filter.
Replacing the air fi ter
In general, you should change the air filter every
six months (the filter status light on the Touch Panel
prompts you to replace the filter after six months)
to ensure optimal filtering of refrigerator odors. You
may want to adjust this time period depending on
the types and amounts of food you typically store in
your refrigerator. To replace your PureAdvantage TM
air filter:
1
2
3
4
5
6
Pull the air filter housing straight out.
Remove the old filter and discard it.
Unpack the new filter and place it inside the
housing.
Slide the housing back into position.
Press and hold the Air Filter Reset button
on the electronic control panel for three
seconds. When the display changes from
"Replace" to "Good," the status has been
reset.
The Air Filter Reset will turn itself off after a
few seconds.
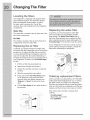
Replacing the water filter
In general, you should change the water filter
every six months to ensure highest possible
water quality. The Water Filter Status light on
the Touch Panel prompts you to replace the filter
after a standard amount of water (400 gallons for
PureAdvantage TM) has flowed through the system.
If your refrigerator has not been used for a period
of time (during moving for example), change the
filter before reinstalling the refrigerator.
Slide
Out to
Remove
To
Release
Ordering repmacement fi ters
Order new filters by calling toll-free, 877-453-5287,
visiting www.electroluxappliances.com, or seeing
the dealer where you bought your refrigerator.
Electrolux recommends that you order extra filters
when you first install your refrigerator, and that you
replace your filters at least once every six months.
Here is the product number to request when
ordering:
PureA dvaRtage TM
Water Filter and Air Filter
Part #EAFWF01
Page is loading ...
Page is loading ...
Page is loading ...
Page is loading ...
Page is loading ...
Page is loading ...
Page is loading ...
Page is loading ...
Page is loading ...
Page is loading ...
Page is loading ...
Page is loading ...
Page is loading ...
Page is loading ...
-
 1
1
-
 2
2
-
 3
3
-
 4
4
-
 5
5
-
 6
6
-
 7
7
-
 8
8
-
 9
9
-
 10
10
-
 11
11
-
 12
12
-
 13
13
-
 14
14
-
 15
15
-
 16
16
-
 17
17
-
 18
18
-
 19
19
-
 20
20
-
 21
21
-
 22
22
-
 23
23
-
 24
24
-
 25
25
-
 26
26
-
 27
27
-
 28
28
-
 29
29
-
 30
30
-
 31
31
-
 32
32
-
 33
33
-
 34
34


Electrolux EW23SS65HS0 Owner's manual
- Category
- Side-by-side fridge-freezers
- Type
- Owner's manual
Ask a question and I''ll find the answer in the document
Finding information in a document is now easier with AI
Related papers
-
Electrolux ERL6296XX User manual
-
Electrolux ERL6297KK0 User manual
-
-
-
Aeg-Electrolux ERL6297XX0 User manual
-
Electrolux EI23CS55GW6 Owner's manual
-
-
Electrolux E32AF85PQS Installation guide
-
-
Other documents
-
Haier HB21FNN User manual
-
-
-
-
Aeg-Electrolux S85628SK2 User manual
-
-
-
LG WT1901CK Owner's manual
-
Frigidaire FRS26R4AQ3 User manual
-