Page is loading ...

328040-26435-R0-June 30, 2016
Style #:
Lot:
Date:
___________
___________
___________
A
REV
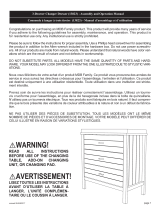
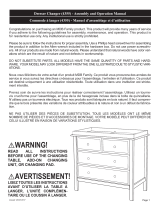
Note: The style of your item may vary from what is pictured in
the instruction sheet.
Remarque : Le modèle de votre article peut être différent de
celui qui est illustré dans le feuillet d’instructions.
Note: El estilo de su artículo puede variar de la ilustración en la
hoja de instrucciones.
Lea todas las instrucciones antes de
ensamblar y usar. MANTENGA LAS
INSTRUCCIONES PARA SU USO FUTURO.
Read all instructions before assembly
and use. KEEP INSTRUCTIONS
FOR FUTURE USE.
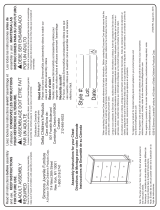
ADULT ASSEMBLY
REQUIRED
Due to the presence of small parts during assembly,
keep out of reach of children until assembly is complete.
DEBE SER ENSAMBLADO
POR UN ADULTO
Debido a la presencia de piezas pequeñas durante el ensamblaje,
mantenga fuera del alcance de los niños hasta que complete el
ensamblaje.
Lisez toutes les instructions avant l’assemblage et
l’utilisation. CONSERVEZ LES INSTRUCTIONS
POUR RÉFÉRENCE ULTÉRIEURE.
L’ASSEMBLAGE DOIT ETRE FAIT
PAR UN ADULTE
A cause de la présence de petites piéces, pendant l’assemblage gardez
hors de portée des enfants jusqu'à ce que celui-ci soit terminé.
When contacting Consumer Care please reference the below information. Before contacting Consumer Care please ensure that the
information below matches the information found on the label on the Back Panel, please reference the information found on the
product when contacting Consumer Care.
Lorsque vous contactez le Service client, veuillez faire référence aux informations ci-dessus. Avant de contacter le Service client,
veuillez vous assurer que les informations ci-dessous correspondent aux informations indiquées sur l’étiquette qui se trouve sur
panneau arrière; veuillez faire référence aux informations indiquées sur le produit lorsque vous contactez le Service client.
Al contactar al servicio al cliente, entregue la información anteriormente mencionada. Antes de contactar al servicio de atención al
cliente, asegúrese de que la información abajo calza con la que aparece en la etiqueta en panel trasero; al contactar al centro de
atención al cliente, mencione la información que aparece en el producto.
Need Help?
Please visit www.SimmonsKids.com/assembly-videos to watch our
easy and effective assembly videos
Besoin d’aide?
Veuillez visiter www.SimmonsKids.com/assembly-videos pour
regarder nos vidéos faciles et efficaces concernant l’assemblage
Necesita ayuda?
Por favor, visite www.SimmonsKids.com/assembly-videos para que
vea nuestros videos que muestran como ensamblar de una manera
efectiva y fácil.
To register your product for important safety alerts and updates to your product please visit
www.SimmonsRegistration.com
Pour enregistrer votre produit afin de recevoir des alertes de sécurité et des mises à jour importantes
relatives à votre produit, veuillez visiter le site www.SimmonsRegistration.com
Para registrar su producto a fin de recibir importantes alertas y actualizaciones de seguridad, visite
www.SimmonsRegistration.com
Distributed in Canada by
Distribué au Canada près
Delta Children’s Products
Care of/Soins de:
501 Franklin Boulevard
Cambridge, Ontario N1R8G9
Canada
212-645-9033
Assembly Instructions for your Dresser With Changing Top
Directives de Montage pour votre Commode avec plan à langer
Instrucciones de Ensamble de su Cómoda con el cambiador
Simmons Juvenile Furniture
A Division Of Delta Children's Products Corp.
114 West 26th Street
New York, NY 10001
1-800-218-2741
©2016 Simmons Juvenile Furniture, A Division of Delta Children's Products Corp.

2
The safest place for your baby to sleep is in a
JPMA Certified crib.
Adult beds are not safe for babies: NEVER
co-sleep
Read all warnings and follow all instructions.
Missing or broken parts, any questions?
CALL Simmons Kids Consumer Care
NEVER place the crib near a window or any
wall hangings.
Your baby should sleep on a firm mattress.
DO NOT place any items in the crib.
AAP Recommends: Always lay your baby on its
back to sleep. Consult your doctor.
Pillows and Blankets have caused infants to
suffocate, NEVER use in a crib.
SAFE SLEEP TIPS
“Every baby deserves a safe place to sleep.”
Visit DeltaChildren.com/Safety for more safety information.

5
FURNITURE SAFETY TIPS
Serious or fatal crushing injuries can occur from
furniture tip-over.
DO NOT set TV’s or other heavy objects on the
top of bedroom or nursery furniture.
ALWAYS use provided tipover restraints.
NEVER allow children to climb or hang on
drawers, doors,or shelves.
Place heaviest items in the lowest drawers.
NEVER open more than one drawer at a time.
DO NOT leave drawers open when not in use.
Read all warnings and follow all instructions.
Missing or broken parts, any questions?
CALL Simmons Kids Consumer Care
Visit DeltaChildren.com/Safety for more safety information.

HH. Back Panel Screw x14
Vis pour Panneau Arrière
Tornillo de Panel Trasero
JJ. Φ6x30mm Dowel x41
Cheville Φ6x30mm
Pasador Φ6x30mm
PP. Knob / Bouton / Perilla x6
#26282
PP1. Knob
Bouton
Perilla
PP2. Knob Screw
Vis de Bouton
Tornillo para Perilla
Parts:
Pièces:
Piezas:
Hardware kits Part# 26434
L'ensemble de quincaillerie - pièce n°26434
El kit de herramientas - Pieza #26434
DD. 30mm Bolt x14
Boulon 30mm
Perno 30mm
KK. Crescent Washer x10
Rondelle en croissant
Arandela de media luna
BB. 55mm Bolt x20
Boulon 55mm
Perno 55mm
EE. Plastic Barrel Nut x20
Écrou à portée cylindrique
en plastique
Tuercacilíndricaplástica
GG. 25mm Screw x40
Vis 25mm
Tornillo 25mm
NN.12mm Screw x24
Vis 12mm
Tornillo 12mm
FF. 40mm Screw x20
Vis 40mm
Tornillo 40mm
M4 Allen Wrench (included)
Clé Allen M4 (inclus)
Llave Allen M4 (incluido)
Phillips Screwdriver – Not included
Tournevis Phillips - non inclus
Destornillidor Phillips – no incluido
M4 Ballend Screwdriver
tournevis M4 à tête sphérique
destornillador M4 con cabeza de bola
CAUTION: Do Not use a power screwdriver
they can cause screws to break or strip.
ATTENTION: Ne Pas utiliser un tournevis
électrique car les vis peuvent casser ou
perdre leurs filets.
ATENCIÓN: No use un destornillador
eléctrico ya que puede causar que los
tornillos se rompan o rueden.
11

JJ. Φ6x30mm Dowel x3
Cheville Φ6x30mm
Pasador Φ6x30mm
DD. 30mm Bolt x2
Boulon 30mm
Perno 30mm
BB. 55mm Bolt x2
Boulon 55mm
Perno 55mm
14
M4 Allen Wrench
Clé Allen M4
Llave Allen M4
STEP #1
ÉTAPE N°1
PASO #1
Attach Middle Front Rail (Part G), Middle Back Rail (Part H), Top Front Rail (Part E) and Top
Back Rail (Part F) to Center panel (Part D) using (2) 55mm bolts (Part BB), (2) 30mm bolts (Part
DD) and (3) Φ6x30mm Dowels (Part JJ). Tighten bolts with M4 Allen wrench provided.
Fije la Barra Frontal Central (Pieza G), Barra Posterior Central (Pieza H), Barra Frontal Superior
(Pieza E) y Barra Posterior Superior (Pieza F) al Panel Central (Pieza D) utilizando (2) Pernos
55mm (Pieza BB), (2) Pernos 30 mm (Pieza DD) y (3) Pasadors Φ6x30mm (Pieza JJ). Apriete
todos los pernos utilizando la llave Allen M4 incluida.
Fixer le Barre Central Avant (Pièce G), Barre Central Arrière (Pièce H), Barre Supérieur avant
(Pièce E) et Barre Supérieur Arrière (Pièce F) aux Panneau Central (Pièce D) à l’aide de (2)
boulons de 55 mm (Pièce BB), (2) boulons de 30 mm (Pièce DD) et (3) Chevilles Φ6x30mm
(Pièce JJ). Serrer les boulons à l’aide de la clé Allen M4 fournie.

DD. 30mm Bolt x1
Boulon 30mm
Perno 30mm
JJ. Φ6x30mm Dowel x10
Cheville Φ6x30mm
Pasador Φ6x30mm
BB. 55mm Bolt x5
Boulon 55mm
Perno 55mm
KK. Crescent Washer x5
Rondelle en croissant
Arandela de media luna
M4 Ballend Screwdriver
tournevis M4 à tête sphérique
destornillador M4 con cabeza de bola
M4 Allen Wrench
Clé Allen M4
Llave Allen M4
16
STEP #2
ÉTAPE N°2
PASO #2
Attach the assembly from Step 1 and Bottom Front Rail (Part N) and Bottom Back Rail (Part P)
to the Left Side (Part A) using (10) Φ6x30mm Dowels (Part JJ), (1) 30mm Bolt (Part DD), (5)
55mm Bolts (Part BB) and (5) Crescent Washers (Part KK). Tighten the Bolts with the M4
Ballend Screwdriver and M4 Allen wrench, following the instructions on pages 12 and 13.
Fixer le l’ensemble monté à l’étape 1, Barre Avant Inférieur (Pièce N) et Barre arrière inférieur
(Pièce P) au côté gauche (Pièce A) à l’aide de (10) Chevilles Φ6x30mm (Pièce JJ), (1) boulon 30
mm (Pièce DD), (5) boulons 55 mm (Pièce BB), et (5) rondelles « croissant » (Pièce KK) à l’aide
de dutournevis M4 à tête sphériqueet la clé Allen M4 ensuivant les instructions pages 12 et 13.
Fije el ensamblaje del Paso 1, Barra Frontal Inferior (Parte N) y la Barra trasero inferior (Parte P)
al Lado Izquierdo (Parte A) utilizando (10) Pasadores Φ6x30mm (Pieza JJ), (1) Perno 30 mm
(Pieza DD), (5) Pernos 55 mm (Pieza BB) y (5) Arandelas de Media Luna (Pieza KK) utilizando el
destornillador M4 con cabeza de bola y la llave Allen M4 siguiendo las instrucciones de
laspáginas 12 y 13.

DD. 30mm Bolt x1
Boulon 30mm
Perno 30mm
JJ. Φ6x30mm Dowel x10
Cheville Φ6x30mm
Pasador Φ6x30mm
KK. Crescent Washer x5
Rondelle en croissant
Arandela de media luna
BB. 55mm Bolt x5
Boulon 55mm
Perno 55mm
M4 Ballend Screwdriver
tournevis M4 à tête sphérique
destornillador M4 con cabeza de bola
M4 Allen Wrench
Clé Allen M4
Llave Allen M4
18
STEP #3
ÉTAPE N°3
PASO #3
Attach the Right Side (Part B) to the assembly from Step 2 using (10) Φ6x30mm Dowels (Part
JJ), (1) 30mm Bolt (Part DD), (5) 55mm Bolt (Part BB) and (5) Crescent Washer (Part KK).
Tighten the Bolts with the M4 Ballend Screwdriver and M4 Allen wrench, following the
instructions on pages 12 and 13.
Fixer le Côté droit (Pièce B) au l’ensemble monté à l’étape 2 à l’aide de (10) Chevilles Φ6x30mm
(Pièce JJ), (1) boulon 30 mm (Pièce DD), (5) boulons 55 mm (Pièce BB), et (5) rondelles
« croissant » (Pièce KK) à l’aide de dutournevis M4 à tête sphériqueet la clé Allen M4 ensuivant les
instructions pages 12 et 13.
Fije el Lado derecho (Pieza B) al ensamblaje del Paso 2 utilizando (10) Pasadores Φ6x30mm
(Pieza JJ), (1) Perno 30 mm (Pieza DD), (5) Pernos 55 mm (Pieza BB) y (5) Arandelas de Media
Luna (Pieza KK) utilizando el destornillador M4 con cabeza de bola y la llave Allen M4 siguiendo
las instrucciones de laspáginas 12 y 13.

JJ. Φ6x30mm Dowel x2
Cheville Φ6x30mm
Pasador Φ6x30mm
BB. 55mm Bolt x8
Boulon 55mm
Perno 55mm
DD. 30mm Bolt x4
Boulon 30mm
Perno 30mm
M4 Ballend Screwdriver
tournevis M4 à tête sphérique
destornillador M4 con cabeza de bola
M4 Allen Wrench
Clé Allen M4
Llave Allen M4
STEP #5
ÉTAPE N°5
PASO #5
Attach the Top Panel (Part C) to the assembly from Step 6 using (2) Φ6x30mm Dowels (Part JJ), (4) 30mm Bolts (Part
DD) and (8) 55mm Bolts (Part BB). Tighten the Bolts with the M4 Ballend Screwdriver and M4 Allen wrench.
22
Fixer le Panneau Avant (Pièce C) au montage assemblé à l’étape 6 à l’aide de (2) Chevilles Φ6x30mm (Pièce JJ), (4)
Boulons 30 mm (Pièce DD) et (8) Boulons 55mm (Pièce BB) à l’aide de du tournevis M4 à tête sphériqueet la cléAllen M4.
Fije el Panel Superior(Pieza C) al ensamblaje del Paso 6 utilizando (2) Pasadores Φ6x30mm (Pieza JJ), (4) Pernos 30
mm (PiezaDD) y (8) Pernos 55 mm(Pieza BB) utilizando el destornillador M4 con cabeza de bola y la llave Allen M4.

HH. Back Panel Screw x14
Vis pour Panneau Arrière
Tornillo de Panel Trasero
Phillips Screwdriver – Not included
Tournevis Phillips - non inclus
Destornillidor Phillips – no incluido
STEP #6
ÉTAPE N°6
PASO #6
24
Attach the Back Panel (Part K) using (14) 15mm Screws (Part HH), tighten with a Phillips
screwdriver. Ensure the labels are facing to the back of the unit.
Fixez le panneau arrière (Pièce K) à l’aide de (14) vis de 15 mm (Pièce HH), serrez à l’aide
d’un tournevis cruciforme. Assurez-vous que les étiquettes est orientée vers le dos de l’unité.
Una el panel posterior (Pieza K) utilizando (14) tornillos de 15 mm (Pieza HH), apriete utilizando
un destornillador Philips. Asegúrese de que las etiquetas estan enfrente la parte posterior de la
unidad.

Assemble 1 Left Top Drawer and 1 Right Top Drawer as shown.
Attach the Top Drawer Sides (Part V1) to the Top Drawer Fronts (Part U) with (4) 25mm Screws (Part GG). Grooves must
align. On the Left Top Drawer the wide side is on the left, on the Right Top Drawer, the wide side is on the right.
Assemblée une Tiroir supérieur Gauche y une tiroir supérieur droit.
Fixer les Barre de tiroir supérieur (Pièces V1) à l’
Avant du Tiroir supérieur (Pièce U) à l’aide de (4) vis 25mm (Pièce GG). Les
rainures doivent être alignées. Sur le Tiroir Supérieur Gauche du côté large se trouve sur la gauche, Sur le Tiroir Supérieur
Droit du côté large se trouve sur la droite
Ensamble una Gaveta Superior Izquierda y una Gaveta Superior Derecha.
Fije los
Barra de la gaveta superior (Pieza V1) a la Parte frontal de la Gaveta superior (Pieza U) utilizando (4) tornillos 25mm (Pieza
GG). Las ranuras deben alinearse. En la gaveta Superior Izquierda el lado grande está a la izquierda, en la gaveta Superior
derecha el lado grande está a la derecha.
Phillips Screwdriver – Not included
Tournevis Phillips - non inclus
Destornillidor Phillips – no incluido
CAUTION: Do Not use a power screwdriver they can cause screws to break or strip.
ATTENTION: Ne Pas utiliser un tournevis électrique car les vis peuvent casser ou perdre leurs filets.
ATENCIÓN: No use un destornillador eléctrico ya que puede causar que los tornillos se rompan o rueden.
26
STEP #7
ÉTAPE N°7
PASO #7
GG. 25mm SCREW x8
Vis 25mm
Tornillo 25mm

GG. 25mm Screw x2
Vis 25mm
Tornillo 25mm
Phillips Screwdriver – Not included
Tournevis Phillips - non inclus
Destornillidor Phillips – no incluido
CAUTION: Do Not use a power screwdriver they can
cause screws to break or strip.
ATTENTION: Ne Pas utiliser un tournevis électrique
car les vis peuvent casser ou perdre leurs filets.
ATENCIÓN: No use un destornillador eléctrico ya que
puede causar que los tornillos se rompan o rueden.
JJ. Φ6x30mm Wood Dowel x4
Cheville en bois Φ6x30mm
Pasador de madera Φ6x30mm
STEP #8
ÉTAPE N°8
PASO #8
EE. PLASTIC BARREL NUT x10
Écrous à Manchon en Plastique
Tuerca de Barril Plásticas
FF. 40mm SCREW x10
Vis 40mm
Tornillo 40mm
.
Slide Top Drawer Bottom (Part Z) into the grooves. Install the Drawer Support (Part W) and Top Drawer Back (Part
R), using (2) Φ6x30mm Wood Dowels ( Part JJ), (1) 25mm Screw (Part GG), (5) 40mm Screws (Part FF) and (5)
Plastic Barrel Nuts (Part EE). Note: Grooves In Bottom Must Align. Repeat this step until both top drawers are
complete.
Glisser le fond du tiroir supérieur (Pièce Z) dans les rainures. Installer le support du tiroir (Pièce W) et l’arrière du
tiroir supérieur (Pièce R), à l’aide de (2) Cheville en bois Φ6x30mm (Part JJ), (1) vis 25mm (Pièce GG), (5) vis
40mm (Pièce FF) et de (5) Écrous à portée cylindriques en plastique (Pièce EE). Remarque: Les rainures
inférieures doiventêtre alignées. Serrer avec un tournevis Phillips. Répéter cette étape jusqu’à ce que les 2 tiroirs
supérieurs soientmontés.
Deslice la parte inferior de la gaveta superior (Pieza Z) hacia las ranuras. Instale el soporte de gaveta (Pieza W) y
parteposterior de la gaveta superior (Pieza R) utilizando (2) Pasadores de madera Φ6x30mm (Pieza JJ), (1) tornillo
25mm(Pieza GG) , (5) tornillos de 40 mm (Pieza FF) y (5) tuercas cilíndricas plásticas (Pieza EE). Nota: Las ranuras
al inferior deben alinearse. Apriete utilizando un destornillador Phillips. Repita este paso hasta haber completado
las 2 gavetas.
28

PP1. Knob x2
Bouton
Perilla
PP2. Knob Screw x2
Vis de Bouton
Tornillo para Perilla
Attach Knob (Part PP1) to Top Drawer Assembly using (1) KnobScrew (Part PP2). Repeat this step until both top drawers
are complete.
Fixer le bouton (Pièce PP1) au montage assemblé du tiroir supérieur à l’aide d’(1) vis de Bouton (Pièce PP2).
Répéter cette étape jusqu’à ce que les 2 tiroirs supérieurs soient montés.
Fije la perilla (Pieza PP1) al ensamblaje de la gaveta superior utilizando (1) tornillo para Perilla (Pieza PP2). Repita
este paso hasta haber completado las 2 gavetas.
CAUTION: Do Not use a power screwdriver they can cause screws to break or strip.
ATTENTION: Ne Pas utiliser un tournevis électrique car les vis peuvent casser ou perdre leurs filets.
ATENCIÓN: No use un destornillador eléctrico ya que puede causar que los tornillos se rompan o rueden.
STEP #9
ÉTAPE N°9
PASO #9
The following tools and parts are required:
Outils et pièces nécessaires:
Se necesitan las siguientes herramientas y piezas:
30

Phillips Screwdriver – Not included
Tournevis Phillips - non inclus
Destornillidor Phillips – no incluido
CAUTION: Do Not use a power screwdriver they can cause screws to break or strip.
ATTENTION: Ne Pas utiliser un tournevis électrique car les vis peuvent casser ou perdre leurs filets.
ATENCIÓN: No use un destornillador eléctrico ya que puede causar que los tornillos se rompan o rueden.
32
STEP #10
ÉTAPE N°10
PASO #10
GG. 25mm SCREW x8
Vis 25mm
Tornillo 25mm
Attach the Bottoom Drawer Sides (Parts V2) to the Bottom Drawer Front (Part T) with (4) 25mm
Screws (Part GG). Note: Grooves in Bottom must align. Tighten With Phillips Screwdriver. Repeat
this step until both bottom drawers are complete.
Fixer les Barre de tiroir inférieur (Pièces V2) à l’avant du tiroir inférieur (Pièce T) à l’aide de (4) vis
25mm (Pièce GG). Remarque: Les rainures inférieures doivent être alignées. Serrer avec un
tournevis Phillips. Répéter cette étape jusqu’à ce que les 2 tiroirs inférieurs soient montés.
Fije los Barra de la gaveta inferior (Pieza V2) a la parte frontal de la gaveta inferior (Pieza T)
utilizando (4) tornillos 25mm (Pieza GG). Nota: Las ranuras al inferior deben alinearse. Apriete
utilizando un destornillador Phillips. Repitaestepaso hasta haber completadolas 2 gavetas
inferiores.

GG. 25mm Screw x2
Vis 25mm
Tornillo 25mm
Phillips Screwdriver – Not included
Tournevis Phillips - non inclus
Destornillidor Phillips – no incluido
CAUTION: Do Not use a power screwdriver they can
cause screws to break or strip.
ATTENTION: Ne Pas utiliser un tournevis électrique
car les vis peuvent casser ou perdre leurs filets.
ATENCIÓN: No use un destornillador eléctrico ya que
puede causar que los tornillos se rompan o rueden.
JJ. Φ6x30mm Wood Dowel x4
Cheville en bois Φ6x30mm
Pasador de madera Φ6x30mm
STEP #11
ÉTAPE N°11
PASO #11
EE. PLASTIC BARREL NUT x10
Écrous à Manchon en Plastique
Tuerca de Barril Plásticas
FF. 40mm SCREW x10
Vis 40mm
Tornillo 40mm
.
Slide Bottom Drawer Bottom (Part X) into the grooves. Install the Drawer Support (Part W) and Bottom Drawer Back
(Part S), using (2) Φ6x30mm Wood Dowels ( Part JJ), (1) 25mm Screw (Part GG), (5) 40mm Screws (Part FF) and
(5) Plastic Barrel Nuts (Part EE). Note: Grooves In Bottom Must Align. Repeat this step until both Bottom drawers
are complete.
Glisser le fond du tiroir inférieur (Pièce X) dans les rainures. Installer le support du tiroir (Pièce W) et l’arrière du
tiroir inférieur (PièceS), à l’aide de (2) Cheville en bois Φ6x30mm (Part JJ), (1) vis 25mm (Pièce GG), (5) vis 40mm
(Pièce FF) et de (5) Écrous à portée cylindriques en plastique (Pièce EE). Remarque: Les rainures inférieures
doiventêtre alignées. Serrer avec un tournevis Phillips. Répéter cette étape jusqu’à ce que les 2 tiroirs inférieurs
soientmontés.
Deslice la parte inferior de la gaveta inferior (Pieza X) hacia las ranuras. Instale el soporte de gaveta (Pieza W) y
parteposterior de la gaveta inferior (Pieza S) utilizando (2) Pasadores de madera Φ6x30mm (Pieza JJ), (1) tornillo
25mm(Pieza GG) , (5) tornillos de 40 mm (Pieza FF) y (5) tuercas cilíndricas plásticas (Pieza EE). Nota: Las ranuras
al inferior deben alinearse. Apriete utilizando un destornillador Phillips. Repita este paso hasta haber completado
las 2 gavetas.
34

PP1. Knob x4
Bouton
Perilla
PP2. Knob Screw x4
Vis de Bouton
Tornillo para Perilla
CAUTION: Do Not use a power screwdriver they can cause screws to break or strip.
ATTENTION: Ne Pas utiliser un tournevis électrique car les vis peuvent casser ou perdre leurs filets.
ATENCIÓN: No use un destornillador eléctrico ya que puede causar que los tornillos se rompan o rueden.
STEP #12
ÉTAPE N°12
PASO #12
The following tools and parts are required:
Outils et pièces nécessaires:
Se necesitan las siguientes herramientas y piezas:
36
Attach (2) Knobs (Part PP1) to Bottom Drawer Assembly using (2) Knob Screws (Part PP2) Repeat this step until both Bottom
drawers are complete.
Fixer (2) boutons (Pièce PP1) au montage assemblé du tiroir inférieur à l’aide d’(2) vis de Bouton (Pièce PP2).
Répéter cette étape jusqu’à ce que les 2 tiroirs inférieur soient montés.
Fije (2) perillas (Pieza PP1) al ensamblaje de la gaveta inferior utilizando (2) tornillos para perilla (Pieza PP2).
Repita este paso hasta haber completado las 2 gavetas.

NN.12mm Screw x24
Vis 12mm
Tornillo 12mm
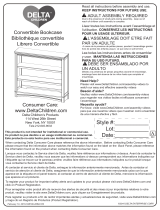
Attach (2) Drawer Guide outer pieces to each assembled drawer. There are pre-drilled holes in each
drawer side.
i) Place the end of the Drawer Guide with the tab against the Drawer front, then align the holes in the
Guide to the holes in the Side, tab should remain very close to the Drawer Front.
ii) Attach the Drawer Guide with (3) 12mm screws (Part NN). Install the screws from the back to the
front (1st,2nd,3rd in the illustration). Tighten with a Phillips Screwdriver.
iii) repeat with the other Drawer Side.
iv) Repeat until all (4) Drawers are complete.
Fixer (2) parties extérieures de glissière de tiroir sur chaque tiroir monté. Des trousprépercés se
trouvent sur le côté de chaque tiroir.
i) Placer l’extrémité de la glissière de tiroir avec la patte contre l’avant du tiroir,puis aligner les trous
de la glissière aux trous sur le côté. La patte doitrester trèsproche de l’avant du tiroir.
iii)Fixez la glissière du tiroir à l’aide de (3) vis de 12 mm (Pièce NN) Montez les vis de l’arrière vers
l’avant (1st,2nd,3rd sur l’illustration). Serrez à l’aide d’un tournevis cruciforme.
iii) répéter cette étape avec le côté de l’autre tiroir.
iv) Répéter jusqu’à ce que les (4) tiroirs soient montés.
Fije (2) piezas externas de guía de gaveta en cada gaveta ensamblada. Hay agujeros
pre taladrados en cada costado de la gaveta.
i) Coloque el extremo de la guía de gaveta, con la lengüeta contra la parte frontalde la gaveta, luego
alinee la guía con los agujeros del costado; la lengüeta debequedar muy cerca de la parte frontal de
la gaveta.
ii)Fije la guía de gaveta con (3) tornillos de 12 mm (Pieza NN). Instale los tornillos desde la parte
posterior hacia el frente (1st,2nd,3rd en la ilustración). Apriete con un destornillador Philips.
iii) Repita con el otro costado de la gaveta.
iv) Repita hasta completar las (4) gavetas
40
STEP #14
ÉTAPE N°14
PASO #14

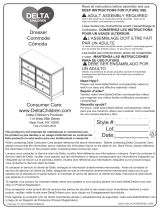
Install the drawers in the case body. Carefully align the Drawer Guides on each drawer with the
Drawer Guides on the case. Push the drawer STRAIGHT in until it "clicks". Check that each side is
fully secure. Open and close the drawer to ensure smooth operation. Changing the locations may
improve fit or performance.
Installez les tiroirs dans le corps du boîtier. Prenez soin d’aligner les glissières de chaque tiroir avec
les glissières destiroirs sur le boîtier. Poussez le tiroir HORIZONTALEMENT vers l’intérieur jusqu’à
ce qu’il s’encastre. Vérifiez que chaque côté est bien fixé. Ouvrez et fermez le tiroir afin de vérifier
qu’il fonctionne bien. Modifiez l’emplacement pour un meilleur ajustement ou de meilleures
performances.
Instale las gavetas en el cuerpo del mueble. Alinee cuidadosamente las guías de gaveta en cada
una de ellas con las guías del cuerpo del mueble. Presione la gaveta EN LÍNEA RECTA hasta que
haga "clic". Revise que cada lado estébien asegurado. Abra y cierre la gaveta para asegurarse de
que funciona correctamente. Cambiar las ubicaciones podría mejorar el funcionamiento.
STEP #15
ÉTAPE N°15
PASO #15
42

JJ. Φ6x30mm Dowel x4
Cheville Φ6x30mm
Pasador Φ6x30mm
DD. 30mm Bolt x2
Boulon 30mm
Perno 30mm
M4 Allen Wrench
Clé Allen M4
Llave Allen M4
44
STEP #16
ÉTAPE N°16
PASO #16
1. Attach Changing Top Right Side (Part Q2) to the Changing Top Front (Part Y) using (1) 30mm
Bolt (Part DD) and (2) Φ6x30mm Dowels (Part JJ). Tighten with the Allen Wrench.
2. Attach Changing Top Left Side (Part Q1) in the same manner
1. Fixer le coté droit du plan à langer (Pièce Q2) à la partie frontale du plan à langer (Pièce Y) à l’aide de
(1) Boulon 30mm (Pièce DD) et (2) Chevilles Φ6x30mm (Pièce JJ). Serrezavec la Clé Allen.
2. Fixer le coté gauche du plan à langer (Pièce Q1) de la même façon.
1. Fijar el lado derecho del cambiador (pieza Q2) con la parte frontal del cambiador (pieza Y) utilizando
(1) perno de 30mm (pieza DD) y (2) Pasadors Φ6x30mm (pieza JJ). Apriete con la Llave Allen.
2. Fijar el lado izquierdo del cambiador (pieza Q1) de la misma manera.

JJ. Φ6x30mm Dowel x4
Cheville Φ6x30mm
Pasador Φ6x30mm
DD. 30mm Bolt x2
Boulon 30mm
Perno 30mm
M4 Allen Wrench
Clé Allen M4
Llave Allen M4
46
STEP #17
ÉTAPE N°17
PASO #17
Attach Changing Top Back (Part J) to the Right and Left Sides using (2) 30mm Bolts (Part DD) and (2) Φ6x30mm
Dowels (Part JJ) . Tighten with the Allen Wrench.
Fixer la partie postérieure du plan à langer (Pièce J) au cotés droit et gauche à l’aide de (2) Boulons 30mm (Pièce
DD) et (2) Chevilles Φ6x30mm (Pièce JJ). Serrezavec la Clé Allen.
Fijar la parte posterior del cambiador (Pieza J) a los lados derecho e izquierdo utilizando (2) pernos de 300mm (Pieza
DD) y (2) Pasadors Φ6x30mm (pieza JJ). Apriete con la Llave Allen.

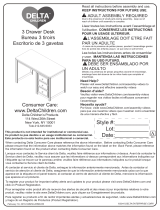
GG. 25mm SCREW x3
Vis 25mm
Tornillo 25mm
48
STEP #18
ÉTAPE N°18
PASO #18
Phillips Screwdriver – Not included
Tournevis Phillips - non inclus
Destornillidor Phillips – no incluido
1. Set the Assembled Changing Top on the top of the Dresser as shown.
2. Insert
(3)
25 mm screws (Part GG) through the back of the Changing Top, into the
pre drilled holes the dresser.
3. Tighten with a Phillips Screwdriver.
1. Placer la Table à Langer maintenant assemblée sur ledessusde la commode.
2. Insérer (3) vis 25mm (pièce GG) à partir del’arrière de la table à langer, jusque dans les
trous deguidage que l’onvientde percer dans la commode.
3. Serrer au moyen d’un tournevis phillips.
1. Poner el equipó de ensemblaje ensima del cambiador.
2.Inserta (3) tornillos 5 mm (pieza GG) en laparte de atras en los wecos pil
ót.
3.Apriete con destornillador phillips.
DRESSER UNIT
LA COMMODE
LA COMMODA
GG
GG
GG
/