Haier LCD19W-M3 User manual

Category
LCD TVs
Type
User manual
USER'S MANUAL
HD Ready Digital LCD TV and
HD Ready Digital LCD TV/DVD Combi
Please read this manual carefully before
using your television and keep this manual
for future reference.
MODEL:
LT15T1CW, LT15T1CBW, LT15T1CWW,
LT19T1CW, LT19T1CBW, LT19T1CWW,
LT22T1CW, LT22T1CBW, LT22T1CWW,
LY15T1CW, LY15T1CBW, LY15T1CWW,
LY19T1CW, LY19T1CBW, LY19T1CWW,
LY22T1CW, LY22T1CBW, LY22T1CWW,
LT15R1CW, LT15R1CBW, LT15R1CWW,
LT19R1CW, LT19R1CBW, LT19R1CWW,
LT22R1CW, LT22R1CBW, LT22R1CWW,
LY15R1CW, LY15R1CBW, LY15R1CWW,
LY19R1CW, LY19R1CBW, LY19R1CWW,
LY22R1CW, LY22R1CBW, LY22R1CWW,
LT1511WCW,LT1911WCW,LT2211WCW
LY1511WCW,LY1911WCW,LY2211WCW
CONTENT
Note: DVD is only available for certain models, please refer to actual products
Safety Notice .........................................................................................
Front Panel Control................................................................................
Connection ...........................................................................................
Remote Control(for TV/DVD Combi).........................................................
Remote Control (for TV/DTV only)......................................................
Installing Batteries.............................................................................
Connection Instructions..........................................................................
Grounding...........................................................................................
External equipment connections...........................................................
Antenna Connection..........................................................................
VGA Input.........................................................................................
YPbPr Input......................................................................................
S-VIDEO Input..................................................................................
SCART Input.....................................................................................
CI Card Input.....................................................................................
HDMI Input.........................................................................................
Wall Mounting....................................................................................
Basic Operating Instructions....................................................................
Turn on the LCD-TV..............................................................................
Input selection......................................................................................
V+/V-..................................................................................................
Mute...................................................................................................
Select the TV Channel ..........................................................................
Picture Mode.......................................................................................
Program Swap.....................................................................................
SLEEP/SCAN/ZOOM.........................................................................
Menu Operations....................................................................................
Picture Menu Options............................................................................
Audio Menu Options..............................................................................
Function Menu Options..........................................................................
Tuning Menu Options............................................................................
DVB-T Main Menu Operations.................................................................
Channel List.........................................................................................
Favourite List........................................................................................
Now/Next EPG.....................................................................................
Timers.................................................................................................
Settings...............................................................................................
TELE TEXT............................................................................................
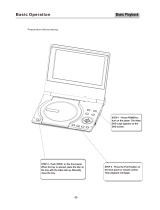
Basic Playback......................................................................................
Advanced Playback...............................................................................
Special Function Playback......................................................................
JPEG DISC PLAYBACK........................................................................
SCREEN SAVER FUNCTION................................................................
DVD System SETUP...............................................................................
General Setup Process.........................................................................
General Setup Page.............................................................................
Preferencel Page.................................................................................
Playable Discs.......................................................................................
Disc Protection and DVD Characteristics..................................................
Troubleshooting Guide...........................................................................
Specifications........................................................................................
1
2
3
4-5
6
6
7
7
7
7
8
8
9
10
10
10
10
11
11
11
11
11
12
12
12
12
13
13
14
16
18
21
21
22
22
23
23
26
28
29
30
30
30
31
31
31
33
35
36
37
38
Safety Notice
To prevent fire or electric shocks please read the instruction before
installing, using and cleaning the television.
Please read all the instructions before operation;
Please keep the manual for future reference ;
Do not use any accessories that are not recommended by the manufacturer:
Before operation, make sure the operating voltage of this unit is corresponds
with your house electrical supply;
Do not place the unit on unstable or in dusty and humid places;
Never put the unit in direct sunlight or near heat sources;
Allow enough space for proper ventilation;
Please keep water away from the LCD-TV . If water comes in to contact with
the LCD-TV, disconnect the power cord from the power source, then wipe the
set with a dry soft cloth;
Do not remove the back cover. If servicing is required , please refer to
customer helpline.
Front Panel Control
Control Panel Function
1. Standby switch
2. SOURCE Select the input signals: TV/S-VIDEO/COMPONENT/PC/
SCART/HDMI/DTV/DVD
3. MENU Press to select the main menu
4. VOL- Volume down / Left orientation to adjust the item in the OSD
VOL+ Volume up / Right orientation to adjust the item/Press to enter
5. CH- TV channel down / to select the item in the menu
CH+ TV channel up / to select the item in the menu
6. Power indicator
Illuminates red in standby mode, no light when the display is
turned on
7.Remote Sensor
6
7
SOURCE MENU VOL- VOL+ CH- CH+ POWER
2 3 4 5 1
SOURCE MENU VOL- VOL+ CH- CH+ STANDBY
(The description of the button may be different, just see the actual set.)
15 inch
Other inch
11W
T1
INPUT
SOURCE MENU VOL- VOL+ CH- CH+ STANDBY
2 3 4 5 1
R1
Connection
DVD
STOP
PLAY/PAUSE OPEN/CLOSE
PREV NEXT
DVD insert
(Please refer to actual product
of the DVD slot)
Just take TV with DVD for example, please see the real)
Pr
ANT IN
Pb
Y
AUDIO IN
HDMI
CI
VGA IN
HDMI
Connect to HDMI
output of other
equipment
VGA Input
Connect to the VGA
15PIN analog output
connector of the PC
display card for PC
display purpose
COMPONENT Input
Connect a component
video/audio
device to these jacks
VGA /COMPONENT/
SVIDEO Audio Input
Connect the PC output
connector from a PC to
the audio input port
Earphone port
Antenna Input
Connect cable or
antenna signals to
the TV, either direc-
tly or through your
cable box.
Pr
ANT IN
Pb
Y
AUDIO IN
HDMI
CI
VGA IN
S-Video Input
SCART
Remote Control (for TV/DVD Combi)
When using the remote control, aim it
towards the remote sensor on the TV
Stand By
DVD Open/close
Picture Mode
Scan
DVD 10+
Mute
Swap
Call Screen Display
Program Number
NICAM
Source Exchange
Digital Selector
DTV/DVD
Volume/Channel Selection
MENU
Zoom
DVD Audio
DVD STOP
Tune Menu Button
DVD SETUP
DVD PAUSE/STEP
DVD FAST REVERSE
DVD FAST FORWARD
DVD/DVB-T MENU
DVD NEXT
DVD PREVIOUS
Exit Screen Display
DVD PLAY/ENTER/DVB-T ok button
DVD PROGRAM/ DVB-T EPG button
DVD /DVB-T Cursor Move button
DVD /DVB-T SUBTITLE
DVD ANGLE/ DVB-T favourite
DVD SEARCH
DVD A-B REPEAT
DVD TITLE/PBC/DVB-T information button
DVD SLOW
DVD CALL
TELETEXT BUTTONS
DVD REPEAT
RED button
Green button
Yellow button
Blue button
Buttons on the remote control
UP
DOWN
LEFT
RIGHT
STANDBY
OPEN/CLOSE
SCAN SWAP CALL
MUTE
1234
5678
90
-/--
SOURCE
DTV/DVD
P+
P-
V- V+
MENU
ZOOM AUDIO
STOP
SETUP
PAUSE/STEP
REV FWD PREV NEXT
D.MENU
EXIT
PROGRAM
PLAY/ENTER
SUBTITLE
ANGLE
TITLE/PBC
SEARCH
SLOW
D.CALL
10+
A-B
TUNE
NICAM
P.STD
EPG
OK
FAV
i
REPEAT
SIZE
TIME
REVEAL
MODE
MIX
TEXT
SUBCODE
HOLD
(For TV/DVD Combi Models)
Fast text button in analog
signal
Function button in DVBT
(just reference the OSD)
Remote Control (for TV/DTV only)
When using the remote control, aim it
towards the remote sensor on the TV
Buttons on the remote control
Stand By
NICAM
SLEEP
Switch to PC mode
Return the last watched program channel
Mute
Automatically adjust in PC mode
Call Screen Display
Program Number
Picture mode
Source Exchange
Digital Selector
DTV/TV
Volume/Channel Selection
MENU
Sound mode
Zoom
TELETEXT BUTTONS
DVB-T MENU
TEXT BUTTON
DVB-T EPG button
DVB-T ok button
DVB-T SUBTITLE
DVB-T Cursor Move button
DVB-T favourite
Exit Screen Display
DVB-T information button
RED button
Green button
Blue button
Yellow button
UP
DOWN
LEFT
RIGHT
STANDBY
NICAM
PC AUTO AD DISPLAY
MUTE
1234
5678
90
-/--
SOURCE
DTV/TV
P+
P-
V- V+
MENU
S SM ZOOM
SUBCODE
MIX
MODE
REVEAL
SIZE
TIME INDEX
D.MENU
TEXT
EPG
SUBTITLE
FAV
INFO
EXIT
HOLD
P.STD
SLEEP
OK
i
Q.VIEW
(For TV /DTV Models)
Note: the instruction on this manual is
taking TV/DVD combi remote control as
an example.
Installing Batteries
3
2
1
1.Open the cover of the battery compartment at the back of the remote
control.
2.Insert two AA alkaline batteries in the compartment. (plus and minus poles to
respective mark)
3.Replace the cover of the battery compartment.
Precautions
Make sure that there is no
obstacle between the remote
controller and television set.
As strong light may interfere the
signals, change your position to
operate the remote controller if
the television cannot be turned
on or off as you expect.
Keep the remote controller
away from heat source or
humid area to ensure
effective performance of
the remote controller.
Make sure that two AA 1.5V alkaline
batteries are loaded. The batteries
must be of the same type. The batteries
must be located properly. The batteries
are not rechargeable. If your TV is to be
stored for a period of time, remove the
batteries from the remote control.
Connection Instructions
Ensure that you connect the grounding / earth wire to prevent possible
electric shock. If grounding methods are not possible, have a qualified
electrician install a separate circuit breaker. Do not try to ground the
unit by connecting it to telephone wires, lightening rods, or gas pipes.
Grounding
External Equipment Connections
Antenna Connection
- Antenna or Cable Service with a Cable Box Connections
- For optimum picture quality, adjust antenna direction if needed.
Multi-family Dwellings/Apartments
(Connect to wall antenna socket)
wall antenna
socket
VHF antenna
UHF antenna
outdoor
antenna
Single-family Dwellings /Houses
(Connect to wall jack for outdoor antenna)
Be careful not to bend the bronze
wire when connecting the antenna.
To improve picture quality in a poor
signal area, purchase and install a
signal amplifier.
If the antenna needs to be split for two
TV s, install a 2-Way Signal Splitter
in the connections.
If the antenna is not installed properly,
contact your dealer for assistance.
NOTE: All cables shown are just for example.
RF coaxial wire (75 ohm)
ANT IN
ANT IN
Connection Instructions
You can use your LCD-TV as a monitor for your personal computer using a VGA
cable (not supplied).
VGA Input
Connection and use steps:
1.Read the user guide supplied with
your computer and ensure that it has
a VGA connector;
2.Make sure that the power of the LCD
-TV and the PC are off;
3.Connect a D type 15-pin VGA interface
cable ( not supplied ) to the VGA video
interface connector on the PC. Then
connect the other end to the PC video
interface connector on the back of the
LCD-TV.Tighten the screws on the VGA
connectors once they are firmly
connected, connect the audio cable(not
supplied)to the audio input on the back of
your LCD-TV;
4.Turn on the power of the LCD-TV first ,
and then turn on the power of the PC;
5.Press the SOURCE button to set the video
input mode of the LCD-TV to PC;
6.Check the image on your TV. There may be noise associated with the resolution,
vertical pattern, contrast or brightness in PC mode. If noise is present, change
the PC mode to another resolution, change the refresh rate to another rate or
adjust the brightness and contrast on the menu until the picture is clear. If the
refresh rate of the PC graphic card cannot be changed,change the PC graphic
card or consult the manufacturer of the PC graphic card.
Frame frequency (Hz)Line frequency (Khz)
VGA
SVGA
XGA
640*480 31.5KHz 60Hz
800*600 37.9KHz 60Hz
1024*768 48.4KHz 60Hz
Mode Resolution
Note: All above listed are subject to VESA Criteria.
YPbPr Input
How to connect
Connect the DVD video outputs (Y, PB, PR)
to the COMPONENT(Y, Pb, Pr) IN socket on
the TV and connect the DVD audio outputs
to the AUDIO IN jacks on the TV, as shown
in the figure.
NOTE: If your DVD player does not have
component video output, use S-Video.
How to use
1. Turn on the DVD player, insert a DVD.
2. Use the SOURCE button on the remote control to select
VGA IN
Connection Instructions
COMPONENT (If connected to S-VIDEO,select the S-VIDEO external
input source.)
3. Refer to the DVD player's manual for operating instructions.
Component Input ports
To get better picture quality, connect a DVD player to the component
input ports as shown below.
S-VIDEO Input
Connection and use steps:
1.Read the user guide supplied with your AV devices and ensure that it has
S-Video connectors;
2.Make sure that the power of the LCD-TV and the AV device are switched off;
.Turn on the power of the LCD-TV first ;
and then turn on the power of the AV
device;
4.Press the SOURCE button to set the
video input mode of the LCD-TV to
SVIDEO mode .
Connection Option 1
Set VCR output switch to 3 or 4 and then
tune TV to the same channel number.
Connection Option 2
1. Connect the audio and S-VIDEO cables
from the VCR's output jacks to the TV
input jacks, as shown in the figure.
2. Insert a video tape into the VCR and
press PLAY on the VCR. (Refer to the
VCR owner s manual.)
3
- To avoid picture noise (interference), leave an adequate distance between the
VCR and TV
.
VCR
1
2
Connection Instructions
SCART Input
1.Connect the scart lead from the external device(DVD
players, settop boxes or game consoles, to the TV SCART
socket.
2.Press SOURCE to select SCART mode.
3. Press Play button on external equipment and it should
appear on the screen.
HDMI
HDMI
HDMI Input
HDMI Devices
Connect the cable from the HDMI devices
to the TV HDMI, as shown in the figure.
How to use
1. Select the HDMI source by using the SOURCE
button on the remote control.
2. Operate the corresponding external equipment.
Refer to external equipment operating guide.
SCART
External equipment
Note: The audio cable included with the TV should be used when connected with PC/
COMPONENT/S-VIDEO.
TV
HDMI Devices
Wall Mounting
Use 4 machine screws(M4x8mm not included) to mount
the TV on the Bracket(not included)
For the Wall Bracket-Refer to the user instructions
supplied with the wall bracket(not included)
Remark: Wall mount is not applicable to 15 inch TV
CI Card Input
Inter CI card(not supplied) to the socket
Basic Operating Instructions
Turn on the LCD-TV
When the POWER(STANDBY) button on the remote control
is pressed and the LCD-TV is turned on, the indicator light on
the front of the LCD-TV changes from red to green. When the
LCD-TV is turned off using the POWER(STANDBY) button,
the LCD-TVwill go into standby mode and the indicator light
turns red.
You can also turn on the TV from standby mode by pressing
the digits(1-9) or P+/- .
V+/-
1.Press the V+/V- button to increase/decrease the volume and there will be
display on the bottom of th e screen.
2. Press V+/V- to adjust the system right/left, to enter the submenu or to confirm.
MUTE
1.Press the MUTE button to mute the sound temporarily. A mute icon appears
on the screen.
2.Press the MUTE button again or V+ to restore the sound.
The mute icon disappears.
The display will appear on the screen
when the TV is turned on for the first
time:
Press P+/P- to select the country you are
in(eg. UK),then pressV+/V- to adjust to
enter the menu: press P+/P- to select ON,
then press V+/V- to confirm.
All channels will be stored after the
process.
COUNTRY
AUSTRIA
GERMANY
SWITZERLAND
BELGIUM
NETHERLANDS
UK
DENMARK
ITALY
SPAIN
POWER
OPEN/CLOSE
SCAN SWAP CALL
MUTE
1234
5678
9 0
-/--
TV/AV
DTV/DVD
P+
P-
V- V+
MENU
ZOOM AUDIO
STOP
SETUP
PAUSE/STEP
REV FWD PREV NEXT
D.MENU
EXIT
PROGRAM
PLAY/ENTER
SUBTITLE
ANGLE
TITLE/PBC
SEARCH
SLOW
D.CALL
10+
A-B
TUNE
NICAM
P.S TD
EPG
OK
FAV
i
REPEAT
SIZE
TIME
REVEAL
MODE
MIX
TEXT
SUBCODE
HOLD
SELECT
ADJUST
EXIT
MENU
AUTO SEARCH
ON
OFF
SELECT
ADJUST
EXIT
MENU
Inputs selection
Press SOURCE button to display the source menu.
Press P+/P- button to select the inputs you need and
the TV switches into the inputs automatically
in 3 seconds. And you could press MENU to exit the
display.
TV
S-VIDEO
COMPONENT
PC
SCART
HDMI
DTV
DVD
P+/-
V+/-
P+/-
V+/-
Basic Operating Instructions
Select the TV Channel
You can use the number keys on the remote control to directly select TV
channels.
The LCD-TV can store up to 100 channels , and you can press the keys on the
remote control or on the panel to make a selection.
1. if you want to choose any channel from 0 to 9, please press the -/-- button
until - is indicated on the screen and then press the relevant key on the
remote control. for example: if you want to choose channel 8, just press the
Key number 8.
2.If you want to choose a channel bigger than 9, please press the -/-- button
until -- is indicated on the screen. Enter the two digits of the channel
number you want to watch.. for example: select channel 16
Note: if you want to choose one digit channel in this condition, you should press
0 first and then one digit number key.
Picture Mode
Press P.STD button on the remote control for menu display . For desired mode as
follows:
PERSONAL STANDARD FRESH MILD
Program Swap
1
2
3
Suppose the channel number you used is now channel 8 and the channel number you
are using is 18 (as shown in the figure).
If you want to return to the last watched program channel 8, you can simply press the
SWAP(Q.VIEW) button.
If you want to return to channel 18, press the button again. Through this function, you
can easily change between the channel you are using and the channel you used last time.
SLEEP
Press SLEEP button to set the sleep timer among 0MIN/15MIN/30MIN/45MIN/60MIN/
90MIN/120MIN/180MIN/240MIN. If 1 minute left, the OFF 59S will appear on the screen.
The TV turns off automatically when the time is on.
SCAN
Press SCAN button to skim the channels . You can press SCAN again or MENU to stop
scanning.
S SM
Press AUDIO(SSM) button on the remote control for menu display . For desired
mode as follows:
PERSONAL STANDARD VOICE MUSIC
ZOOM
Press to zoom into the picture .
Menu Operations
Picture Menu Options
1. Press MENU button to display the main menu, and V+/V-to select the
main menu .
2. Press P+/P- to scroll through the options
3. Press V+/V- buttons to make changes to the parameters
4. Press MENU to exit the menu step by step
5. Press the EXIT button to exit the menu
Picture quality can be adjusted for any input separately .
The picture quality on the screen can be adjusted as follows:
1. Press MENU button and V+/V- until the PICTURE menu appears on the screen.
2. Press P+/P- button to enter the picture menu and to go up and down to select
the desired option .
PICTURE
VIDEO MODE STANDARD
CONTRAST 50
BRIGHTNESS 50
COLOUR 50
SHARPNESS 50
NOISE REDUCE MID
TEMP. NORMALCOLOUR
AUDIO
AUDIO MODE STANDARD
BASS 50
TREBLE 50
BALANCE 50
AVL ON
FUNCTION
LANGUAGE ENGLISH
TXT LANGUAGE EAST
BLUE SCREEN ON
OSD SETTINGS
ADJUST
DISPLAY MODE FULL SCREEN
CHILD LOCK
SLEEP 0 MIN
TUNING
CHANNEL 1
PROGRAM TABLE
COLOUR SYSTEM PAL
SOUND SYSTEM D/K
COUNTRY UK
AUTO SEARCH
MANUAL SEARCH
FINE TUNE
AFC ON
NOTE: The menu may be different from kinds of signal inputs.
And some options are not available in some signal.
PICTURE MENU AUDIO MENU
FUNCTION MENU TUNING MENU
Menu Operations
3.Press V+/V- button to increase and decrease the level to match your preference .
4. Repeat step 2 and step 3 until desired picture quality has been achieved .
Functions:
VIDEO MODE: Press V+/V- to set the picture mode .
CONTRAST : The image becomes higher as the number increase.
BRIGHTNESS :Adjust the brightness of the picture . By increasing the level, it
will add more light to dark parts of the picture and by decreasing the level ,it will
add more dark to light parts of the picture.
COLOUR : PressV+/V- to adjust the colour.
SHARPNESS : By increasing the level, it will show cleaner and clearer images
and by decreasing the level, it will make picture smoother.
NOISE REDUCE: Adjust the quality of the picture by selecting OFF,LOW,
MID,HIGH.
COLOUR TEMP. : Press to select the colour temperature from WARM/NORMAL/
COLD
Picture Menu Options Continued
Audio Menu Options
Sound can be adjusted as follows:
1. Press MENU and V+/V- button until the following menu appears on the screen
AUDIO
AUDIO MODE STANDARD
BASS 50
TREBLE 50
BALANCE 50
AVL ON
Menu Operations
Audio Menu Options Continued
2. Press P+/P- button to enter the audio menu and to go up and down to
select the desired option .
3.Press V+/V- button to increase and decrease the level to match your preference .
4. Repeat step 2 and step 3 until desired sound quality has been achieved .
Functions :
AUDIO MODE : Press V+/V- to select among PERSONAL, STANDARD, VOICE
and MUSIC.
BASS : Adjust the bass of the sound .
TREBLE : Adjust the treble of the sound .
Note: BASS and TREBLE can be adjust in any audio mode, and if the numerical
value is changed, the audio mode will be changed to personal automatically.
BALANCE : Adjust the balance of the audio output from left to right . When
indication value of balance increases towards 100 , sound of the left speaker
becomes weaker . When indication value of balance decreases towards 0 ,
sound of the right speaker become weaker .
AVL: Automatic Volume Limit Control reduces the effect of the large volume by
the same volume of all the channels .
Menu Operations
Function Menu Options
1. Press MENU button and V+/V- until the following menu appears
on the screen.
2. Press P+/P- button to enter the sound menu and to go up and down to
select the desired option .
3.Press V+/V- button to increase and decrease the level to match your preference .
4. Repeat step 2 and step 3 until desired picture quality has been achieved .
Functions:
1. LANGUAGE: Used to select OSD language .
2. TXT LANGUAGE: To switch the teletext languages among EAST/RUSSIAN/
ARABIC/WEST.
3. BLUE SCREEN: To set On, the screen will be in blue screen after 3 seconds
if there is no signal.
4. OSD SETTINGS: Press V+/V- button to enter the submenu.
FUNCTION
LANGUAGE ENGLISH
TXT LANGUAGE EAST
BLUE SCREEN ON
OSD SETTINGS
ADJUST
DISPLAY MODE FULL SCREEN
CHILD LOCK
SLEEP 0 MIN
FUNCTION
MENU TIMEOUT 10
MENU BACKGROUND 2
H. POSITION 50
V. POSITION 50
MENU TIMEOUT: Press V+/V- to set the time, the menu will disappear from
the screen when the time you set is over.
Menu Operations
Function Menu Options Continued
MENU BACKGROUND: When the number changes from 0 to 8, the menu
background will change from dark to tint (from black to blue).
H. POSITION: When the number changes from 0 to 100, the menu will move from
left to right.
V. POSITION: When the number changes from 0 to 100, the menu will move from
down to up .
Note: The menu will be on the middle of screen when H. POSITION and V. POSITION are
set to 50.
5. ADJUST(can be adjust only in PC mode and there is PC signal): PressV+/V- to
enter the submenu.
AUTO SYNC: Press V+/V- to adjust the picture location frequency and phase
parameters automatically in PC.
CLOCK: Adjust the clock of the LCD to match the PC input source.
PHASE: Removes any horizontal distortion and clears or sharpness the
displayed characters.
H.POSITION: Picture horizontal adjust.
V.POSITION: Picture vertical position adjust.
7. CHILD LOCK: Press V+/V- to enter the submenu.
6.DISPLAY MODE: To select the display mode between 4:3, 16:9, FULL SCREEN
and AUTO.( Display mode may differ from different inputs. )
FUNCTION
AUTO SYNC
CLOCK 50
PHASE 2
H. POSITION 50
V. POSITION 50
PASSWORD
* * * *
Menu Operations
Function Menu Options Continued
CHILD LOCK
O PASSWORD
O CHILD LOCK ON
PASSWORD: The password can be changed. Press P+/P- to select PASSWORD
and V+/V- to enter. The screen will display NEW PW.: ****, then enter the new
password and the screen display CONFIRM PW.: ****, if the same password
is entered correctly twice, the old password will be changed.
CHILD LOCK: PressP+/P- button to select it. Press V+/V- button to set on or off
mode. If lock on mode is set, child lock is inactivated automatically. In such case,
buttons on the television is useless and only buttons on remote control can be
used, if child lock button(button on the television) is pressed, the screen will
display CHILD LOCK. The child lock mode can be resumed by entering CHILD
LOCK set menu, set child lock off .
8. SLEEP: Press V+/V- to set the timer when the TV turns off .
Tuning Menu Options
1. Press MENU and V+/V- button until the following menu appears on the
screen
TUNING
CHANNEL 1
PROGRAM TABLE
COLOUR SYSTEM PAL
SOUND SYSTEM D/K
COUNTRY UK
AUTO SEARCH
MANUAL SEARCH
FINE TUNE
AFC ON
If password is correctly entered, the CHILD LOCK menu will be entered. If the
password is not correctly entered, you will be required to re-enter the password
and the cursor will stay at the first place. CHILD LOCK menu is as follows:
(The initial password is 0000.)
  • Page 1 1
  • Page 2 2
  • Page 3 3
  • Page 4 4
  • Page 5 5
  • Page 6 6
  • Page 7 7
  • Page 8 8
  • Page 9 9
  • Page 10 10
  • Page 11 11
  • Page 12 12
  • Page 13 13
  • Page 14 14
  • Page 15 15
  • Page 16 16
  • Page 17 17
  • Page 18 18
  • Page 19 19
  • Page 20 20
  • Page 21 21
  • Page 22 22
  • Page 23 23
  • Page 24 24
  • Page 25 25
  • Page 26 26
  • Page 27 27
  • Page 28 28
  • Page 29 29
  • Page 30 30
  • Page 31 31
  • Page 32 32
  • Page 33 33
  • Page 34 34
  • Page 35 35
  • Page 36 36
  • Page 37 37
  • Page 38 38
  • Page 39 39
  • Page 40 40
  • Page 41 41

Haier LCD19W-M3 User manual

Category
LCD TVs
Type
User manual

Ask a question and I''ll find the answer in the document

Finding information in a document is now easier with AI