Page is loading ...

Replacement Instructions For Protective Boot
!
WARNING
Read and understand this entire guide and your employer's safety practices before installing, operating, or servic-
ing the equipment. While the information contained in this guide represents the manufacturer's best judgment, the
manufacturer assumes no liability for its use.
!
WARNING
Serious injury or death may result if gouging and cutting equipment is not properly installed, used, and maintained.
Misuse of this equipment and other unsafe practices can be hazardous. The operator, supervisor, and helper must
read and understand the following safety warnings and instructions before installing or using any air carbon-arc
torch or equipment.
!
WARNING
Install and maintain equipment in accordance with the National Electrical Code (NFPA 70) and local codes. Do not
service or repair equipment with power on. Do not operate equipment with protective insulators or covers removed.
Service or repair to equipment must be done by qualified and/or trained personnel only.
WARNING
Turn off the power supply or disconnect the input power cable from the power supply before attempting this procedure.
1. Turn off the power supply or disconnect the input
power cable from the power supply.
2. Turn off the compressed air to the torch and cable
assembly.
3. Using scissors, cut the boot away from the cable
assembly.
4. Using the valve bonnet wrench, remove the valve
bonnet and spool assembly from the torch body
and handle. Slide the handle away from the torch
body and over the cable assembly.

5. Place the brass hex connector on the cable assem-
bly into the jaws of a vice and tighten in place.
6. Using a 7/8” wrench or crescent wrench, loosen
the torch body from the hex connector and re-
move the cable from the torch body.
7. Slide the handle away from the cable assembly.
8. Remove the cable assembly from the vice jaws
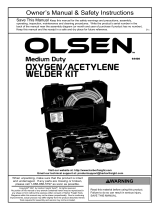
9. Using a heat gun, direct the “hot” air at the end of
the replacement boot as shown. Do not overheat.
10. Insert the cable assembly through the large
opening of the boot and begin pushing the cable
through the 13/16” diameter hole.
11. Pull the boot down over the length of the cable
assembly until it covers the brass connector at
the other end of the cable.
12. Slide the handle back over the cable assembly.
13. Thread the cable back into the torch body and
tighten to 200 inch/pounds.
14. Remove the torch body from the vice jaws.
15. Slide the handle over the torch body and insert
the valve bonnet back in place using the valve
bonnet wrench to tighten
© 2013 Victor Technologies International, Inc. www.victortechnologies.com Printed in U.S.A.
U.S. Customer Care: 800-426-1888
•
Canada Customer Care: 905-827-4515
•
International Customer Care: 940-381-1212
INNOVATION TO SHAPE THE WORLD
™
T ECHNOLOGIES
™
Manual No.: 89250011, Rev.: A, Date: 12/04/13
/