Page is loading ...

USER MANUAL
PowerTel 196

2
SUMMARY
DESCRIPTION OF TELEPHONE PowerTel 196 ---------------------------4
INSTALLATION -------------------------------------------------------------------5
Recommendations --------------------------------------------------------------5
Telephone installation ---------------------------------------------------------5
Caution ---------------------------------------------------------------------------6
GENERAL USE --------------------------------------------------------------------6
Make a call ------------------------------------------------------------------------6
Call from memories --------------------------------------------------------------6
Dial back an outgoing number ------------------------------------------------6
Answering a call ------------------------------------------------------------------7
Set hands-free volume ----------------------------------------------------------7
Set handset volume (and audio-boost) --------------------------------------7
Handset receiver equalizer adjustment --------------------------------------7
PROGRAMMING -----------------------------------------------------------------8
Select language ------------------------------------------------------------------8
Select contrast --------------------------------------------------------------------8
Set direct access memories M1/M2/KEY1 -----------------------------------10
Phonebook ----------------------------------------------------------------------11
Delete an entry ------------------------------------------------------------------10
View or dial an entry -----------------------------------------------------------11
Key tones --------------------------------------------------------------------------9
Wall mounting -------------------------------------------------------------------5
Set ringer volume ----------------------------------------------------------------7
Set Flash Time --------------------------------------------------------------------8
Ringer tone -----------------------------------------------------------------------8
Confirmation tone ---------------------------------------------------------------9
Software version -----------------------------------------------------------------9
Dial mode -------------------------------------------------------------------------9
Reset ------------------------------------------------------------------------------10
Copy a contact or call list number to M1/M2/KEY1------------------------10

3
SECURITY ------------------------------------------------------------------------18
ENVIRONMENT -------------------------------------------------------------18
CONFORMITY ------------------------------------------------------------------18
WARRANTY ---------------------------------------------------------------------16
Edit a name and number ------------------------------------------------------11
Delete an entry ------------------------------------------------------------------12
Delete all contacts --------------------------------------------------------------12
Memory status ------------------------------------------------------------------12
Caller ID and calls list -----------------------------------------------------------12
Caller ID --------------------------------------------------------------------------12
Call list ----------------------------------------------------------------------------12
View the call list -----------------------------------------------------------------13
Dial a number in the call list ---------------------------------------------------13
Copy a call list number to the phonebook ----------------------------------13
Delete an entry ------------------------------------------------------------------13
Delete the entire call list -------------------------------------------------------13
Date and time -----------------------------------------------------------------14
Set the date and time ----------------------------------------------------------14
Set the time format -------------------------------------------------------------14
Help -------------------------------------------------------------------------------15
No dial tone ----------------------------------------------------------------------15
No ring tone ---------------------------------------------------------------------15
Caller ID service does not work -----------------------------------------------15
A phonebook entry cannot be stored ---------------------------------------15
No display ------------------------------------------------------------------------15

4
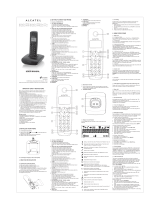
DESCRIPTION OF TELEPHONE PowerTel 196
1. LCD screen
2. Right soft key
3. Indicator (incoming call)
4. Handset Receiver Equalizer
5. Phonebook key
6. Flash key
7. Redial key
8. Audio boost (Handset receiver volume amplify)
9. Handsfree or Handset volume increase/decrease
10. Handsfree key
11. 2 one touch direct memory (M1 and M2)
12. Left soft key
13. Hanger knob
14. Up
15. Return key
16. Down/CID Review
17. Ringer pitch
18. Ringer volume control
19. AMPLIFY Override Switch
20. DC 6V input
21. Line jack
13
1
2
3
4
5
6
7
8
9
10
18
17
19 20 21
11
12
14
15
16

5
INSTALLATION
• Do not expose the phone to direct sunlight or excessive temperature.
• Operating temperature between + 5 ° C and + 40 ° C.
• Your phone must be installed at least 1 meter away from radio equipment
such as television, cell phone, etc.
• Your phone should be placed on a flat surface for more stability.Plug the
coiled cord into the handset (A) and into the socket on the left side of the
phone (B).
• Plug the small end of power adapter into power jack on base (D)
• Plug the large end of power adapter into a wall outlet (E)
• Plug the telephone cord into the socket at the back of the set and into the
wall outlet (C) or into the telephone port of the internet box.For desktop
position, raise the 2 feet under the base (F).
Recommendations
Telephone installation
(A)
(B)
(E)
(C)
(F)
(D)
• Fold the 2 feet under the base (F).
• Flip the small plastic piece on the base (13).
• Drill two 6mm holes spaced 100mm apart.Insert 2 wall plugs and screw in the
wood screws (3.5 mm in diameter and 30 mm long).
• Mount the base to the 2 screws by pulling it downwards.
Wall mounting

6
• Pick up the handset or press the key.
• Dial the number using the keypad.
• To end the call : Put back the handset on the base or press the key.
• Pick up the handset or press key.
• Press , or + / + Call.
• At the end of the call, hang up the handset or press the key.
• Press the key.
• Press or to select the number.
• Pick up the handset or press the key.
GENERAL USE
Make a call
Call from memories
Dial back an outgoing number
• Only use the 6.0V DC power supply provided with the telephone.
AC/DC power adaptor model : HJ-0600400P1-EU or HJ-0600400A1-UK
Manufacturer : Shenzhen Huajin Electronic Co., Ltd.
Input : AC 100 - 240 V ; 50/60 Hz ; 0.15A max.
Output : DC 6.0V ; 400mA
OR
AC/DC power adaptor model : AT-337E-060045A or AT-536B-060045B
Manufacturer : Shenzhen Baijunda Electronic Co., Ltd.
Input : AC 100 - 240 V ; 50/60 Hz ; 0.2A max.
Output : DC 6.0V ; 450mA
For PLUGGABLE EQUIPMENT, the socket-outlet shall be installed near the
equipment and shall be easily accessible.
Caution
PT196 is a FULL DUPLEX phone, allowing you to enjoy simultaneous 2-way
conversation without any acoustic feedback, in the receiver during normal
conversation as well as in handsfree mode conversation.

7
Equalizer
Choose the sound profile that suits you best.
Slide the switch to adjust the handset receiver sound frequency pitch
(3 selections) .
Set handset volume (and audio-boost)
During handset conversation, 2 modes of amplification are available:
• Standard mode
Press or to increase or decrease (8 levels).
• Audio boost mode ( extra strong upto + 60db)
During handset conversation, press the key. Press this button again to stop
amplification.
A slider on the back of the phone (AMPLIFY) is used to always activate the
audio boost function. By default, the position is "OFF" If it is in the "ON"
position, the audio boost will be automatically activated at each call.
During (hands-free) conversation :
• Press to increase the volume.
• Press to decrease the volume.
• 8 levels can be selected.
Set hands-free volume
Set ringer volume
Slide the switch to adjust the ringer volume .
Note : When the ringer is off, the call light will still flash to indicate an
incoming call.
• To answer : pick up the handset or press the key (hands-free mode).
• To hang up : replace the handset on the base or press the key.
Answering a call

8
Select contrast
1. Press Menu.
2. Press or to select Settings. Press OK.
3. Press or to select Display contrast. Press OK.
4. Press or to select the required level. Press OK.
5. Press to return to standby.
1. Press Menu.
2. Press or to select Settings. Press OK.
3. Press or to select Recall time. Press OK.
4. Press or to select the required flash time. Press OK.
5. Press to return to standby.
Select language
1. Press Menu.
2. Press or to select Settings. Press OK.
3. Press or to select the Language. Press OK.
4. Press or to select the required language. Press OK.
5. Press to return to standby.
Ringer tone
You can set different ringer tones for your calls. Choose from 20 different
tones.
You will hear a sample ring as you scroll to each ring tone.
1. Press Menu.
2. Press or to select Settings. Press OK.
3. Press or to select Ringer tone. Press OK.
4. Press or to select the required ringer tone. Press OK.
5. Press to return to standby.
PROGRAMMING
Set Flash Time

9
Key tones
When you press a button on the keypad, you will hear a beep. You can switch
these beeps on or off.
1. Press Menu.
2. Press or to select Settings. Press OK.
3. Press or to select Keypad tones. Press OK.
4. Press or to select Tones On or Tones Off. Press OK.
5. Press to return to standby.
Confirmation tones
When you confirm a setting, you will hear a beep. You can switch these beeps
on or off.
1. Press Menu.
2. Press or to select Settings. Press OK.
3. Press or to select Confirmation tones. Press OK.
4. Press or to select Tones On or Tones Off. Press OK.
5. Press to return to standby.
Software version
1. Press Menu.
2. Press or to select Settings. Press OK.
3. Press or to select Software version. Press OK.
4. The software version is displayed
5. Press to return to standby.
Dial Mode
1. Press Menu.
2. Press or to select Settings. Press OK.
3. Press or to select Dial mode. Press OK.
4. Press or to select Tone or Pulse. Press OK.
5. Press to return to standby.

10
Reset
1. Press Menu.
2. Press or to select Settings. Press OK.
3. Press or to select Reset. Press OK.
4. Press or to select Reset settings or Delete user data. Press OK.
5. Press Yes to confirm.
6. Press to return to standby.
Set Direct access memories M1/M2/KEY1
1. Press Menu.
2. Press or to select Direct memory. Press OK.
3. Press or to select M1, M2 or KEY1. Press Add or Options/Edit/OK.
4. Enter the number using the keypad. Press Save.
5. Press to return to standby.
Delete an entry
1. Press Menu.
2. Press or to select Direct memory. Press OK
3. Press or to the entry you want to delete. Press Options.
4. Press or to select Delete. Press OK.
5. The display shows Are You Sure?. Press Yes.
6. Press to return to standby.
Copy a contact or call list number to M1/M2/KEY1
When M1/M2/KEY1 are empty :
1. Press Menu.
2. Press or to select Direct memory. Press OK.
3. Press or to select M1, M2 or KEY1. Press Add.
4. Press Options.
5. Press or to select From contacts or From calls list. Press OK.
6. Press or to select the number. Press Select.
7. Press to return to standby.

11
1. Press . The first entry will be displayed.
2. Press or to the entry you want to edit. Press Options.
3. Press or to select Edit contact. Press OK.
4. The name is displayed. Delete the name if required. Enter the new name.
Press Next.
5. The existing number is displayed. Delete the number if required. Enter the
new number. Press Save.
6. Press to return to standby.
Phonebook
1. Press .
2. When phonebook is empty :
- Press Add.
- Enter the name using the keypad. Press Next.
When phonebook has records :
- Press Options.
- Press or to select Add new contact. Press OK.
3. Enter the name using the keypad. Press Next.
4. Enter the number using the keypad. Press Save.
5. Press to return to standby.
Entering names
Use the keypad letters to enter names, e.g. to store Tom:
Press 8 once to enter T.
Press 6 three times to enter o.
Press 6 once to enter m.
Writing tips
Press the Clear to delete the last character or digit.
Press 0 to insert a space.
Press # to change from upper to lower case and from characters to digits.
View or dial an entry
1. Press .
2. Press or to select the entry you want.
OR
Enter first letter of the name to search alphabetically.
3. Lift the handset to dial the number, to dial the number over hands-free.
Edit a name and number

12
Delete all contacts
1. Press . Press Options.
2. Press or to select Delete all contacts. Press OK.
3. The display shows Are you sure?. Press Yes.
4. Press to return to standby.
Memory status
1. Press . Press Options.
2. Press or to select Memory status. Press OK.
3. The number of contacts stored is displayed.
4. Press to return to standby.
1. Press .
2. Press or to the entry you want to delete. Press Options.
3. Press or to select Delete contact. Press OK.
4. The display shows Are You Sure?. Press Yes.
5. Press to return to standby.
Delete an entry
Caller ID and calls list
Important
To use Caller ID, you must first subscribe to the service from your network
provider. A subscription fee may be payable.
To ensure that the caller’s name is displayed, make sure you have stored the full
telephone number, including the area code in the phonebook.
Caller ID
If subscribed to Caller ID, the caller’s number will be displayed (provided it is
not withheld) prior to answering the call.
Call list
The call list stores details of the last 30 received calls, missed and dialled calls,
including the phone number and date of the call.

13
View the call list
1. Press to open the calls list. If there are no calls in the list, the display
shows List empty.
2. Press or to scroll through the list.
3. When you reach the end of the list the display will show ----End----
Dial a number in the call list
1. Press to open the calls list.
2. Press or to the entry you want.
3. Lift the handset to dial the number, or press to dial the number over
hands-free.
Copy a call list number to the phonebook
1. Press to open the calls list.
2. Press or to the entry you want. Press Options.
3. Press or to select Save number. Press OK.
4. Enter the name. Press Next.
5. Edit the number if required. Press Save.
6. Press to return to standby.
See sections ‘Entering names’ and ‘Writing tips’.
Delete an entry
1. Press to open the calls list.
2. Press or to the entry you want. Press Options.
3. Press or to Delete call. Press OK.
4. Press to return to standby.
Delete the entire call list
1. Press to open the calls list. Press Options.
2. Press or to Delete all calls. Press OK.
3. The display shows Are you sure?. Press Yes.
4. Press to return to standby.

14
Set the date and time
1. Press Menu.
2. Press or to select Time & date. Press OK.
3. Press or to select Set time & date. Press OK.
4. Enter the time using the keypad (e.g. 06--30 for 6:30am). Press Next.
5. Use the keypad to enter the date using the format DD/MM/YYYY. Press
Save.
6. Press to return to standby.
Date and time
If you have subscribed to Caller ID Service, the date and time is set automatically
when you receive your first call.
If you do not have Caller ID service, you can set the date and time manually.
Set the time format
You can use a 24 hour or 12 hour format to display the time on your phone.
To set your preference:
1. Press Menu.
2. Press or to select Set time & date. Press OK.
3. Press or to select Time format. Press OK.
4. Press or to select either 12 hour or 24 hour. Press OK.
5. Press to return to standby.

15
No dial tone
• Use only the telephone line cord supplied.
• Check that the telephone line cord is connected properly.
Help
No ring tone
• The ring tone is deactivated.
• Increase the volume.
Caller ID service does not work
• Check your subscription with your network operator.
A phonebook entry cannot be stored
• The phonebook is full. Delete an entry to free memory.
No display
• Try disconnecting and connecting the power supply.

16
WARRANTY
Please read carefully the user guide included in this box. PowerTel 196 is an
approvedequipment in accordance with the European regulations, attested by
the CEmarking. The product you just bought is a technological product, it must
be handled with care.
Note: You have a legal warranty on this product in accordance with the
regulations applicable to the sale of consumer goods in the country in which
you made this purchase.
For any information regarding this legal warranty, please contact your dealer.
Without prejudice to the legal guarantee of the products, ATLINKS guarantees
that the product in this box conforms to its technical specifications contained
in the user guide included in the this box, and this during a warranty period,
counted from the date of purchase of the new product, the date on your
invoice or ticket checkout where is indicated the name of your reseller, and
equal to: Twenty four (24) months for the telephone, excluding consumables,
accessories and batteries. For any claim under this warranty during the warranty
period, you must return the entire Product to your dealer, together with the
proof of purchase, the invoice or receipt issued by your dealer, indicating
the place of purchase and the serial number of the Product, following the
appearance or discovery of the defect. ATLINKS undertakes to repair any
defective item due to a defect in design, material or workmanship, at its
expense, or to replace, at its expense, by an identical or at least equivalent
element in terms of functionalities and performance. If the repair or
replacement is impossible under normal commercial conditions, the Product
will be refunded or replaced by a Product equivalent. Within the maximum
limit allowed by the applicable law, the product or element replacement, which
may be new or reconditioned, is warranted during a period of ninety (90) days
from the date of repair or until the end date of the initial warranty period,
whichever is the earlier greater than ninety (90) days, it being specified that any
period of immobilization of the Product of at least seven (7) days will be added
to the warranty period remaining to run.
This warranty does not apply in the following cases:
• Installation or use not in accordance with the instructions in the guide of the user,
• Incorrect connection or abnormal use of the Product, especially with
noncompatible accessories, as indicated in the user guide,
• Product opened, modified or replaced by means of non-approved parts, serial
number deleted, illegible, damaged,
• Normal wear, including normal wear and tear on accessories, batteries and displays,
• Failure to comply with the technical and safety standards in force in the area
geographical use,
• Product having suffered a shock or a fall,

17
• Product damaged by lightning, electrical surge, heat source or radiation,
water damage, exposure to conditions of temperature, humidity or other
excessive ambient conditions or any other cause external to the product,
• Negligence or faulty maintenance,
• An intervention, a modification or a repair carried out by a not authorized by
ATLINKS.
If the returned Product is not covered by the warranty, you will receive a quote
from repair that will mention the cost of analysis and transportation costs that
you will be charged if you want the Product returned to you. This guarantee is
valid in the country in which you regularly purchased the Product, provided that
the country is a member of the European Union. Subject to the legal provisions
in force, all warranties other than described herein are expressly excluded.
TO THE MAXIMUM EXTENT PERMITTED BY APPLICABLE LAW,
A) THIS WARRANTY IS EXCLUSIVE TO ALL OTHER WARRANTIES EXPRESS
OR IMPLIED, INCLUDING, BUT NOT LIMITED TO, WARRANTIES OF
MERCHANTABILITY OR FITNESS FOR A PARTICULAR PURPOSE PARTICULAR;
B) ATLINKS DISCLAIMS LIABILITY FOR LOSS OR DETERIORATION OF DATA, LOSS
OF USE LOST TO WIN, LOSS OF CHANCE, DEREVENUES OR INCOME, LOSS OF
OPERATION, DAMAGES INDIRECT, CONSEQUENTIAL, CONSEQUENTIAL OR
INCIDENTAL;
C) ATLINKS LIABILITY IS LIMITED TO THE VALUE OF PURCHASE OF PRODUCT
EXCEPT HEAVIL OR UNINTENTIONAL FAULT AND EXCEPT DAMAGE BODY

18
ENVIRONMENT
This symbol means that your inoperative appliance must be collected
separately and not mixed with the household waste.
Help us preserve the environment in which we live!
The logo printed on the products indicates the conformity with all essential
requirements and all applicable directives. You can download the Declaration
of Conformity from our website: www.amplicomms.com
SECURITY
Do not use your telephone to report for a gas leak or other potential explosion
hazard. Do not try to open your phone to avoid electrical shock.
Your telephone must be installed in a dry place, away from heat, humidity and
direct sunlight.
CONFORMITY

www.amplicomms.com
ATLINKS Europe
147 avenue Paul Doumer
92500 RUEIL-MALMAISON France
RCS Nanterre 508 823 747
© ATLINKS 2020 - Reproduction prohibited.
The Manufacturer reserves the right to modify the specifications
of its products in order to make technical improvements or
comply with new regulations.
AMPLICOMMS and ATLINKS are registered trademarks.
PowerTel 196
A/W No.: 10002321 Rev.0 (EN)
Printed in China
/