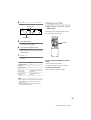
Sony LBT-G1 Operating instructions
- Category
- Audio tuners
- Type
- Operating instructions

LBT-G1S. 3-860-141-11. EN
Compact-Hi-Fi
Stereo System
3-860-141-11(1)
©1997 by Sony Corporation
LBT-G1S
F
Operating Instructions
f

LBT-G1S. 3-860-141-11. EN
2
WARNING
To prevent fire or shock hazard, do not
expose the unit to rain or moisture.
To avoid electrical shock, do not open the cabinet.
Refer servicing to qualified personnel only.
Do not install the appliance in a confined space,
such as a bookcase or built-in cabinet.
Laser component in this product is capable of
emitting radiation exceeding the limit for Class 1.
This caution label is located inside the unit.
This appliance is classified
as a CLASS 1 LASER
product. The CLASS 1
LASER PRODUCT
MARKING is located on
the rear exterior.

3
LBT-G1S. 3-860-141-11. EN
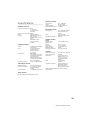
Table of Contents
Getting Started
Step 1: Hooking up the system............ 4
Step 2: Setting the time ......................... 5
Step 3: Presetting radio stations .......... 6
Connecting optional AV components
and outdoor aerials ......................... 7
Basic Operations
Playing a CD ........................................... 9
Recording a CD .................................... 10
Listening to the radio........................... 11
Recording from the radio .................... 12
Playing a tape........................................ 13
Recording from a tape ......................... 14
The CD Player
Playing the CD tracks repeatedly ...... 15
Playing the CD tracks in random
order ................................................ 16
Programming the CD tracks ............... 16
Playing only the beginning of each
track ................................................. 17
The Tape Deck
Recording a CD by specifying track
order ................................................ 18
Sound Adjustment
Adjusting the sound ............................ 19
Selecting the Preset Equalizer menu . 19
Other Features
Falling asleep to music ........................ 20
Waking up to music ............................. 20
Additional Information
Precautions ............................................ 22
Troubleshooting ................................... 23
Specifications ........................................ 25
Index....................................................... 26

4
LBT-G1S. 3-860-141-11. EN
Getting Started
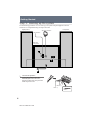
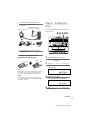
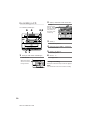
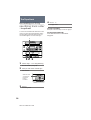
Step 1: Hooking up the system
Do the following procedures 1 to 3 to hook up your system using the supplied cords and
accessories. To complete the setup, do steps 2 and 3 also.
1
Connect the speakers.
Connect the speaker cords to the
SPEAKER jacks of the same color .
Keep the speaker cords away from the
aerials to prevent noise.
Left speaker
Right speaker
FM antenna
AM loop antenna
LBT-G1S
rear panel
Red (‘)
Black (’)

LBT-G1S. 3-860-141-11. EN
5
Step 2: Setting the
time
You must set the time beforehand to use the
timer function.
1 Press CLOCK SET for a few
seconds, when the power is off.
“– – : – –” appears.
2 Press )± or 0 and set
the hour. “A” indicates AM and “P”
indicates PM.
3 Press CLOCK SET.
The minute indication flashes.
4 Press )± or 0 and set
the minute.
2
Connect the FM/AM antennas.
Set up the AM loop antenna, then
connect it.
Connect the AC power cord to a
wall outlet.
Inserting two R03 (size AAA)
batteries into the remote
Tip
With normal use, the batteries should last for about
six months. When the remote no longer operates
the system, replace both batteries with new ones.
Note
If you do not use the remote for a long period of
time, remove the batteries to avoid possible damage
from battery leakage.
3
continued
AM loop antenna
Extend the FM wire
antenna horizontally.
ANTENNA
AM
FM
750HM
1,3,52,4

6
LBT-G1S. 3-860-141-11. EN
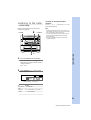
Step 3: Presetting
radio stations
You can preset up to 30 stations.
1 Press TUNER/BAND repeatedly
until the band you want appears in
the display.
Each time you press the button, the band
changes as follows:
FM ˜AM
2 Press )± or 0 for a
second.
The frequency indication changes and
scanning stops when the system tunes in
a station. “TUNED” and “STEREO” (for
a stereo program) appear.
3 Press MEMORY.
“MEMORY” flashes.
Setting the time (continued)
5 Press CLOCK SET.
The clock starts working.
To light up the display
Press TIMER SET when the power is off.
The light on the display turns on for 5
seconds.
To check the clock when the
power is on
Press CLOCK SET.
The clock is displayed for a few seconds.
3,5
2
1
4

LBT-G1S. 3-860-141-11. EN
7
4 Press PRESET + or – and select the
preset number you want.
5 Press MEMORY.
The station is stored.
6 Repeat steps 1 to 5 to store other
stations.
To tune in a station with a weak
signal
Press )± or 0 repeatedly to tune
in the station.
To change the preset number
Start again from step 1.
Tip
The preset stations are retained for a week even if
you pull out the AC power cord or if a power failure
occurs.
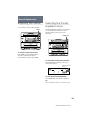
Connecting optional
AV components and
outdoor antennas
Connecting a turntable
To enhance your system, you can connect a
turntable. Refer to the instructions of each
component.
Make sure to match the colour of the plugs
and the connectors.
To listen to the sound of a
turntable
Press PHONO.
“Phono” appears in the display.
Tip
You can record the turntable sound.
continued
Preset number
To the audio output of a turn table.
TUNED
PRESET EQ
FLAT ROCK POPS JAZZ
MHz

8
LBT-G1S. 3-860-141-11. EN
Connecting outdoor
antennas
Connect the outdoor antenna to improve the
reception.
FM antenna
Connect the optional FM outdoor antenna.
You can also use the TV antenna instead.
AM antenna
Connect a 6- to 15- meter (20- to 50- feet)
insulated wire to the AM antenna terminal.
Leave the supplied AM loop antenna
connected.
Important
If you connect an outdoor antenna, ground it
against lightning. To prevent a gas explosion,
do not connect the ground wire to a gas pipe.
Connecting optional AV
components and outdoor
antennas (continued)
75-ohm coaxial
cable (not supplied)
Insulated wire
(not supplied)
Ground wire
(not supplied)
Ground wire
(not supplied)
ANTENNA
AM
FM
750HM
ANTENNA
AM
FM
750HM

LBT-G1S. 3-860-141-11. EN
Basic Operations
9
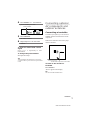
Basic Operations
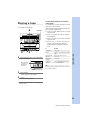
Playing a CD
You can play up to three CDs continuously.
1 Press § and place a CD on the disc
tray.
To place the third disc, press DISC SKIP
to rotate the disc tray.
2 Press ·P.
The disc tray closes and play starts from
the CD loaded on the tray whose button
is lit green.
To
Stop play
Pause
Select a track
Find a point in
a track
Select a CD
Remove or
exchange the
CD
Adjust the
volume
Do this
Press p.
Press ·P. Press again to
resume play.
Press )± or 0 (or
+ or = on the remote).
Press and hold down )±
or 0 during play and
release it at the desired point.
Press DISC 1 – 3 or DISC SKIP.
Press §.
Turn VOLUME (or press VOL
+ or – on the remote).
Tips
•Pressing ·P when the power is off
automatically turns the power on and starts CD
playback if there is a CD on the tray (One Touch
Play).
•You can switch from another source to the CD
player and start playing a CD just by pressing
·P (Automatic Source Selection).
•When the disc tray is selected or the CD loaded on
the tray is playing, the DISC 1 – 3 button for the
tray is lit green.
With the label
side up. When
you play a single
CD, place it on
the inner circle
of the tray.
Track number
Playing timeDisc tray number
DISC 1–3
2
1
p
VOLUME›0/)–
1
23
PRESET EQ
DISC FLAT ROCK POPS JAZZ

LBT-G1S. 3-860-141-11. EN
10
Recording a CD
Use a TYPE I (normal) tape.
1 Press p6 and insert a blank tape
into deck A.
2 Press § and insert a CD on the disc
tray.
3 Press §.
The disc tray closes.
4 Press one of the DISC 1 – 3 buttons
to select a CD.
5 Press r on deck A.
Recording starts.
6 Press ·P.
CD play starts.
To stop recording
Press p6 on deck A and p on the CD player.
Note
You cannot listen to other sources while recording.
With the label
side up. When
you play a single
CD, place it on
the inner circle
of the tray.
With the side you
want to record on
facing forward
5 1
2,364

LBT-G1S. 3-860-141-11. EN
Basic Operations
11
Listening to the radio
–– Preset Tuning
Firstly preset radio stations in the tuner’s
memory (see page 6).
1 Press TUNER/BAND repeatedly
until the band you want appears.
Each time you press the button, the band
changes as follows:
FM˜ AM
2 Press PRESET + or – to tune in the
desired preset station.
Do this
Press POWER.
Turn VOLUME (or press VOL +
or – on the remote).
To
Turn off the
radio
Adjust the
volume
To listen to non-preset radio
stations
Press )± or 0 repeatedly to tune
in the desired station.
Tips
•Pressing TUNER/BAND when the power is off
automatically turns the power on and tunes to the
last received station (One Touch Play).
•You can switch from another source to the tuner
just by pressing TUNER/BAND (Automatic
Source Selection).
•To improve broadcast reception, reorient the
supplied antennas.
Preset number Frequency
VOLUME
›0/)–
POWER
2
1
PRESET TUNED
PRESET EQ
FLAT ROCK POPS JAZZ
MHz

LBT-G1S. 3-860-141-11. EN
12
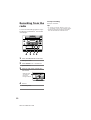
Recording from the
radio
You can record the radio program on a tape
by calling up a preset station. Use a TYPE I
(normal) tape.
1 Press TUNER/BAND to select the
band you want.
2 Press PRESET + or – to tune in a
preset station.
3 Press p6 and insert a blank tape
into deck A.
4 Press r.
Recording starts.
With the side
you want to
record on
facing forward
To stop recording
Press p6 on deck A.
Tips
•To record non-preset stations, press )± or
0 repeatedly to tune in the desired station.
•If noise is heard while recording an AM radio,
move the AM antenna to reduce the noise.
34
21

LBT-G1S. 3-860-141-11. EN
Basic Operations
13
To
Stop play
Pause
Fast-forward
Rewind
Remove the
cassette
Adjust the
volume
Do this
Press p6.
Press P. Press again to resume
play.
Press p6 then press ).
Press 0.
Press p6.
Turn VOLUME (Press VOL +
or – on the remote).
Tip
If you play both decks at the same time, you’ll hear
the sound from deck B.
To play both decks in succession
(relay play)
You can listen to one side of the tapes in deck
B and deck A in succession.
When the tape in deck B finishes playing, the
tape in deck A starts playing.
1 Press p6 on deck B and insert a recorded
tape in deck B.
2 Press · on deck B. The tape on deck B
starts playback.
3 Press p6 on deck A and insert a recorded
tape in deck A.
4 Press P and · on deck A. The tape on
deck A is paused and automatically
released when the playback on deck B
ends.
Playing a tape
Use a TYPE I (normal) tape.
1 Press p6 and insert a recorded tape
in deck A or B.
2 Press TAPE.
“TAPE” appears in the display.
3 Press ·.
The tape starts playing.*
* The deck stops automatically when the playback
of the tape ends.
With the side
you want to
play facing
forward
31
0)
P
VOLUME2

LBT-G1S. 3-860-141-11. EN
14
Recording from a tape
— Dubbing
Use a TYPE I (normal) tape.
1 Press p6 and insert a blank tape in
deck A and a recorded tape in deck
B.
2 Press TAPE.
“TAPE” appears in the display.
3 Press P on deck A.
4 Press r on deck A.
Deck A stands by for recording.
5 Press · on deck B.
The tape starts dubbing.
To stop recording
Press p6 on deck A and B.
With the side
you want to
play/record on
facing forward
54321 1

LBT-G1S. 3-860-141-11. EN
15
The CD player
Playing the CD tracks
repeatedly
–– Repeat Play
This function lets you repeat a single CD or
all CDs in normal play, Shuffle Play and
Program Play.
1 Press CD and place a CD on the disc
tray.
2 Press REPEAT.
3 Press ·P.
Repeat Play starts. Do the following
procedure to change the repeat mode.
Press
REPEAT repeatedly until
“REPEAT 1” appears in the
display while playing the track
you want to repeat.
REPEAT repeatedly until
“REPEAT 1 DISC” appears in
the display.
REPEAT repeatedly until
“REPEAT ALL DISC” appears
in the display.
To cancel Repeat Play
Press REPEAT so that “REPEAT”, “REPEAT
1” or “REPEAT ALL DISC” disappears from
the display.
To repeat
Only one
track
All the tracks
on the current
CD
All the tracks
on all CDs
21
3

LBT-G1S. 3-860-141-11. EN
16
Programming the CD
tracks
–– Program Play
You can make a program of up to
32 tracks from all the CDs in the order you
want them to be played.
1 Press CD and place a CD on the disc
tray.
2 Press PROGRAM.
“PROGRAM” appears.
3 Press one of the DISC 1 – 3 buttons
to select a CD.
Playing the CD tracks
in random order
–– Shuffle Play
You can play all the tracks on one CD or all
CDs in random order.
1 Press CD and place a CD on the disc
tray.
2 Press SHUFFLE.
“SHUFFLE” appears, then all the tracks
play in random order.
To cancel Shuffle Play
Press SHUFFLE so that “SHUFFLE”
disappears.
Tips
•You can start Shuffle Play during normal play by
displaying “SHUFFLE”.
•To skip a track, press )±.
Note
You cannot select a CD even if you press DISC SKIP
while shuffle play.
21
7
14
32,5
p
(P
=+
p
CLEAR

LBT-G1S. 3-860-141-11. EN
17
4 Press )± or 0 to select a
track.
5 Press PROGRAM.
The track is programmed. The last
programmed track appears.
6 To program additional tracks,
repeat steps 3 to 5.
Skip step 3 if you select a track from
the same disc.
7 Press ·P.
All the tracks play in the order you
selected.
Selected disc
Selected track
To
Program a pause
Stop play
Cancel program
play
Erase a track
from the end
Erase the entire
program
Press
·P
p
p
CLEAR on the remote in
stop mode
p for more than two
seconds
Tips
• The program you made remains after the Program
Play has finished. To play the same program
again, press ·P.
• “FULL” appears when you have programmed
more than 32 track numbers.
Playing only the
beginning of each track
— Music Scan
The begining of each track on all the CDs in
the CD tray play for 10 seconds.
To play only the begining of each
track
Press M. SCAN on the remote.
Track number blinks during the scanning.
To cancel music scan
Press M. SCAN on the remote again.
1
23
PROGRAM
PRESET EQ
FLAT ROCK POPS JAZZ
(P
=+
p
M.SCAN

LBT-G1S. 3-860-141-11. EN
18
4 Press ·P.
CD play starts.
To stop recording
Press p6 on deck A and p on the CD player.
To cancel Program Edit
Press PROGRAM so that “PROGRAM”
disappears.
The Tape Deck
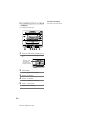
Recording a CD by
specifying track order
–– Program Edit
You can record tracks from all the CDs in the
order you want. When programming, make
sure the playing times for each side do not
exceed the length of one side of the tape.
1 Follow step 1 – 6 in “Programming
the CD tracks” (see p.16).
2 Press p6 and insert a blank tape
into deck A.
3 Press r.
Recording starts.
With the side
you want to
record on
facing
forward
3 4 2
p

LBT-G1S. 3-860-141-11. EN
19
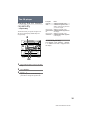
Sound Adjustment
Adjusting the sound
You can listen to music with strong bass.
To reinforce the bass sound
Press DBFB (Dynamic Bass Feedback).
The lamp on the button lights up.
Press the button again to cancel DBFB.
Selecting the Preset
Equalizer menu
The Preset Equalizer enables you to select the
sound characteristic among four sound
effects according to the sound you are
listening to.
To select the sound characteristic
Press PRESET EQ repeatedly to select your
desired sound effect.
To cancel the Preset Equalizer
Press PRESET EQ until “FLAT” is selected.
Tip
The Preset Equalizer effect is not recorded on a tape.
Selected sound
effect
DBFB
PRESET EQ
1
23
PRESET EQ
DISC FLAT ROCK POPS JAZZ

LBT-G1S. 3-860-141-11. EN
20
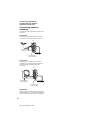
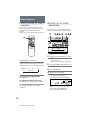
Waking up to music
— Wake-up Timer
You can wake up to music at a preset time.
Make sure you have set the clock (see page 5).
1 Prepare the music source you want
to play.
• CD: Place a CD.
• Radio: Tune in a station (see page 11).
2 Turn VOLUME to adjust the sound
volume.
3 Press TIMER SET.
4 Set the time to start play.
Press )± or 0 to set the
hour, then press TIMER SET.
The minute indication starts flashing.
Press )± or 0 to set the
minute, then press TIMER SET.
The hour indication flashes again.
Other Features
Falling asleep to music
— Sleep Timer
You can let the system turn off at a preset
time, so you can sleep to the music. You can
preset the time to be turned off by 10
minutes.
Make sure you have set the clock (see page 5).
Press SLEEP on the remote.
“SLEEP” appears.
Each time you press the button, the minute
display (the turn-off time) changes as follows:
SLEEP 90 n 80 n 70 n… n 10
To check the remaining time
Press SLEEP once.
To change the time to turn off
Select the time you want by pressing SLEEP.
To cancel the Sleep Timer function
Press SLEEP repeatedly until “SLEEP”
disappears.
N
(Sleep off)
(P
=+
p
SLEEP
76
2
3,4,5
4,5
PRESET EQ
FLAT ROCK POPS JAZZ
MHz
Page is loading ...
Page is loading ...
Page is loading ...
Page is loading ...
Page is loading ...
Page is loading ...
Page is loading ...
-
 1
1
-
 2
2
-
 3
3
-
 4
4
-
 5
5
-
 6
6
-
 7
7
-
 8
8
-
 9
9
-
 10
10
-
 11
11
-
 12
12
-
 13
13
-
 14
14
-
 15
15
-
 16
16
-
 17
17
-
 18
18
-
 19
19
-
 20
20
-
 21
21
-
 22
22
-
 23
23
-
 24
24
-
 25
25
-
 26
26
-
 27
27


Sony LBT-G1 Operating instructions
- Category
- Audio tuners
- Type
- Operating instructions
Ask a question and I''ll find the answer in the document
Finding information in a document is now easier with AI
